全国でしょっちゅうGoogle APIの変更に踊らされている皆様こんにちは
大橋です。
I/O見てましたか 楽しかったですね Google API好きにとっては前半しんどすぎましたが(白目
さてI/Oの裏でひっそりとGmail APIが公開されました。
今まではIMAPを利用した通常のメールやり取りか、GmailのInboxのみを触れるGmail Inbox APIしかなく、
Google Apps ScriptでのみGmail周りをAPIとして触れる状況が続いていました。
今回のGmail APIは
- 基本的にクライアントを選ばないREST APIベース
- 認証周りはOAuth2
と非常に扱いやすいAPIとなっています。
では今回はこのGmail APIをクライアント側のJSから触ってみたいと思います。
ものすごくすぐ試したい方は「API Explorer」を使うと良いと思います。
先に見どころ
できることは
- メールの取得、作成、検索、送信、削除、ラベルの設定
- ラベルの作成、修正、削除
- 下書きの作成、修正、削除
あたりはできます。
なんとなく「既読」が無い気がしますが気のせいだと願いたいです。
2014/07/02 追記
@howdy39 さんからコメントを頂きまして、未既読はUNREADラベルを付け外しすると、
操作できるらしいです! ありがとうございます!
また面白い機能として「メールを送信・受信せずに、メールボックスにメールデータを入れる(users.messages.insert)」があります。
これはrfc822形式のデータをGmailのメールボックス中に送信・受信せずに突っ込むことが出来る機能で、
色々ごまかすのに使えそうな(ゲフンゲフン
サンプルアプリも作っておいたので見てみて下さい。
なおサーバサイド(golang)で認証してメッセージを送るバージョンも作っておきました。
https://compute-engine-sandbox.appspot.com
https://github.com/soundTricker/gmail-api-with-go
準備
Gmail APIを利用できるように設定
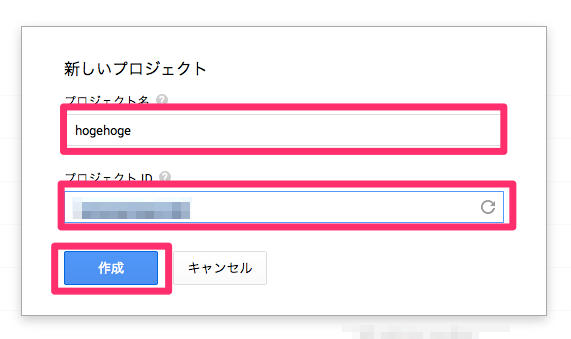
Developer Consoleからプロジェクトを作成、APIを使えるようにします。
-
Developer Consoleを開き、「プロジェクトの作成」をクリックします。
※ 既存のプロジェクトに設定する場合は既存のプロジェクトを開いて下さい。

-
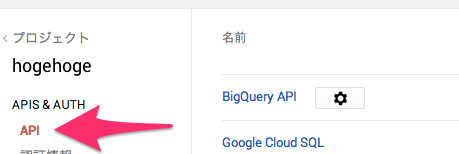
しばらく待ってプロジェクトが作成されたら(画面が変わったら)左メニューより「API & AUTH」 > 「API」を選択しAPI一覧を表示します。
認証キーを作成
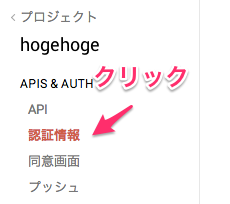
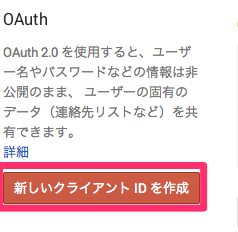
OAuth用のClientID、ClientSecretを作成します。
-
アプリケーションの種類から「ウェブ アプリケーション」を選択し、「承認済みの JAVASCRIPT 生成元」に「http://localhost:8080」等の検証元URLを入力します。
「承認済みのリダイレクト URI」も「http://localhost:8080/oauth2callback」など適当な感じで設定しておいて下さい。 設定が終わったら「クライアント IDを作成」をクリックします。
※なおAndroidからやiOS、デスクトップアプリの場合はそれぞれいい感じで設定して下さい。
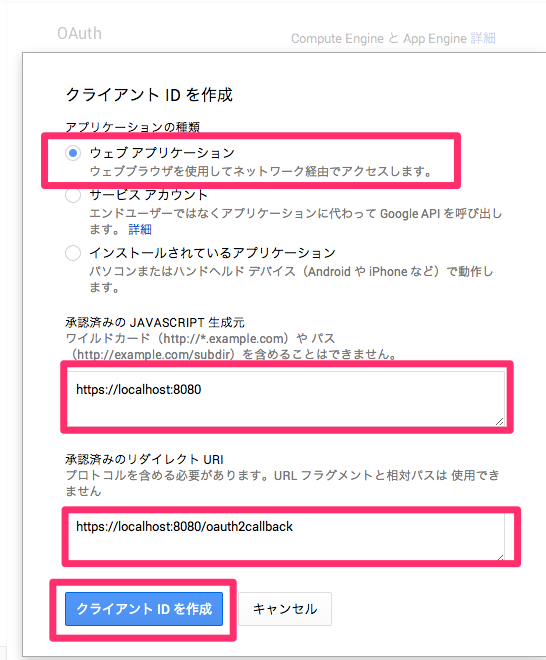
-
設定が終わって暫く待つと「クライアントID」と「クライアントシークレット」が発行されます。 これらは公開しないようにし、どこかに控えておいて下さい。

Libraryの準備と実装
Gmail APIでは既に各種Libraryが準備されています。まだリポジトリ上に上がっていないLibrary(GoとかNodeJSとか)も有りますが、Discovery Based APIに準拠していそうなので大体の場合それらのLibraryについてるGenerator経由でGmail API用のLibraryは作れると思います。
今回はGoogle API Client for Javascriptを利用してやってみます。
フルコードは以下に乗っけて置くので見てみて下さい。
ClientIdを設定してjqueryとか入れれば使えるはずです。多分。
注意点はメッセージの送信やInsertなどはrfc822 形式でbase64エンコードしたrawデータで送信する必要があり、Google API Client for Javascriptでは直接送信できないっぽい(postで送る)らへんです。
<!doctype html>
<html>
    <head>
        <meta charset="utf-8">
        <meta http-equiv="X-UA-Compatible" content="IE=edge">
        <title>gmail api</title>
        <meta name="description" content="">
        <meta name="viewport" content="width=device-width">
        <!-- Place favicon.ico and apple-touch-icon.png in the root directory -->
        <!-- build:css(.tmp) styles/main.css -->
        <link rel="stylesheet" href="styles/main.css">
        <!-- endbuild -->
    </head>
    <body>
        <!--[if lt IE 10]>
            <p class="browsehappy">You are using an <strong>outdated</strong> browser. Please <a href="http://browsehappy.com/">upgrade your browser</a> to improve your experience.</p>
        <![endif]-->


        <div class="container">
            <div class="row" id="authorizeArea" style="display: none;">
                <div class="col-lg-12">
                    <button id="authorize-button" class="btn btn-default">認可</button>
                </div>
            </div>
            <div class="row" id="buttonsArea" style="display: none;">
                <div class="col-lg-12">
                    <div class="btn-group">
                        <button id="getLabelButton" type="button" class="btn btn-default">Labelの取得</button>
                        <button id="searchButton" type="button" class="btn btn-default">検索</button>
                        <button id="createMessageButton" type="button" class="btn btn-default">空メッセージの作成</button>
                    </div>
                </div>
            </div>
            <div class="row">
                <pre id="result"></pre>

            </div>

            <div class="footer">
                <p>♥ from the Yeoman team</p>
            </div>

        </div>


        <!-- build:js scripts/vendor.js -->
        <!-- bower:js -->
        <script src="bower_components/jquery/jquery.js"></script>
        <!-- endbower -->
        <!-- endbuild -->

        <!-- build:js({app,.tmp}) scripts/main.js -->
        <script src="scripts/main.js"></script>
        <!-- endbuild -->
        <script type="text/javascript" charset="utf-8" >
        var clientId = "xxxxx";
        var scopes = ["https://mail.google.com/"].join(",");
        //https://mail.google.com/スコープはすべての権限を持ったスコープだけど、Threadやメッセージの削除を行いたい場合のみに利用するべき
        //それ以外にいかが有る。
        //https://www.googleapis.com/auth/gmail.modify
        //https://www.googleapis.com/auth/gmail.readonly
        //https://www.googleapis.com/auth/gmail.compose

        function handleClientLoad() {
            window.setTimeout(checkAuth,1);
        }

        function checkAuth() {
            gapi.auth.authorize({client_id: clientId, scope: scopes, immediate: true}, handleAuthResult);
        }

        function handleAuthResult(authResult) {
            var $authorizeArea = $("#authorizeArea"),
            $buttonsArea = $("#buttonsArea");
            if (authResult && !authResult.error) {
                //エラーがなければ認可ボタン消して操作ボタン群オープンする
                $authorizeArea.hide();

                gapi.client.load("gmail","v1", function(){

                $buttonsArea
                    .find("#getLabelButton")
                        .on("click", getLabel)
                    .end()
                    .find("#searchButton")
                        .on("click", search)
                    .end()
                    .find("#createMessageButton")
                        .on("click", createMessage)
                    .end()
                    .show();
                });

            } else {
                $buttonsArea.hide();
                $authorizeArea
                    .find("#authorize-button")
                        .on("click", handleAuthClick)
                    .end()
                    .show();
            }
        }

        function handleAuthClick(event) {
            // Step 3: get authorization to use private data
            gapi.auth.authorize({client_id: clientId, scope: scopes, immediate: false}, handleAuthResult);
            return false;
        }

        function getLabel() {

            var $result = $("#result");

            gapi.client.gmail.users.labels.list({userId : "me"}).execute(function(result , rowData) {
                console.log(result,rowData);
                $result.text(rowData);
            });

        }

        function search() {
            var $result = $("#result");
            var searchText = window.prompt("検索文字列を入力して下さい", "label:inbox");

            if (!searchText) {
                $result.text("検索文字は何かしら入力して下さい");
            }

            gapi.client.gmail.users.threads.list({
                userId:"me",
                q: searchText
            }).execute(function(result , rowData) {
                console.log(result,rowData);
                $result.text(rowData);
            });
        }

        function createMessage() {


            var $result = $("#result");
            var from = window.prompt("fromメールアドレスを入力して下さい。", "hoge@example.com");
            var to = window.prompt("toメールアドレスを入力して下さい。", "fuga@example.com");


            var mimeData = "From: " + from+ "\n" +
"To: " + to + "\n" +
"Subject: test\n" +
"MIME-Version: 1.0\n" +
"Content-Type: text/plain; charset=UTF-8\n" +
"\n\n Test";

            var b = window.btoa( unescape(encodeURIComponent( mimeData )) );

            //users.message.insertだけはpostでrawデータを送る必要がある。

            $.ajax("https://content.googleapis.com/gmail/v1/users/me/messages", {
                dataType : "json",
                type : "POST",
                contentType : "application/json",
                data  : JSON.stringify({ raw : b}),
                headers : {
                    "Authorization" : "Bearer " + gapi.auth.getToken().access_token
                }
            }).done(function(result){
                console.log(result);
                $result.text(JSON.stringify(result, "", "\t"));
                if (result && !result.error) {
                    window.alert("メールを保存しました。 Gmailにて「すべてのメールを見る」から確認して下さい。")
                }
            });
        }


        </script>
        <script src="https://apis.google.com/js/client.js?onload=handleClientLoad"></script> <!-- ① -->
</body>
</html>
まとめ
いかがでしたでしょうか。
Gmail APIができたことにより例えば、
- Chrome Appsで専用Gmailクライアントを作る
- GAEでメールデータを取得して、解析する
- Send Later(後から送る)を実装する
などなど非常に夢が広がるものです。
今までGASだけしか触れなかったので非常に辛かったですが、今後は光が見えそうですね。
