Google Cloud Platform Liveが開催され、
今までAlphaリリース扱いだったCompute EngineのAutoscalerがBetaリリースになり、誰でも使えるようになりました。
コレによりGoogle Compute EngineでもAuto Scaleが利用できるようになりました。
なので今回はautoscalerを使って、GCEのLBの下にnginxを並べてみたいと思います。
なお少しAWSとの話も書いておきます。
前提
- Client OS : Mac OSX
- Cloud SDKインストール済み &
$ gcloud componentes update preview済み
概要 & 準備
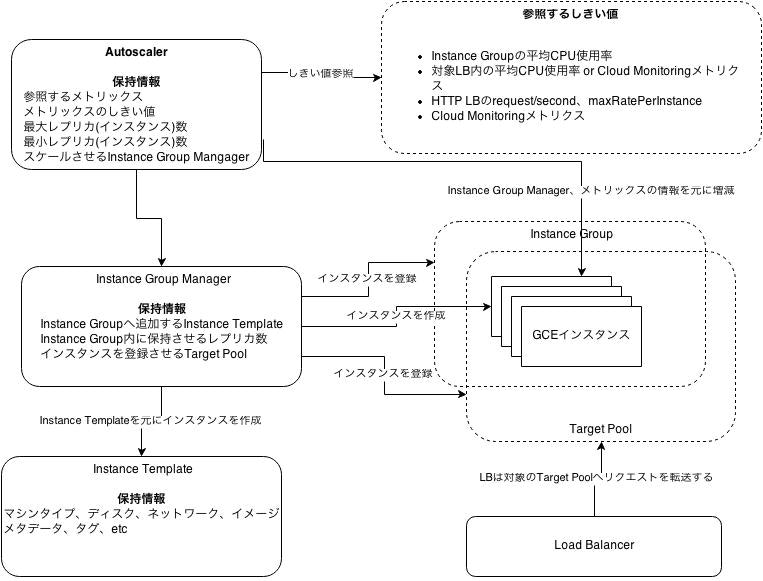
Autoscalerを触るには少なくとも4つのAPIをONにする必要があります。
Cloud ConsoleでAutoscalerを設定するプロジェクトでONにしてください。
- Compute Engine API
- Compute Engineのインスタンスを起動したり、落としたりするためのAPI
-
Instance Groups API
- Compute Engineのインスタンスをグループ化するためのAPI
- 旧Resource View API
-
Instance Templates API
- インスタンスのテンプレートを定義するためのAPI
- Autoscalerで立ち上がるインスタンスのマシンタイプ、イメージ、ディスク、メタデータ、タグなどを設定できる。
- AWSでいうところのLaunch Configrationに近いイメージ
-
Instance Group Manager API
- Instance Templateを元にInstance Groupを作成、定義、管理するためのAPI
- Instance Templateを元に設定されたインスタンス数のインスタンスを作成し、Instance Groupや、LBのTaget Poolへの自動追加してくれる。
- AWSでいうところのAuto Scaling Group(のメトリックスやmin/max instanceを引いたもの)
- 旧Replica Pool API
-
Autoscaler API
- 平均CPUや、LB、HTTP-LBへのアクセス状態、Cloud Monitoring APIのメトリックスを元に指定Instance Group(Manager)のインスタンス数を制御するAPI
ざっくり絵で書くと以下の様な関係になります。
ドキュメント上はInstance Templates APIは書いていませんがInstance Group ManagerにてInstance Groupを作成する際に必要となります。
つまりAutoscalerを設定するための流れは以下のようになります。
- Inastance Templateを作成する
- カスタムImageを使う場合はImageを作成しておく
- Instance Group Managerを作成する
- Target Poolを指定する場合はLB & Target Pool作成しておく
- Autoscalerを作成する
今回は以下の構成で作ります。
Instance Templateを作成する。
Instance Templateを作成するには以下のコマンドを利用します。
$ Usage: gcloud compute instance-templates create NAME [optional flags]
optonal flagsでImageやDisk、Machine Typeなどなどを設定します。
今回はcoreosを使うので以下のようになります。
$ gcloud compute instance-templates create web-coreos-template \
  --image coreos \
  --machine-type g1-small \
  --tags http-server \
  --metadata-from-file user-data=cloud-config.yaml

Created [https://www.googleapis.com/compute/v1/projects/kubernetes-sandbox/global/instanceTemplates/web-coreos-template].
NAME                MACHINE_TYPE CREATION_TIMESTAMP
web-coreos-template g1-small     xxxxxxxx
余談ですがカスタムImageを作るのが面倒臭いので、CoreOSのcloud-configを利用して、起動時にnginxのdockerコンテナを立ち上げるようにします。
上記の--metadata-from-file user-data=cloud-config.yamlはcoreosへ以下のcloud-configの設定ファイルをCompute Engineのmetadataを利用して渡しています。
※以下はCoreOS用のファイルなので、autoscalerとは無関係です。
※細かい話はおいておいて下さい。
# cloud-config
coreos:
  etcd:
    #  tokenは curl https://discovery.etcd.io/new で取得
    discovery: https://discovery.etcd.io/<token>
    addr: $private_ipv4:4001
    peer-addr: $private_ipv4:7001
  units:
    - name: etcd.service
      command: start
    - name: docker.service
      command: start
    - name: fleet.service
      command: start
    - name: web.service
      command: start
      content: |
        [Unit]
        Requires=docker.service
        After=docker.service

        [Service]
        Restart=always
        ExecStartPre=/usr/bin/docker pull nginx
        ExecStart=/usr/bin/docker run --rm --name nginx -p 80:80 nginx
        ExecStop=/usr/bin/docker kill nginx

        [X-Fleet]
        X-Conflicts=nginx.service
作成できたかはgcloud compute instance-templates describe TEMPLATENAMEで確認できます。
$ gcloud compute instance-templates describe web-coreos-template


creationTimestamp: 'xxxxxxxxxxxxxxxxxxx'
description: ''
id: 'xxxxxxxxxxxxxxxxxxxxxx'
kind: compute#instanceTemplate
name: web-coreos-template
properties:
  canIpForward: false
  disks:
  - autoDelete: true
    boot: true
    initializeParams:
      sourceImage: https://www.googleapis.com/compute/v1/projects/coreos-cloud/global/images/coreos-stable-444-5-0-v20141016
    kind: compute#attachedDisk
    mode: READ_WRITE
    type: PERSISTENT
  machineType: g1-small
  metadata:
    items:
    - key: user-data
      value: "#cloud-config\ncoreos:\n  etcd:\n    discovery: https://discovery.etcd.io/9d78a26de0c410fd782b380ecea0188a\
        \ \n    addr: $private_ipv4:4001\n    peer-addr: $private_ipv4:7001\n  units:\n\
        \    - name: etcd.service\n      command: start\n    - name: docker.service\n\
        \      command: start\n    - name: fleet.service\n      command: start\n \
        \   - name: web.service\n      command: start\n      content: |\n        [Unit]\n\
        \        Requires=docker.service\n        After=docker.service\n        \n\
        \        [Service]\n        Restart=always\n        ExecStartPre=/usr/bin/docker\
        \ pull nginx\n        ExecStart=/usr/bin/docker run --rm --name nginx -p 80:80\
        \ nginx\n        ExecStop=/usr/bin/docker kill nginx\n        \n        [X-Fleet]\n\
        \        X-Conflicts=nginx.service\n\n"
    kind: compute#metadata
  networkInterfaces:
  - accessConfigs:
    - kind: compute#accessConfig
      name: external-nat
      type: ONE_TO_ONE_NAT
    network: https://www.googleapis.com/compute/v1/projects/kubernetes-sandbox/global/networks/default
  scheduling:
    automaticRestart: true
    onHostMaintenance: MIGRATE
  serviceAccounts:
  - email: default
    scopes:
    - https://www.googleapis.com/auth/devstorage.read_only
  tags:
    items:
    - http-server
selfLink: https://www.googleapis.com/compute/v1/projects/kubernetes-sandbox/global/instanceTemplates/web-coreos-template
LBとか作る。
次にInstance Group Managerを作成したいのですが
今回はLB配下で増減するautoscalerを作りたいので、先にLBとTarget Groupを作成します。
以下にコマンドは書いていきますが画面から作成して、Target Group名だけ覚えておけば問題ありません。
Health Checkの作成
まずHealth Checkを作成します
細かい設定は $ gcloud compute http-health-checks create -hで見てみて下さい
$ gcloud compute http-health-checks create "web-lb-check" \
  --port "80" \
  --request-path "/" \
  --check-interval "5" \
  --timeout "5" \
  --unhealthy-threshold "2" --healthy-threshold "2"
これで名称が"web-lb-check"な80ポートの"/"へ5秒間に1回チェックする(しきい値 成功/失敗 2回) Health Checkが作成されます。
Target Poolの作成
次にTarget Poolを作成します。
このTarget Pool名は後で利用します。
$ gcloud compute target-pools create "web-lb-pool" \
  --region "asia-east1" \
  --health-check "web-lb-check" \
  --session-affinity "NONE"
これで名称が"web-lb-pool"、regionがasia-east1向けでHealth Checkに上記で作成した"web-lb-check"を利用したTarget Poolが作成されます。
なおまだインスタンスは作成されていないのでインスタンスは登録されていません。
LBの作成
最後にLBを作成します。
$ gcloud compute forwarding-rules create "web-lb-rule" \
  --region "asia-east1" \
  --ip-protocol "TCP" \
  --port-range "80" \
  --target-pool "web-lb-pool"
Instance Group Managerを作成する。
上記Instance Template、Target Poolを指定した、Instance Group Managerを作成します。
Instance Group Managerを作成すると自動的にInstance Groupが作成されます。
Instance Group Managerは以下のコマンドで作成します。
gcloud preview managed-instance-groups --zone ZONE create NAME \
  --base-instance-name BASE_NAME \
  --size SIZE \
  --template TEMPLATENAME \
  [--target-pool TARGET_POOL]
今回は以下のようになります。
$ gcloud preview managed-instance-groups --zone asia-east1-b create web-instance-group \
  --base-instance-name web-coreos \
  --size 1 \
  --template web-coreos-template \
  --target-pool web-lb-pool
この--base-instance-name web-coreosは作成されるインスタンスのプレフィックス名称を設定しています。
また--size 1を指定しているので、1インスタンスがこの時点で作成されます。
Instance Group ManagerはInstance Group内のインスタンス数を制御可能なため、
gcloud preview managed-instance-groups resizeコマンドからこのインスタンス数を増減することも可能です。
$ gcloud preview managed-instance-groups --zone asia-east1-b resize web-instance-group --new-size 3
ちなみに現時点でLBにアクセスすればnginxのデフォルト画面は見れる状態です。
※ 最初のdocker pullが若干時間かかるので少し待って下さい
Autoscalerを作成する
最後にautoscalerを作成します。
autoscalerは以下のコマンドで作成します。
$ gcloud preview autoscaler --zone asia-east1-b create NAME --max-num-replicas MAX_NUM --min-num-replicas MIN_NUM --target INSTANCE_GROUP_MANAGER_URI [otion flags]
注意が必要なのはINSTANCE_GROUP_MANAGER_URIはInstance Group Managerの名前ではありません。
この値は以下のコマンドの結果から取得します。
$ gcloud preview managed-instance-groups --zone asia-east1-b describe web-instance-group

---
baseInstanceName: web-coreos
creationTimestamp: ''
currentSize: 3
description: ''
fingerprint: 7VhI5YgauGA=
group: https://www.googleapis.com/resourceviews/v1beta2/projects/kubernetes-sandbox/zones/asia-east1-b/resourceViews/web-instance-group
id: 'xxxxxxxxxxxxxxxxxx'
instanceTemplate: https://www.googleapis.com/compute/v1/projects/kubernetes-sandbox/global/instanceTemplates/web-coreos-template
kind: replicapool#instanceGroupManager
name: web-instance-group
selfLink: https://www.googleapis.com/replicapool/v1beta2/projects/kubernetes-sandbox/zones/asia-east1-b/instanceGroupManagers/web-instance-group
targetPools:
- https://www.googleapis.com/compute/v1/projects/kubernetes-sandbox/regions/asia-east1/targetPools/web-lb-pool
targetSize: 3

#
上記のselfLinkの値がそれです。
https://www.googleapis.com/replicapool/v1beta2/projects/kubernetes-sandbox/zones/asia-east1-b/instanceGroupManagers/web-instance-group
上記から以下のコマンドでAutoscalerを作成します。
今回は面倒臭いのでCPUの平均値をしきい値にスケールするようにします。
$ gcloud preview autoscaler --zone asia-east1-b create web-autoscaler --max-num-replicas 5 --min-num-replicas 1 --target-cpu-utilization 0.02 --target https://www.googleapis.com/replicapool/v1beta2/projects/kubernetes-sandbox/zones/asia-east1-b/instanceGroupManagers/web-instance-group
これで少しインスタンスに負荷をかければ増減するはずです。
後始末
設定を解除する場合は以下のコマンドでAutoscalerを削除して下さい。
$ gcloud preview autoscaler --zone asia-east1-b delete web-autoscaler
またInstance Group Managerもsizeを0にして削除してしまいましょう。
$ gcloud preview managed-instance-groups --zone asia-east1-b resize web-instance-group --new-size 0
$ gcloud preview managed-instance-groups --zone asia-east1-b delete web-instance-group
インスタンステンプレートなどはお好みで削除して下さい。
まとめ
昔のAWSの様にまだWeb UIはありませんが機能としてはAutoscalerの機能は十分に用意されているように思います。
HTTP LoadbalancerやCloud Monitoringを利用することで
より細かなメトリックスでインスタンスの増減が可能になりそうです。
また基本的なハマリポイントやノウハウもAWSで培ってきたものが十分に使える印象です。
個人的にはAWSの時よりインスタンスの起動などが速いようにも感じました。(刺さないで下さい
時間があればHTTP Load BalancerやCloud Monitoringを利用したAutoscalerも書きたいと思います。


