前回、IFTT Tを使ってピッコロボを動かすデモを行いました。
今回は、myThingsを使ってピッコロボを動かしてみます。
myThings
myThingsは、インターネットサービスやプロダクトを利用して、あなたにあった便利な組み合わせをつくることができるアプリです.
myThings
IFTTTをご存知の方は、Yahoo!Japan版IFTTTと言えば、理解いただけるでしょうか。
いろいろなwebサービスを組み合わせて自分用にカスタマイズした動作を実現する事ができます。今だと、IoTということで、webサービスと手元のデバイスを接続する事も可能です。
IDCF channel
その中で、IFTTTのMaker channelに相当するのが、myThingsのIDCF channelです。
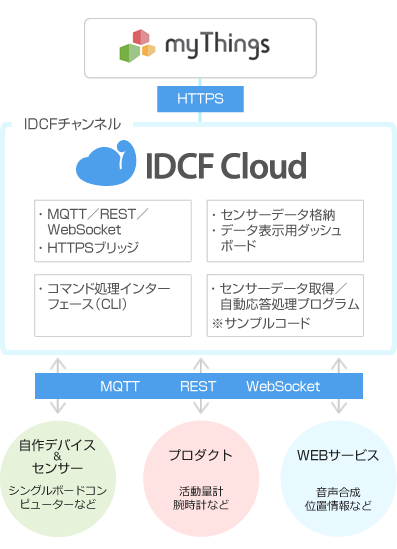
下図のように、IDCF Cloudに仮想マシンを起動して、その中でmeshbluを主としたアプリで環境を構築します。
myThingsとはhttpsで、デバイスとはMQTT/REST APIで通信します。
構築手順
こちらを参考にします。
「とりあえず、IoTってよく分からないけど、とにかく試してみたい」って方は、上記と同じものを購入して、手順に従って試すのが一番です。
「IFTTTのMaker Channelを試した事ある」って方は、下記の2stepを中心に試してみてください。
- サーバーの準備で、仮想マシンの作成および必要アプリのinstallを行い、
- myThingsアプリと接続を参考に、レシピを作成し、triggerもしくはactionに対応するtopicに対して、デバイス側からMQTTで連携するプログラムを用意。
myThingsレシピ
前回と同様に、myThings経由でtwitterからtweetを受けて、ピッコロボを動かします。
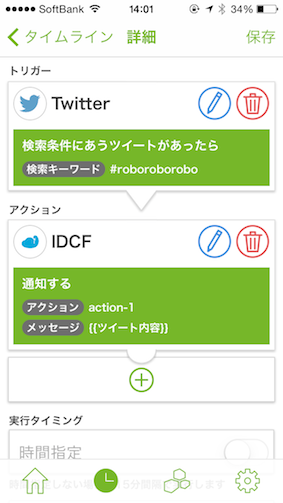
下図のように、トリガーとしてTwitterの検索キーワードを定義し、アクションとしてIDCF Channelの環境側の「action-1」と関連付けをします。さらに、tweet内容をdataとして、IDCF channelに渡します。
arduinoスケッチ
PubsubclientとESP8266のサンプルコードを参考に下記を用意し、ESP-WROOM-02に書き込みします。
# include <SPI.h>
# include <PubSubClient.h>
# include <ESP8266WiFi.h>

const char* ssid     = "<wifi SSID>";
const char* password = "<password>";

IPAddress server(a, b, c, d); # MQTTサーバのIP addressがa.b.c.dの場合

void callback(char* topic, byte* payload, unsigned int length) {
//  Serial.print("Message arrived [");
//  Serial.print(topic);
//  Serial.print("] ");
  for (int i=0;i<length;i++) {
    Serial.print((char)payload[i]);
  }
  Serial.println();
}

WiFiClient wifiClient;
PubSubClient client(wifiClient);

void reconnect() {
  // Loop until we're reconnected
  while (!client.connected()) {
    Serial.print("Attempting MQTT connection...");
    // Attempt to connect
    if (client.connect("<clientID>","<username>","<password>")) {
      Serial.println("connected");

      client.subscribe("<topic>");
    } else {
      Serial.print("failed, rc=");
      Serial.print(client.state());
      Serial.println(" try again in 5 seconds");
      // Wait 5 seconds before retrying
      delay(5000);
    }
  }
}

void setup()
{
  Serial.begin(9600);
  WiFi.begin(ssid, password);

  client.setServer(server, 1883);
  client.setCallback(callback);

  delay(1500);
}

void loop()
{
  if (!client.connected()) {
    reconnect();
  }
  client.loop();
}
動作確認
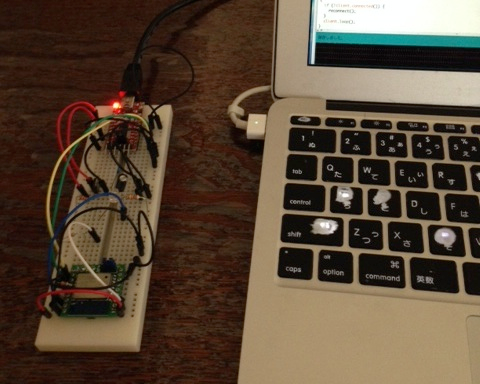
上述のmyThingsレシピとESP-WROOM-02を用意し、tweetするもESP-WROOM-02側のシリアルには何も表示されません。
mosquitto_subコマンドで該当トピックを確認すると、メッセージは確認できるので、ESP-WROOM-02側のスケッチが正常に動作していないようです。
$ mosquitto_sub -h 210.140.x.x -p 1883 -t <toppic> -u <username> -P <password> -d
Client mosqsub/18634-43220800- sending CONNECT
Client mosqsub/18634-43220800- received CONNACK
Client mosqsub/18634-43220800- sending SUBSCRIBE (Mid: 1, Topic: a16d1d2e-28f4-4191-b4aa-***, QoS: 0)
Client mosqsub/18634-43220800- received SUBACK
Subscribed (mid: 1): 0
Client mosqsub/18634-43220800- received PUBLISH (d0, q0, r0, m0, 'a16d1d2e-28f4-4191-b4aa-***', ... (160 bytes))
{"topic":"message","data":{"devices":["a16d1d2e-28f4-4191-b4aa-***"],"payload":"test3 roboroborobo","fromUuid":"***"}}
Client mosqsub/18634-43220800- sending PINGREQ
Client mosqsub/18634-43220800- received PINGRESP
まとめ
- 今回は、myThingsを使って、twitterからロボ操作に挑戦し、結果、動作確認までできませんでした。ESP-WROOM-02側のスケッチ不具合と思われるので、後で、切り分けしたいと思います。
- 構成自体は、IFTTTのmaker channelと同じようようにMQTT/REST APIを使う事がわかりましたが、IT系に詳しくない人は、環境構築やデバッグでのはまりポイントかなと思います。


