はじめに
Angular1系でこれまでプロダクト開発に関わってきました。
2016年の9月に新サービスを開発する事が決定して、「フロントエンドどうしよかなー」と考えていて、以下3つの選択肢に絞られました。
- React?
- Angular1系?
- Angular2系?
色々考えた末に、まだ公式リリース直後で日本語での情報も少なかったので逆に面白そうだなと思いAngular2系を使うことにしました。
個人的なメモをQiitaに起こした感じなので乱文や誤記があるかと思います。(確実にあるはず)
GoogleはAngularと称してますが、1系と区別する為にAngular2と書いてます。
(あと、もう4出ましたね)
本題に入る前に!Angular2の重要ポイント
TypeScript
TypeScriptが書けないと何にもはじまりません。
書き方、使い方などは詳しいサイトやがたくさんあるのでそこを参照してください。
コンポーネント指向
Angular2ではコンポーネントと呼ばれるパーツをベースとして開発していきます。UIの部品ととらえてください。
コンポーネントは再利用出来たり、コンポーネントごとに機能を作り込めるので、書いたコード⇒目に見えるUIパーツといった感じでAngular1系から比較すると直感性が上がったというか、TypeScriptの影響もあると思いますが、確実に可読性向上の一助にはなっていると思います。
RxJS
Angular2でHTTP通信するうえで絶対に外せないリアクティブプログラミングのライブラリです。使い出すとObservableが便利過ぎて発狂しそうになります。
英語
リリース直後の段階から利用しはじめたので、とにかく英語のドキュメントと格闘しました。最近は日本語でも実例とかも結構増えてきていますが、英語のほうが圧倒的に情報が多いので、困ったら英語でGoogle検索で解決というパターンがよくありました。
エディタ
エディタは慣れ親しんだものが一番ですが、オススメはVisual Studio Codeです。途中までAtomを使っていたのですが、パッケージ管理と何より重い!と感じる事が多くなってきて、Visual Studio Codeに変更しました。
ここ数年のエディタの遍歴として、Sublime⇒Atom だったのですが、個人的にはVS Codeが一番良いエディタだと思います。
TypeScriptを書く時のプラグインの設定も楽で、以下2点入ってればまずは困りません。
TSLint
https://marketplace.visualstudio.com/items?itemName=eg2.tslint
Angular v4 TypeScript Snippets
https://marketplace.visualstudio.com/items?itemName=johnpapa.Angular2
SCAFFOLD的なもので彷徨う
Angular1系だとYeomanという便利なscaffoldingツールがありました。
http://yeoman.io/
よくあるディレクトリ構成とかをコマンドで生成してくれるやつですね。
mgechev/angular-seed
2系ではどうなってるんだ?というのを真っ先に考えて探したところ、mgechev/angular-seedにたどりつきました。
https://github.com/mgechev/angular-seed
githubのスターも多いし、1系で慣れ親しんだgulpも使えるしいいじゃないか!と色々やってみました。
が、、もう使わなくなって時間が経ったのでもしかしたら改善されているかもしれませんが、恐ろしくビルドが遅い問題があって、結局やめました。
githubのissueにもビルド遅いよーとの書き込みがあって、この人は解決できたようですが、残念ながら私の環境では解決できなかったので、他も試してみようとなりました。
https://github.com/mgechev/angular-seed/issues/1804
安心と信頼のAngular CLI
現在はAngular CLIを利用しています。
https://cli.angular.io/
簡単で早いので文句無しです。
mgechev/angular-seedが決して悪いわけではないと思うのですが、使い所が私には見い出せませんでした。誰かこういう点はAngular CLIより優れてるとかあれば教えて頂きたいです。
Angular CLIの使い方はオフィシャルでもそれ以外ネットでも大量にありますので、基本的なところは検索してみてください。以下、Tips的なとこだけご紹介します。
途中でscss使いたいと思った時
プロジェクトを作った後にscssの設定に変えたいときです。
ng set defaults.styleExt scss
忘れないように初めから設定するならng newする時に以下のコマンドを使います。
ng new sassy-project --style=sass
ビルドしたファイルにハッシュを付与したい時
ビルドしたは良いがファイル名が同じだとキャッシュされたファイルを見に行ってしまい即時反映されないですよね?そういう時のためにファイルにハッシュをつけてビルドするオプションがあります。
-output-hashing=allをつけるとビルドされたファイル名にハッシュが付与されます。
ng build --dev --output-hashing=all
ルーティングやってみた
Angular-CLIでルーティングした方法です。
サンプルとして、indexページとloginページのルーティングを作成します。
app.moduleにRouterModuleをimport
import { RouterModule } from '@angular/router';

// 〜色んなのが多分importされてて(省略)〜

// importsでRouterModule.forRootします
imports: [
 RouterModule.forRoot(routes, { useHash: true }),
]
indexページとloginページのルーティングを作成
こんな感じで、indexページに対して
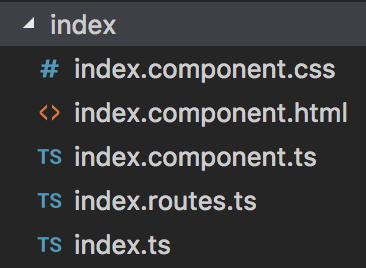
- css
- html
- component
- routes
- index
があるようなディレクトリ構成です。今回、ここのindex.routes.tsに処理を書いていきます。
import { Route } from '@angular/router';
import { IndexComponent } from './index';

export const IndexRoutes: Route[] = [
  {
    path: '',
    component: IndexComponent,
  }
];
同様にログインページなら以下のように設定します
import { Route } from '@angular/router';
import { LoginComponent } from './index';

export const LoginRoutes: Route[] = [
  {
    path: 'login',
    component: LoginComponent,
  },
];
app.routesにルーティングを追加
import { IndexRoutes } from './index/index';
import { LoginRoutes } from './login/index';

export const routes: Routes = [
  ...IndexRoutes,
  ...LoginRoutes,
];
これで、パス無しならindexに。/loginならログインページに遷移するようになります。
HTTP通信のクラスを作ってみた
// こんな感じでもろもろインポートして
import { Http, Response, Headers, RequestOptions } from '@angular/http';
import { Observable } from 'rxjs/Observable';
import 'rxjs/add/operator/map';
import 'rxjs/add/operator/catch';

// http通信サービス
@Injectable()
export class HttpService {

  // コンストラクターでhttp突っ込んで
  constructor(private http: Http) { }

  /**
   * Getでhttp通信を行う
   * @param URL
   * @return getで取得したJSONデータ
   */
  get(url: string): Observable<string[]> {
    let options = this.setHeader();
    return this.http.get(url, options)
      .map((res: Response) => res.json())
      .catch(this.handleError);
  }

  /**
   * http通信を行う際の共通ヘッダーをセット(JSON使う前提)
   * @return httpリクエストヘッダー
   */
  private setHeader(): RequestOptions {
    let headers = new Headers({ 'Content-Type':'application/json' });
    let headerOptions = new RequestOptions({ headers: headers });
    return headerOptions;
  }

  /**
   * HTTP通信エラーハンドラー
   * @return エラーメッセージ
   */
  private handleError(error: any) {
    let errMsg = (error.message) ? error.message :
      error.status ? `${error.status} - ${error.statusText}` : 'Server error';
    return Observable.throw(errMsg);
  }
}
使い方
// インポートして
import { Component } from '@angular/core';
import { HttpService } from '../shared/http/index';

// providers に入れる
@Component({
  moduleId: module.id,
  selector: 'app-use-http',
  providers: [HttpService],
  templateUrl: 'app_use.component.html',
  styleUrls: ['app_use.component.css'],
})

export class UseHttpComponent {

  // コンストラクタに入れる
  constructor(private http: HttpService,
  ) {}

  // HTTP通信してデータを取得するメソッド
  getdata(){
    // リクエストするURL
    const requsetUrl='http://testapi.jp';
    // GETでデータ取得
    this.http.get(requsetUrl).subscribe(
      // 取得したデータをセット
      data => {
        response = data;
        console.log(response);
      },
      // エラーがあればコンソールに表示
      err => console.dir(err),
      () => {
        // 処理完了時
        console.log('complete');
      }
    );
  }
}
URLのサニタイズ
アップロードした画像のblobを表示しようとしたら怒られました。
当たり前ですが・・・。
解決した方法
// DomSanitizerインポートして
import { DomSanitizer } from '@angular/platform-browser';

// コンストラクターに突っ込んで
constructor(private sanitizer: DomSanitizer) {
}

// 画像のBLOB URL
private url:string;

// this.sanitizer.bypassSecurityTrustUrl でサニタイズ
this.sanitizer.bypassSecurityTrustUrl(window.URL.createObjectURL(this.url));
hiddenの使い方
Angular1系のng-show ng-hideと似たような用途です
<div [hidden]="show">
  "show"がtrueの場合は非表示。
</div>
<div [hidden]="!show">
  "show"がtrueの場合は表示。
</div>
ngIfの使い方
プランが1なら表示しますというサンプルです。
ng-containerはHTML要素として描画させたくない時に利用します。
この部分は普通に<div></div>でも置き換え可能です。
<ng-container *ngIf="plan=='1'">
  <span>現在加入中</span>
</ng-container>
データバインドで初歩的にハマったところ
private movie: any;
// 取得したJSONからmovieのURLをサニタイズしてセット
this.movie = this.sanitizer.bypassSecurityTrustUrl(this.json.movie);
# これはダメ
<video [src]="{{movie}}"></video>
エラー内容
zone.js?1477977328359:344 Unhandled Promise rejection: Template parse errors:
で盛大に怒られます。
onewayバインドだから{{movie}}でいいんじゃない?とセットしましたが違います。
正しくは
<video [src]="movie"></video>
です。
キーイベント
inputタグの例です。
詳しくはここに書いてあります
https://angular.io/docs/ts/latest/guide/user-input.html
ここの例ではTypeScriptで以下が書いてある前提です。
myMethod(){
	console.log("key!!!")
}
何か入力があったら発動
<input (keyup)="myMethod()
エンター押したら発動
<input (keyup.enter)="myMethod()
カーソル外したら発動
いわゆるblur
<input (blur)="myMethod()
変更を検知したい
OnChanges使います
// OnChanges,SimpleChangesをインポート
import{ Component,OnChanges,SimpleChanges } from '@angular/core';

export class MySampleComponent  implements OnChanges {

  // ログイン状態に変更があった場合
  ngOnChanges(changes: SimpleChanges) {
   // ログイン済ならユーザー名とアイコンを表示
   if (changes['login'].currentValue === true) {
	 // 何か処理
   }
  }
routeにページタイトルをセットして各コンポーネントで使う
routeの設定
{
 path: 'login',
 component: LoginComponent,
 data:{pageTitle:'ログインページ'}
},
コンポーネント側
// ActivatedRouteインポートして
import { ActivatedRoute } from '@angular/router';

// コンストラクタで宣言して
constructor(private route: ActivatedRoute) {};

// ページ名をconsoleで出力するメソッド
getPageTitle() {
   console.log(this.route.snapshot.data['pageTitle']);
}
リロードすると404に
ng serveしたりするローカルの開発環境では発生しないのですが、ビルドしてサーバーで動かす場合に発生しました。
解決策
app.module.tsで{ useHash: true }を追加してあげる
imports: [
    RouterModule.forRoot(routes, { useHash: true }),
これでダメならNginx側でtry_filesの設定も追加してあげます。
(Apacheは未検証です)
location / {
    root /var/www/develop;
    index index.html;
    try_files $uri$args $uri$args/ $uri $uri/ /index.html =404;
}
async await 使いたい
と思って
async function()
とか書いたら
Async functions are only available when targeting ECMAScript 2015 or higher.)
と怒られました。あれ?できない。と思ってたのですが、ターゲットを変更してあげる必要がありました。
tsconfig.jsonを開いて
これを
"target": "es5",
es6に変更してあげればOKです。
"target": "es6",
router-outletを複数利用する
ルーティング設定
  {
    path: '',
    component: NavigationComponent,
    outlet: 'navigation'
  },
router-outletを記載するhtml
<router-outlet name="navigation"></router-outlet>
<router-outlet></router-outlet>
こんな感じで
name="navigation"
nameにルーティングで設定したoutletの値を入れればOK
トースターを使いたい
ng2-toastr
https://www.npmjs.com/package/ng2-toastr

1.npm インストール
npm install ng2-toastr --save
2.jsとcssをインクルード
HTMLインクルードなら
<link href="node_modules/ng2-toastr/bundles/ng2-toastr.min.css" rel="stylesheet" />
<script src="node_modules/ng2-toastr/bundles/ng2-toastr.min.js"></script>
Angular CLIならangular-cli.jsonに以下を追加
"styles": [
            "styles.scss",
            "../node_modules/ng2-toastr/bundles/ng2-toastr.min.css",
        ],
3.コンポーネントでの利用
// ViewContainerRefが必須
import { Component, ViewContainerRef } from '@angular/core';
// ToastsManagerのインポート
import { ToastsManager } from 'ng2-toastr/ng2-toastr';

// providersにToastsManagerを入れる
@Component({
  moduleId: module.id,
  selector: 'app-sample',
  providers: [ToastsManager],
  templateUrl: 'sample.component.html',
  styleUrls: ['sample.component.css'],
})


export class SampleComponent {
  // ToastsManagerをコンストラクタに入れて{}内で前処理
  constructor(public toastr: ToastsManager,){
    this.toastr.setRootViewContainerRef(viewContainerRef);
  }

  showToaster(){
    // 何らかのレスポンスがtrueなら
    if (response === true) {
      // 成功のトースター表示
      this.toastr.success('成功しました!', '成功');
    } else {
      // 失敗のトースター表示
      this.toastr.error('失敗しました', '失敗');
    }
  }

}
vexを使いたい
vexはHubSpotが開発しているイケてる感じのポップアップを提供するライブラリです。
https://github.com/hubspot/vex
https://www.npmjs.com/package/vex-js

1.npm インストール
npm install vex-js --save
2.jsとcssをインクルード
HTMLインクルードなら
<script src="vex.combined.min.js"></script>
<script>vex.defaultOptions.className = 'vex-theme-os'</script>
<link rel="stylesheet" href="vex.css" />
<link rel="stylesheet" href="vex-theme-os.css" />
Angular CLIならangular-cli.jsonに以下を追加
"styles": [
  "../node_modules/vex-js/dist/css/vex.css",
  "../node_modules/vex-js/dist/css/vex-theme-wireframe.css"
],
"scripts": [
  "../node_modules/vex-js/dist/js/vex.js",
  "../node_modules/vex-js/dist/js/vex.combined.min.js",
  "../node_modules/vex-dialog/dist/vex.dialog.js"
],
3.モーダルサービスの作成
共通で使いたいので/shared配下に作成
import { Injectable } from '@angular/core';

// vexのセットアップ
const vex = require('vex-js');
vex.registerPlugin(require('vex-dialog'));
vex.defaultOptions.className = 'vex-theme-wireframe';
vex.defaultOptions.contentClassName = 'vex-custom';
vex.dialog.buttons.YES.text = 'はい';
vex.dialog.buttons.NO.text = 'いいえ';

/**
 * モーダル関連のサービスを提供するクラス
 */
@Injectable()
export class ModalService {

  constructor() {}

  show(message: string, callback: any) {
    // ダイアログ表示のインスタンスをリターン
    return vex.dialog.confirm({
        message: message,
        callback: function (value) {
            if (value) {
              return callback('ok');
            }else {
              return callback('cancel');
            }
        },
    });
  }
}
3.コンポーネントでの利用
import { Component } from '@angular/core';
import { ModalService } from '../shared/modal.service';

// providersにModalServiceを入れる
@Component({
  moduleId: module.id,
  selector: 'app-sample',
  providers: [ModalService],
  templateUrl: 'sample.component.html',
  styleUrls: ['sample.component.scss'],
})

export class SampleComponent {
  // ModalServiceをセット
  constructor(private modal: ModalService){}

  // モーダルサービス実行
  openModal(){
      this.modal.show(message, function (result) {
        // [はい]なら
        if (result === 'ok') {
          // 何らか処理実行
        }
      });
  }
}
TintMCEを使いたい
TinyMCEはいわゆるWYSIWYGと呼ばれるエディタです。
https://www.tinymce.com/

ブログの投稿画面なんかで見るこういうやつです↑
1.npm インストール
npm install tinymce --save
2.jsとcssをインクルード
HTML直のインクルードは未検証なので、Angular CLIのみ説明します。
"scripts": [
 // ここの2つは必須
 "../node_modules/tinymce/tinymce.js",
 "../node_modules/tinymce/themes/modern/theme.js",
 // プラグインは自分が使うものを
 "../node_modules/tinymce/plugins/link/plugin.js",
 "../node_modules/tinymce/plugins/paste/plugin.js",
 "../node_modules/tinymce/plugins/table/plugin.js",
],
3.TinyMCEのコンポーネントを作成
import {
    Component, ElementRef, OnDestroy, AfterViewInit,
    EventEmitter, Input, Output, Inject
} from '@angular/core';

declare var tinymce: any;

@Component({
    selector: 'angular-tinymce',
    moduleId: module.id,
    template: `
    <div id="tinyFormGroup">
        <div style="display:none;">
            <textarea id="baseTextArea">{{htmlContent}}</textarea>
        </div>
    </div>`,
})

export class TinymceComponent implements AfterViewInit, OnDestroy {
    @Output() contentChanged: EventEmitter<any>;
    @Input()
    set mceContent(content: any) {
        this.htmlContent = content;
    }
    // デフォルトの表示領域を設定
    @Input() mceheight: 500;
    public htmlContent: string;
    private elementRef: ElementRef;
    private elementID: string;

    constructor( @Inject(ElementRef) elementRef: ElementRef) {
        this.elementRef = elementRef;

        const randLetter = String.fromCharCode(65 + Math.floor(Math.random() * 26));
        const uniqid = randLetter + Date.now();

        this.elementID = 'tinymce' + uniqid;
        this.contentChanged = new EventEmitter();
    }

    ngAfterViewInit() {
        // ベースとなるtextareaをクローン
        const baseTextArea = this.elementRef.nativeElement.querySelector('#baseTextArea');
        const clonedTextArea = baseTextArea.cloneNode(true);
        clonedTextArea.id = this.elementID;

        const formGroup = this.elementRef.nativeElement.querySelector('#tinyFormGroup');
        formGroup.appendChild(clonedTextArea);

        // tinymceのベースURL
        tinymce.baseURL = '../node_modules/tinymce';
        // tinemceの初期化
        tinymce.init(
            {
                skin_url: 'assets/skins/lightgray',
                mode: 'exact',
                height: this.mceheight,
                theme: 'modern',
                // language: 'ja',
                plugins: [
                    'link image media',
                ],
                toolbar: 'undo redo | styleselect | bold italic | bullist numlist | link image media',
                elements: this.elementID,
                setup: this.tinyMCESetup.bind(this),
            },
        );
    }

    // 要素の破棄
    ngOnDestroy() {
        tinymce.get(this.elementID).remove();
    }

    tinyMCESetup(ed: any) {
        ed.on('keyup', this.tinyMCEOnKeyup.bind(this));
    }

    tinyMCEOnKeyup(e: any) {
        this.contentChanged.emit(tinymce.get(this.elementID).getContent());
    }

}
4.TinyMCEのモジュールを作成
import { NgModule } from '@angular/core';
import { CommonModule } from '@angular/common';
import { TinymceComponent } from './tinymce.component';

@NgModule({
    imports: [CommonModule],
    declarations: [TinymceComponent],
    exports: [TinymceComponent],
})

export class TinymceModule {}
5.コンポーネントでの利用
今回はSampleコンポーネントで利用する例です。
まず、SampleコンポーネントのモジュールにTinymceModuleをimportします。
import { NgModule } from '@angular/core';
import { CommonModule } from '@angular/common';
import { SampleComponent } from './question_detail.component';
import { TinymceModule } from '../shared/tinymce.module';

@NgModule({
  imports: [CommonModule, TinymceModule],
  declarations: [SampleComponent],
  exports: [SampleComponent],
})
export class QuestionDetailModule { }
htmlで自作のangular-tinymceを利用
// sampleTextに入力内容が反映されるので、sample.component.tsで事前に用意が必要
<angular-tinymce [mceheight]=100 [(mceContent)]="sampleText" (contentChanged)="mceInputChanged($event)" class="tinymce"></angular-tinymce>
画面遷移の前に処理を入れたい
ページ遷移の前にログイン済か?などの判定を行うのに役立ちます
CanActivateを利用します。
https://angular.io/api/router/CanActivate
ここではログイン認証をmemberコンポーネントで行う想定です。
1.ログインチェックの仕組みを作る
CanActivateをimportして、classのところでimplements CanActivateしてあげます。
import { Injectable } from '@angular/core';
import { CanActivate } from '@angular/router';

@Injectable()
export class LoginCheck implements CanActivate {

  constructor() {}

  // ログインしてるか?の処理を書いてBooleanで返す
  canActivate() {
    if('判定処理' === true){
      return true;
    }else{
     return false;
    }
  }

}
2.メンバーだけのページのルーティング処理でcanActivateを利用
import { LoginCheck } from '../shared/auth/index';
とありますが、1.で作ったlogin_check.tsを同じ階層のindex.tsで以下のようにexportしています。
export * from './login_check';
import { Route } from '@angular/router';
import { MemberComponent } from './index';
import { LoginCheck } from '../shared/auth/index';

export const QuestionDetailRoutes: Route[] = [
  {
    path: 'member',
    component: MemberComponent,
    canActivate: [LoginCheck]
  },
];
おわりに
メモの書き起こしは意外と疲れました。
アップデートとか修正あれば変更加えていきます。