環境
Mac OS 10.10.3
cocos2d-x 3.7
なんでモザイク?
最近、cocos2d-xに触ってないから。
なんとなく。
要件
- モザイクのタイルはDrawNodeで描画する
- モザイクの粒度を指定できる
- モザイクの元はNodeで指定できる
- 指定していないNode(背景など)はモザイクにしない
ソース
githubにあげているものにコメントを付けただけのものです。
FilterMozaic.h
#include "cocos2d.h"

class FilterMozaic : public cocos2d::DrawNode // 1. DrawNodeで描画する
{
public:
    // 2. モザイクの粒度を指定できる
    // 3. モザイクの元はNodeで指定できる
    static FilterMozaic* createWithTarget(cocos2d::Node* target, cocos2d::Size mozaicSize);
    bool initWithTarget(cocos2d::Node* target, cocos2d::Size mozaicSize);
    bool refreshWithTarget(cocos2d::Node* target, cocos2d::Size mozaicSize);

protected:
    cocos2d::Size _mozaicSize;
};
FilterMozaic.cpp
#include "FilterMozaic.h"

using namespace cocos2d;

/**
 * 普通のcreateメソッド、読む必要なし
 */
FilterMozaic* FilterMozaic::createWithTarget(Node* target, Size mozaicSize)
{
    FilterMozaic* instance = new FilterMozaic();
    if (instance != nullptr && instance->initWithTarget(target, mozaicSize)) {
        instance->autorelease();
        return instance;
    }

    delete instance;
    instance = nullptr;
    return instance;
}

/**
 * 実質、refreshWithTargetのシノニム
 */
bool FilterMozaic::initWithTarget(Node* target, Size mozaicSize)
{
    if (!DrawNode::init()) return false;

    return this->refreshWithTarget(target, mozaicSize);
}

/**
 * メインの処理
 * Actionとしても取り回しが利くように、作成済みFilterMozaicを更新できるようにする
 */
bool FilterMozaic::refreshWithTarget(Node* target, Size mozaicSize)
{
    _mozaicSize = mozaicSize;

    // glReadPixelで読むときに使う
    float contentScaleFactor = Director::getInstance()->getContentScaleFactor();

    float minPix = 1.0f / contentScaleFactor;

    // 小さすぎる値で無限ループするのを回避
    if (_mozaicSize.width < minPix)
        _mozaicSize.width = minPix;
    if (_mozaicSize.height < minPix)
        _mozaicSize.height = minPix;

    // 描画済み内容のclear
    this->clear();

    // 元Nodeがなければ何もしない
    if (target == nullptr) return false;

    bool originalVisibility = target->isVisible();
    Vec2 originalScale      = Vec2(target->getScaleX(), target->getScaleY());

    this->setContentSize(target->getContentSize());

    Director* director = Director::getInstance();

    Size contentSize = target->getContentSize();
    Vec2 anchorPoint = target->getAnchorPoint();

    // 0座標を左下に固定
    Vec2 leftBottom  = target->getPosition() - Size(contentSize.width * anchorPoint.x, contentSize.height * anchorPoint.y);

    // オフスクリーンレンダリング用にメンバを一時的に変更する
    target->setVisible(true);
    target->setScale(1.0f);

    // 4. 指定していないNode(背景など)はモザイクにしない
    // 元Nodeだけをオフスクリーンレンダリングする
    RenderTexture* rt = RenderTexture::create(director->getVisibleSize().width, director->getVisibleSize().height);
    rt->begin();
    target->draw(director->getRenderer(), target->getNodeToParentTransform(), false);
    director->getRenderer()->render();

    // モザイクのタイルの間隔でピクセルを読み、その色で矩形を描画する
    for (float x = 0.0f; x <= contentSize.width - _mozaicSize.width; x += _mozaicSize.width) {
        for (float y = 0.0f; y <= contentSize.height - _mozaicSize.height; y += _mozaicSize.height) {
            // 元Nodeだけしか描画されていないので、背景などの余計な情報は含まれない
            void* buffer = malloc(sizeof(Color4B)*1);
            glReadPixels((GLint)(int)((leftBottom.x + x) * contentScaleFactor),
                         (GLint)(int)((leftBottom.y + contentSize.height - y) * contentScaleFactor),
                         1, 1, GL_RGBA, GL_UNSIGNED_BYTE, buffer);

            Color4B* color = static_cast<Color4B*>(buffer);
            // 完全に透過なピクセルは無視
            if (color->a <= 0.0f) continue;

            Vec2 verts[4] = {
                Vec2(x,                     contentSize.height - y),
                Vec2(x + _mozaicSize.width, contentSize.height - y),
                Vec2(x + _mozaicSize.width, contentSize.height - y - _mozaicSize.height),
                Vec2(x,                     contentSize.height - y - _mozaicSize.height)
            };

            this->drawPolygon(verts, 4, Color4F(color->r / 255.0f, color->g / 255.0f, color->b / 255.0f, color->a / 255.0f), 0, Color4F(0.0f, 0.0f, 0.0f, 0.0f));

            free(buffer);
        }
    }

    // オフスクリーンレンダリング終了
    rt->end();

    // オフスクリーンレンダリング用に変更したメンバを元に戻す
    target->setVisible(originalVisibility);
    target->setScale(originalScale.x, originalScale.y);

    // 自身のscaleも元Nodeに合わせても良い (好みや使い方の問題)
    // this->setScale(originalScale.x, originalScale.y);

    return true;
}
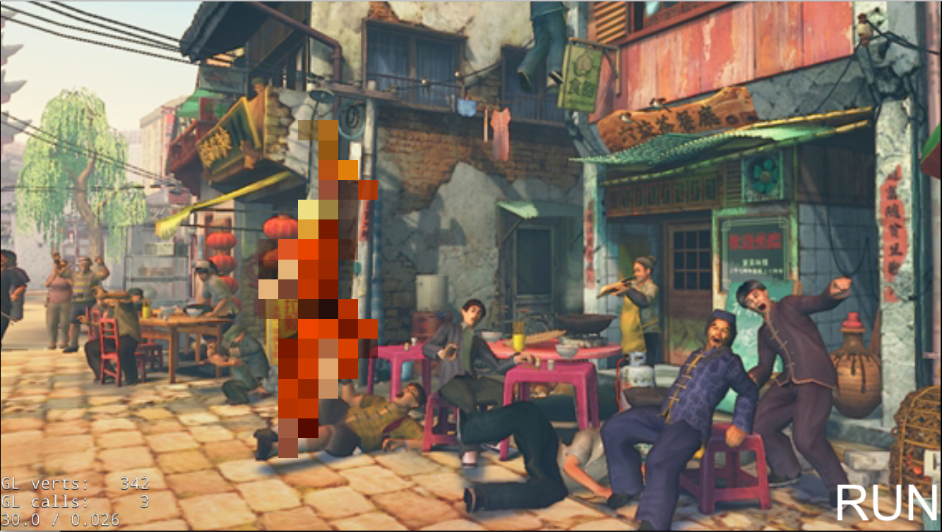
サンプル
BEFORE
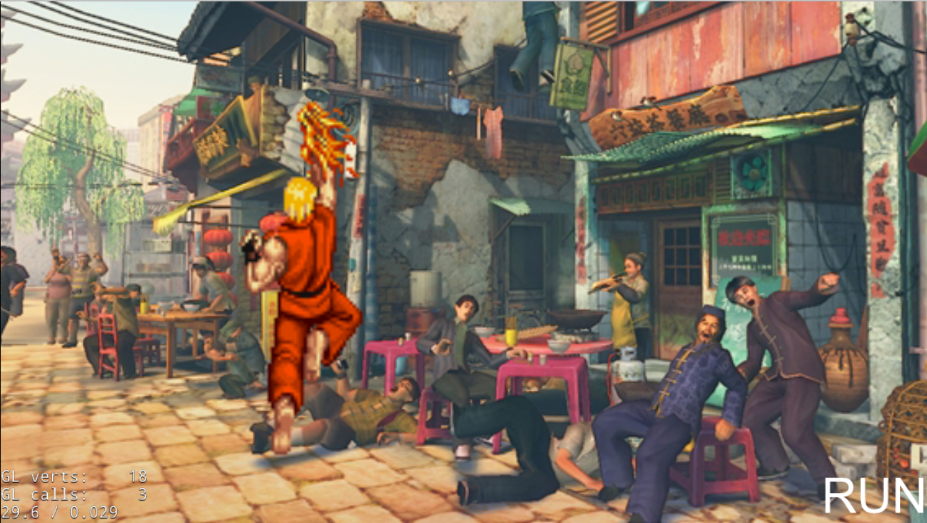
AFTER