Googleコンソールで認証作成
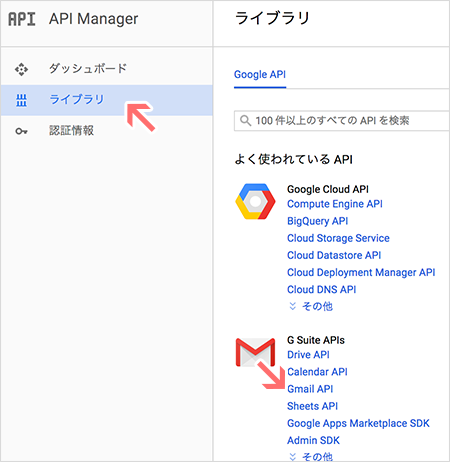
Googleコンソール https://console.developers.google.com で、使うGoogleアカウントにログインして、左サイドメニューの「ライブラリ」→「Gmail API」をクリック。
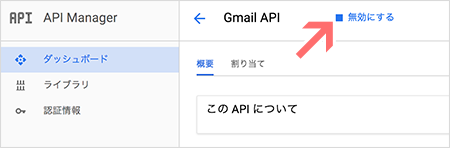
Gmail API を「有効にする」をクリックする(「無効にする」に変わる)
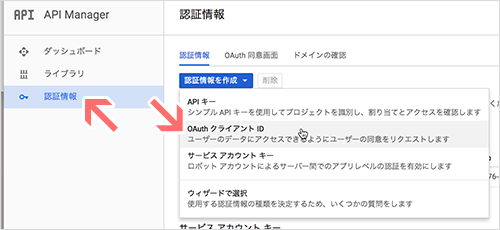
左サイドメニュー「認証情報」クリックして、「認証情報を作成」で「OASuthクライアントID」を選択。
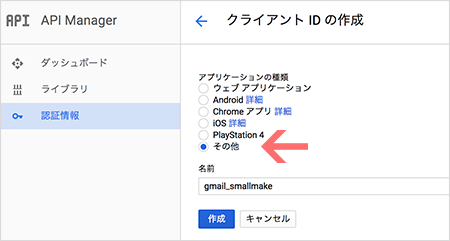
ここで、とりあえずWebアプリじゃなくコマンドなどで作る場合(redirect urlはないとか定まらないとか)「その他」を選ばなければならない。(参考: https://stackoverflow.com/questions/28321570/google-oauth-2-0-error-redirect-uri-mismatch)
確認ダイアログでクライアントIDとクライアントシークレットをコピー、OKする。
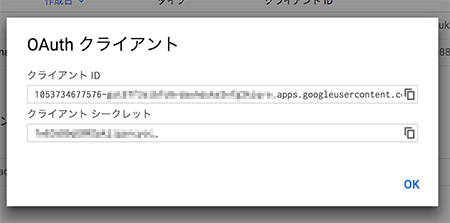
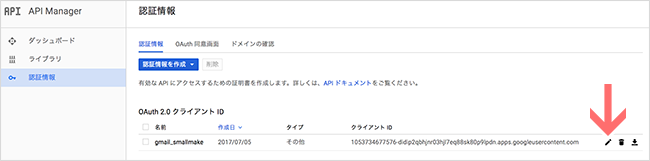
これは後でも、一覧の鉛筆ボタンでクライアントIDなどが表示されるので、こちらから取ることもできる。
gmail-oauth2-tool oauth2.py をダウンロードして使う
下記URLでgmail-oauth2-tools を入手。
ここに書いてあるとおり、python oauth2.py すると、URLが表示される。
$ python oauth2.py --generate_oauth2_token --client_id=364545978226.apps.googleusercontent.com --client_secret=zNrNsBzOOnQy8_O-8LkofeTR
To authorize token, visit this url and follow the directions:
https://accounts.google.com/o/oauth2/auth?>client_id=364545978226.apps.googleusercontent.com&redirect_uri=urn%3Aietf%3Awg%3Aoauth%3A2.0%3Aoob&response_type=code&scope=https%3A%2F%2Fmail.google.com%2F
Enter verification code:
これにアクセスして、表示されるコードを、その下の Enter verification code:のところにペーストすると、Refresh Token, Access Token が取得できる。ただ Access Token Expiration Seconds: 3600 とあるように1時間で無効になるので、Refresh Tokenを使えるようにしないといけない。
Refresh Token: 1/q4SaB2JMQB9I-an6F1rxJE9OkOMtfjaz1bPm1tfDpQM
Access Token: ya29.AHES6ZRKeUQwH2xhirksSUDSyjg9oPuRMMal05Ty0cfFIT_uRfESHw
Access Token Expiration Seconds: 3600
Refresh Token に Httparty を使う
新しいTokenを取得するために、Httparty をつかう。
https://github.com/jnunemaker/httparty
(https://stackoverflow.com/questions/12792326/how-do-i-refresh-my-google-oauth2-access-token-using-my-refresh-token を参考にさせていただきました)
options = {
    body: {
      client_id: <クライアントID>,
      client_secret: <クライアントシークレット>,
      refresh_token: <Refresh Token>,
      grant_type: 'refresh_token'
    },
    headers: {
      'Content-Type' => 'application/x-www-form-urlencoded'
    }
}
response = HTTParty.post('https://accounts.google.com/o/oauth2/token', options)
new_token = response.parsed_response['access_token'] if response.code == 200
gem gmail でAPI叩く
使えるTokenさえあれば、あとはgem gmail で簡単に受信など組める。
gmail = Gmail.connect(:xoauth2, 'email@domain.com', 'ACCESS_TOKEN')
以上です。
補足1:
僕はどこかのサイトの情報でトークン指定は、 :token => 'ACCESS_TOKEN' と書いてあったのをそのまま信じて使いはまった。:token => は要らないので注意。
補足2:
僕が使った時点では、gem gmail の方にまだ https://github.com/gmailgem/gmail/issues/230 の問題があったので、GitHub の master を使わなければならなかった。
以上