概要
- consulとconsul-templateでAPサーバの自動切り替え の環境構築編です
- 適当なので、あくまでも参考程度に。
構成
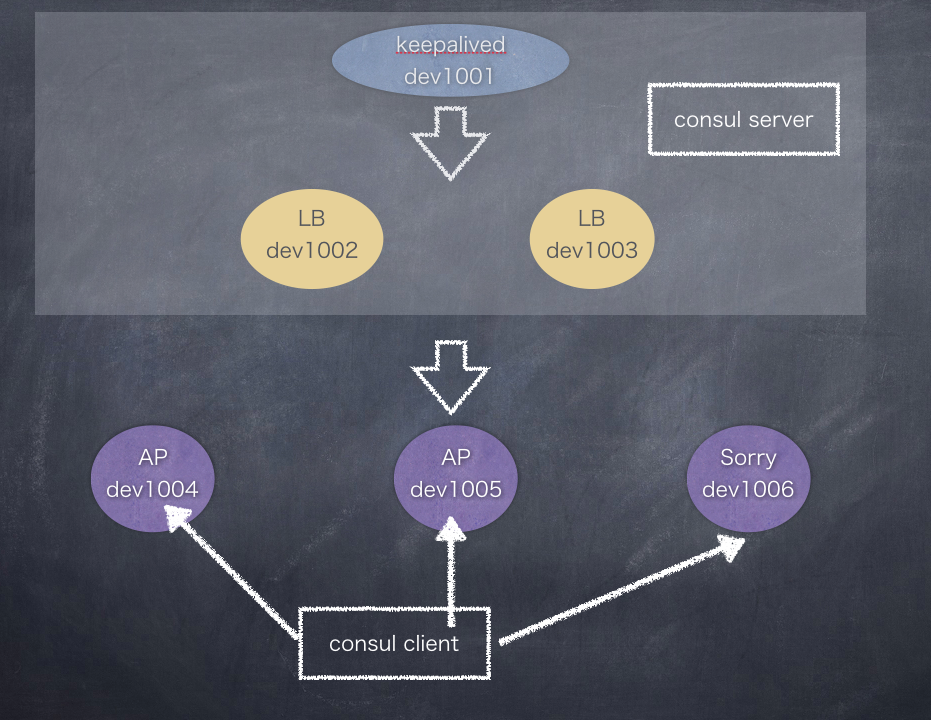
① keepalived構築
dev1001
### keepalivedをインストール
$ yum install -y keepalived ipvsadm

### iptables再起動
# ここら辺、どっかにぶち込んでればいけるはず。。
$ vim /etc/sysconfig/iptables
-A INPUT -p icmp -j ACCEPT
-A INPUT -i lo -j ACCEPT
-A INPUT -i eth0 -j ACCEPT
-A INPUT -p tcp -m tcp --dport 80 -j ACCEPT
-A INPUT -p tcp -m tcp --dport 443 -j ACCEPT
-A INPUT -p vrrp -j ACCEPT

$ service iptables restart

### config設定
$vim /etc/keepalived/keepalived.conf
vrrp_instance VI_KOYAMA_TEST {
    state BACKUP
    interface eth0
    virtual_router_id 1
    priority 105
    advert_int 1
    virtual_ipaddress {
        10.1.1.1
    }
}
include conf.d/*.conf

### conf.dの修正
$ sudo vim /etc/keepalived/conf.d/hoge.conf
! koyama_test 80
virtual_server 10.1.1.1 80 {
    delay_loop 15
    lb_algo wrr
    lb_kind DR
    protocol TCP
    real_server 10.0.1.2 80 {
        weight 1
        HTTP_GET {
            url {
              path /health_check.txt
              status_code 200
        }
              connect_port 10080
              connect_timeout 15
        }
    }
    real_server 10.0.1.2 80 {
        weight 1
        HTTP_GET {
            url {
              path /health_check.txt
              status_code 200
        }
              connect_port 10080
              connect_timeout 15
        }
    }
}

### 再起動
$ sudo service keeapalived restart
$ sudo chkconfig keepalived on
② LB構築
dev1002,dev1003
# *.hoge.dev.jp A 10.1.1.1 が社内DNSで登録されてます

### iptables設定
# ここら辺、どっかにぶち込んでればいけるはず。。
$ vim /etc/sysconfig/iptables
-A INPUT -p icmp -j ACCEPT
-A INPUT -i lo -j ACCEPT
-A INPUT -i eth0 -j ACCEPT
-A INPUT -p tcp -m tcp --dport 80 -j ACCEPT
-A INPUT -p tcp -m tcp --dport 443 -j ACCEPT
-A INPUT -p tcp -m tcp -s 10.0.0.0/8 --dport 10080 -j ACCEPT
COMMIT

### iptables再起動
$ service iptables restart

### リポジトリ編集
$ sudo vim /etc/yum.repo.d/nginx.repo
[nginx-main]
name=nginx mainline repo
baseurl=http://nginx.org/packages/mainline/centos/$releasever/$basearch/
gpgcheck=0
enabled=1

### nginxインストール
$ sudo yum -y --enablerepo=nginx-main install  nginx

### keepalivedが読みに行くhealth_checkファイルを作成
$ vim /var/nginx/health_check.txt
OK

### health_check用のnginxファイル設定
$ sudo vim /etc/nginx/conf.d/health_check.conf
server {
  allow 10.0.0.0/8;
  allow 192.168.0.0/16;
  deny all;
  listen 10080;
  root /var/nginx;
  location / {
      index   health_check.txt;
  }
}

### APサーバのプロキシ用設定
$ sudo vim /etc/nginx/conf.d/default.conf
upstream app1 {
        server 10.0.1.2:80 weight=5;
        server 10.0.1.3:80 weight=5;
}
server {
        listen 80;
        listen 443;
        server_name test.hoge.dev.jp;
        proxy_set_header Host $host;
        satisfy any;
        proxy_set_header X-Real-IP $remote_addr;
        proxy_set_header X-Forwarded-Proto $scheme;
        proxy_set_header X-Forwarded-Host $http_host;
        proxy_set_header X-Forwarded-Server $host;
        proxy_set_header X-Forwarded-For $proxy_add_x_forwarded_for;
        location / {
                proxy_pass http://app1;
        }
}

### nginx再起動
$ service nginx restart
③ APサーバ構築
とりあえずsinatoraでアプリ作る
dev1004,dev1005,dev1006
### rbenv適当に入れる
# 必要なパッケージを入れる
$ sudo yum install -y libxml2-devel libxslt-devel openssl-devel libffi-devel readline-devel sqlite-devel gcc
$ cd /usr/local
$ sudo git clone git://github.com/sstephenson/rbenv.git rbenv
$ sudo git clone git://github.com/sstephenson/ruby-build.git rbenv/plugins/ruby-build
$ cd rbenv/plugins/ruby-build/
$ sudo ./install.sh

# PATHを通す
$ sudo vim /etc/profile.d/rbenv.sh
export RBENV_ROOT="/usr/local/rbenv"
export PATH="/usr/local/rbenv/bin:$PATH"
eval "$(rbenv init -)"

# 2.2.3ぐらいを入れる
$ sudo rbenv install 2.2.3
$ sudo rbenv global 2.2.3

### rbenvインストール完了

### bundlerインストール
$ sudo gem install bundler --no-ri --no-rdoc

### /var/tmp/hogeあたりにアプリ作ってく
$ sudo mkdir -p /var/tmp/hoge
$ cd /var/tmp/hoge
$ sudo bundle init

### Gemfile作成
$ sudo vim Gemfile
source "https://rubygems.org"bundle
gem 'sinatra'
gem 'unicorn'

### bundle install
$ sudo bundle install --path vendor/bundle
$ mkdir tmp

### unicorn設定
$ sudo vim unicorn.rb
# coding: utf-8
@path = "/var/tmp/hoge"
worker_processes 1 # CPUのコア数に揃える
working_directory @path
timeout 300
listen "#{@path}/tmp/unicorn.sock", backlog: 1024
pid "#{@path}/tmp/unicorn.pid" # pidを保存するファイル

# logを保存するファイル
stderr_path "#{@path}/tmp/unicorn.stderr.log"
stdout_path "#{@path}/tmp/unicorn.stdout.log"
preload_app true

### アプリの内容
$ sudo vim /var/tmp/hoge/config.ru
require 'rubygems'
require 'sinatra/base'
class HelloApp < Sinatra::Base
  get '/' do
    'dev1004'
  end
end
run HelloApp

### 起動
$ sudo bundle exec unicorn -E production -c unicorn.rb -D
AP側のnginx設定
dev1004,1005,1006
### リポジトリ編集
$ sudo vim /etc/yum.repo.d/nginx.repo
[nginx-main]
name=nginx mainline repo
baseurl=http://nginx.org/packages/mainline/centos/$releasever/$basearch/
gpgcheck=0
enabled=1

### nginxインストール
$ sudo yum -y --enablerepo=nginx-main install  nginx

### nginx.confの設定
$ sudo vim /etc/nginx/nginx.conf
worker_processes  1;
events {
    worker_connections  1024;
}

### default.confの設定
$ sudo vim /etc/nginx/conf.d/default.conf
worker_processes  1;
events {
    worker_connections  1024;
}
http {
    upstream app1 {
        server unix:/var/tmp/hoge/tmp/unicorn.sock;
    }

    server {
        listen       80;
        server_name  test.hoge.dev.jp
        location / {
            proxy_pass http://app1;   #unicornのupstreamを指定
            proxy_set_header Host $host;
        }
    }

### パーミッション変更
$ sudo chown nginx:nginx -R /var/tmp/hoge

### nginx再起動
$ sudo service nginx restart