Kubernetesにはとっても便利な Dashboard の機能があります。

KubernetesのフルマネージドサービスであるContainer Engineでももちろん確認できます。
この記事では、Container Engineを操作する時によく利用する Cloud Shell から、Kubernetes Dashboardを確認する方法を説明します。
credential取得コマンドの表示
Cloud ShellからContainer Engine上のNodeにアクセスする場合、最初にCredentialを取得します。
Container Engineの場合は、 gcloud command を利用して簡単に取得できます。
commandの内容はContainer EngineのConsoleで表示してくれます。


Cloud Shell上でkubectl proxyを起動する
credentialを取得してから、 kubectl proxy を起動します。
kubectl proxy のデフォルトポートは 8001 になっていますが、Cloud Shellからは8001は見れないので、 --port 8081 を付けて起動するポートを変更します。
gcloud container clusters get-credentials {your Container Engine Node Name} \
    --zone {your Container Engine Node Zone} --project {your project ID}

kubectl proxy --port 8081
実際実行したShell

Webプレビューの表示
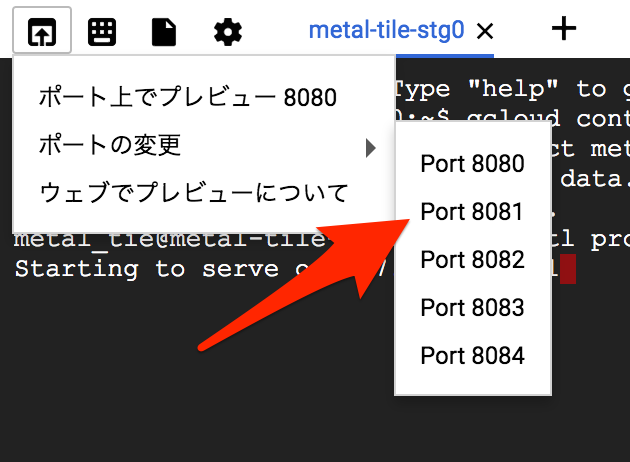
Cloud Shell上の左上のメニューから、Port 8081へのアクセスを行います。

Port 8081へアクセスすると、以下のような画面が表示されます。

後は、URLを https://8081-dot-XXXXXX-dot-devshell.appspot.com/ui/ に変更すれば、Dashboardが表示されます。
おわり
KubernetesのDashboardはとっても便利です。
Docker Imageを変更したり、Podの数を変更するのも、Podのログを確認するのもチョイなのです。
Deploymentを作ってみたけど、ひたすらPodがCrashしてる!みたいな時も、Podのログを見れば、なぜCrashしてるのかが分かります。
Container Engineを利用する場合は、活用していきたいですね!