はじめに
こんにちは。123D Designマスター(D言語くん部門)の @simd_nyan です。
今日はstl2povでSTLファイルを変換し、POV-Rayでレンダリングする方法についてまとめます。
POV-Rayとは
OSSの3Dレンダリングエンジンです。3DCGをスクリプトで書くという特徴があります。
古くからあるソフトウェアですが、今でも高校や大学の授業で使われているそうです。
py-stl / stl2pov
その名の通り、STLファイルをPOV-Rayで使えるファイルに変換するPythonのスクリプトです。
C言語で実装されたものもダウンロードできます。環境に応じて使い分けて下さい。
使い方
変換
stl2pov d-man.stl
-2オプションでmesh2オブジェクトに変換できます。
stl2pov -2 d-man.stl
123D Designが出力するSTLファイルはオブジェクト名がasciiなので、出力されるmeshオブジェクト名がm_asciiになります。また、cornell.povに降臨させるとオブジェクトが反転します。
不便なのでスクリプトを書き換えます。
--- stl2pov.py.org
+++ stl2pov.py
@@ -38,29 +38,29 @@
     print ver
     print "Usage: stl2pov infile [outfile]"

-def mesh1(s):
+def mesh1(s, name):
     '''Returns a string containing the Surface s as a POV-ray mesh object.'''
-    ms = "# declare m_{} = mesh {{\n".format(s.name)
+    ms = "# declare {} = mesh {{\n".format(name)
     sot = "  triangle {{ // #{}\n"
     fc = "    <{1}, {0}, {2}>,\n"
     fct = "    <{1}, {0}, {2}>\n"
     for n, f in enumerate(s.facets):
         ms += sot.format(n+1)
-        ms += fc.format(f.v[0].x, f.v[0].y, f.v[0].z)
-        ms += fc.format(f.v[1].x, f.v[1].y, f.v[1].z)
-        ms += fct.format(f.v[2].x, f.v[2].y, f.v[2].z)
+        ms += fc.format(-f.v[0].x, f.v[0].y, f.v[0].z)
+        ms += fc.format(-f.v[1].x, f.v[1].y, f.v[1].z)
+        ms += fct.format(-f.v[2].x, f.v[2].y, f.v[2].z)
         ms += "  }\n"
     ms += "}\n"
     return ms

-def mesh2(s):
+def mesh2(s, name):
     '''Returns a string containing the Surface s as a POV-ray mesh2 object.'''
-    ms = "# declare m_{} = mesh2 {{\n".format(s.name)
+    ms = "# declare {} = mesh2 {{\n".format(name)
     numkeys = [(i, k) for (i, k) in enumerate(s.vertices.keys())]
     ms += '  vertex_vectors {\n'
     ms += '    {},\n'.format(len(numkeys))
     for (i, k) in numkeys:
-        ms += '    <{1}, {0}, {2}>,'.format(s.vertices[k].x, s.vertices[k].y,
+        ms += '    <{1}, {0}, {2}>,'.format(-s.vertices[k].x, s.vertices[k].y,
                                           s.vertices[k].z)
         ms += ' // vertex #{}\n'.format(i)
     i = ms.rindex(', //')
@@ -103,10 +103,11 @@
 outs += "// The abovementioned coordinates are in the STL file's right-handed\n"
 outs += "// coordinate system, while POV-ray uses a left-handed system.\n"
 outs += "// You should swap the x and y above to get POV-ray coordinates.\n"
+object_name = os.path.splitext(os.path.basename(sys.argv[1]))[0]
 if oldmesh:
-    outs += mesh1(stlobj)
+    outs += mesh1(stlobj, object_name)
 else:
-    outs += mesh2(stlobj)
+    outs += mesh2(stlobj, object_name)
 # Write output to file.
 if len(sys.argv) < 3:
     # Derive output name
レンダリング
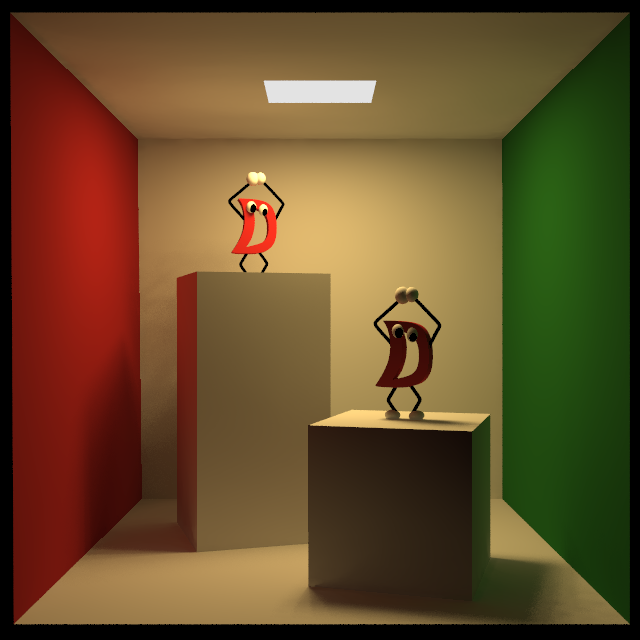
シーンファイルの中でオブジェクトをインクルードし、任意の場所に配置してレンダリングします。
おわりに
stl2povによるSTLファイルの変換方法と、POV-Rayでレンダリングする方法についてまとめました。
最新の3DCGソフトには敵わないものの、POV-Rayは様々な使い方ができるので、もう少し記事を書く予定です。