アプリを作っていてtextFieldやtextViewを使って文字を入力させたいという場面は多々でてくると思います。しかし、画面の下の方に設置した時にキーボードで隠れてしまうといった経験はないでしょうか?
具体的にはこんな感じです。今回はtextFieldを例にとってみていきます。
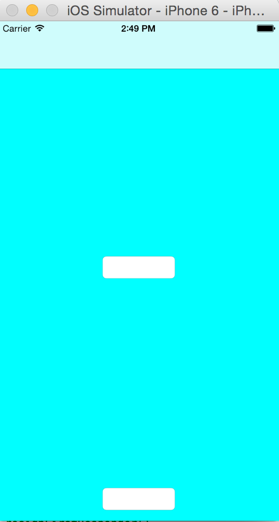
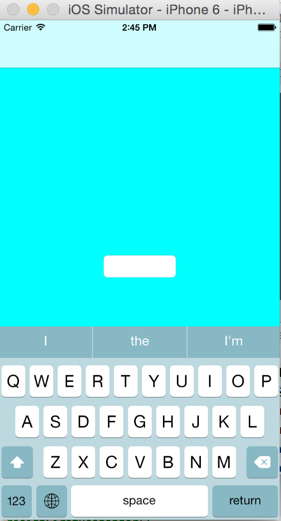
textField(もしくはtextView)が隠れてしまい文字が見えません。
この問題を解決するために使うのがNSNotificationCenterクラスです。
NSNotificationCenterクラスとは
このクラスが実はかなり便利なんです!クラス間のメソッドや変数の受け渡しにdelegateを使っていたと思いますが、NSNotificationCenterもそれと同じようなことをやってくれます。(具体的には少し違うので後で説明します)
こちらのサイトがイメージがつきやすいので図のところを見てまたここに戻ってきてください。
(http://iphone-tora.sakura.ne.jp/nsnotificationcenter.html)
NSNotificationCenterはswiftがデフォルトで用意してくれているクラスで、notificationとは通知という意味です。上記のサイトの図のようにある1つのクラスからNSNotificationCenterに登録しておくと他のクラスで何らかの処理が起こった際にNSNotificationCenterが通知を受け取り、それを登録元のクラスに教えてくれます。NotificationCenterは通知観測センターみたいなものです。これにより、他のクラスで処理が行われた時に処理を実行することができるようになります。
説明の中でNSNotificationCenterに登録したクラスを「登録元クラス」、NSNotificationCenterのことを「観測センター」と呼ぶことにします。
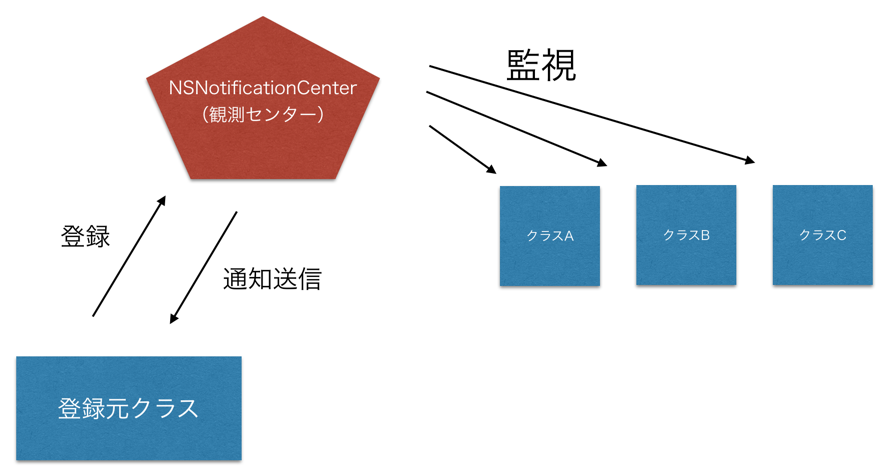
今回の例で言うと
登録元クラス・・ViewControllerクラス
観測センター・・NSNotificationCenter
監視されているオブジェクト・・キーボードの表示/非表示を管理するオブジェクト
では順を追って設定していこうと思います。
1. NSNotificationCenterに登録する
2. NSNotificationCenterに通知の依頼をする
3. NSNotificationCenterから通知を受け取る
4. NSNotificationCenterを解除する
1.NSNotificationCenterに登録する
まず初めにNSNotificationCenterクラス(観測センター)に自分自身(ViewController)を登録しないといけません
let notificationCenter = NSNotificationCenter.defaultCenter()
NSNotificationCenterクラスのインスタンスを生成しました。NSNotificationCenterクラスはシングルトンなのでどのクラスからも同じインスタンスを生成することができます。(ここでシングルトンについては詳しく説明しません)
これで、観測センターに登録できたので、ViewControllerは通知を受け取ることができるようになりました。
2.NSNotificationCenterに通知の依頼をする
観測センターに登録はしましたが、今のままではどの処理が行われた時に通知を登録元クラスに送信すればいいのか観測センターはわかりません。ここで使うのがaddObserverメソッドです。
notificationCenter.addObserver(self, selector: "handleKeyboardWillShowNotification:", name: UIKeyboardWillShowNotification, object: nil)

notificationCenter.addObserver(self, selector: "handleKeyboardWillHideNotification:", name: UIKeyboardWillHideNotification, object: nil)
addObserverメソッドにより通知の設定を行います。addObserverメソッドは引数を4つとります。
第一引数・・通知を受け取るクラスのオブジェクト。ここでは観測センター自身を指します(self)
第二引数・・selectorキーに対して通知を受け取った際に呼び出すメソッドを記述します。メソッドの中身は後述します。
第三引数・・nameキーに対して通知の種類を表す名前がはいります。nameキーに書いてある名前の通知を登録元のクラスに通知してselectorキーで指定したメソッドが動くといった具合です
第四引数・・観測センターが監視しているオブジェクトを指定します。ある特定のオブジェクトからしか通知を受けたくない場合にはそれを指定し、特に指定はなくすべてから通知を受け取る場合にはnilを指定します。
これでどの通知が来た時にどの処理を行うかを観測センター(NSNotificationCenterクラスのインスタンス)が認識できるようになりました。
3.NotificationCenterから通知を受け取った際のメソッド定義
次に通知を受けとった際に呼び出すメソッドを定義します。今回はtextFieldがキーボードに隠れてしまうのが問題だったので、handleKeyboardWillShowNotificationメソッドにはキーボード分だけ画面が上にスクロールする処理を書き、handleKeyboardWillHideNotificationメソッドには元に戻す処理を書きます。
   //キーボードが表示された時
    func handleKeyboardWillShowNotification(notification: NSNotification) {
        //郵便入れみたいなもの
        let userInfo = notification.userInfo!
        //キーボードの大きさを取得
        let keyboardRect = (userInfo[UIKeyboardFrameEndUserInfoKey] as! NSValue).CGRectValue()
    // 画面のサイズを取得
        let myBoundSize: CGSize = UIScreen.mainScreen().bounds.size
        // ViewControllerを基準にtextFieldの下辺までの距離を取得
        var txtLimit = txtActiveField.frame.origin.y + txtActiveField.frame.height + 8.0
    // ViewControllerの高さからキーボードの高さを引いた差分を取得
        let kbdLimit = myBoundSize.height - keyboardRect.size.height

    // こうすることで高さを確認できる(なくてもいい)
        println("テキストフィールドの下辺:(\(txtLimit))")
        println("キーボードの上辺:(\(kbdLimit))")

        //スクロールビューの移動距離設定
        if txtLimit >= kbdLimit {
            addScroll.contentOffset.y = txtLimit - kbdLimit
        }
  }
    func handleKeyboardWillHideNotification(notification: NSNotification) {
        addScroll.contentOffset.y = 0
    }
4.NotificationCenterを解除する
NotificationCenterに登録したままにせずに処理が終わったら解除してやります。
    override func viewDidDisappear(animated: Bool) {
        super.viewDidDisappear(animated)

        let notificationCenter = NSNotificationCenter.defaultCenter()
        notificationCenter.removeObserver(self, name: UIKeyboardWillShowNotification, object: nil)
        notificationCenter.removeObserver(self, name: UIKeyboardWillShowNotification, object: nil)
    }
これでNotificationCenterを解除することができました。
最終的なコードは以下のようになります。
import UIKit

class ViewController: UIViewController, UITextFieldDelegate {
    @IBOutlet weak var addScroll: UIScrollView! //スクロールビュー関連付け
    @IBOutlet weak var text1: UITextField! //上部のtextField関連付け
    @IBOutlet weak var text2: UITextField! //下部のtextField関連付け

    var txtActiveField: UITextField! //編集後のtextFieldを新しく格納する変数を定義


    override func viewDidLoad() {
        super.viewDidLoad()

        // Do any additional setup after loading the view, typically from a nib.
        text1.delegate = self
        text2.delegate = self //デリゲート設定(このdelegateは画面もしくはreturnをタップした時にキーボードを閉じる処理を扱うのに必要なもので、NSNotificationCenterを使うために必要としているものではない。)
        // Do any additional setup after loading the view, typically from a nib.
    }
  // Viewが画面に表示される度に呼ばれるメソッド
    override func viewWillAppear(animated: Bool) {
    // NSNotificationCenterへの登録処理
        let notificationCenter = NSNotificationCenter.defaultCenter()
        notificationCenter.addObserver(self, selector: "handleKeyboardWillShowNotification:", name: UIKeyboardWillShowNotification, object: nil)
        notificationCenter.addObserver(self, selector: "handleKeyboardWillHideNotification:", name: UIKeyboardWillHideNotification, object: nil)
    }
    // Viewが非表示になるたびに呼び出されるメソッド
    override func viewDidDisappear(animated: Bool) {
        super.viewDidDisappear(animated)

    // NSNotificationCenterの解除処理
        let notificationCenter = NSNotificationCenter.defaultCenter()
        notificationCenter.removeObserver(self, name: UIKeyboardWillShowNotification, object: nil)
        notificationCenter.removeObserver(self, name: UIKeyboardWillShowNotification, object: nil)
    }
  //画面がタップされた際にキーボードを閉じる処理
    func tapGesture(sender: UITapGestureRecognizer) {
        text1.resignFirstResponder()
        text2.resignFirstResponder()

    }
  //キーボードのreturnが押された際にキーボードを閉じる処理
    func textFieldShouldReturn(textField: UITextField) -> Bool {
        text1.resignFirstResponder()
        text2.resignFirstResponder()
        //        itemMemo.resignFirstResponder()
        return true
    }
  //textFieldを編集する際に行われる処理
    func textFieldShouldBeginEditing(textField: UITextField) -> Bool {
        txtActiveField = textField // 編集しているtextFieldを新しいtextField型の変数に代入する
        return true
    }

    //キーボードが表示された時
    func handleKeyboardWillShowNotification(notification: NSNotification) {
        //郵便入れみたいなもの
        let userInfo = notification.userInfo!
        //キーボードの大きさを取得
        let keyboardRect = (userInfo[UIKeyboardFrameEndUserInfoKey] as! NSValue).CGRectValue()
    // 画面のサイズを取得
        let myBoundSize: CGSize = UIScreen.mainScreen().bounds.size
        // ViewControllerを基準にtextFieldの下辺までの距離を取得
        var txtLimit = txtActiveField.frame.origin.y + txtActiveField.frame.height + 8.0
    // ViewControllerの高さからキーボードの高さを引いた差分を取得
        let kbdLimit = myBoundSize.height - keyboardRect.size.height

    // こうすることで高さを確認できる(なくてもいい)
        println("テキストフィールドの下辺:(\(txtLimit))")
        println("キーボードの上辺:(\(kbdLimit))")

        //スクロールビューの移動距離設定
        if txtLimit >= kbdLimit {
            addScroll.contentOffset.y = txtLimit - kbdLimit
        }
    }

    //ずらした分を戻す処理
    func handleKeyboardWillHideNotification(notification: NSNotification) {
        addScroll.contentOffset.y = 0
    }
}
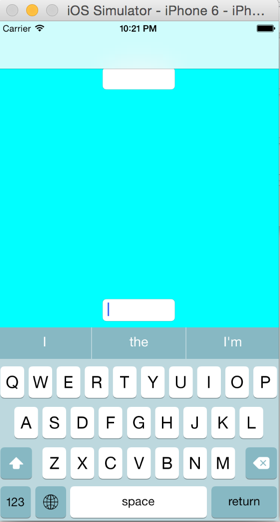
すると、キーボードが出た際にtextFieldが上にスクロールされて、隠れなくなります!
今回はtextFieldを例として扱いましたが、もちろんtextViewを扱いたい場合はtextFieldになっているところをtextViewに変えることで同じ挙動を得ることができます。
最後に、、、
NSNotificationCenterとdelegateの違い
NSNotificationCenterとdelegateは通知という仕組みを使うという点では共通しています。あるオブジェクト(呼び出し元)があるオブジェクト(呼び出し先)のメソッドを呼び出すことができる、つまりクラス間での処理を簡単に行うことができます。
主たる違いは呼び出し元と呼び出し先の関係で、以下のような関係が成り立っています
delegate・・・1対1
NSNotificationCenter・・・多対多
delegateはあるクラスの1つのオブジェクトと他のクラスの1つのオブジェクト間でしか通知の受け渡しができません。
一方でNSNotificationCenterはシングルトンなのでどのクラスでも同じオブジェクトが生成することができ、かつ1つのオブジェクトは多数のオブジェクトから通知を受け取ることができるます。つまり多対多の関係にあります。
以上になります。