今日はReact NativeのコードとiOS側のネイティブコードの連携を説明します。基本的なマクロはすでに定義されているので、それらを使って非同期で受け渡しをするイメージになります。
1) Nativeコードの作成
react-native init後にXcodeから.xprojファイルを読み込んだ後に、XcodeからCocoa Touch Classのファイルを作成します。(下図:File->New->File)
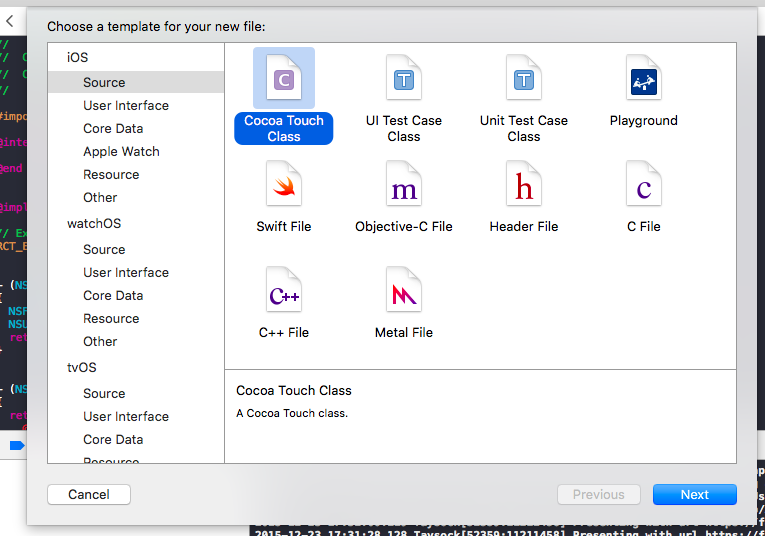
ファイル名以外は後で上書きするのでSubclassも適当に選んでも大丈夫です。今回はSafariViewControllerを使いたいと思うので、ファイル名をMySafariViewControllerにして、MySafariViewController.m, MySafariViewController.hができてることを確認します。
2) Macroを使う
MySafariViewController.mを下記のように変更。
#import "MySafariViewController.h"

@interface MySafariViewController ()

@end

@implementation MySafariViewController

// Expose this module to the React Native bridge
RCT_EXPORT_MODULE()

RCT_EXPORT_METHOD(presentSafari:(NSString *)url) {
  NSLog(@"Presenting with url %@", url);

  SFSafariViewController *safariViewController = [[SFSafariViewController alloc]
    initWithURL:[NSURL URLWithString:url]
    entersReaderIfAvailable:YES];

  safariViewController.delegate = self;

  dispatch_async(dispatch_get_main_queue(), ^{
    UIViewController *rootViewController = [[
      [UIApplication sharedApplication] keyWindow] rootViewController];

    [rootViewController presentViewController:safariViewController animated:YES completion: nil];
  });
}

-(void) safariViewControllerDidFinish:(nonnull SFSafariViewController *)controller {
  UIViewController *rootViewController = [
    [[UIApplication sharedApplication] keyWindow] rootViewController];

  [rootViewController dismissViewControllerAnimated:YES completion:nil];
}

@end
同様にMySafariViewController.hも下記のようにします。
#import <UIKit/UIKit.h>
#import <RCTBridge.h>
#import <SafariServices/SafariServices.h>

@interface MySafariViewController : NSObject <RCTBridgeModule, SFSafariViewControllerDelegate>

@end
これで準備が整いました。
3) JSから呼ぶ
MySafariViewController.mファイルにpresentSafariという関数をRCT_EXPORT_METHODというマクロ経由で定義しています。これによってJSファイル側から呼ぶことができます。このSafariViewControllerの例では、presetViewControllerを置き換えてます。
'use strict';

var React = require('react-native');
var {
  AppRegistry,
  StyleSheet,
  Text,
  View,
  TouchableHighlight,
} = React;

var Taysock = React.createClass({

  _openSafari(url) {
    const {MySafariViewController} = require('NativeModules')
    MySafariViewController.presentSafari(url)
  },

  render: function() {
    return (
      <View style={styles.container}>

        <TouchableHighlight onPress={() => this._openSafari("https://facebook.github.io/react-native/")}>
          <Text>Click for RN</Text>
        </TouchableHighlight>
      </View>
    );
  }
});

var styles = StyleSheet.create({
  container: {
    flex: 1,
    justifyContent: 'center',
    alignItems: 'center',
    backgroundColor: '#F5FCFF',
  },
  welcome: {
    fontSize: 20,
    textAlign: 'center',
    margin: 10,
  },
  instructions: {
    textAlign: 'center',
    color: '#333333',
    marginBottom: 5,
  },
});

AppRegistry.registerComponent('Taysock', () => Taysock);
基本的にGetterのようにネイティブの変数を取るには、非同期でcallbackもしくはpromiseを使うことになります。例えば、app groupのファイルパスを取ってくるときは、callbackで渡して、
RCT_EXPORT_METHOD(getAppGroupPath:(NSString *) appGroupId :(RCTResponseSenderBlock)callback) {
  NSFileManager *fileManager = [NSFileManager defaultManager];
  NSURL *destURL = [fileManager containerURLForSecurityApplicationGroupIdentifier: appGroupId];
  callback(@[[NSNull null], [destURL absoluteString]]); ;
}
それをJS側から呼びます。
MySafariViewController.getAppGroupPath("group.com.the.id", (error, path) => {
   if (error) {
     console.error(error);
   } else {
     console.log('here:'+path);
   }
})
Summary
いかがでしょうか。すごく簡単にネイティブと連携ができるのがわかったと思います。他のハイブリッド開発を経験したことがないのですが、podcast等の話を聞く所、他のに比べて簡単だという話です。この辺の組み込みのしやすさもFacebookのメインアプリにもReact Nativeのコードが入れられている理由であると思います。
今回初めてobject-cを書きました。そこが一番大変でした。