Abstract
Lambda と Kinesis を使って、LED マトリックスを搭載したインテリジェントなTシャツを作ります。前編では Tシャツの作り方を説明します。
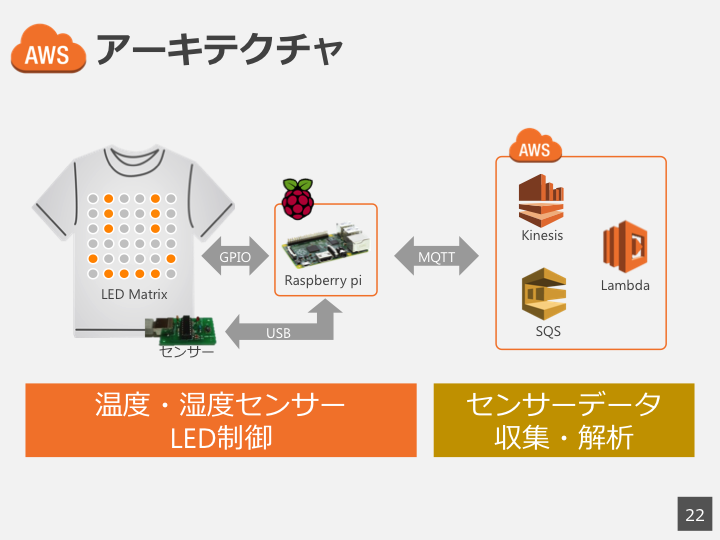
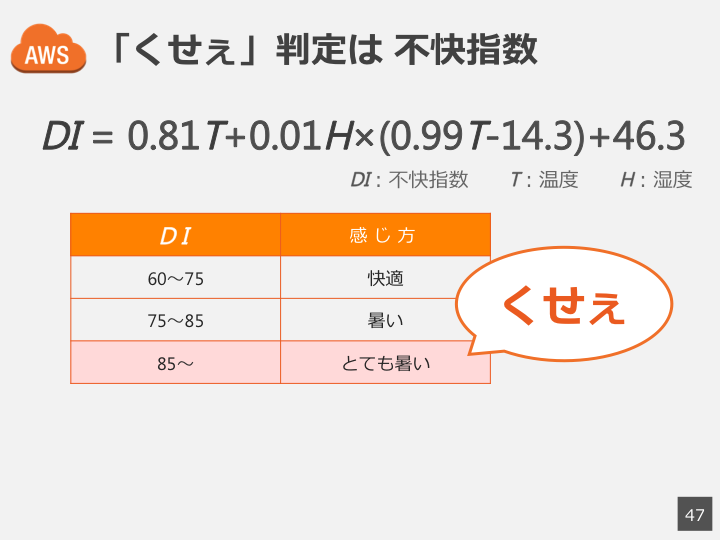
Tシャツは、MQTT経由でAWS上に構築したサービスと連動しており、温度/湿度センサーから収集したデータを元に不快指数を計算し、ある条件に合致すると LED マトリックスにメッセージを送信し表示します。
不快指数が85以上の場合には、Tシャツが暑く蒸している状態ですので、「くせぇ」とメッセージを表示したいと思います。
それでは、Tシャツの作り方を説明していきます。
Raspberry Pi Type B+
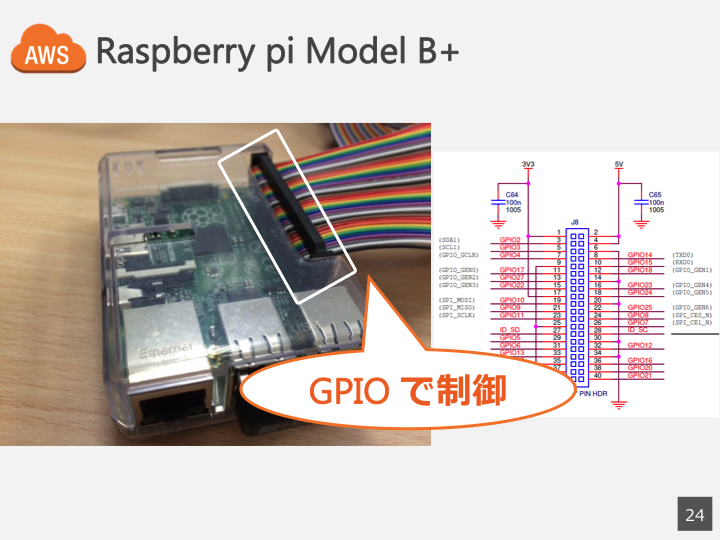
LED マトリックスと 温度/湿度センサーの制御には Raspberry Pi を利用します。Raspberry Pi Type B+ では 40 pin の IO が利用できます。LED は GPIO 経由で、温度/湿度センサーは USB 経由で接続しました。Raspberry Pi は 5000 円程度で売っています。一家に一台あると便利ですね(*´Д`)
Raspberry Pi
LED Matrix パーツ
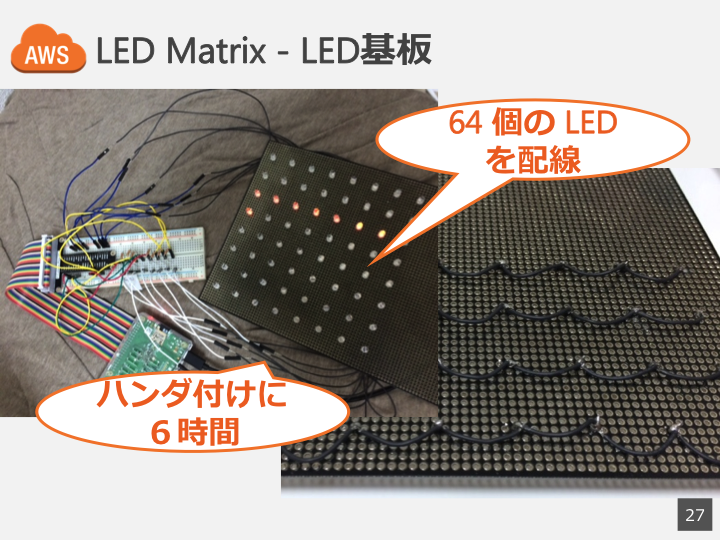
LED マトリックスは 64 個( 8x8 )の LED が接続されており GPIO 経由で Raspberry Pi から制御します。Dynamic 点灯という手法を利用することで、GPIO 16 pin で 64 個の LED を簡単に制御することができます。
今回は、LED 64 個をひとつずつ基板にハンダ付けしました。フレキシブル基板を利用するとTシャツに設置した時にも違和感が少ないかと思います。また簡単にハサミでカットできるのも良い点です。
フレキシブル基板
配線自体は秋月電子で販売されているデバイスと同様ですので、以下の回路図を参考にしてハンダ付けすれば難なく実装できると思います。ただし非常に手間と時間がかかりますので忍耐あるのみです。
秋月電子 LED Matrix
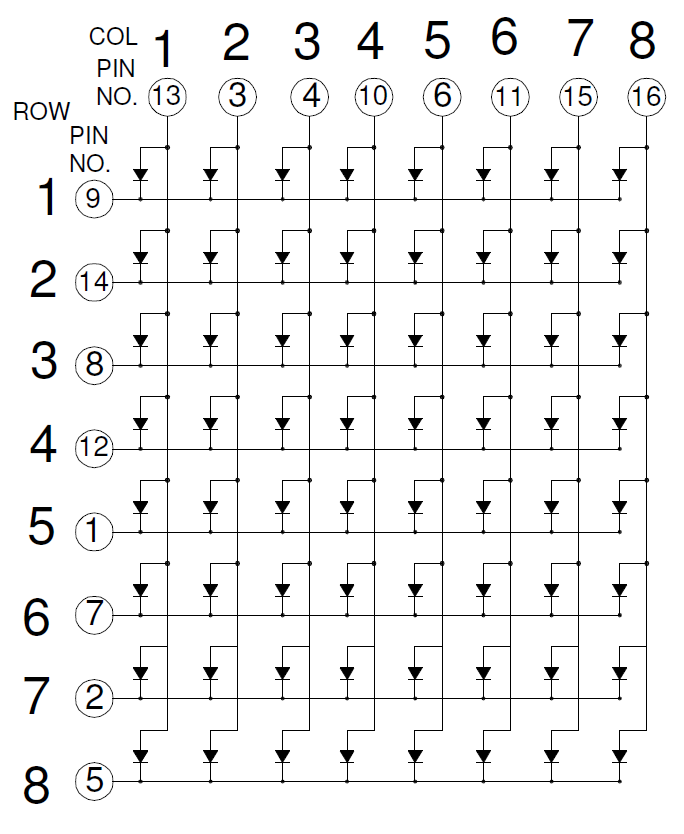
上記の回路図を参考にすると、LED のアノード(回路図上 13,3,4,10,6,11,15,16)とカソード(回路図左 9,14,8,12,1,7,2,5)の計 16 pin を Raspberry pi の GPIO に接続することになります。GPIO は 3.3 V の出力がありますので、LED の電流を換算してだいたい 300 Ω の抵抗を直接に接続します。
GPIO (19, 13, 16, 5, 22, 27, 17, 4) → R(300Ω)x8 → アノード(回路図上 13, 3, 4, 10, 6, 11, 15, 16) → LEDx64 → カソード(回路図左 9, 14, 8, 12, 1, 7, 2, 5) → GPIO (18, 23, 24, 25, 12, 16, 20, 21)
ちなみに、 Raspberry pi と LED マトリックスの間はフラットケーブルで接続しました。フラットケーブルは、パーツショップでメートル単位で販売されています。Raspberry pi の GPIO コネクタが 40 pin なので、40 芯のフラットケーブルで接続すると便利です。
フラットケーブル本体
コネクタとフラットケーブルの圧着は専用機材があり高価ですが、万力などを使うと意外に簡単に圧着できます。私は割り箸で上から体重をかけて圧着しました。
フラットケーブルコネクタ
LED Matrix フォント
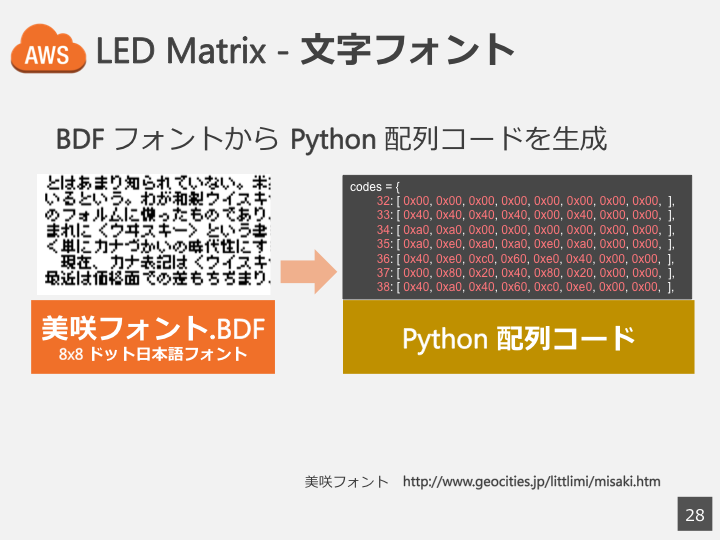
LED マトリックスに表示する文字は、8x8 のドットでの表示になります。自力で文字を表す行列を作ってドット表示させるのもひとつの手ですが、今回は美咲フォントという8ドットフォントを利用します。
美咲フォント
BDFファイルをダウンロード してPythonコードに変換します。以下のように BDF のフォーマットで変換します。
import sys
print 'codes = {'
data = u''
for line in sys.stdin:
	items = line[0:-1].split(' ')
	if items[0] == 'STARTCHAR':
		code_char = items[1]
	if items[0] == 'ENCODING':
		code = items[1]
		data = u''
# ・・・・・つづく
で、このあたりで気づいたんですが、このままだと JIS 配列のコード一覧が出力されるので、UTF8 配列に変換する必要があります。が、時間がなかったので、英数字、ひらがな、カタカナのみに対応(漢字は非対応)することにして、エンジニアの最終奥義 Excel を使って UTF8 配列に変換しました。変換途中はグダグダだったので、出力結果のフォント変換コードだけ置いておきます。
codes = {
        32: [ 0x00, 0x00, 0x00, 0x00, 0x00, 0x00, 0x00, 0x00,  ],
        33: [ 0x40, 0x40, 0x40, 0x40, 0x00, 0x40, 0x00, 0x00,  ],
        34: [ 0xa0, 0xa0, 0x00, 0x00, 0x00, 0x00, 0x00, 0x00,  ],
        35: [ 0xa0, 0xe0, 0xa0, 0xa0, 0xe0, 0xa0, 0x00, 0x00,  ],
        36: [ 0x40, 0xe0, 0xc0, 0x60, 0xe0, 0x40, 0x00, 0x00,  ],
        37: [ 0x00, 0x80, 0x20, 0x40, 0x80, 0x20, 0x00, 0x00,  ],
# 〜〜〜〜〜
        8736: [ 0x00, 0x02, 0x04, 0x08, 0x10, 0x20, 0x7e, 0x00,  ],
        8735: [ 0x00, 0x40, 0x40, 0x40, 0x40, 0x40, 0x7e, 0x00,  ],
        8895: [ 0x00, 0x02, 0x06, 0x0a, 0x12, 0x22, 0x7e, 0x00,  ],
        8757: [ 0x00, 0x44, 0x00, 0x00, 0x00, 0x10, 0x00, 0x00,  ],
        8745: [ 0x00, 0x3c, 0x42, 0x42, 0x42, 0x42, 0x42, 0x00,  ],
        8746: [ 0x42, 0x42, 0x42, 0x42, 0x42, 0x3c, 0x00, 0x00,  ],
}
LED Matrix 表示プログラム
以下のコードで GPIO で LED マトリックスにメッセージを表示できます。LED マトリックスの原理は以下の動画が参考になります。Python からの GPIO 制御も理解できると思います。
Raspberry Pi Project: The LED Matrix
# -*- coding: utf-8 -*-
import RPi.GPIO as GPIO
import time
import font as font
import os
import sys

###### GPIO Initialization #####
GPIO.cleanup()
GPIO.setmode(GPIO.BCM)

cathodes = [4,17,27,22,5,6,13,19]
anodes = [18,23,24,25,12,16,20,21]

for cathode in cathodes:
    GPIO.setup(cathode, GPIO.OUT)
    GPIO.output(cathode, 0)

for anode in anodes:
    GPIO.setup(anode, GPIO.OUT)
    GPIO.output(anode, 0)

###### Display message #####
def display_message(str):
    sleeptime = 0.001
    speed = 8
    half = 4
    full = 8
    matrix_height = 8
    matrix_width = 0

    for idx in range(len(str)):
        char_code = ord(str[idx])
        if char_code < 1000:
            matrix_width += half
        else:
            matrix_width += full

    matrixes = matrix_height*['']

    for idx in range(len(str)):
        char_code = ord(str[idx])
        if font.codes.has_key(char_code):
            hex_pattern = font.codes[char_code]
        else:
            hex_pattern = font.codes[9632]

        for n in range(matrix_height):
            if char_code < 1000:
                bits_str = format(hex_pattern[n]>>4, '04b')
            else:
                bits_str = '{0:08b}'.format(hex_pattern[n])
            bits_str = bits_str.replace('0', '.').replace('1', 'o')
            bits_str = bits_str.replace('.', '1').replace('o', '0')
            matrixes[n] += bits_str

    try:
        pattern = matrix_height*['']
        for cnt in range(len(matrixes[0])-matrix_height):

            for row_no in range(matrix_height):
                pattern[row_no] = matrixes[row_no][cnt:cnt+matrix_height]

            os.system('clear')
            print '\n'.join(pattern).replace('0', 'o').replace('1', ' ')

            for pause in range(speed):
                for i in range(8):
                    for j in range(8):
                        GPIO.output(cathodes[j], int(pattern[i][j]))

                    GPIO.output(anodes[i],1)
                    time.sleep(sleeptime)
                    GPIO.output(anodes[i],0)

    except KeyboardInterrupt:
        GPIO.cleanup()

##### main #####
str = u" ハローセカイ "
display_message(str)
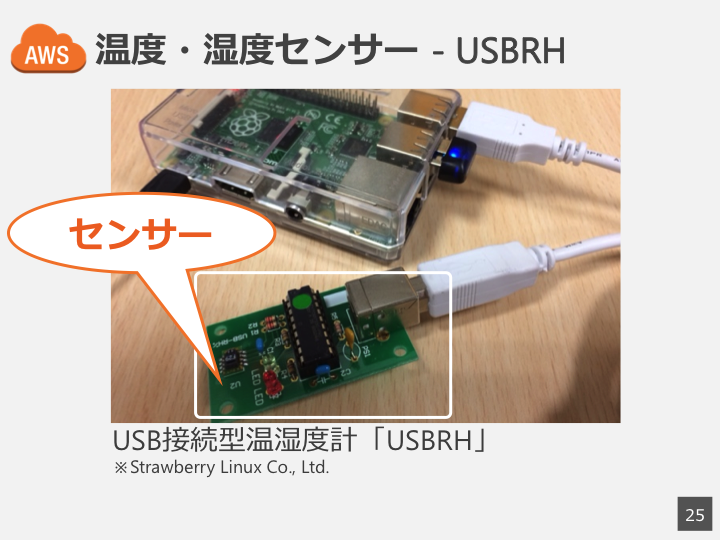
温度/湿度センサー
温度/湿度センサーには USBRH という Straberry Linux Co, Ltd. で販売されているものを利用しました。
https://strawberry-linux.com/catalog/items?code=52002
usbrh を実行すると以下のように、温度と湿度を取得できます。
$ sudo usbrh
$ 29.68 41.41
以下の記事を参考にすると、インストールや利用方法がわかると思います。
http://hitoriblog.com/?p=9835
http://www.infiniteloop.co.jp/blog/2013/02/raspberrypitem/
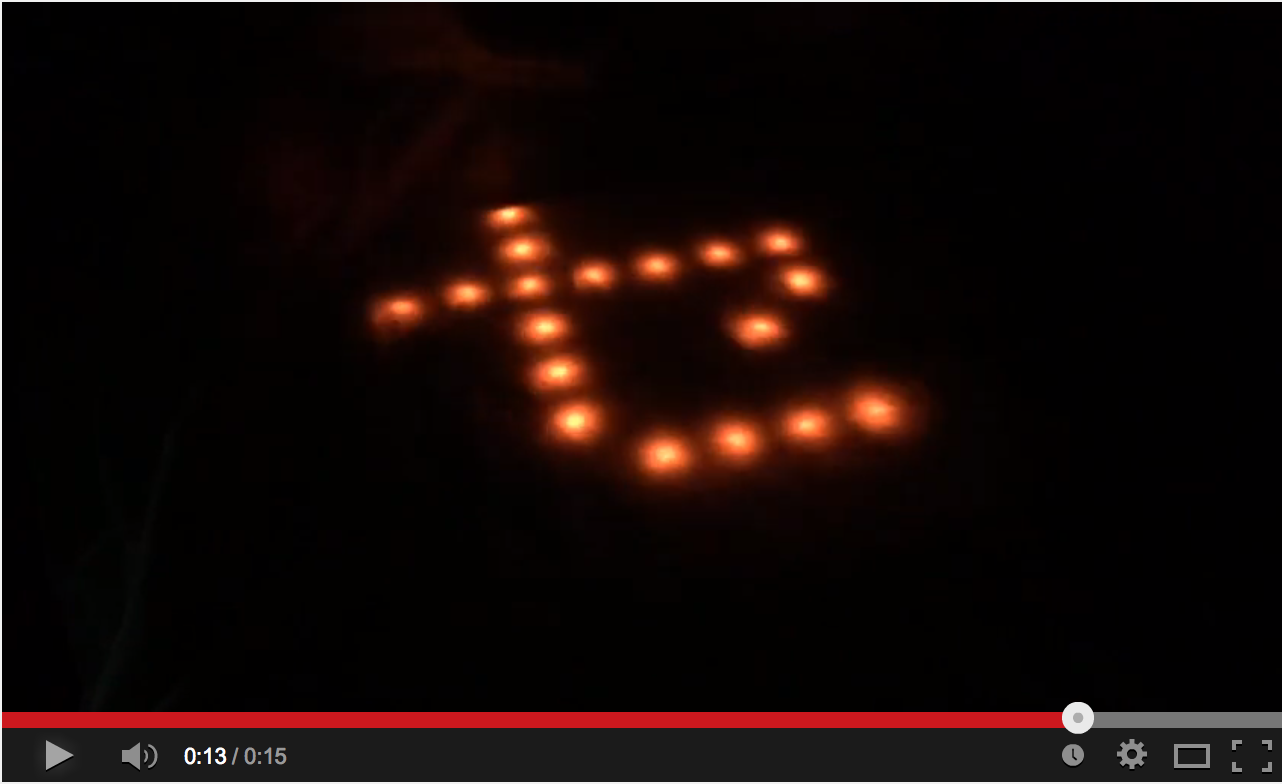
Tシャツのテスト
https://www.youtube.com/watch?v=YxEnnobXkWY
まとめ
Lambda アドベントカレンダー用の記事なんですが、まだ Lambda の話がでてきてませんね・・・力尽きたので後編でお会いしましょう。
免責
こちらは個人の意見で会社とは関係ありません。
