言語処理100本ノック 2015の挑戦記録です。環境はUbuntu 16.04 LTS + Python 3.5.2 :: Anaconda 4.1.1 (64-bit)です。過去のノックの一覧はこちらからどうぞ。
第6章: 英語テキストの処理
英語のテキスト(nlp.txt)に対して,以下の処理を実行せよ.
53. Tokenization
Stanford Core NLPを用い,入力テキストの解析結果をXML形式で得よ.また,このXMLファイルを読み込み,入力テキストを1行1単語の形式で出力せよ.
出来上がったコード:
# coding: utf-8
import os
import subprocess
import xml.etree.ElementTree as ET

fname = 'nlp.txt'
fname_parsed = 'nlp.txt.xml'


def parse_nlp():
	'''nlp.txtをStanford Core NLPで解析しxmlファイルへ出力
	すでに結果ファイルが存在する場合は実行しない
	'''
	if not os.path.exists(fname_parsed):

		# StanfordCoreNLP実行、標準エラーはparse.outへ出力
		subprocess.run(
			'java -cp "/usr/local/lib/stanford-corenlp-full-2016-10-31/*"'
			' -Xmx2g'
			' edu.stanford.nlp.pipeline.StanfordCoreNLP'
			' -annotators tokenize,ssplit,pos,lemma,ner,parse,dcoref'
			' -file ' + fname + ' 2>parse.out',
			shell=True,		# shellで実行
			check=True		# エラーチェックあり
		)


# nlp.txtを解析
parse_nlp()

# 解析結果のxmlをパース
root = ET.parse(fname_parsed)

# wordのみ取り出し
for word in root.iter('word'):
	print(word.text)
実行結果:
長いので先頭部分の抜粋です。
Natural
language
processing
From
Wikipedia
,
the
free
encyclopedia
Natural
language
processing
-LRB-
NLP
-RRB-
is
a
field
of
computer
science
,
artificial
intelligence
,
and
linguistics
concerned
with
the
interactions
between
computers
and
human
-LRB-
natural
-RRB-
languages
.
As
such
,
NLP
is
related
to
the
area
of
humani-computer
interaction
.
全体の結果はGitHubにアップしています。
なお、Stanford Core NLPの実行時は標準エラーに次のようなメッセージが出力されます。今回のプログラムではparse.outにリダイレクトさせました。
[main] INFO edu.stanford.nlp.pipeline.StanfordCoreNLP - Adding annotator tokenize
[main] INFO edu.stanford.nlp.pipeline.TokenizerAnnotator - No tokenizer type provided. Defaulting to PTBTokenizer.
[main] INFO edu.stanford.nlp.pipeline.StanfordCoreNLP - Adding annotator ssplit
[main] INFO edu.stanford.nlp.pipeline.StanfordCoreNLP - Adding annotator pos
[main] INFO edu.stanford.nlp.tagger.maxent.MaxentTagger - Reading POS tagger model from edu/stanford/nlp/models/pos-tagger/english-left3words/english-left3words-distsim.tagger ... done [2.6 sec].
[main] INFO edu.stanford.nlp.pipeline.StanfordCoreNLP - Adding annotator lemma
[main] INFO edu.stanford.nlp.pipeline.StanfordCoreNLP - Adding annotator ner
[main] INFO edu.stanford.nlp.ie.AbstractSequenceClassifier - Loading classifier from edu/stanford/nlp/models/ner/english.all.3class.distsim.crf.ser.gz ... done [5.3 sec].
[main] INFO edu.stanford.nlp.ie.AbstractSequenceClassifier - Loading classifier from edu/stanford/nlp/models/ner/english.muc.7class.distsim.crf.ser.gz ... done [3.7 sec].
[main] INFO edu.stanford.nlp.ie.AbstractSequenceClassifier - Loading classifier from edu/stanford/nlp/models/ner/english.conll.4class.distsim.crf.ser.gz ... done [4.9 sec].
[main] INFO edu.stanford.nlp.time.JollyDayHolidays - Initializing JollyDayHoliday for SUTime from classpath edu/stanford/nlp/models/sutime/jollyday/Holidays_sutime.xml as sutime.binder.1.
[main] INFO edu.stanford.nlp.ling.tokensregex.CoreMapExpressionExtractor - Reading TokensRegex rules from edu/stanford/nlp/models/sutime/defs.sutime.txt
[main] INFO edu.stanford.nlp.ling.tokensregex.CoreMapExpressionExtractor - Read 84 rules
[main] INFO edu.stanford.nlp.ling.tokensregex.CoreMapExpressionExtractor - Reading TokensRegex rules from edu/stanford/nlp/models/sutime/english.sutime.txt
[main] INFO edu.stanford.nlp.ling.tokensregex.CoreMapExpressionExtractor - Read 267 rules
[main] INFO edu.stanford.nlp.ling.tokensregex.CoreMapExpressionExtractor - Reading TokensRegex rules from edu/stanford/nlp/models/sutime/english.holidays.sutime.txt
[main] INFO edu.stanford.nlp.ling.tokensregex.CoreMapExpressionExtractor - Read 25 rules
[main] INFO edu.stanford.nlp.pipeline.StanfordCoreNLP - Adding annotator parse
[main] INFO edu.stanford.nlp.parser.common.ParserGrammar - Loading parser from serialized file edu/stanford/nlp/models/lexparser/englishPCFG.ser.gz ... done [0.6 sec].
[main] INFO edu.stanford.nlp.pipeline.StanfordCoreNLP - Adding annotator dcoref

Processing file /home/segavvy/ドキュメント/言語処理100本ノック2015/53/nlp.txt ... writing to /home/segavvy/ドキュメント/言語処理100本ノック2015/53/nlp.txt.xml
Annotating file /home/segavvy/ドキュメント/言語処理100本ノック2015/53/nlp.txt ... done [20.6 sec].

Annotation pipeline timing information:
TokenizerAnnotator: 0.2 sec.
WordsToSentencesAnnotator: 0.0 sec.
POSTaggerAnnotator: 0.2 sec.
MorphaAnnotator: 0.1 sec.
NERCombinerAnnotator: 2.6 sec.
ParserAnnotator: 12.8 sec.
DeterministicCorefAnnotator: 4.7 sec.
TOTAL: 20.6 sec. for 1452 tokens at 70.5 tokens/sec.
Pipeline setup: 27.2 sec.
Total time for StanfordCoreNLP pipeline: 48.1 sec.
特に気にする内容はなさそうです。
Stanford Core NLPのインストール
プログラミングの前に環境の構築です。
今回は問題で指示されている「Stanford Core NLP」が必要です。オフィシャルサイトはこちらです。
このサイトの「Programming languages and operating systems」のところを見るとJava 1.8以上が必要とありますので、Javaのインストールから始めます。
Java 1.8のインストール
私はOpenJDK 8のJREを入れました。これはapt一発でいけます。
segavvy@ubuntu:~$ sudo apt install openjdk-8-jre
[sudo] segavvy のパスワード:
パッケージリストを読み込んでいます... 完了
依存関係ツリーを作成しています
状態情報を読み取っています... 完了
以下の追加パッケージがインストールされます:
  ca-certificates-java fonts-dejavu-extra java-common libbonobo2-0
  libbonobo2-common libgif7 libgnome-2-0 libgnome2-common libgnomevfs2-0
  libgnomevfs2-common liborbit-2-0 openjdk-8-jre-headless
提案パッケージ:
  default-jre libbonobo2-bin desktop-base libgnomevfs2-bin libgnomevfs2-extra
  gamin | fam gnome-mime-data icedtea-8-plugin openjdk-8-jre-jamvm
  fonts-ipafont-gothic fonts-ipafont-mincho ttf-wqy-microhei | ttf-wqy-zenhei
  fonts-indic
以下のパッケージが新たにインストールされます:
  ca-certificates-java fonts-dejavu-extra java-common libbonobo2-0
  libbonobo2-common libgif7 libgnome-2-0 libgnome2-common libgnomevfs2-0
  libgnomevfs2-common liborbit-2-0 openjdk-8-jre openjdk-8-jre-headless
アップグレード: 0 個、新規インストール: 13 個、削除: 0 個、保留: 169 個。
29.5 MB のアーカイブを取得する必要があります。
この操作後に追加で 111 MB のディスク容量が消費されます。
続行しますか? [Y/n] y
取得:1 http://us.archive.ubuntu.com/ubuntu xenial/main amd64 libbonobo2-common all 2.32.1-3 [34.7 kB]
取得:2 http://us.archive.ubuntu.com/ubuntu xenial/main amd64 liborbit-2-0 amd64 1:2.14.19-1build1 [140 kB]
取得:3 http://us.archive.ubuntu.com/ubuntu xenial/main amd64 libbonobo2-0 amd64 2.32.1-3 [211 kB]
取得:4 http://us.archive.ubuntu.com/ubuntu xenial/main amd64 ca-certificates-java all 20160321 [12.9 kB]
取得:5 http://us.archive.ubuntu.com/ubuntu xenial/main amd64 java-common all 0.56ubuntu2 [7,742 B]
取得:6 http://us.archive.ubuntu.com/ubuntu xenial-updates/main amd64 openjdk-8-jre-headless amd64 8u111-b14-2ubuntu0.16.04.2 [26.9 MB]
(以下略)
終わったら、正しくインストールできているか、バージョン表示で確認してみます。
segavvy@ubuntu:~$ java -version
openjdk version "1.8.0_111"
OpenJDK Runtime Environment (build 1.8.0_111-8u111-b14-2ubuntu0.16.04.2-b14)
OpenJDK 64-Bit Server VM (build 25.111-b14, mixed mode)
大丈夫そうですね。
Stanford Core NLPのインストール
続いてStanford Core NLP本体です。
Stanford Core NLPはオフィシャルサイトのダウンロードページからダウンロードできます。zipファイルになっているのでダウンロードして展開します。
私はダウンロード後、/usr/local/lib/に展開しました。
segavvy@ubuntu:~/ダウンロード$ sudo unzip stanford-corenlp-full-2016-10-31.zip -d /usr/local/lib/
[sudo] segavvy のパスワード:
Archive:  stanford-corenlp-full-2016-10-31.zip
   creating: /usr/local/lib/stanford-corenlp-full-2016-10-31/
  inflating: /usr/local/lib/stanford-corenlp-full-2016-10-31/xom-1.2.10-src.jar
  inflating: /usr/local/lib/stanford-corenlp-full-2016-10-31/CoreNLP-to-HTML.xsl
  inflating: /usr/local/lib/stanford-corenlp-full-2016-10-31/README.txt
  inflating: /usr/local/lib/stanford-corenlp-full-2016-10-31/jollyday-0.4.9-sources.jar
 (以下略)
Pythonバインディングのインストールは見送り
Stanford Core NLPをPythonで直接使うためには、corenlp-pythonなどのライブラリが必要です。
ただ、今回の問題の指示は、解析結果のxmlファイルをまず作り、それを改めて読み込んでから処理しなさいという内容です。解析結果のXMLはStanford Core NLPのコマンドで作成できるため、どうやらPythonからStanford Core NLPを直接使う形は想定していないようです(もうインストールで苦労したくない私の希望的観測^^)。ということで、Stanford Core NLPのPythonバインディングは使わないことにしました。
そのため、今回の環境構築はこれで終わりです。
Stanford Core NLPを使った解析
上述のように、解析はコマンドでできます。今回は、Quick startで解説されているコマンドラインをほぼそのまま使ってxmlファイルを作りました。
なお、解析には少し時間がかかります。そのため、すでにnlp.txt.xmlが存在している場合は解析しないようにしました。解析をやり直したい場合は、nlp.txt.xmlを削除してから実行してください。
コマンドの実行
Pythonからのコマンドの実行は、subprocess.run()を使いました。
最初、shell=Trueの指定をしておらず「No such file or directory」のエラーになって悩みましたが、パスの解決はシェルがやっているため、シェル経由で実行しないとjavaの場所が分からないからですね、おそらく。
あと、check=Trueを指定すると、コマンドがエラーを返した時に例外が起きるようになるので、コマンドの実行失敗に気づけるようになります。
Stanford Core NLPのXML
今回出力されたXMLの先頭部分は、次のような感じになっています。
<?xml version="1.0" encoding="UTF-8"?>
<?xml-stylesheet href="CoreNLP-to-HTML.xsl" type="text/xsl"?>
<root>
  <document>
    <sentences>
      <sentence id="1">
        <tokens>
          <token id="1">
            <word>Natural</word>
            <lemma>natural</lemma>
            <CharacterOffsetBegin>0</CharacterOffsetBegin>
            <CharacterOffsetEnd>7</CharacterOffsetEnd>
            <POS>JJ</POS>
            <NER>O</NER>
            <Speaker>PER0</Speaker>
          </token>
          <token id="2">
            <word>language</word>
            <lemma>language</lemma>
            <CharacterOffsetBegin>8</CharacterOffsetBegin>
            <CharacterOffsetEnd>16</CharacterOffsetEnd>
            <POS>NN</POS>
            <NER>O</NER>
            <Speaker>PER0</Speaker>
          </token>
          <token id="3">
            <word>processing</word>
            <lemma>processing</lemma>
            <CharacterOffsetBegin>17</CharacterOffsetBegin>
            <CharacterOffsetEnd>27</CharacterOffsetEnd>
            <POS>NN</POS>
            <NER>O</NER>
            <Speaker>PER0</Speaker>
          </token>
ファイル全体はGitHubにアップしています。
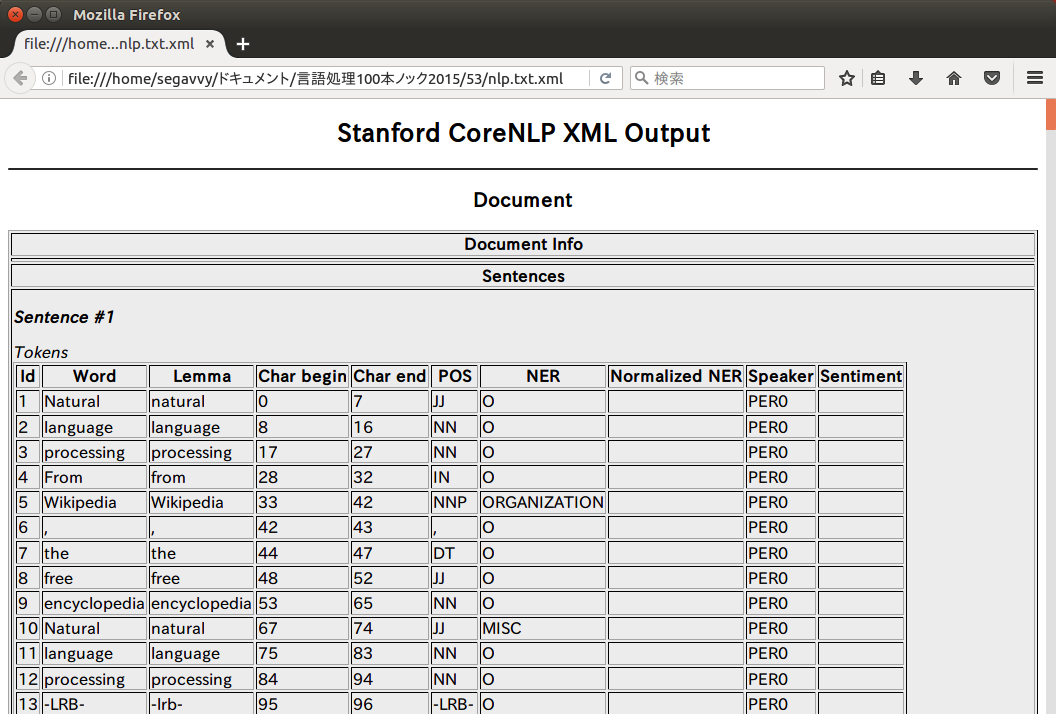
このXMLはXSLTスタイルシートに従ったフォーマットになっています。xmlファイルの先頭部分にあるCoreNLP-to-HTML.xslというのがそれで、Stanford Core NLPのインストール先(私の場合は/usr/local/lib/stanford-corenlp-full-2016-10-31)に入っています。
このファイルをnlp.txt.xmlと同じ位置に持ってきて、nlp.txt.xmlをブラウザで開くと、次のように中身が確認できるようになります。
今回の問題は単語を抽出すれば良いので、wordタグの内容を取り出せば良さそうです。
XMLの解析
XMLの解析はElementTree XML APIを使いました。ElementTree XML APIのチュートリアルを適当に真似して書いていますが、指定タグの中身を列挙するだけなら簡単です。
54本目のノックは以上です。誤りなどありましたら、ご指摘いただけますと幸いです。
実行結果には、100本ノックで用いるコーパス・データで配布されているデータの一部が含まれます。この第6章で用いているデータのライセンスはクリエイティブ・コモンズ 表示-継承 3.0 非移植(日本語訳)です。
