サービス概要
遠くの場所を、リアルタイムに360度体験できるサービスをなるべく簡単に作ります。
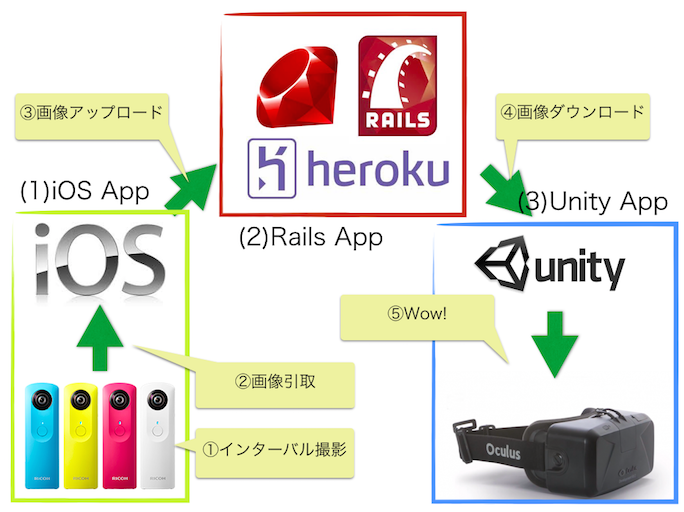
ゴールイメージ
- 作成したアプリの入ったiPhoneとTHETAを持って旅にでる
- 家で待っている人が、旅先の風景をOculusでリアルタイムに360°体験できる
使ったもの
Hardware
- THETA m15
- Oculus Rift DK2
- iPhone 6
- MacBook Air (13-inch, Mid 2012)
Software
- Ruby 2.1.5
- Rails 4.1.8
- Unity
- Xcode 6.1
サービス全体像
Ruby on Rails App - ローカル編
- はじめに (2)の Rails App を作ります。
- まずは、ローカルで写真のアップロード・ダウンロードができるAPIを作りましょう。
前提条件
- ruby がインストールされていること
- https://www.ruby-lang.org/ja/downloads/
- rbenv, rvm でインストールするのもオススメ
- rails がインストールされていること
- ruby インストール後に ↓
- $ gem install rails
APIの作成
- Railsアプリのひな形をつくります。DBは使用しないのでオプションを指定します。
- [app name]は任意の名前でOK
$ rails new -O --skip-active-record [app name] && cd [app name]
- コントローラを生成します。THETAの画像はEquirectangularという形式なので、名前はequiにします。
$ rails g controller equi
- URLルーティングの設定を行います
# config/routes.rb
Rails.application.routes.draw do
  resources :equi, only:[ :index, :create ]
URLルーティングの設定結果は下記のコマンドで確認できます。
$ rake routes
    Prefix Verb URI Pattern     Controller#Action
equi_index GET  /equi(.:format) equi#index
           POST /equi(.:format) equi#create
- 今回はなるべく簡単に作りたいので、CSRF対策が動かないようにします。
くわしくは http://qiita.com/naoty_k/items/b40b13735fd7f06f8cb7
# app/controller/application_controller.rb
class ApplicationController < ActionController::Base
  protect_from_forgery with: :exception
  skip_before_filter  :verify_authenticity_token
- コントローラに画像の保存、取得をおこなうコードを書きます。
# app/controllers/equi_controller.rb
class EquiController < ApplicationController
  def create
    file = params[:img]
    open("public/equi.jpg", 'wb') { |f|
      f.write(file.read)
    }
    render nothing: true, status: 200
  end
  def index
    send_data(
        File.read("public/equi.jpg"),
        type: 'application/octet-stream',
        filename: 'equi.jpg'
    )
  end
end
APIの動作確認
- Railsサーバを起動します。
$ rails server
=> Booting WEBrick
=> Rails 4.1.8 application starting in development on http://0.0.0.0:3000
=> Run `rails server -h` for more startup options
=> Notice: server is listening on all interfaces (0.0.0.0). Consider using 127.0.0.1 (--binding option)
=> Ctrl-C to shutdown server
[2014-12-10 16:40:51] INFO  WEBrick 1.3.1
[2014-12-10 16:40:51] INFO  ruby 2.1.5 (2014-11-13) [x86_64-darwin14.0]
[2014-12-10 16:40:51] INFO  WEBrick::HTTPServer#start: pid=33481 port=3000
- curlでローカルにある画像をアップロードします
- (THETAで撮影した画像では無くても、動作確認はできます)
$ curl -X POST -F img=@[path/to/theta-image.jpeg] http://localhost:3000/equi
- 同様にダウンロードします、アップロードした画像が開けばOK!
$ curl -o theta.jpg http://localhost:3000/equi && open theta.jpg
Ruby on Rails App - Heroku編
ローカルで動作したAPIをHerokuで動作させます。
前提条件
- Herokuのアカウント作成されていること https://signup.heroku.com/devcenter
- heroku toolbelt のインストールがされていること https://toolbelt.heroku.com/
Herokuにアプリをデプロイする
- herokuにログインを行います。アカウント登録している メールアドレス、パスワードを入力します。
$ heroku login
Enter your Heroku credentials.
Email:
Password (typing will be hidden):
Authentication successful.
- herokuにソースコードをデプロイするために gitリポジトリを作成し、コードを追加します。
$ git init

$ git add .

$ git commit -m "first commit."
master (root-commit) 9978625] first commit.
 62 files changed, 899 insertions(+)
...
- Heroku上にアプリを作成し、デプロイを行います。
- こちらの[app name]はURLにも使われるので、被りづらい素敵な名前を。
$ heroku apps:create [app name]
Creating [app name]... done, stack is cedar-14
https://[app name].herokuapp.com/ | https://git.heroku.com/[app name].git
Git remote heroku added

$ git push heroku master
Counting objects: 71, done.
…
remote: Verifying deploy... done.
To https://git.heroku.com/[app name].git
 * [new branch]      master -> master
デプロイしたAPIの動作確認
- ローカルで行った時と同様に、curlで確認します。
- URLは Heroku のものを指定します。
- 画像が開けば大成功です。
- (アップロードした画像はURLを知っていれば、誰でも見えるので要注意)
$ curl -X POST -F img=@[path/to/theta-image.jpeg] https://[app name].herokuapp.com/equi
 %

$ curl -o theta.jpg http://[app name].herokuapp.com/equi && open theta.jpg
つづき
次は THETAから画像を引き取って、APIにアップロードするところをiOSでつくります。