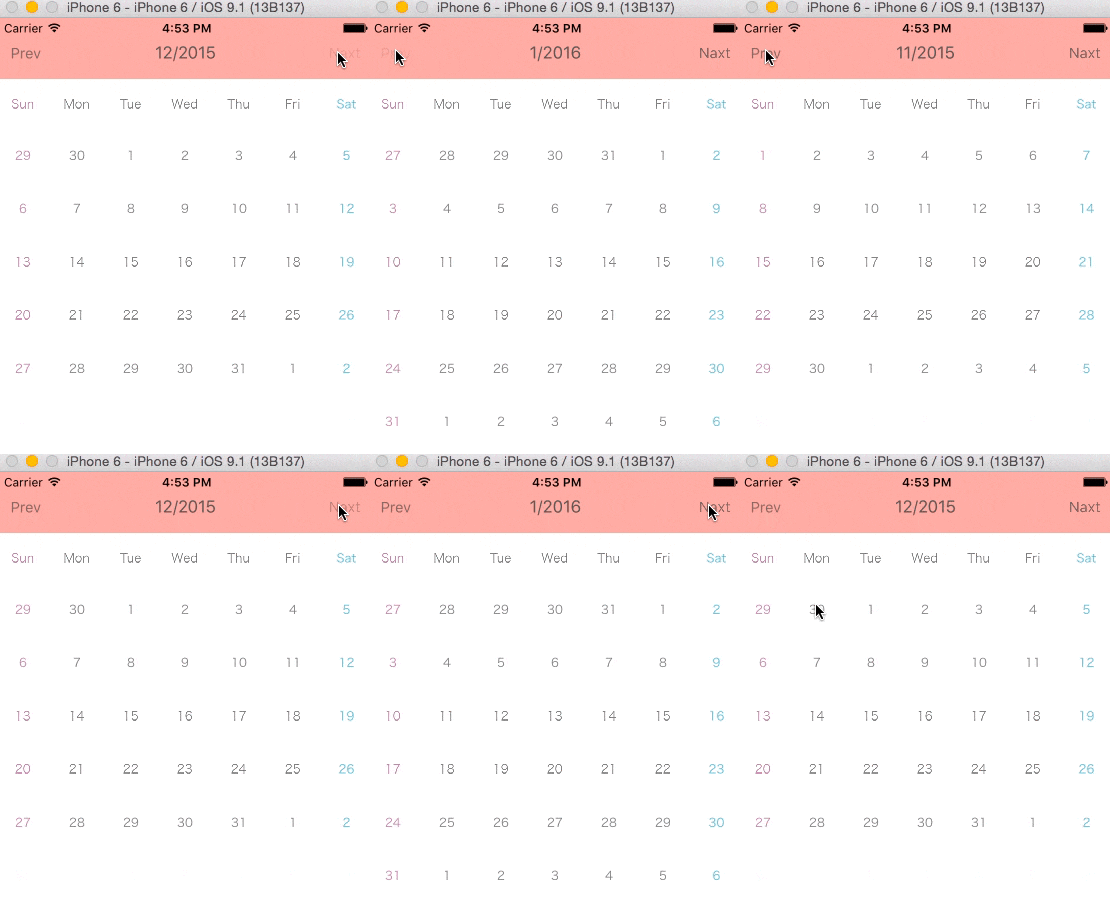
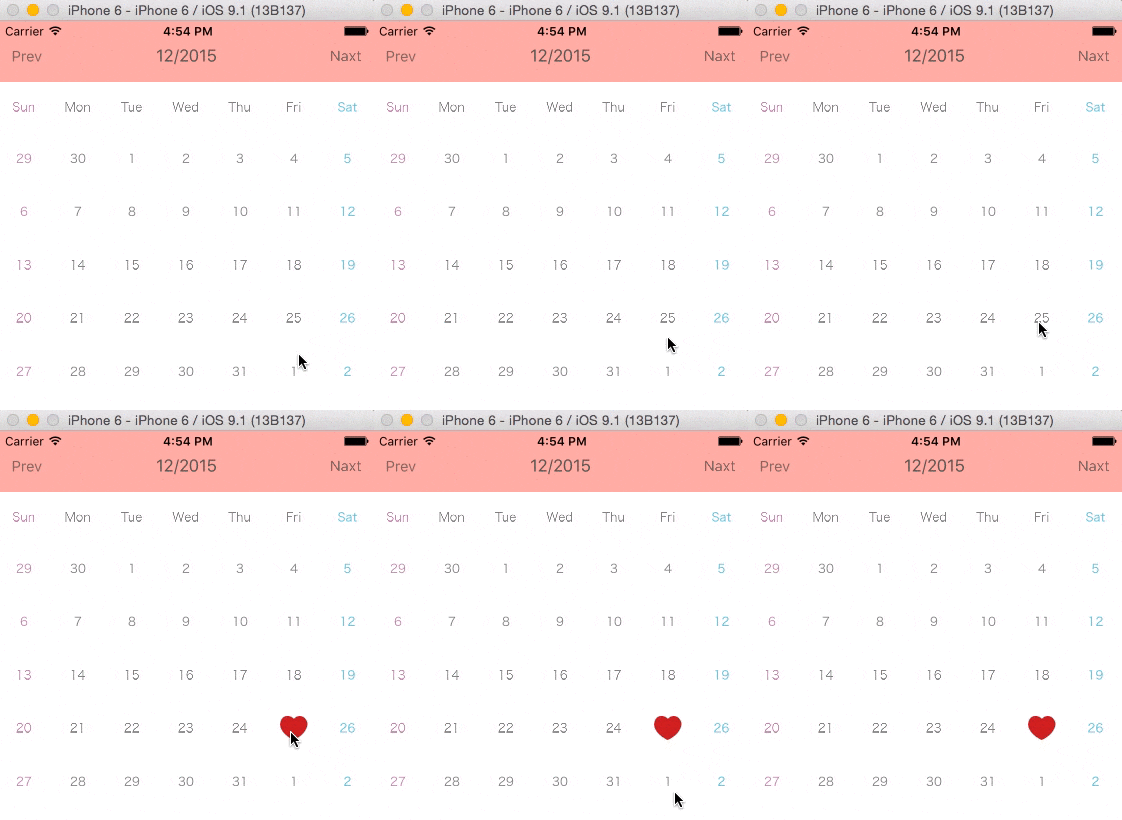
シンプルなカレンダーアプリを作成します。
はじめに
カレンダーを作成するコードはObjective-Cであればたくさん見つかるのですが、swiftだとあまり無く、特にUICollectionViewを使用した実装方法は見つからなかったので参考になればと思い書きました。
記事を作成するにあたり、こちらの平屋真吾さんの記事を大変参考にさせていただきました。
http://dev.classmethod.jp/smartphone/how-to-calendar-ui-with-uicollectionview/
それでは、さくさくと行っていきます。
Xcodeで新規プロジェクトを作成する
プロジェクト名は「CalendarApp」としました。
必要なファイルを作成する
⑴DateManager.swift(サブクラス:NSObject):カレンダーを作成するための処理を記述します。
⑵CalendarCell.swift(サブクラス:UICollectionViewCell):セルに追加するプロパティを記述します。
AutoLayoutの設定をする
⑴ ①②③④⑤それぞれ追加する。
⑤だけ高さ380以上にしてください。他のは自由で大丈夫です。
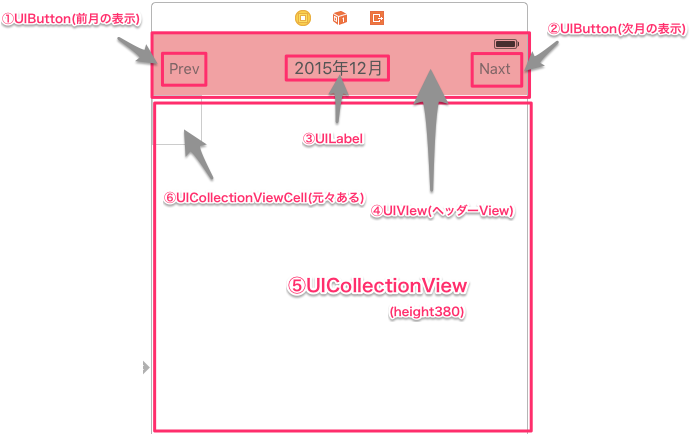
⑵ ⑥のcellをタップしてCustom ClassのClass名を「CalendarCell」に変更

⑶ ①〜⑤の部品をViewControllerにOutlet接続
①②のボタンはタップ時のActionも接続
import UIKit

class ViewController: UIViewController {

    @IBOutlet weak var headerPrevBtn: UIButton!//①
    @IBOutlet weak var headerNextBtn: UIButton!//②
    @IBOutlet weak var headerTitle: UILabel!    //③
    @IBOutlet weak var calenderHeaderView: UIView! //④
    @IBOutlet weak var calenderCollectionView: UICollectionView!//⑤


    override func viewDidLoad() {
        super.viewDidLoad()
    }

    override func didReceiveMemoryWarning() {
        super.didReceiveMemoryWarning()
        // Dispose of any resources that can be recreated.
    }

    //①タップ時
    @IBAction func tappedHeaderPrevBtn(sender: UIButton) {
    }

    //②タップ時
    @IBAction func tappedHeaderNextBtn(sender: UIButton) {
    }


}
日付を表示するUILabelを生成
CalendarCell.swiftに以下を記述します。
import UIKit

class CalendarCell: UICollectionViewCell {

    var textLabel: UILabel!

    required init(coder aDecoder: NSCoder) {
        super.init(coder: aDecoder)!

        // UILabelを生成
        textLabel = UILabel(frame: CGRectMake(0, 0, self.frame.width, self.frame.height))
        textLabel.font = UIFont(name: "HiraKakuProN-W3", size: 12)
        textLabel.textAlignment = NSTextAlignment.Center
        // Cellに追加
        self.addSubview(textLabel!)
    }

    override init(frame: CGRect) {
        super.init(frame: frame)

    }

}
表示するカレンダーの実装
ViewController.swiftに以下を記述します。
import UIKit

extension UIColor {
    class func lightBlue() -> UIColor {
        return UIColor(red: 92.0 / 255, green: 192.0 / 255, blue: 210.0 / 255, alpha: 1.0)
    }

    class func lightRed() -> UIColor {
        return UIColor(red: 195.0 / 255, green: 123.0 / 255, blue: 175.0 / 255, alpha: 1.0)
    }
}

class ViewController: UIViewController, UICollectionViewDataSource, UICollectionViewDelegate, UICollectionViewDelegateFlowLayout {

    let dateManager = DateManager()
    let daysPerWeek: Int = 7
    let cellMargin: CGFloat = 2.0
    var selectedDate = NSDate()
    var today: NSDate!
    let weekArray = ["Sun", "Mon", "Tue", "Wed", "Thu", "Fri", "Sat"]

    @IBOutlet weak var headerPrevBtn: UIButton!//①
    @IBOutlet weak var headerNextBtn: UIButton!//②
    @IBOutlet weak var headerTitle: UILabel!    //③
    @IBOutlet weak var calenderHeaderView: UIView! //④
    @IBOutlet weak var calenderCollectionView: UICollectionView!//⑤


    override func viewDidLoad() {
        super.viewDidLoad()

        calenderCollectionView.delegate = self
        calenderCollectionView.dataSource = self
        calenderCollectionView.backgroundColor = UIColor.whiteColor()
    }

    override func didReceiveMemoryWarning() {
        super.didReceiveMemoryWarning()
        // Dispose of any resources that can be recreated.
    }

    //1
    func numberOfSectionsInCollectionView(collectionView: UICollectionView) -> Int {
        return 2
    }
    //2
    func collectionView(collectionView: UICollectionView, numberOfItemsInSection section: Int) -> Int {
        // Section毎にCellの総数を変える.
        if section == 0 {
            return 7
        } else {
            return dateManager.daysAcquisition() //ここは月によって異なる(後ほど説明します)
        }
    }
    //3
    func collectionView(collectionView: UICollectionView, cellForItemAtIndexPath indexPath: NSIndexPath) -> UICollectionViewCell {
        let cell = collectionView.dequeueReusableCellWithReuseIdentifier("cell", forIndexPath: indexPath) as! CalendarCell

        return cell
    }


    //①タップ時
    @IBAction func tappedHeaderPrevBtn(sender: UIButton) {
    }

    //②タップ時
    @IBAction func tappedHeaderNextBtn(sender: UIButton) {
    }


}
詳しく見ていきます。
viewControllerでUICollectionViewのデリゲートメソッドを使いたいので宣言を行います。
class ViewController: UIViewController, UICollectionViewDataSource, UICollectionViewDelegate, UICollectionViewDelegateFlowLayout {
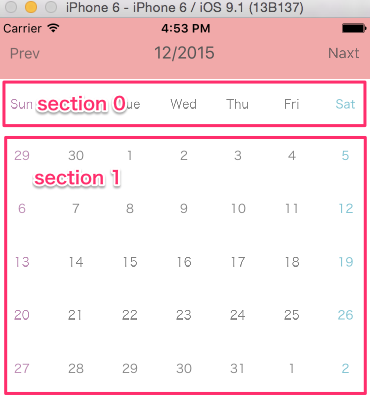
次に、セクションの数です。
以下のように二つなので「2」を返します。
//1
    func numberOfSectionsInCollectionView(collectionView: UICollectionView) -> Int {
        return 2
    }
次にセルの数ですが、section1のセルの数は月によって異なります。
//2
    func collectionView(collectionView: UICollectionView, numberOfItemsInSection section: Int) -> Int {
        // Section毎にCellの総数を変える.
        if section == 0 {
            return 7
        } else {
            return dateManager.daysAcquisition() //ここは月によって異なる
        }
    }
セルの数は行×列で求められますが、列は7で異なるのに対し、行(週の数)は月によって異なります。
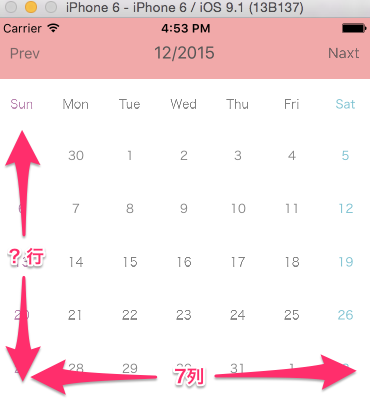
各月が週の数をいくつ持っているかを計算すれば必要なセルの数が求められます。
週の数はNSCalendarクラスのrangeOfUnit:inUnit:forDate:メソッドを使えば求めることができます。
DateManager.swift内に以下を記述します。
    var currentMonthOfDates = [NSDate]() //表記する月の配列
    var selectedDate = NSDate()
    let daysPerWeek: Int = 7
    var numberOfItems: Int!

    //月ごとのセルの数を返すメソッド
    func daysAcquisition() -> Int {
        let rangeOfWeeks = NSCalendar.currentCalendar().rangeOfUnit(NSCalendarUnit.WeekOfMonth, inUnit: NSCalendarUnit.Month, forDate: firstDateOfMonth())
        let numberOfWeeks = rangeOfWeeks.length //月が持つ週の数
        numberOfItems = numberOfWeeks * daysPerWeek //週の数×列の数
        return numberOfItems
    }
    //月の初日を取得
    func firstDateOfMonth() -> NSDate {
        let components = NSCalendar.currentCalendar().components([.Year, .Month, .Day],
            fromDate: selectedDate)
        components.day = 1
        let firstDateMonth = NSCalendar.currentCalendar().dateFromComponents(components)!
        return firstDateMonth
    }
次はセルに日にちを表示します。ViewControllerに以下を追記します。
    //3
    func collectionView(collectionView: UICollectionView, cellForItemAtIndexPath indexPath: NSIndexPath) -> UICollectionViewCell {
        let cell = collectionView.dequeueReusableCellWithReuseIdentifier("cell", forIndexPath: indexPath) as! CalendarCell
        //テキストカラー
        if (indexPath.row % 7 == 0) {
            cell.textLabel.textColor = UIColor.lightRed()
        } else if (indexPath.row % 7 == 6) {
            cell.textLabel.textColor = UIColor.lightBlue()
        } else {
            cell.textLabel.textColor = UIColor.grayColor()
        }
        //テキスト配置
        if indexPath.section == 0 {
            cell.textLabel.text = weekArray[indexPath.row]
        } else {
            cell.textLabel.text = dateManager.conversionDateFormat(indexPath)
            //月によって1日の場所は異なる(後ほど説明します)
        }
        return cell
    }
テキストカラーとテキスト配置の週の部分は大丈夫だと思います。
重要なのは、cellの日にちを表示する部分です。月の初日つまり1日は必ずしも月曜日から始まるわけではないので、cellの0番目にくる日にちは月によって異なります。
セルの0番目には月の初めのセルの番号分戻った先月の日にちが表示されます。
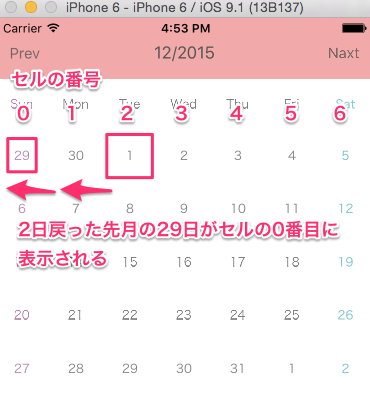
ではそのような日付を取得するメソッドを実装します。
    // ⑴表記する日にちの取得
    func dateForCellAtIndexPath(numberOfItems: Int) {
        // ①「月の初日が週の何日目か」を計算する
        let ordinalityOfFirstDay = NSCalendar.currentCalendar().ordinalityOfUnit(NSCalendarUnit.Day, inUnit: NSCalendarUnit.WeekOfMonth, forDate: firstDateOfMonth())
        for var i = 0; i < numberOfItems; i++ {
            // ②「月の初日」と「indexPath.item番目のセルに表示する日」の差を計算する
            let dateComponents = NSDateComponents()
            dateComponents.day = i - (ordinalityOfFirstDay - 1)
            // ③ 表示する月の初日から②で計算した差を引いた日付を取得
            let date = NSCalendar.currentCalendar().dateByAddingComponents(dateComponents, toDate: firstDateOfMonth(), options: NSCalendarOptions(rawValue: 0))!
            // ④配列に追加
            currentMonthOfDates.append(date)
        }
    }

    // ⑵表記の変更
    func conversionDateFormat(indexPath: NSIndexPath) -> String {
        dateForCellAtIndexPath(numberOfItems)
        let formatter: NSDateFormatter = NSDateFormatter()
        formatter.dateFormat = "d"
        return formatter.stringFromDate(currentMonthOfDates[indexPath.row])
    }
詳しく見ていきます。
⑴で先ほどの差分戻った日付から、セルの数だけ日付を取得し、currentMonthOfDatesという配列に追加しています。
【 2015年12月を例に説明していきます。】
①「月の初日が週の何日目か」を計算する
2015年12月1日は火曜日なので、日曜から始まるカレンダーの3番目にあたります。
let ordinalityOfFirstDay = NSCalendar.currentCalendar().ordinalityOfUnit(NSCalendarUnit.Day, inUnit: NSCalendarUnit.WeekOfMonth, forDate: firstDateOfMonth()) //→3
②「月の初日」と「indexPath.item番目のセルに表示する日」の差を計算する
iの値は一番初めは「0」です。
また、①のメソッドは日曜日が1番目なのに対し、セルの番号は0番目から始まるため、(ordinalityOfFirstDay - 1)を行っています。
dateComponents.day = 0 - (3 - 1)で -2 になります。
let dateComponents = NSDateComponents()
dateComponents.day = i - (ordinalityOfFirstDay - 1) //→-2
③ 表示する月の初日から②で計算した差を引いた日付を取得
12月から-2(差分)を引いた日付(11月29日)を取得しています。
let date = NSCalendar.currentCalendar().dateByAddingComponents(dateComponents, toDate: firstDateOfMonth(), options: NSCalendarOptions(rawValue: 0))!
④③で求めた日付を配列に追加しています。
currentMonthOfDates.append(date)
①〜④の処理をnumberOfItemsの数だけ繰り返し配列に追加しています。
⑵でそのメソッドを実行し、その中身の表記を変更しています。
このメソッドを先ほどの日にちの表示部分で呼んでいます。
Cellのレイアウトを設定
ViewController.swiftに以下を追加してください。
ここは説明しなくても大丈夫だと思います。
始めに設定したCollectionViewのheight380pxに良い感じで収まるサイズにしています。
    //セルのサイズを設定
    func collectionView(collectionView: UICollectionView, layout collectionViewLayout: UICollectionViewLayout, sizeForItemAtIndexPath indexPath: NSIndexPath) -> CGSize {
         let numberOfMargin: CGFloat = 8.0
         let width: CGFloat = (collectionView.frame.size.width - cellMargin * numberOfMargin) / CGFloat(daysPerWeek)
         let height: CGFloat = width * 1.0
         return CGSizeMake(width, height)

    }

    //セルの垂直方向のマージンを設定
    func collectionView(collectionView: UICollectionView, layout collectionViewLayout: UICollectionViewLayout, minimumLineSpacingForSectionAtIndex section: Int) -> CGFloat {
        return cellMargin
    }

    //セルの水平方向のマージンを設定
    func collectionView(collectionView: UICollectionView, layout collectionViewLayout: UICollectionViewLayout, minimumInteritemSpacingForSectionAtIndex section: Int) -> CGFloat {
        return cellMargin
    }
前月・次月を表示
ここもそれほど難しくありません。
まずは下記をそれぞれファイルに追加してください。
    //headerの月を変更
    func changeHeaderTitle(date: NSDate) -> String {
        let formatter: NSDateFormatter = NSDateFormatter()
        formatter.dateFormat = "M/yyyy"
        let selectMonth = formatter.stringFromDate(date)
        return selectMonth
    }


    //①タップ時
    @IBAction func tappedHeaderPrevBtn(sender: UIButton) {
        selectedDate = dateManager.prevMonth(selectedDate)
        calenderCollectionView.reloadData()
        headerTitle.text = changeHeaderTitle(selectedDate)
    }

    //②タップ時
    @IBAction func tappedHeaderNextBtn(sender: UIButton) {
        selectedDate = dateManager.nextMonth(selectedDate)
        calenderCollectionView.reloadData()
        headerTitle.text = changeHeaderTitle(selectedDate)
    }
import UIKit

extension NSDate {
    func monthAgoDate() -> NSDate {
        let addValue = -1
        let calendar = NSCalendar.currentCalendar()
        let dateComponents = NSDateComponents()
        dateComponents.month = addValue
        return calendar.dateByAddingComponents(dateComponents, toDate: self, options: NSCalendarOptions(rawValue: 0))!
    }

    func monthLaterDate() -> NSDate {
        let addValue: Int = 1
        let calendar = NSCalendar.currentCalendar()
        let dateComponents = NSDateComponents()
        dateComponents.month = addValue
        return calendar.dateByAddingComponents(dateComponents, toDate: self, options: NSCalendarOptions(rawValue: 0))!
    }

}

class Date: NSObject {
	//省略

    //前月の表示
    func prevMonth(date: NSDate) -> NSDate {
        currentMonthOfDates = []
        selectedDate = date.monthAgoDate()
        return selectedDate
    }
    //次月の表示
    func nextMonth(date: NSDate) -> NSDate {
        currentMonthOfDates = []
        selectedDate = date.monthLaterDate()
        return selectedDate
    }
}
前月と次月は逆のことを行っているだけなので、前月だけ説明します。
簡単に説明すると、現在表示している月の一つ前の月を取得し、collectionViewを更新しています。
まず、タップされた時の処理とprevMonth()メソッドの中身は大丈夫だと思います。
DateManagerクラスの拡張のmonthAgoDate()の内容を確認します。
func monthAgoDate() -> NSDate {
        let addValue = -1 //一つ前の月を表示したいので「-1」
        let calendar = NSCalendar.currentCalendar()
        let dateComponents = NSDateComponents()
        dateComponents.month = addValue
        return calendar.dateByAddingComponents(dateComponents, toDate: self, options: NSCalendarOptions(rawValue: 0))!
    }
NSCalendar.currentCalendar()はこのメソッドを呼んでいる値の月のカレンダーを生成します。
一番最初に呼ぶ時は、dateの中身はNSDate()なので、今日の日付が入っています。
次にこのメソッドが呼ばれる時、dateの中身は一月前の日付になっているということです。
その生成されたcalendarに対してdateByAddingComponentsメソッドを行うことで一月前の日付を返しています。
headerの変更を行うメソッドも説明しなくて大丈夫だと思います。
最後に、以下を追加します。
    override func viewDidLoad() {
        super.viewDidLoad(
        //省略
        headerTitle.text = changeHeaderTitle(selectedDate) //追記
    }
以上でカレンダーの作成は終了です。
あとは、ViewControllerに以下のタップされた時に呼ばれるメソッドを使用して、セルにviewを追加したりなど自由にアレンジして楽しんでください(*´-`)
func collectionView(collectionView: UICollectionView, didSelectItemAtIndexPath indexPath: NSIndexPath) {
//ここに処理を記述
}
最後に
とても長い記事を最後まで読んでいただき本当にありがとうございます。
まだまだ改善できると思いますので、ご意見よろしくお願いします。
それでは皆さん良いクリスマスをお過ごし下さい。
