Amazon Rekognition
A new image analysis service that is based on Deep learning, “Amazon Rekognition” is announced at AWS re:Invent 2016. Amazon Rekognition makes it easy to add image analysis to our applications (press release, official blog, official document for developers).
Demo Concept of analyzing photos in kintone with Amazon Rekognition
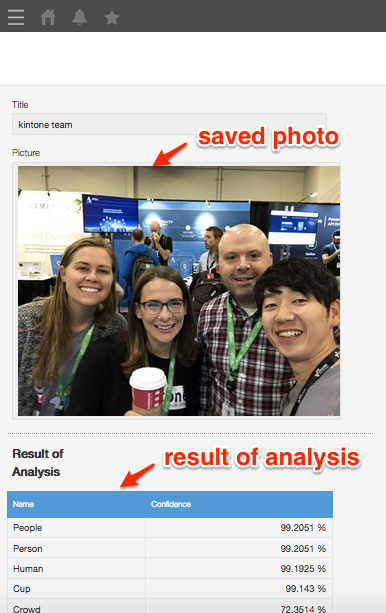
In this case, I try a simple demo scenario that if you save a photo as kintone record, the result of detecting that photo is spread at the kintone record.
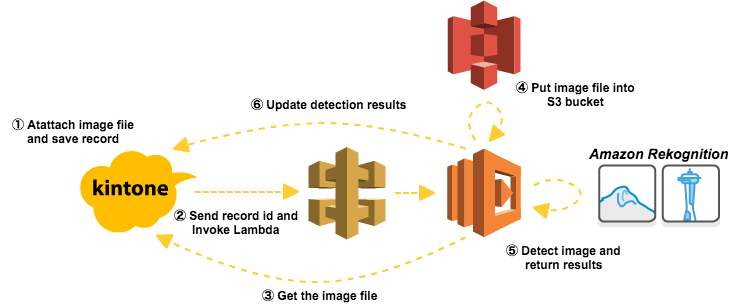
Architecture
Record view of kintone
Configuration of kintone & Amazon Rekognition
kintone app.
Create a kintone application
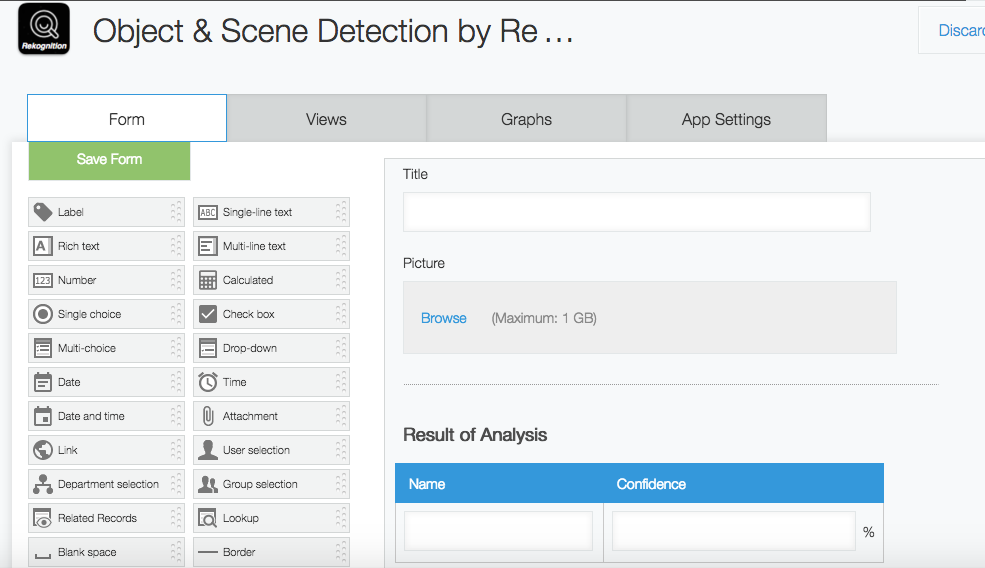
create a kintone application consisting of forms like this.
| Field labels & code | Summary | Field types |
|---|---|---|
| Title | Title of Photo | SINGLE_LINE_TEXT |
| Photo | Photo you want to analyze | FILE |
| Results | Analyzed results | SUBTABLE |
| Results/Name | Analyzed names(labels) | SUBTABLE/SINGLE_LINE_TEXT |
| Results/Confidence | Analyzed confidence | SUBTABLE/NUMBER |
 |
(AWS) IAM
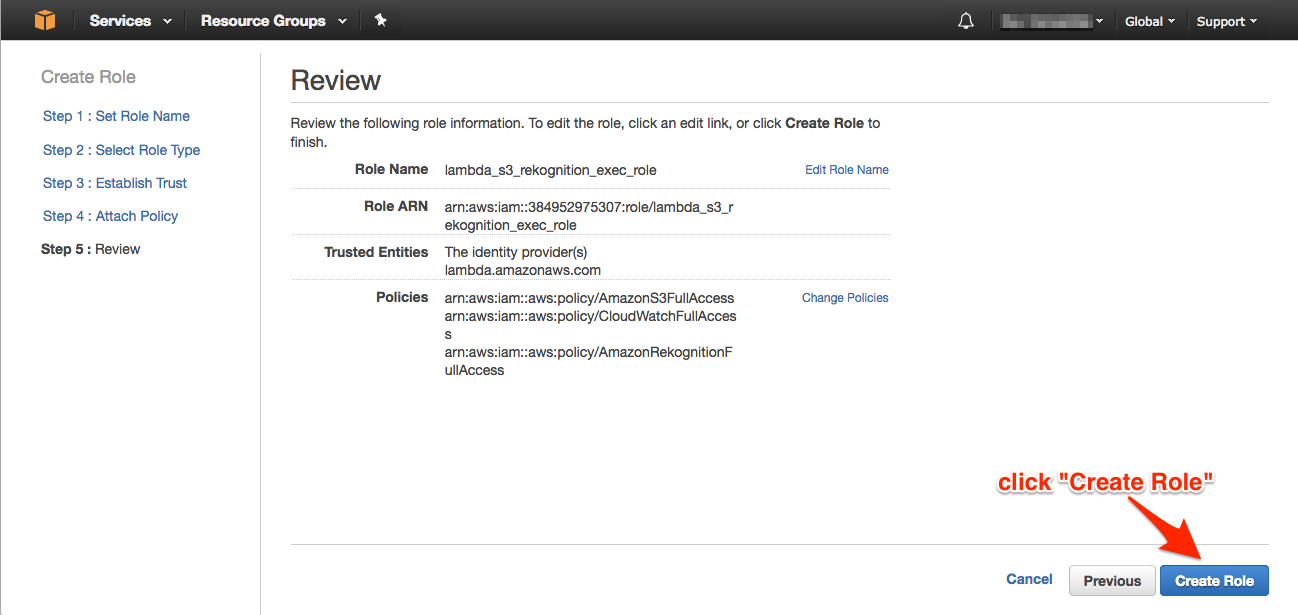
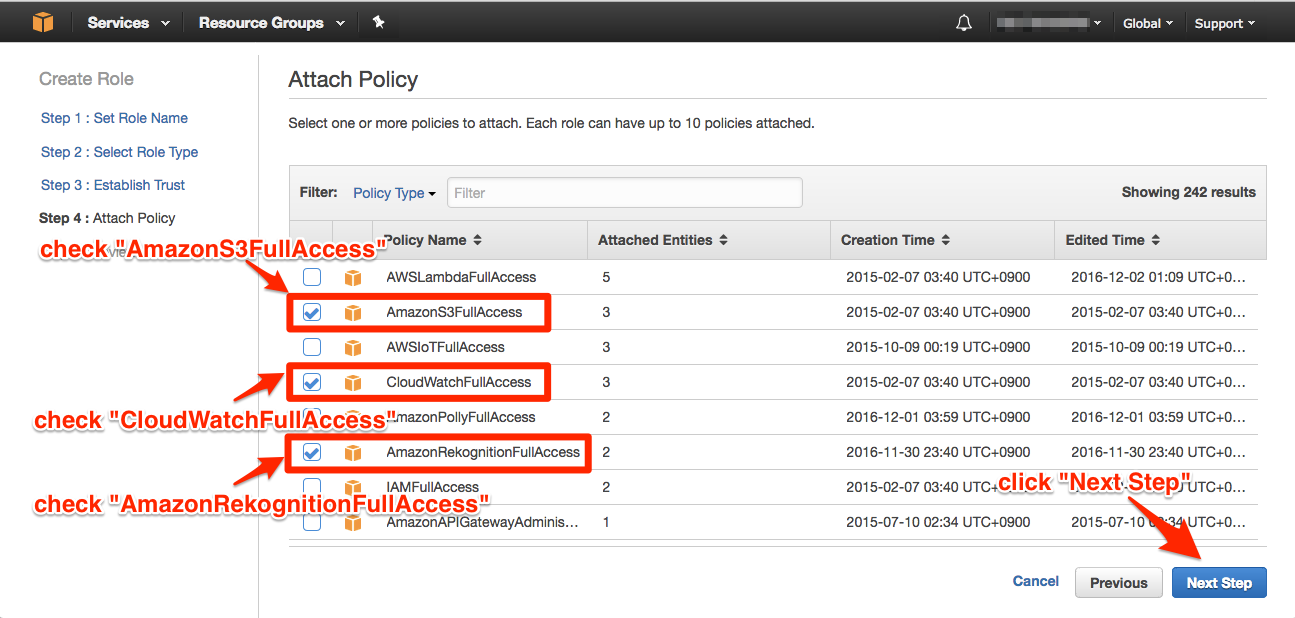
We create new role that can access from Lambda to S3, Rekognition and CloudWatch.
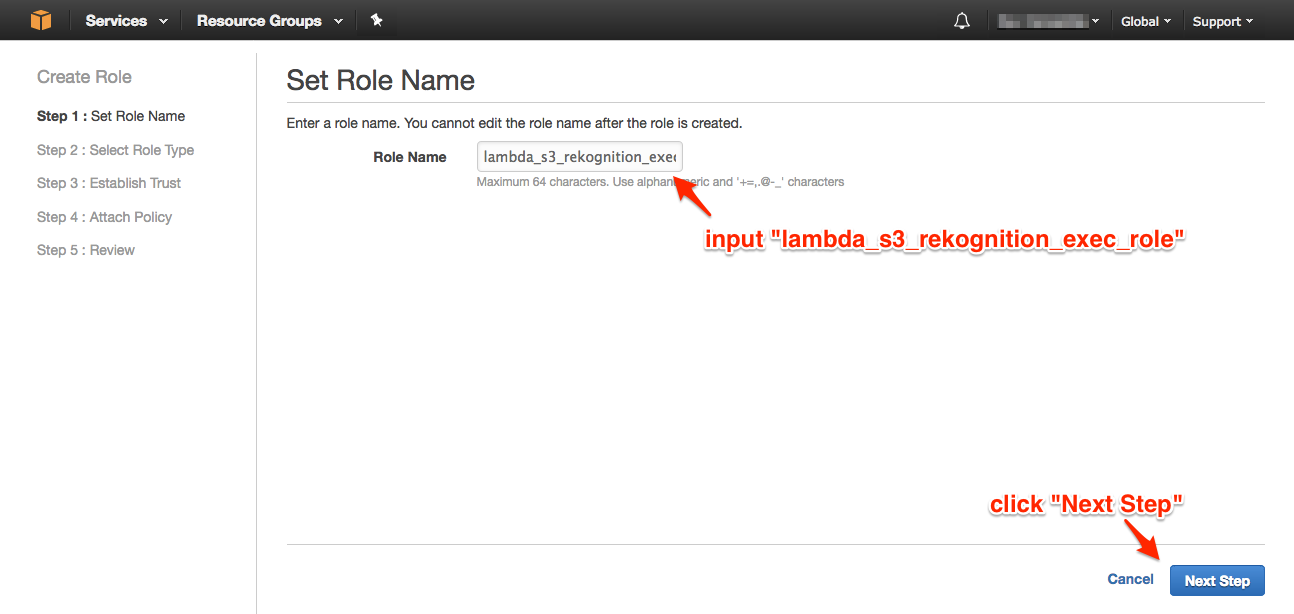
Create New Role
input "lambda_s3_rekognition_exec_role", and click "Next Step"
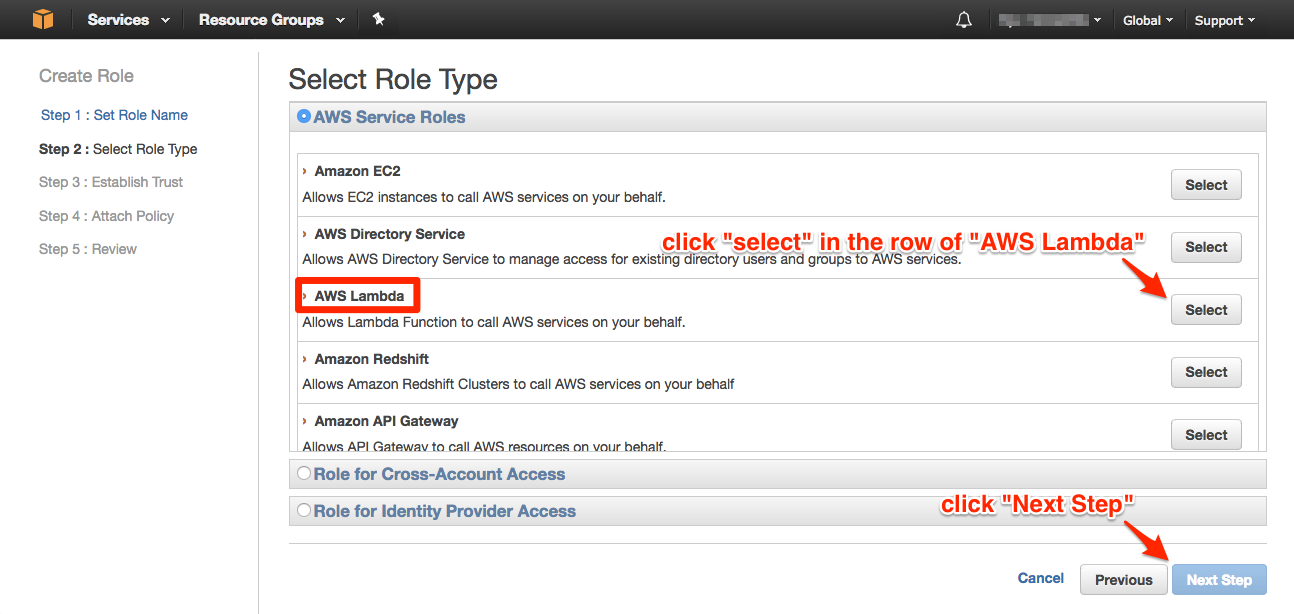
click "select" in the row of "AWS Lambda" and click "Next Step"
check "AmazonRekognitionFullAccess", "AmazonS3FullAccess" and "CloudWatchFullAccess". and click "Next Step".
Amazon S3
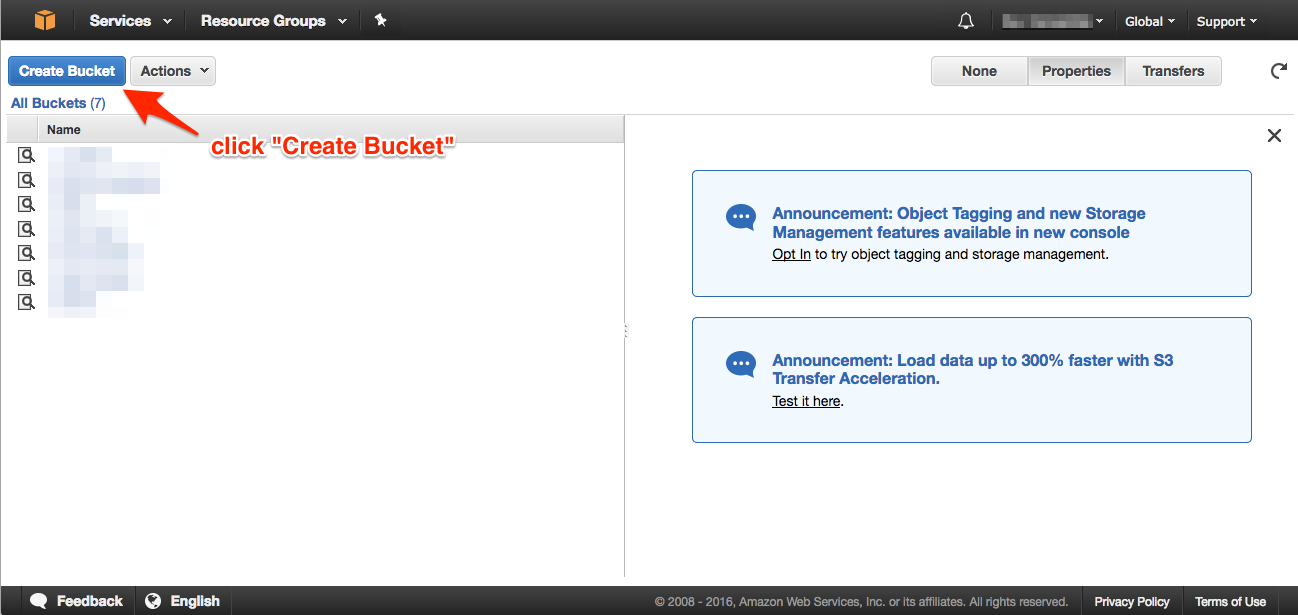
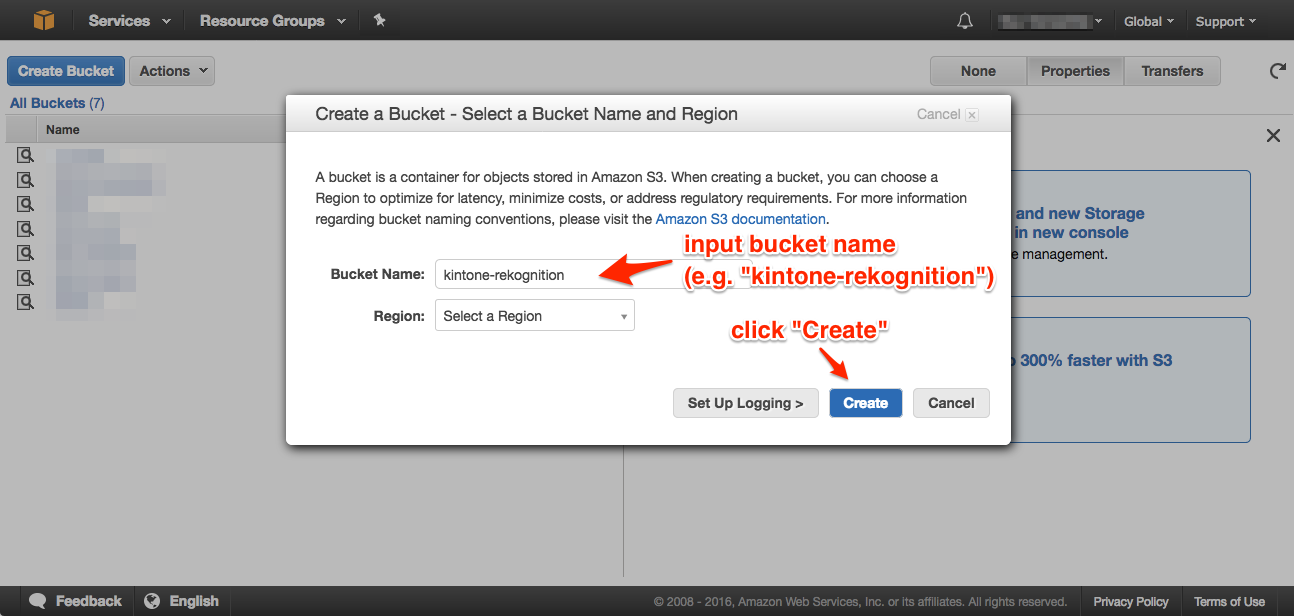
We create the S3 bucket that store photos from kintone, and be accessed from Rekognition.
Create Bucket
input bucket name(e.g. "kintone-rekognition") and click "Create".
AWS Lambda
We create the Lambda function that access to kintone, S3 and Rekognition.
Create Lambda function
We have to replace {S3 bucket}, {kintone domain}, {app. id}, {api token}, {basic user}, {basic password} with your parameters (see also, kintone REST API, User Authentication, Add record).
/**
 * Rekognition Demo for re:Invent 2016
 *
 * 1. Saving record and send request to API GW (kintone)
 * 2. Download picture to '/tmp/' from kintone (Lambda)
 * 3. Upload picture to S3 (Lambda)
 * 4. Send request to rekognition (Lambda)
 * 5. Update record by using response of rekognition (Lambda)
 */
'use strict';

const fs = require('fs');
const request = require('request');

//S3 Info
const BUCKET_NAME = '{S3 bucket}';

//kintone's Info
const DOMAIN = '{kintone domain}';
const APP = '{app id}';
const API_TOKEN = '{api token}';
const BASIC_TOKEN = (new Buffer('{basic user}:{basic password}')).toString('base64');

//Load AWS SDK and set auth info
const AWS = require('aws-sdk');
const REGION = 'us-east-1';

//2. Download picture from kintone
const downloadPhotoData = (fileKey, fileName) => {
  return new Promise((resolve, reject) => {
    const headers = {
      'X-Cybozu-API-Token': API_TOKEN,
      'Authorization': 'Basic ' + BASIC_TOKEN
    };
    const url = 'https://' + DOMAIN + '/k/v1/file.json?fileKey=' + fileKey;
    const options = {
      url: url,
      headers: headers,
      method: 'GET'
    };
    var picStream = fs.createWriteStream('/tmp/' + fileName);
    request(options)
      .pipe(picStream)
      .on('close', function() {
        resolve();
      });
  });
};

//3. Upload picture to S3
const uploadToS3 = (fileKey, fileName, contentType) => {
  const s3 = new AWS.S3();
  const params = {
    Bucket: BUCKET_NAME,
    Key: fileName,
    ContentType: contentType,
    Body: fs.readFileSync('/tmp/' + fileName),
    ACL: 'public-read'
  };
  return s3.putObject(params).promise();
};

//4. Send request to rekognition
const sendRequestToRekognition = (fileName) => {
  // Create an rekognition client
  const rekognition = new AWS.Rekognition({
    region: REGION,
  });
  const params = {
    Image: {
      S3Object: {
        'Bucket': BUCKET_NAME,
        'Name': fileName
      }
    }
  };
  return rekognition.detectLabels(params).promise();
};

//5. Update record by using response of rekognition
const updateKintoneRecord = (result, recordId) => {
  const arrayLabels = result.Labels;
  let tableData = [];
  const createTmpRow = () => {
    return {
      value: {
        Name: {
          value: undefined
        },
        Confidence: {
          value: undefined
        }
      }
    };
  };
  for (let i = 0; i < arrayLabels.length; i++) {
    let tmpRow = createTmpRow();
    tmpRow.value.Name.value = arrayLabels[i].Name;
    tmpRow.value.Confidence.value = arrayLabels[i].Confidence;
    tableData.push(tmpRow);
  }

  return new Promise((resolve, reject) => {
    const headers = {
      'X-Cybozu-API-Token': API_TOKEN,
      'Authorization': 'Basic ' + BASIC_TOKEN,
      'Content-Type': 'application/json'
    };
    const url = 'https://' + DOMAIN + '/k/v1/record.json';
    const body = {
      app: APP,
      id: recordId,
      record: {
        Results: {
          value: tableData
        }
      }
    };
    const options = {
      url: url,
      headers: headers,
      method: 'PUT',
      json: body
    };
    request(options, (err, response, body) => {
      if (err) {
        console.log(err, err.stack);
        reject(err);
      } else {
        resolve();
      }
    });
  });
};


exports.handler = (event, context, callback) => {
  console.log('begin.');
  if (!event['body-json'] || !event['body-json'].record) {
    console.log('No record data in body-json. Finish Process.');
    callback(null);
  }
  const record = event['body-json'].record;
  console.log(record);

  if (!(record.$id.value && record.Photo.value.length > 0)) {
    console.log('Can not find recordId or photo. Finish Process.');
    callback(null);
  }

  const recordId = record.$id.value;
  const fileKey = record.Photo.value[0].fileKey;
  const fileName = record.Photo.value[0].name;
  const contentType = record.Photo.value[0].contentType;

  return downloadPhotoData(fileKey, fileName).then(() => {
    console.log('download file completed.');
    return uploadToS3(fileKey, fileName, contentType);
  }).then(() => {
    console.log('upload to s3 completed.');
    return sendRequestToRekognition(fileName);
  }).then((result) => {
    console.log(result);
    console.log('request to rekoginition completed');
    return updateKintoneRecord(result, recordId);
  }).then((result) => {
    console.log('update record completed.');
    console.log('all completed.');
    callback(null);
  }).catch((e) => {
    console.log('error occurred.');
    console.log(e);
    callback(e);
  });
};
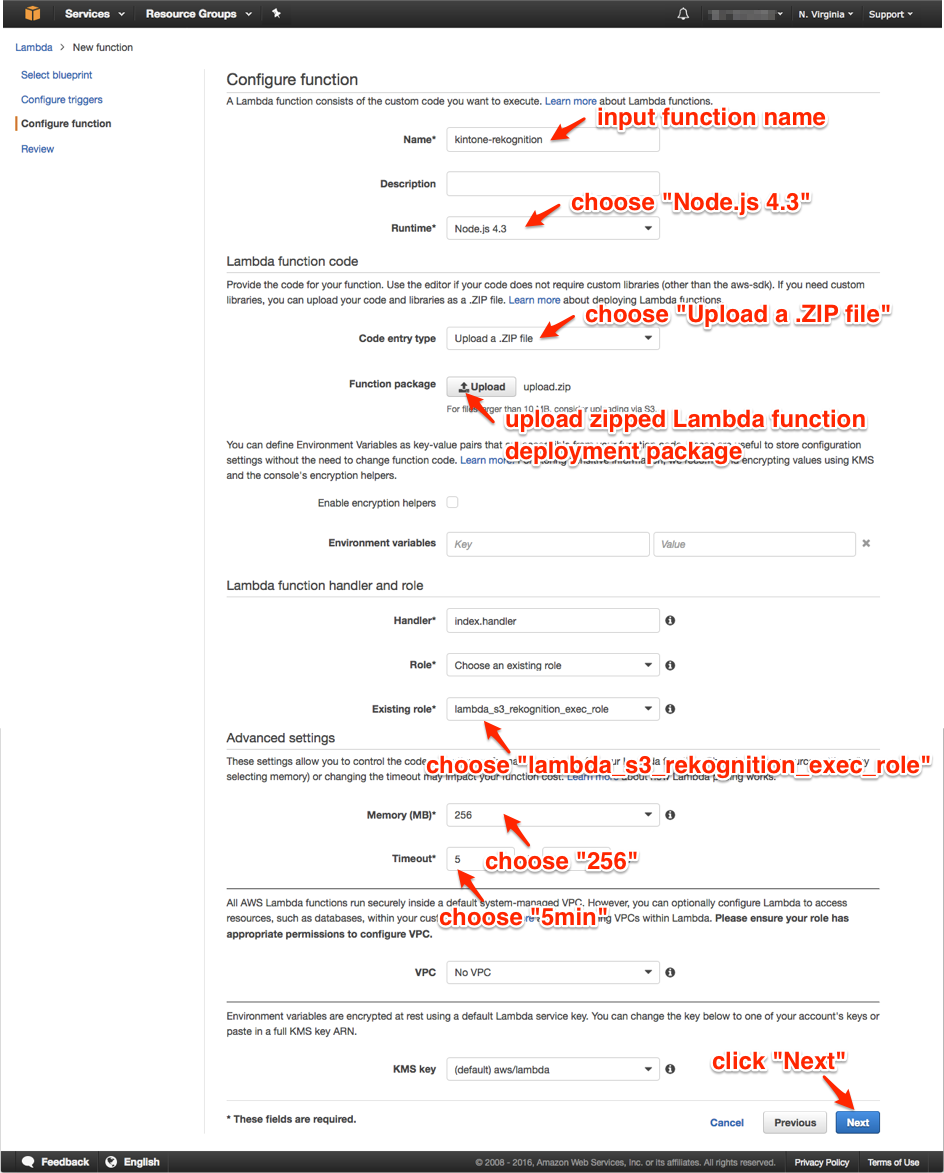
install request & aws-sdk libraries, and create a Lambda function as a deployment package.
$ npm install --save request aws-sdk
$ zip -r upload.zip index.js node_modules/
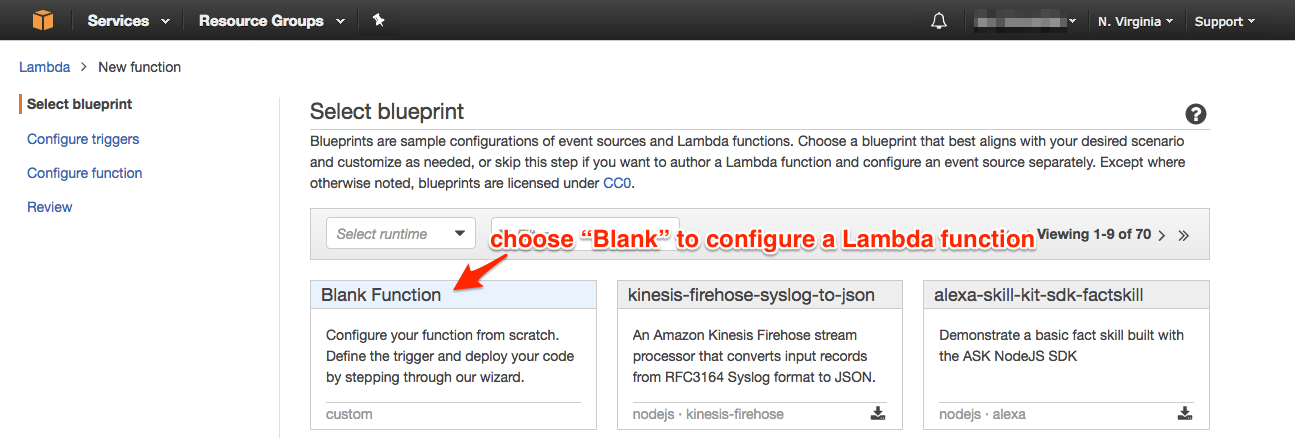
select "N. Virginia(us-east-1)" and click “Create a Lambda function”.

choose “Blank Function” to configure a Lambda function.
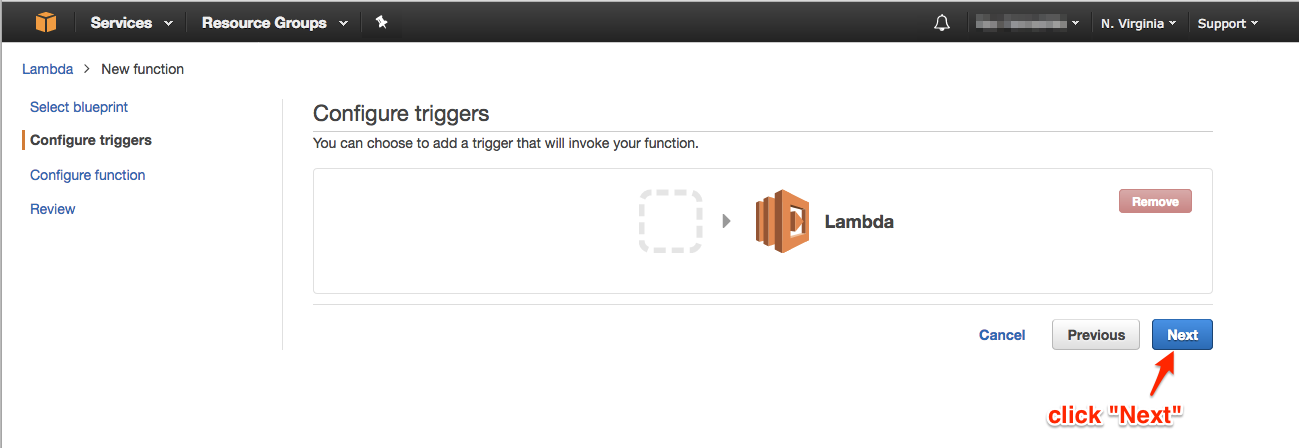
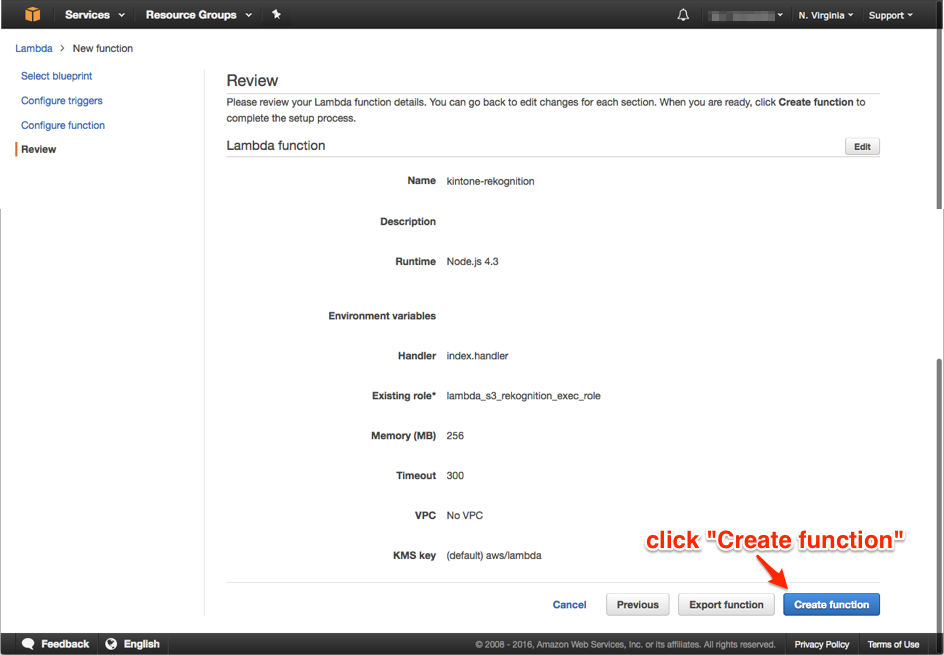
configure a Lambda function as below.
Amazon API Gateway
create API set for invoking Lambda & pass kintone parameters to Lambda via API Gateway.
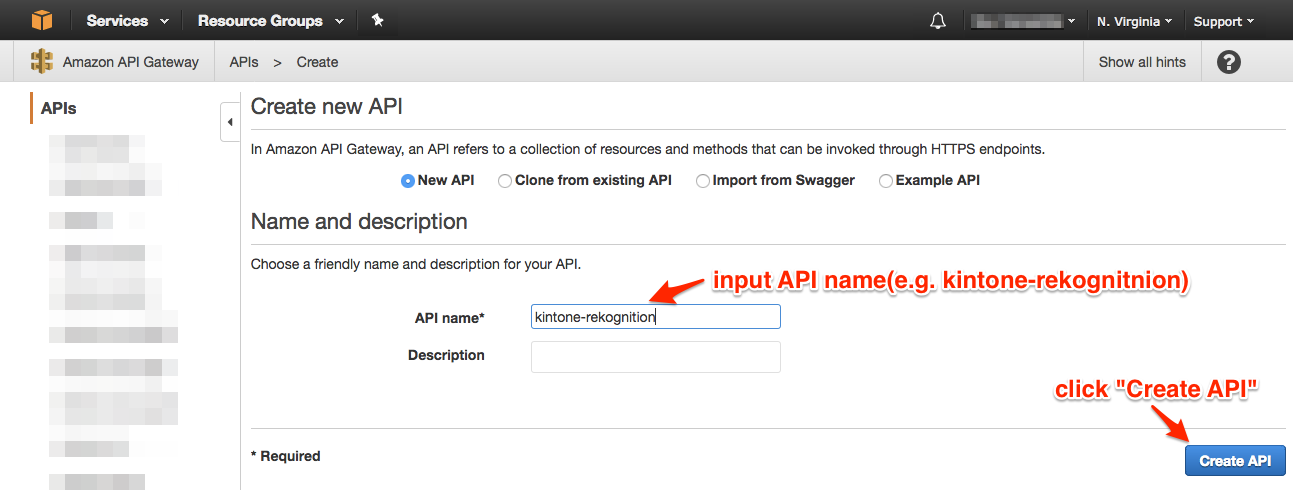
Create API
input API name(e.g. "kintone-rekognition") and click "Create API".
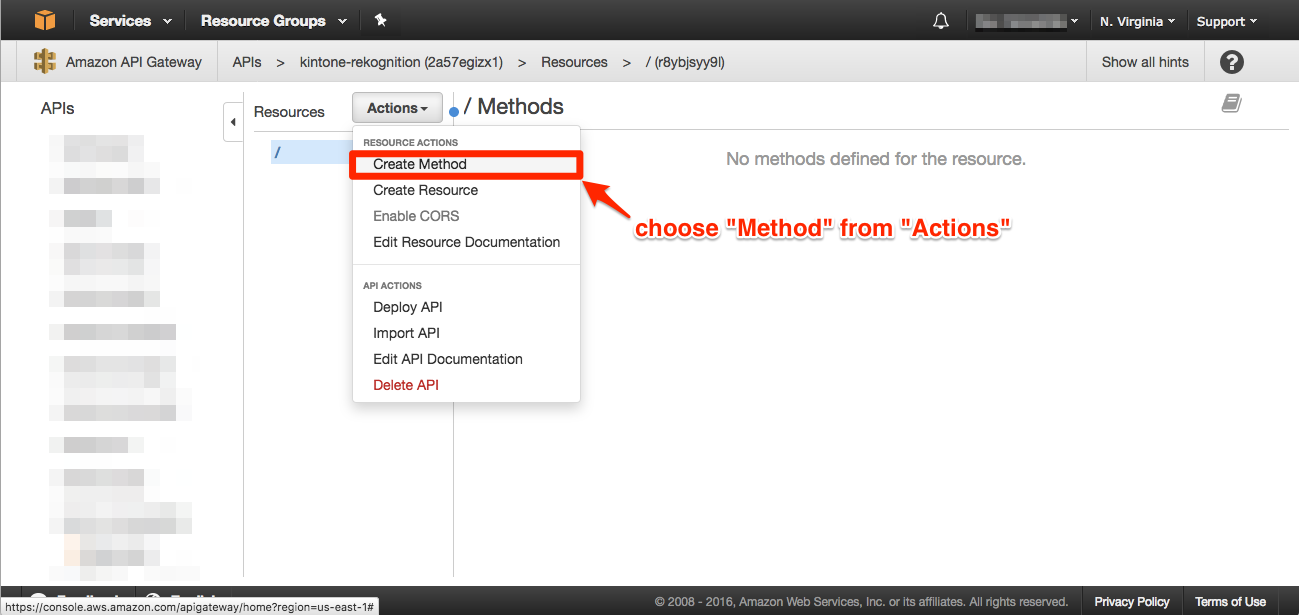
choose "Create Method" from "Actions".
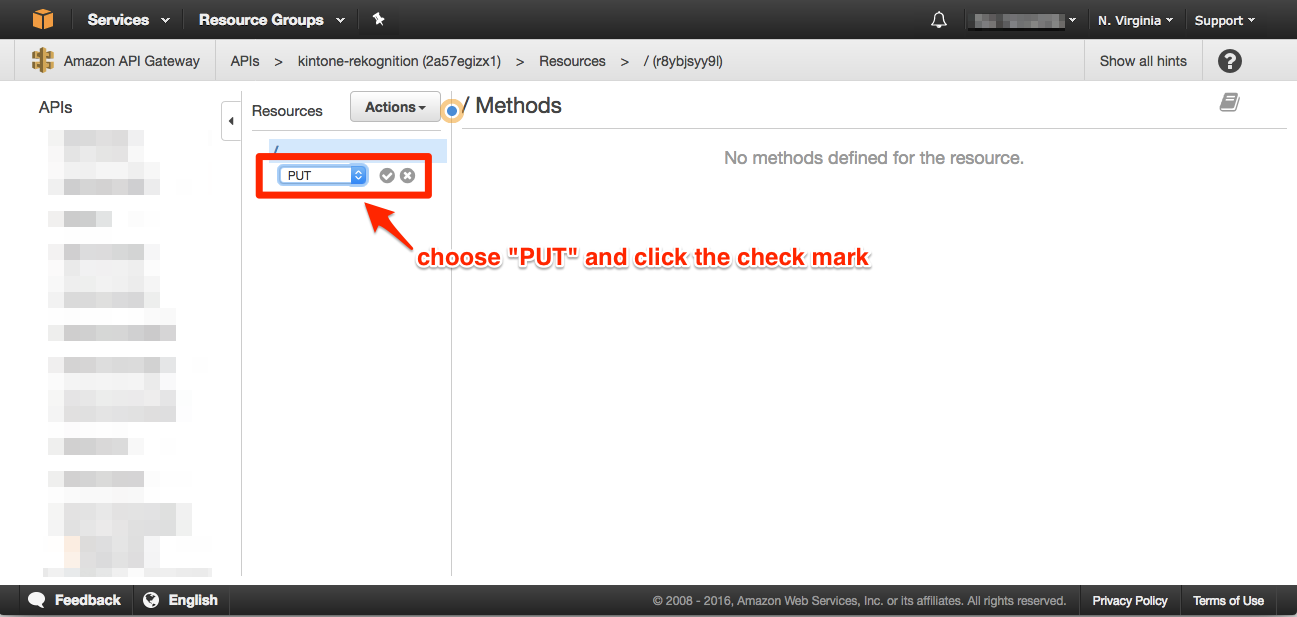
choose "PUT" and click the check mark.
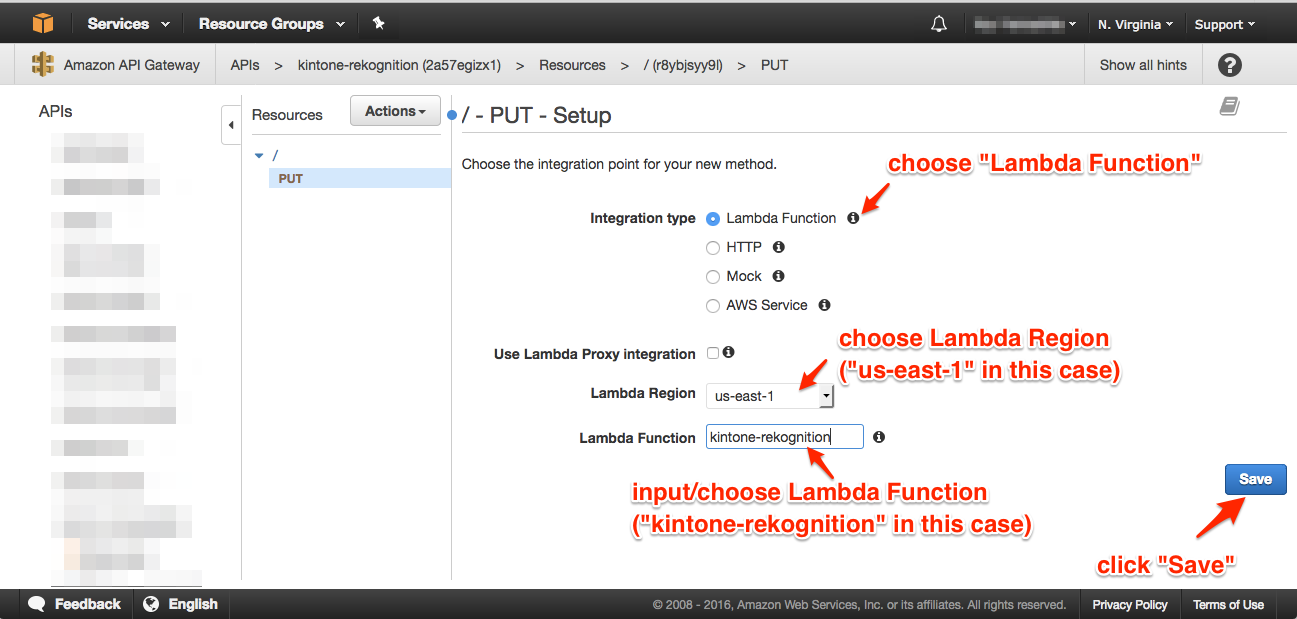
configure PUT method API as below.
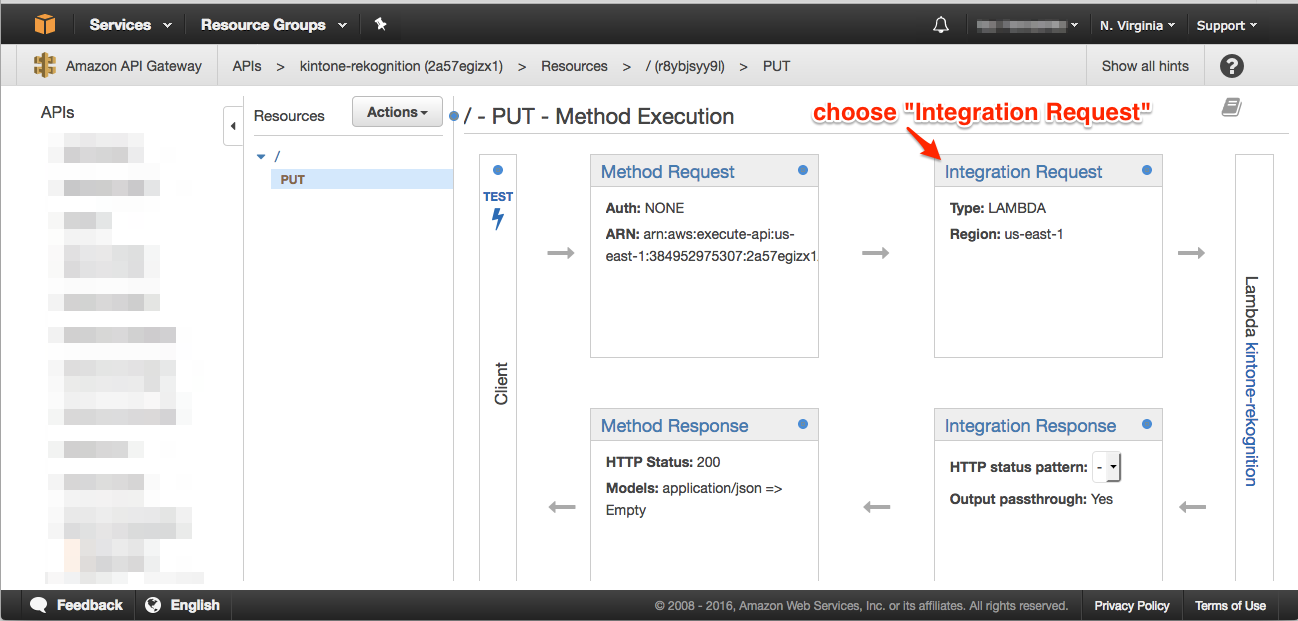
configuration only "Integration Request" to set minium although we have to set up all four section.
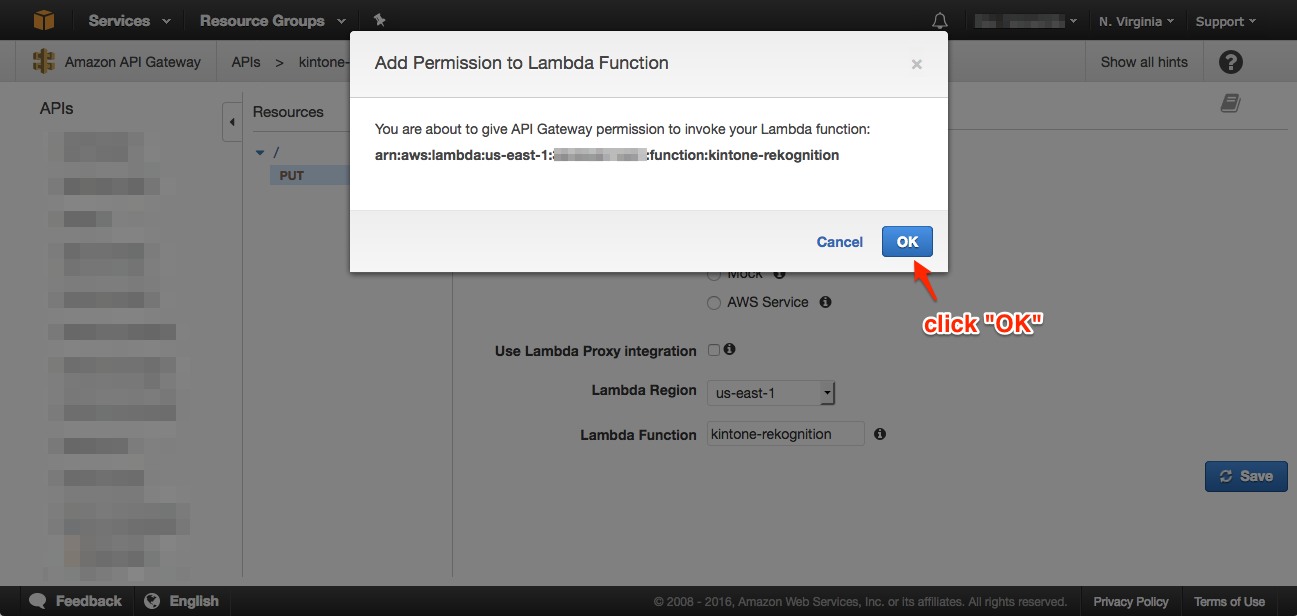
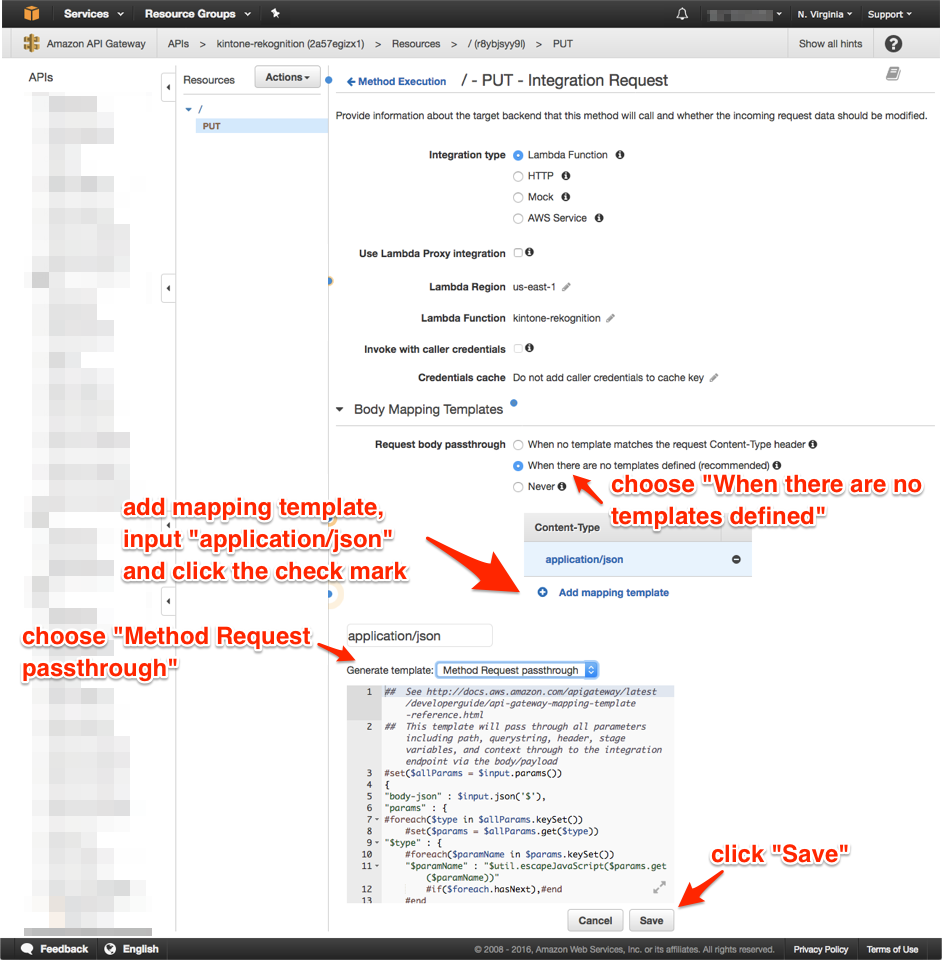
configure Integration Request as follows.
choose "Deploy API" from "Actions".
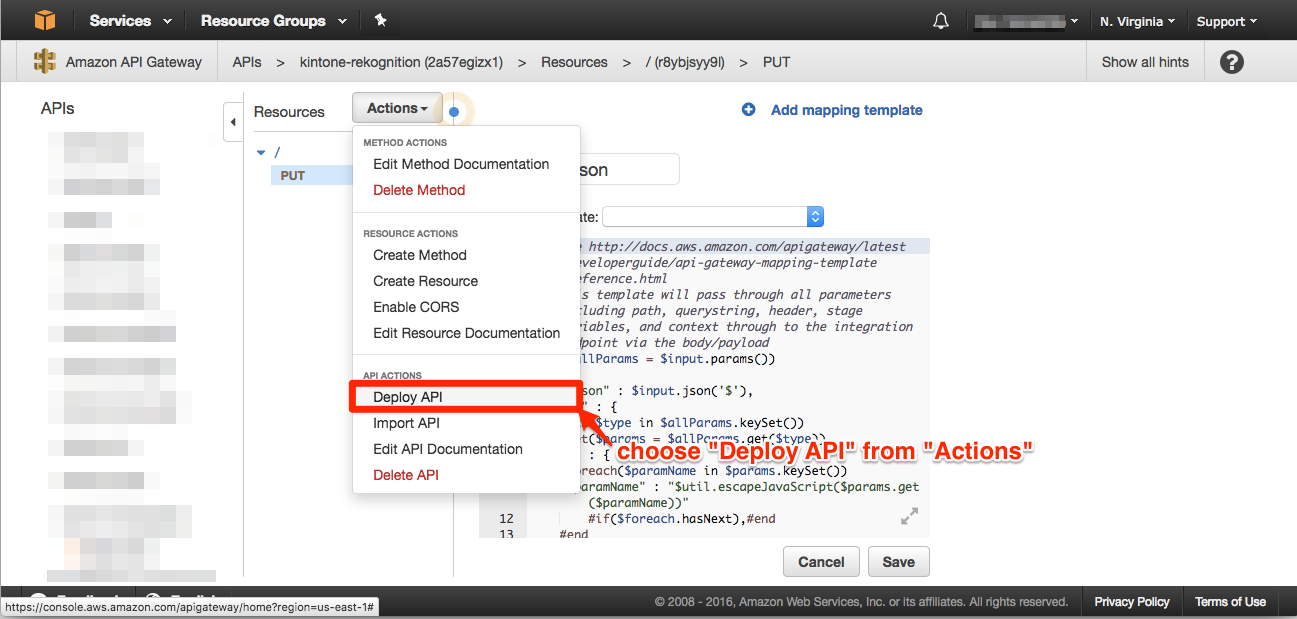
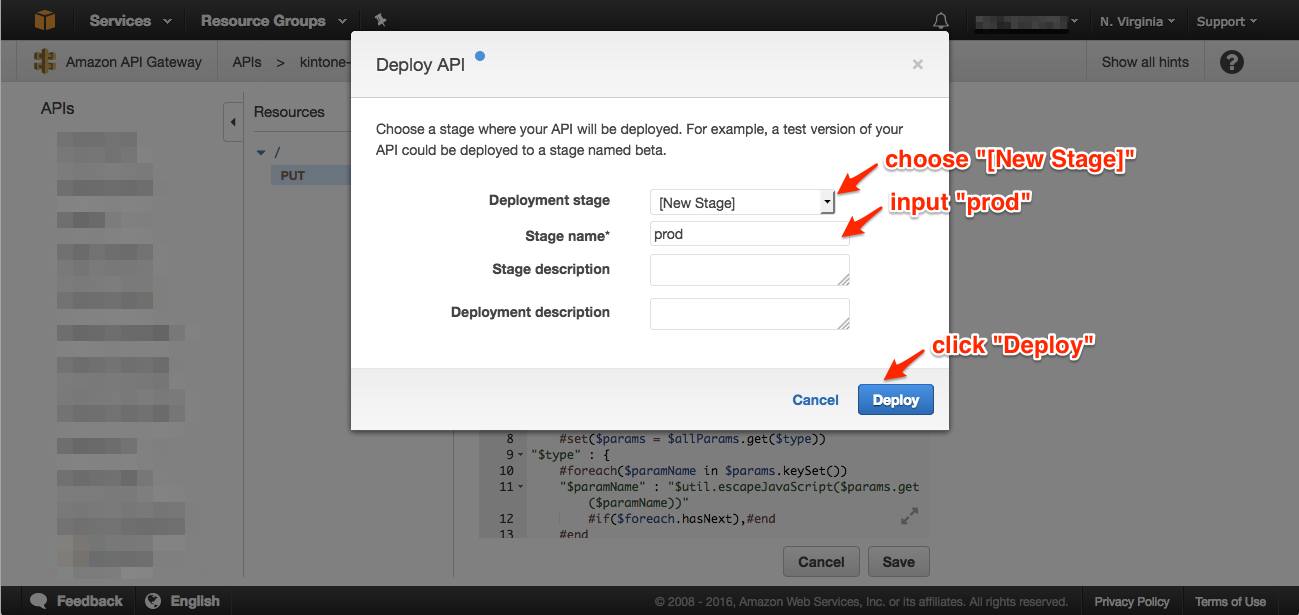
conclude API settings as bellow.
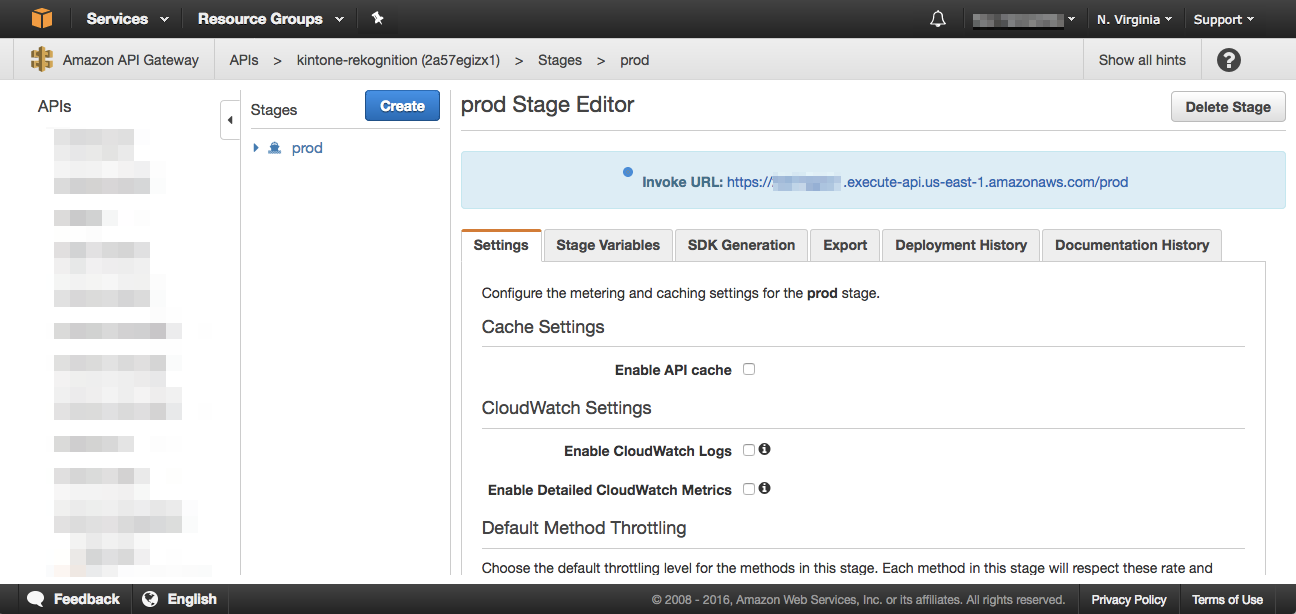
copy invoke URL to call from kintone JavaScript customization later.
kintone JavaScript Customization
Finally, we set kintone JavaScript customization to call the API we configured.
Main file
We save this main file as "desktop-rekognition.js". We have to replace {api gw. endpoint} with your parameters.
jQuery.noConflict();
(function ($) {
    'use strict';

    var API_GW_ENDPOINT = '{api gw. endpoint}';

    // show spinner
    var showSpinner = function () {
        // initialization
        if ($('.kintone-spinner').length == 0) {
            // create elements for spinner and background
            var spin_div = $('<div id ="kintone-spin" class="kintone-spinner"></div>');
            var spin_bg_div = $('<div id ="kintone-spin-bg" class="kintone-spinner"></div>');

            // append spinner element to "body"
            $(document.body).append(spin_div, spin_bg_div);

            // style for spinner
            $(spin_div).css({
                'position': 'fixed',
                'top': '50%',
                'left': '50%',
                'z-index': '510',
                'background-color': '#fff',
                'padding': '26px',
                '-moz-border-radius': '4px',
                '-webkit-border-radius': '4px',
                'border-radius': '4px'
            });
            $(spin_bg_div).css({
                'position': 'absolute',
                'top': '0px',
                'z-index': '500',
                'width': '150%',
                'height': '150%',
                'background-color': '#000',
                'opacity': '0.5',
                'filter': 'alpha(opacity=50)',
                '-ms-filter': "alpha(opacity=50)"
            });

            // options for spinner
            var opts = {
                'color': '#000'
            };

            // invoke spinner
            new Spinner(opts).spin(document.getElementById('kintone-spin'));
        }

        // start(show) spinner
        $('.kintone-spinner').show();
    };

    // stop(hide) spinner
    var hideSpinner = function () {
        // hide spinner element
        $('.kintone-spinner').hide();
    };

    // submit success events
    kintone.events.on([
        'app.record.create.submit.success',
        'app.record.edit.submit.success',
    ], function (event) {
        showSpinner();

        var headers = {
            'Content-Type': 'application/json'
        };

        return kintone.proxy(API_GW_ENDPOINT, 'PUT', headers, event).then(function () {
            hideSpinner();
            return;
        });
    });
})(jQuery);
Customizing an App with JavaScript
set links and a file as follows at JavaScript and CSS Customization view.
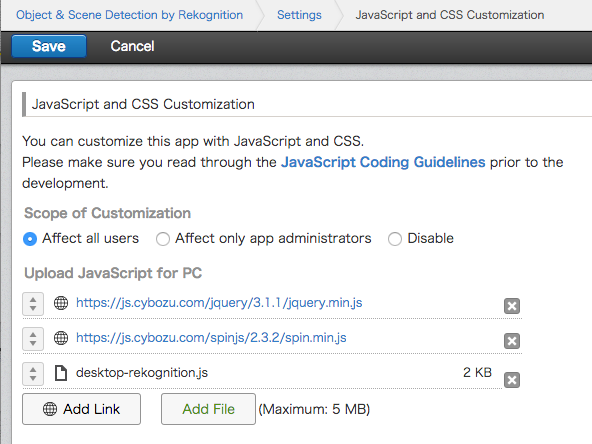
Upload JavaScript for PC
- https://js.cybozu.com/jquery/3.1.1/jquery.min.js [link]
- https://js.cybozu.com/spinjs/2.3.2/spin.min.js [link]
- desktop-rekognition.js [saved file]
Save a photo and analyze
If you save a photo as kintone record, the result of detecting that photo is spread at the kintone record.
