Summer'17 のリリースノートを見ていたところ、ちょっと夢が広がりそうな機能が追加されていました。
Retrieve and Deploy Metadata in Apex
現状対応できているメタデータは、カスタムメタデータとページレイアウトだけのようですが、これを使えば、以前作ろうとして断念した、ページレイアウトに合わせて動的にVF画面を生成することができそうだと思い、軽く試してみました。
メタデータの取得
まず、メタデータを取得する方法ですが、こんな感じ
List<String> componentNameList =
new List<String>{'Account-Account Layout'};

List<Metadata.Metadata> components = Metadata.Operations.retrieve(Metadata.MetadataType.Layout, componentNameList);

List<Metadata.Layout> leyout = (Metadata.Layout)components[0]
Metadata.Operations.retrieve の第一引数には、 Metadata.MetadataType enum 型を渡します。
現在使えるのは、 CustomMetadata とLayoutだけです。
第2引数では、取得したいコンポーネントのフルネームのリストを渡します。ページレイアウトの場合、《オブジェクト名》-《レイアウト名》がフルネームになります。
また、 Metadata.Operations.retrieve の戻り値は Metadata.Metadata型なので、適切な型にキャストします。
Metadata.Layoutの中身
今回利用する部分を元のページレイアウトと比較すると、下図のような感じになっています。
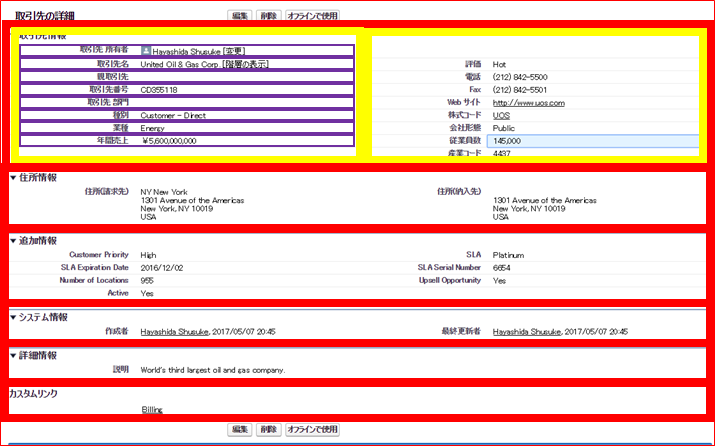
赤枠部分がMetadata.layoutSection
黄枠部分がMetadata.LayoutColumn
紫枠部分がMetadata.LayoutItem
にそれぞれ対応します。
ここで面倒臭いのが、LayoutColumnです。
VFではApex:PageBlockSection内に存在する要素を左から右に並べるようになっていますが、メタデータでは1列ごとのまとまりになっています。
これがなければ、そのままVFに表示出来たかもしれないんのですが、今回はそれぞれにラッパークラスを用意して実装してみます。
ラッパークラスの準備
作成したラッパークラスを順に説明します。
Metadata.LayoutItemのラッパークラス
public class LayoutItemWrapper {
    private Metadata.LayoutItem mLayoutItem  {get; set;}

    public String field {
        get {
            return mLayoutItem.field;
        }
    }
    public String customLink {
        get {
            return mLayoutItem.customLink;
        }
    }
    public Boolean isEditable {
        get {
            return mLayoutItem.behavior != Metadata.UiBehavior.Readonly ;
        }
    }
    public Boolean isRequirable {
        get {
            return mLayoutItem.behavior == Metadata.UiBehavior.Required;
        }
    }

    public Boolean isEmptySpace {
        get {
            return mLayoutItem.emptySpace;
        }
    }

    public Boolean isCustomLink {
        get {
            return mLayoutItem.customLink != null;
        }
    }

    public Boolean isAddress {
        get {
            return mLayoutItem.field.endsWith('Address');
        }
    }

    private LayoutItemWrapper(Metadata.LayoutItem mLayoutItem) {
        system.debug(mLayoutItem);
        this.mLayoutItem = mLayoutItem;
    }

    public static LayoutItemWrapper getLayoutItemWrapper(Metadata.LayoutItem mLayoutItem) {
        return new LayoutItemWrapper(mLayoutItem);
    }

    public static List<LayoutItemWrapper> getLayoutItemWrapper(List<Metadata.LayoutItem> mLayoutItems) {
        List<LayoutItemWrapper> retVal = new List<LayoutItemWrapper>();
        for(Metadata.LayoutItem li : mLayoutItems) {
            retVal.add(new LayoutItemWrapper(li));
        }

        return retVal;
    }
}
ここでは大したことはやってません。(ので、わざわざラッパークラス作らなくてもよかったかも。)
ちょっと手を加えているところとしては、isCustomLink と isAddress というプロパティを用意したところぐらいです。
これは、カスタムリンクと住所項目はVFに素直に表示できなかったので、VF上に表示しないカラムを判定するフラグに使います。
この二つの型も対応できるようであれば、 そのうち修正するかもしれません。
Metadata.LayoutSectionのラッパークラス
public class LayoutSectionWrapper {
    private Metadata.LayoutSection mLayoutSection {get; set;}
    public List<LayoutItemWrapper> items{get; private set;}

    public String label {
        get {
            return mLayoutSection.label;
        }
    }

    public Integer columns {
        get {
            return mLayoutSection.layoutColumns.size();
        }
    }

    public Boolean detailHeading {
        get {
            return mLayoutSection.detailHeading;
        }
    }

    public Boolean editHeading{
        get {
            return mLayoutSection.editHeading;
        }
    }

    public Boolean isCustomLink {
        get {
            return mLayoutSection.style == Metadata.LayoutSectionStyle.CustomLinks;
        }
    }

    private List<Metadata.LayoutItem> createSingleLayoutItemList(List<Metadata.LayoutColumn> layoutColumns) {
        List<Metadata.LayoutItem> retVal = new List<Metadata.LayoutItem>();

        Integer maxSize = 0;
        for(Metadata.LayoutColumn col : layoutColumns) {
            if(col.layoutItems != null) {
                maxSize = col.layoutItems.size() > maxSize ? col.layoutItems.size() : maxSize;
            }
        }
        for(Integer i = 0; i < maxSize; i++) {
            for(Integer j = 0; j < layoutColumns.size(); j++) {
                if(layoutColumns[j].layoutItems != null && i < layoutColumns[j].layoutItems.size()) {
                    retval.add(layoutColumns[j].layoutItems.get(i));
                }
            }
        }

        return retVal;
    }

    private LayoutSectionWrapper(Metadata.LayoutSection mLayoutSection) {
        this.mLayoutSection = mLayoutSection;
        items= new  List<LayoutItemWrapper>();
        if(columns  == 1){
            this.items= LayoutItemWrapper.getLayoutItemWrapper(mLayoutSection.layoutColumns[0].layoutItems);
        }
        else {
            this.items= LayoutItemWrapper.getLayoutItemWrapper(createSingleLayoutItemList(mLayoutSection.layoutColumns));
        }
    }

    public static LayoutSectionWrapper getLayoutSectionWrapper(Metadata.LayoutSection mLayoutSection) {
        return new LayoutSectionWrapper(mLayoutSection);
    }

    public static List<LayoutSectionWrapper> getLayoutSectionWrapper(List<Metadata.LayoutSection> mLayoutSections) {
        List<LayoutSectionWrapper> retVal = new List<LayoutSectionWrapper>();
        for(Metadata.LayoutSection s : mLayoutSections) {
            retVal.add(new LayoutSectionWrapper(s));
        }
        return retVal;
    }


}
セクション内のLayoutColumnの中にあるLayoutItemを、1つのリストに詰め直し、itemsプロパティでアクセスできるようにしています。
Metadata.Layoutのラッパークラス
public class LayoutWrapper {
     private Metadata.Layout mLayout{get; set;}
     public List<LayoutSectionWrapper> sections{get; private set;}
     public List<String> fieldNames {
         get {
             List<String> retVal = new List<String>();
             for(LayoutSectionWrapper s : sections) {
                 for(LayoutItemWrapper i : s.items) {
                     if(i.field != null) {
                         retVal.add(i.field);
                     }
                 }
             }
             return retVal;
         }
     }

     public LayoutWrapper(Metadata.Layout mLayout) {
         this.mLayout = mLayout;
         this.sections = LayoutSectionWrapper.getLayoutSectionWrapper(mLayout.layoutSections);
     }
}
ここでも大したことはしていませんが、拡張コントローラの中で取得する項目のリストを返す fieldNames プロパティを用意しています。
画面とコントローラー
拡張コントローラー
public with sharing class ApexMetadataLayoutSampleController {
    public LayoutWrapper layout {get; private set;}

    public ApexMetadataLayoutSampleController(ApexPages.StandardController stdController){
        String layoutName = EncodingUtil.urlDecode(ApexPages.currentPage().getParameters().get('lyt'), 'UTF-8');

        List<String> layoutNames = new List<String> {layoutName};
        List<Metadata.Metadata> layouts
          = Metadata.Operations.retrieve(Metadata.MetadataType.Layout, layoutNames );

        if(!layouts.isEmpty()) {
            this.layout = new LayoutWrapper((Metadata.Layout)layouts[0]);

            stdController.addFields(this.layout.fields);
        }

    }
}
今回、Visualforceには動的バインドを利用するので、拡張コントローラーとして実装します。
また、パラメータでレイアウト名を受け取るようにしています。
Visualforce
<apex:page standardController="Account" extensions="ApexMetadataLayoutSampleController">
    <apex:sectionHeader title="{!IF(Account.ID="","取引先の編集",Account.Name)}" subtitle="{!IF(Account.ID=="","新規取引先","")}" />
    <apex:pageBlock mode="maindetail">
        <apex:repeat value="{!layout.sections}" var="section">
            <apex:pageBlockSection title="{!section.label}" rendered="{!AND(section.detailHeading, NOT(section.isCustomLink))}">
                <apex:repeat value="{!section.items}" var="item">
                    <apex:outputField value="{!Account[item.field]}" rendered="{!AND(NOT(item.isEmptySpace), NOT(item.isCustomLink), NOT(item.isAddress))}"/>
                    <apex:outputLabel rendered="{!item.isEmptySpace}"/>
                </apex:repeat>
            </apex:pageBlockSection>
        </apex:repeat>
    </apex:pageBlock>
</apex:page>
Sections分repeatして複数セクションを作成し、その中でItems分repeatしてoutputFieldを配置します。
空白もあり得るので、空白の場合はoutputLabelの方を表示しています。
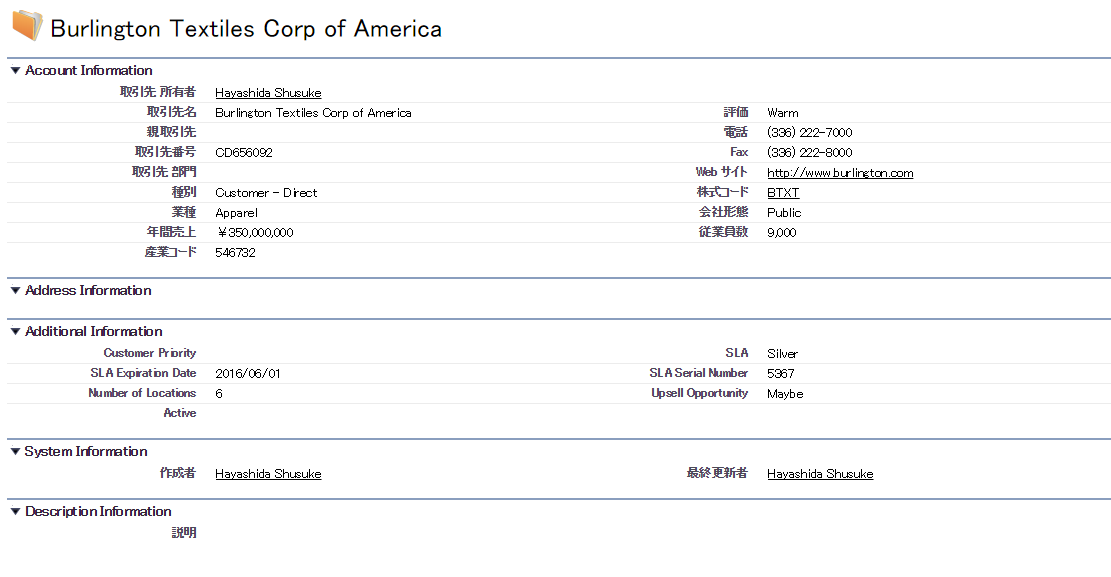
実行結果
こんな感じの表示になります。
終わりに
おおよそ期待通りのものが出来ました。
期待通りに行かなかったところは、セクション名にトランスレーションワークベンチが効いて無い所と、カスタムリンクのURL情報がメタデータから取得できないので、カスタムリンクは作れそうに無い所ですかね。住所項目はもうしょうがないので、代替案を考えたい所。
現状はページレイアウトとカスタムメタデータだけですが、他のも扱えるようになると、いろいろおもしろいものが作れそうな気がします。