Amazon Inspectorを触る機会があったため、脆弱性診断におけるAmazon Inspectorの位置づけを軽く整理した上で、自分なりにその使い方をまとめました。
Amazon Inspectorとは?
Amazon InspectorとはAWSが提供する脆弱性診断を行うサービスで、エージェントを利用したプラットホーム診断のためのサービスです。EC2に対して実施するもので有料です。またEC2のみのため、他社クラウドのインスタンスやデータセンターにあるサーバには実行できません。
こうしたサービスが求められる背景(私見)
あくまで私見ですが、セキュリティへの取り組みにはまずは「リスクの可視化」が必要と言われてますが、これまではインフラ担当者という「人」に依存する形で、自分たちのサービスで利用しているサーバのOSやミドルウェアに脆弱性有無の可視化や対応が行われていることが多いように思います。
しかしAWSをはじめ、パブリッククラウドを利用したサービスではインフラ担当者がいないのは普通です。そうした背景を考えると、Amazon Inspectorのように自動にリスクが可視化されるようにすることは、今後は重要なことと考えています。
Amazon Inspectorと脆弱性診断サービスの違い
Amazon Inspectorと外部会社を利用した(よくある)脆弱性診断サービスには、以下のような違いがある。(もちろん脆弱性診断サービスにはいろいろあるため、これが全てではない)
| Amazon Inspector | 脆弱性診断サービス | |
|---|---|---|
| 診断の種類(トポロジー) | 診断用エージェントを利用したホスト型診断 | 外部ネットワーク型診断など |
| 診断の種類(レイヤー) | プラットホーム診断(ネットワーク/OS/ミドルウェア) | プラットホーム診断+Webアプリケーション診断など選択可能 |
| 実施者 | プログラム(エージェント) | セキュリティ診断の担当者 |
| AWSへの事前申請 | 不要 | 必要 |
詳細はこちらを参照
http://www.slideshare.net/AmazonWebServicesJapan/aws-black-belt-online-seminar-amazon-inspector
そしてAmazon Inspectorでは以下のような項目とルールパッケージが用意されており、内容に沿ったテストが可能になっている。
| 項目 | ルールパッケージ名 | 内容 | 注意点 |
|---|---|---|---|
| 共通脆弱性識別子 | Common Vulnerabilities and Exposures | EC2 インスタンス が一般的な脆弱性や曝露 (CVE) に曝露されているかを確認する | |
| CIS オペレーティングシステムのセキュリティ設定ベンチマーク | CIS Operating System Security Configuration Benchmarks | アメリカにあるインターネット・セキュリティー・センター(CIS)が定義したセキュリティチェックリストに沿って確認する | Amazon Linuxでのみ利用可能 |
| セキュリティのベストプラクティス | Security Best Practices | システムが安全に設定されているかどうかを判断するのに利用する | WindowsのEC2インスタンスでは結果が出ないので、LinuxのEC2インスタンスで利用すること。 |
| 実行時の動作の分析 | Runtime Behavior Analysis | 評価の実行中にインスタンスの動作を分析し、EC2 インスタンスのセキュリティを高めるためのガイダンスを提供する |
詳細はこちらを参照
https://docs.aws.amazon.com/ja_jp/inspector/latest/userguide/inspector_rule-packages.html
費用の話
月250回までなら1台実行毎に$0.3かかる。
| Amazon Inspector の利用開始から 90 日間 | エージェント評価ごとの料金 |
|---|---|
| 最初の 250 回のエージェント評価 | 0.00 USD |
| 任意の月 | エージェント評価ごとの料金 |
|---|---|
| 最初の 250 回のエージェント評価 | 0.30 USD |
| 次の 750 回のエージェント評価 | 0.25 USD |
詳細はこちらを参照
https://aws.amazon.com/jp/inspector/pricing/
Amazon Inspectorの使い方
Inspectorの実施条件は以下の通り。RHELやCentOSの場合、6以下では利用できない。またWindows向け対応はまだβ版のため、正式には対応していない。
- Amazon Linux (2015.03 以降)
- Ubuntu (14.04 LTS)
- Red Hat Enterprise Linux (7.2)
- CentOS (7.2)
- Windows Server 2008 R2 および Windows Server 2012(β版)
準備
IAMロールの作成
AWS Webコンソール上のInspectorを開いて、「今すぐ始める」→「ロールの選択または作成」をクリック

IAMロール名"inspector"、ポリシー名「新しいロールポリシーの作成」を選び、右下の「許可」をクリック。
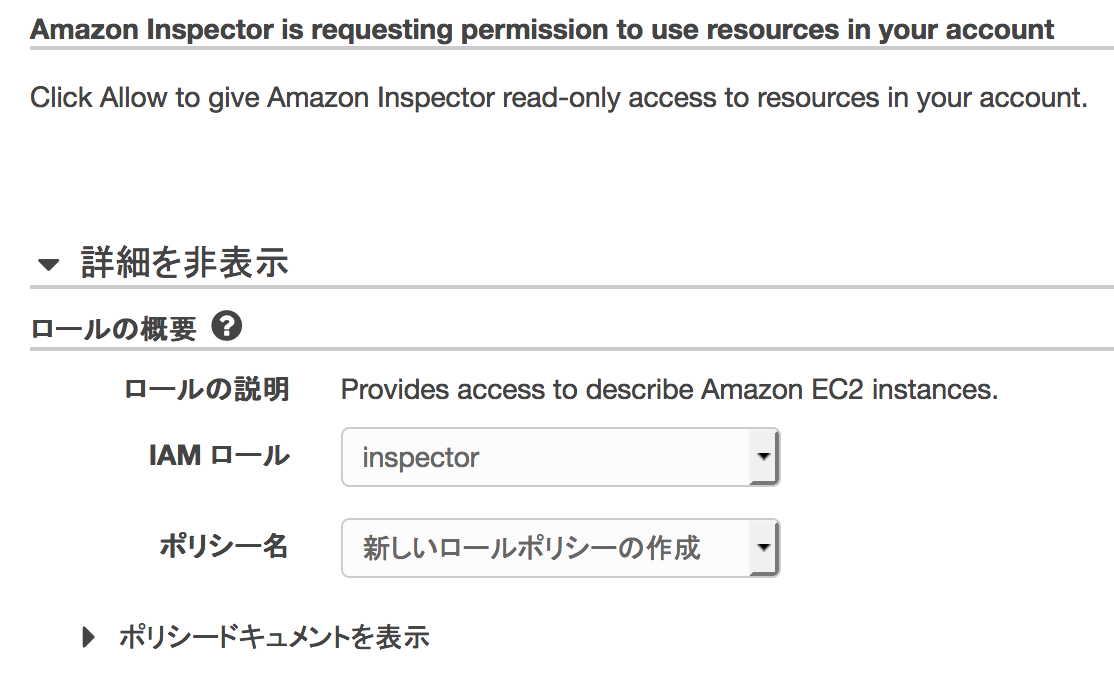
なおこのポリシーはec2 describe-instancesのアクションのみ許可するもの。またロール名は他の名前でも問題ない。
タグを付ける
Amazon Inspectorを実行するEC2インスタンスに対してタグを付ける。GUIから実施するか、以下のようにaws-cliを使ってタグをつける。
# テスト実行
aws ec2 create-tags --dry-run --resources i-XXXXXXXXXXXXX --tags Key=inspector,Value=True

# 本番実行(--dry-runなし)
aws ec2 create-tags --resources i-XXXXXXXXXXXXX --tags Key=inspector,Value=true
- --resources の後にEC2インスタンスのリソースIDを指定します。
- 上記例だと「Key: inspector, Value: true」というタグが設定される。
参考資料
https://docs.aws.amazon.com/ja_jp/inspector/latest/userguide/inspector_applications.html
エージェントのインストール
Amazon Inspectorを実行するEC2インスタンス上で、以下のようにコマンドを実行する
ファイルの入手
# installファイルの入手
wget https://d1wk0tztpsntt1.cloudfront.net/linux/latest/install
# wget https://d1wk0tztpsntt1.cloudfront.net/linux/latest/install
--2016-11-18 11:45:51--  https://d1wk0tztpsntt1.cloudfront.net/linux/latest/install
Resolving d1wk0tztpsntt1.cloudfront.net (d1wk0tztpsntt1.cloudfront.net)... 54.192.233.79, 54.192.233.106, 54.192.233.110, ...
Connecting to d1wk0tztpsntt1.cloudfront.net (d1wk0tztpsntt1.cloudfront.net)|54.192.233.79|:443... connected.
HTTP request sent, awaiting response... 200 OK
Length: 23648 (23K)
Saving to: ‘install’

100%[==================================================================================>] 23,648      --.-K/s   in 0.002s

2016-11-18 11:45:51 (14.8 MB/s) - ‘install’ saved [23648/23648]
インストール
# installスクリプトを実行してエージェントをインストール
bash install
# ls -ltr
total 24
-rw-r--r-- 1 root root 23648 Nov 16 23:59 install

# bash install
Distribution of the machine is CentOS Linux.
Distribution type of the machine is centos.
Revision of the distro is 7.
Kernel version of the machine is 3.10.0-327.13.1.el7.x86_64.
...
(略)
...
Installation script completed successfully.

Notice:
By installing the Amazon Inspector Agent, you agree that your use is subject to the terms of your existing
AWS Customer Agreement or other agreement with Amazon Web Services, Inc. or its affiliates governing your
use of AWS services. You may not install and use the Amazon Inspector Agent unless you have an account in
good standing with AWS.
*  *  *
Current running agent reports to arsenal endpoint:
Current running agent reports version as: 1.0.551.0
This install script was created to install agent version:1.0.551.0
In most cases, these version numbers should be the same.
#
セキュリティグループ確認(オプション)
EC2からAmazon Inspector および Amazon S3 サービス用のパブリックエンドポイントへのアウトバウンド許可されているか確認する。なお、インバウンドの許可は不要。
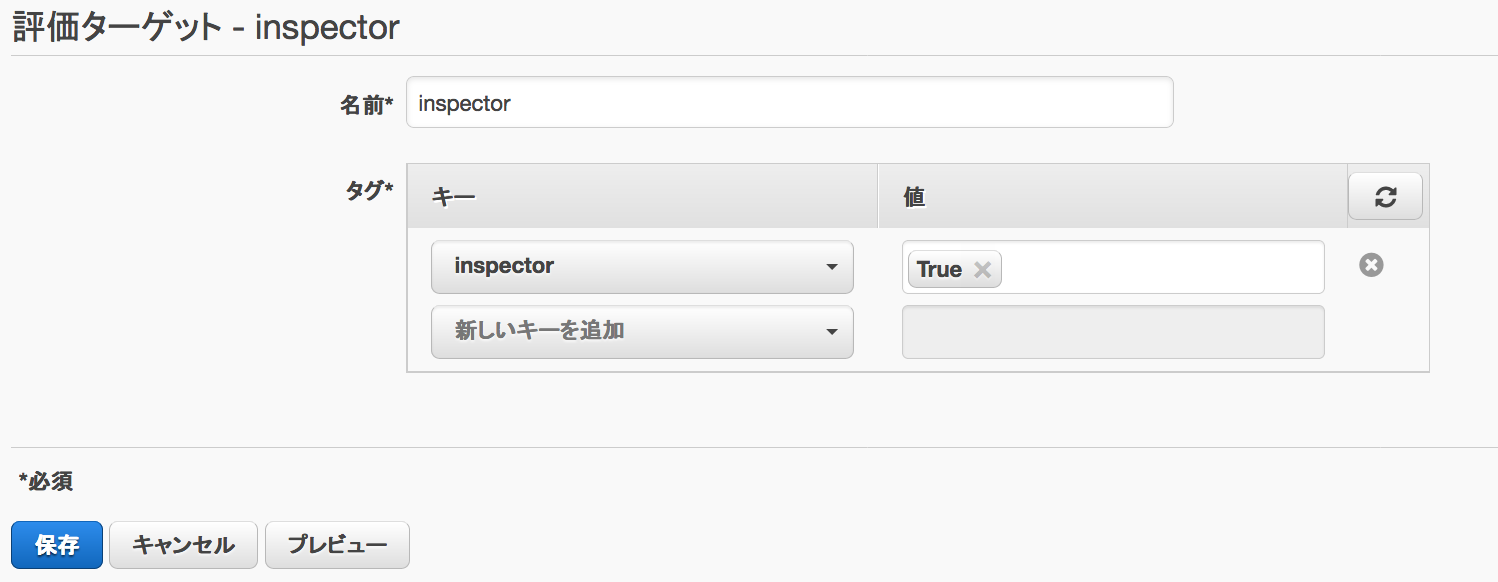
評価ターゲットを作る
どのタグがついているものをAmazon Inspectorの調査対象とするかを設定するために、評価ターゲットを作成します。ここでは「キー: inspector、値:True」となっているものをAmazon Inspectorの調査対象とするようにしてます。
| 項目 | 設定値 |
|---|---|
| 名前 | 任意の名称(下記では"inspector") |
| キー | Keyの値(下記では"inspector") |
| 値 | Valueの値(下記では"True") |
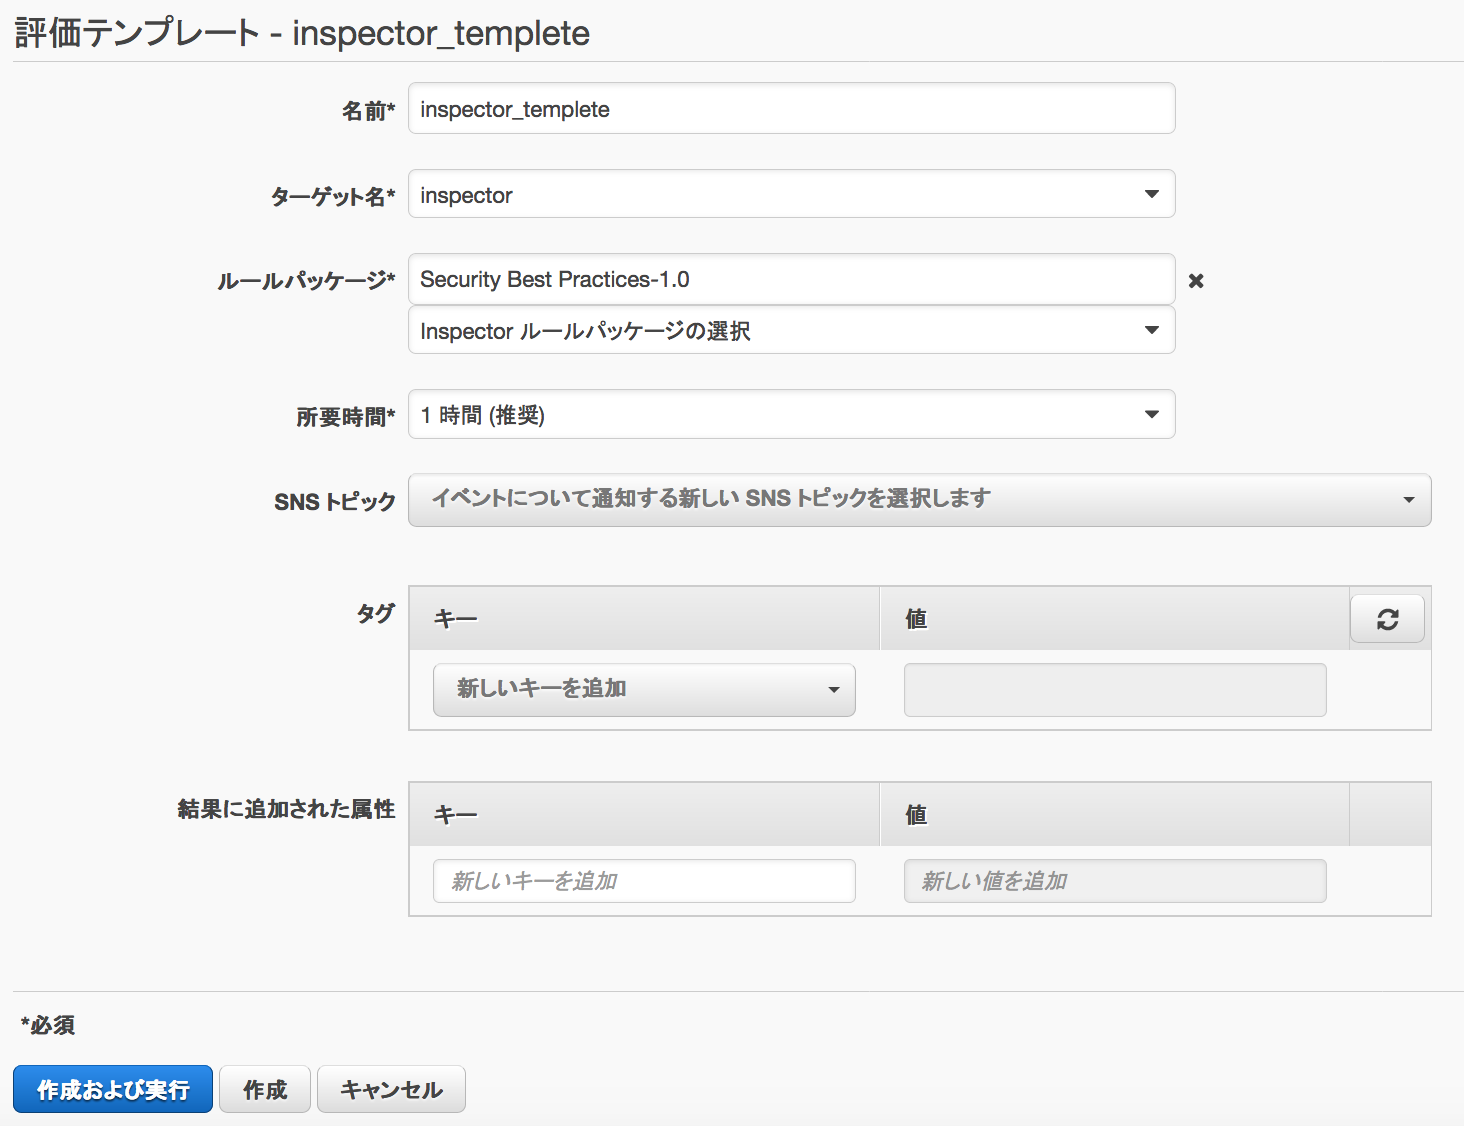
評価テンプレートを作る
以下のようにして評価テンプレートを作成し、「作成および実行」でAmazon Inspectorが実行される。
なお評価テンプレートの修正はできない。削除&作成が必要となる。
| 項目 | 設定値 |
|---|---|
| 名前 | 任意の名称(下記では"inspector_templete") |
| ターゲット名 | 先程作成したターゲット名を記載(本資料では"inspector") |
| ルールパッケージ | 前述のルールパッケージを選択(下記では"Security Best Practices-1.0"を選択) |
| 所要時間 | 時間を選択。長ければ長いほど詳細のテストができるが推奨は1時間 |
| SNSトピック | 検出されたものをSNSに通知する場合は設定する(オプション) |
| タグ | 必要に応じて設定(オプション) |
| 結果に追加された属性 | 必要に応じて設定(オプション) |
またaws-cliでAmazon Inspectorを実行する場合は以下のように行う
aws inspector start-assessment-run --assessment-run-name (評価テンプレート名) --assessment-template-arn (評価テンプレートのARN)
# aws inspector start-assessment-run --assessment-run-name inspector_templete --assessment-template-arn arn:aws:inspector:ap-northeast-1:XXXXXXXXXXXX:target/xxxxxxxx/template/xxxxxxxx
結果確認
実行開始すると、検出されたものから左ペインにある「評価の実行」内に出力される。検出件数をクリックすると以下のような画面が表示されるので、検出された内容や推奨事項を確認して対応を行う。

まとめ
Amazon Inspectorは、GUIでもaws-cliでもあっけないほど簡単に実行できました。
またaws-cliとcronやRundeckやjenkinsなどが利用して自動実行もできるため、有料サービスですが定期的に実行してリスクの可視化を行うとよさそうです。
資料
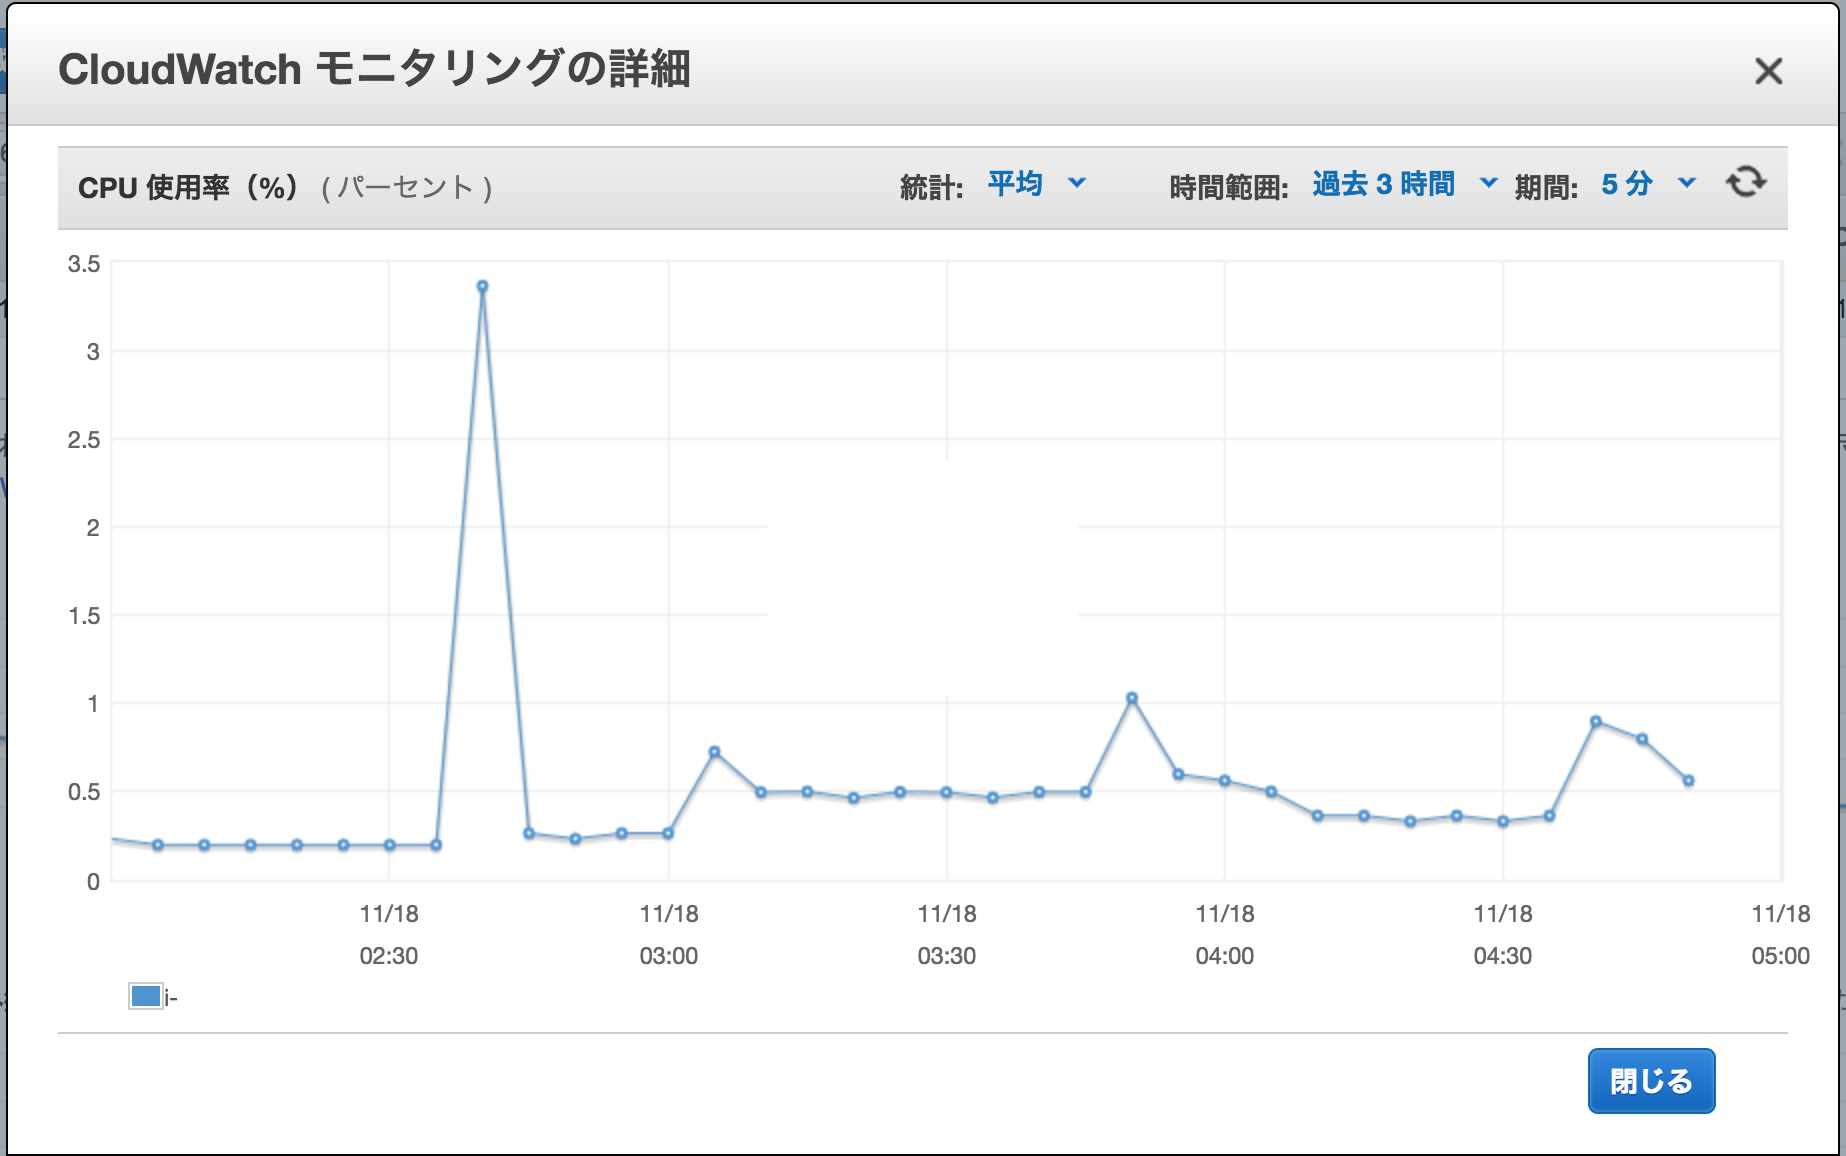
診断実行中のプロセスと負荷
診断実行中は以下のようなプロセスが起動してました。
root     14202  0.0  0.0      0     0 ?        S<   Nov17   0:00 [kworker/0:2H]
root     14203  0.0  0.0      0     0 ?        S<   Nov17   0:00 [kworker/0:0H]
root     21393  0.0  0.0      0     0 ?        S    10:40   0:00 [kworker/0:0]
root     21430  0.0  0.4 140788  5060 ?        Ss   10:42   0:00 sshd: root@pts/0
root     21434  0.0  0.2 115384  2112 pts/0    Ss   10:42   0:00 -bash
root     21994  0.0  0.0      0     0 ?        R    11:46   0:00 [kworker/0:1]
root     22054  0.0  2.9 470424 30116 ?        Ssl  11:46   0:01 /opt/aws/awsagent/bin/awsagent
root     22231  0.0  0.2 176024  2412 ?        S    12:03   0:00 /usr/sbin/CROND -n
root     22232  0.0  0.1 113120  1200 ?        Ss   12:03   0:00 /bin/bash -c /bin/sleep $[ ( $RANDOM % 3420 ) + 1 ]s; /opt/aws/awsagent/bin/update > /var/log/awsagent-update.log 2>&1
root     22233  0.0  0.0 107896   616 ?        S    12:03   0:00 /bin/sleep 3324s
root     22293  0.0  0.0      0     0 ?        S<   12:12   0:00 [inspector_task_]
root     22294  0.0  0.0      0     0 ?        S<   12:12   0:00 [inspector_libra]
CloudWatchで負荷をみたところ、インストール時のみ一瞬負荷があがりましたが、診断中はあまり負荷が上がりませんでした。
参考資料
http://dev.classmethod.jp/cloud/aws/aws-inspector/
http://dev.classmethod.jp/cloud/aws/blackbelt2016-inspector/
https://docs.aws.amazon.com/ja_jp/inspector/latest/userguide/inspector_introduction.html
https://docs.aws.amazon.com/ja_jp/inspector/latest/userguide/inspector_settingup.html