前回は Cardboard の組み立てでしたが、今回は Google VR SDK を用いて画像や動画を表示するアプリの作り方について説明します。
SDK
こちら のページに、Unity、Android、iOS のそれぞれに向けた SDK が用意されています。
iOS
iOS は CocoaPods からインストールすることができるので、こんな感じで Podfile を作成し、インストールします。
# Uncomment this line to define a global platform for your project
# platform :ios, '8.0'
# Uncomment this line if you're using Swift
# use_frameworks!

target 'vr-sample' do
    pod 'GVRSDK'
end
Android
事前に NDK をインストールしておく必要があります。
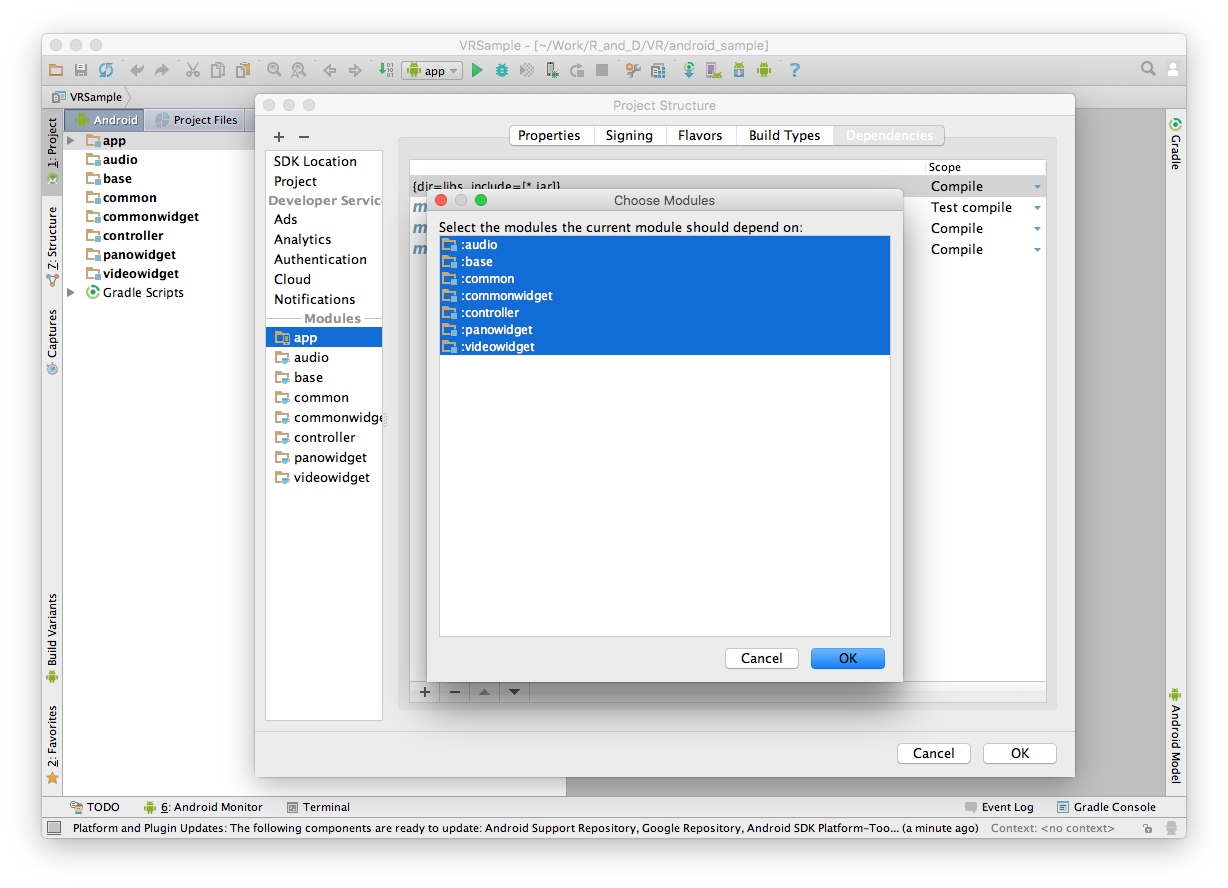
SDK の libraries ディテクトリーの中に .AAR 形式でライブラリが提供されていますので、必要なライブラリをプロジェクトに追加します。
ファイル形式
JPEG や H.264|MPEG-4 AVC であれば、iOS も Android も問題なく表示、再生できます。動画は HLS 配信にも対応しています。
また、コンテンツの種類として、Mono と Stereo を指定するのですが、RICOH THETA S や Kodak SP360 などで撮影したものを使用する場合は、Mono を指定します。
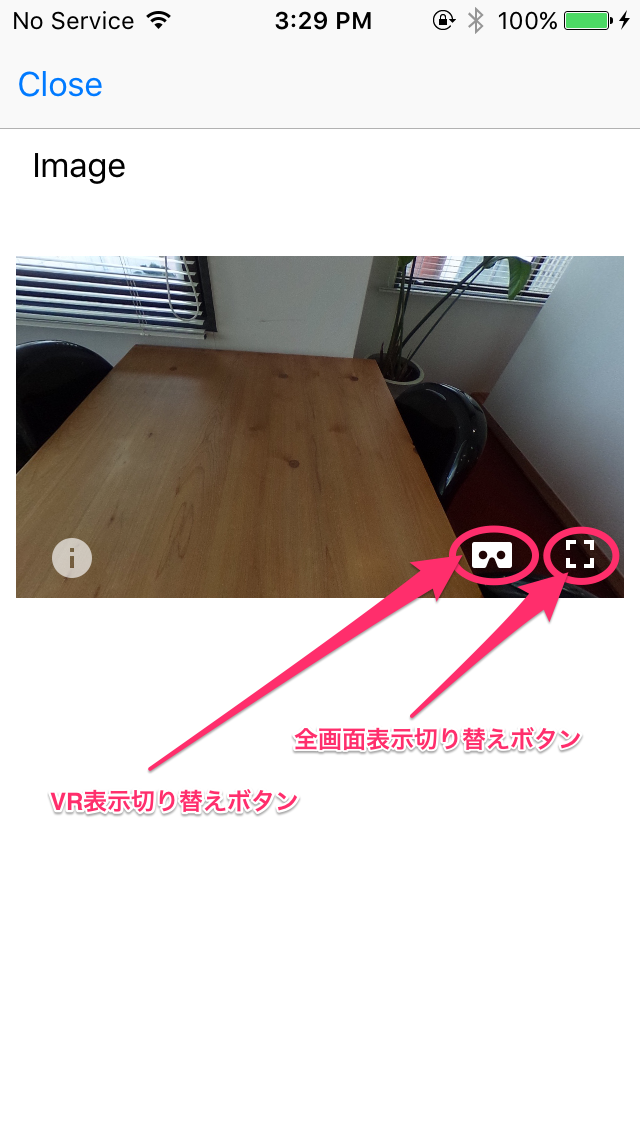
画面イメージ
画面に配置した際のイメージはこのようになります。
画像の表示
iOS
GVRPanoramaView を利用します。
VR 表示処理など、必要な処理はライブラリ側が行ってくれますので、アプリ側は View を配置して画像を読み込ませるだけです。
# import "VrImageViewController.h"
# import <GVRSDK/GVRPanoramaView.h>

@interface VrImageViewController () <GVRWidgetViewDelegate> {

}

@end

@implementation VrImageViewController

- (void)viewDidLoad {
    [super viewDidLoad];
    // Do any additional setup after loading the view.
    CGRect viewFrame = CGRectZero;
    viewFrame.origin.x = 8;
    viewFrame.origin.y = 128;
    viewFrame.size.width = self.view.frame.size.width - viewFrame.origin.x * 2;
    viewFrame.size.height = floor(viewFrame.size.width * self.view.frame.size.width / self.view.frame.size.height);

    GVRPanoramaView *panoramaView = [[GVRPanoramaView alloc] initWithFrame:viewFrame];
    panoramaView.delegate = self;
    // 全画面表示切り替えボタン
    panoramaView.enableFullscreenButton = YES;
    // VR表示切り替えボタン
    panoramaView.enableCardboardButton = YES;
    [self.view addSubview:panoramaView];

    // 表示する画像を取得する。
    NSString *imageFilePath = [[NSBundle mainBundle] pathForResource:@"image_sample" ofType:@"jpg"];
    UIImage *vrImage = [UIImage imageWithContentsOfFile:imageFilePath];
    // 取得した画像を読み込ませる。
    [panoramaView loadImage:vrImage ofType:kGVRPanoramaImageTypeMono];
}

# pragma mark - Google VR Widget View Delegate

- (void)widgetViewDidTap:(GVRWidgetView *)widgetView
{
    // View がタップされた時に呼ばれる。
    NSLog(@"%s", __PRETTY_FUNCTION__);
}

- (void)widgetView:(GVRWidgetView *)widgetView didChangeDisplayMode:(GVRWidgetDisplayMode)displayMode
{
    // 表示モードが切り替わった時に呼ばれる。
    NSString *displayModeName = nil;
    switch (displayMode) {
        case kGVRWidgetDisplayModeEmbedded:
            // 埋め込み表示
            displayModeName = @"Embedded";
            break;
        case kGVRWidgetDisplayModeFullscreen:
            // 全画面表示
            displayModeName = @"Fullscreen";
            break;
        case kGVRWidgetDisplayModeFullscreenVR:
            // VR表示
            displayModeName = @"FullscreenVR";
            break;
        default:
            displayModeName = @"Unknown";
            break;
    }
    NSLog(@"%s - %@", __PRETTY_FUNCTION__, displayModeName);
}

- (void)widgetView:(GVRWidgetView *)widgetView didLoadContent:(id)content
{
    // コンテンツの読み込みが完了した時に呼ばれる。
    NSLog(@"%s - %@", __PRETTY_FUNCTION__, content);
}

- (void)widgetView:(GVRWidgetView *)widgetView didFailToLoadContent:(id)content withErrorMessage:(NSString *)errorMessage
{
    // コンテンツの読み込みに失敗した時に呼ばれる。
    NSLog(@"%s\n%@", __PRETTY_FUNCTION__, errorMessage);
}

@end
Android
VrPanoramaView を利用します。
Android も iOS と同様に View を配置して、画像を読み込ませます。
<?xml version="1.0" encoding="utf-8"?>
<RelativeLayout xmlns:android="http://schemas.android.com/apk/res/android"
    xmlns:tools="http://schemas.android.com/tools"
    android:layout_width="match_parent"
    android:layout_height="match_parent"
    android:paddingBottom="@dimen/activity_vertical_margin"
    android:paddingLeft="@dimen/activity_horizontal_margin"
    android:paddingRight="@dimen/activity_horizontal_margin"
    android:paddingTop="@dimen/activity_vertical_margin"
    tools:context="jp.co.ienter.vrsample.MainActivity">

    <TextView
        android:layout_width="wrap_content"
        android:layout_height="wrap_content"
        android:text="Hello World!"
        android:id="@+id/textView" />

    <com.google.vr.sdk.widgets.pano.VrPanoramaView
        android:layout_width="match_parent"
        android:layout_height="256dp"
        android:layout_below="@+id/textView"
        android:layout_alignParentStart="true"
        android:id="@+id/vr_image_view"
        android:layout_marginTop="16dp">

    </com.google.vr.sdk.widgets.pano.VrPanoramaView>
</RelativeLayout>
public class MainActivity extends AppCompatActivity {

    private VrPanoramaView panoramaView;
    private ImageLoaderTask imageLoaderTask;

    @Override
    protected void onCreate(Bundle savedInstanceState) {
        super.onCreate(savedInstanceState);
        setContentView(R.layout.activity_main);

        panoramaView = (VrPanoramaView) findViewById(R.id.vr_image_view);
        panoramaView.setEventListener(new PanoramaEventListener());

        imageLoaderTask = new ImageLoaderTask();
        imageLoaderTask.execute();
    }

    private class ImageLoaderTask extends AsyncTask<Void, Void, Boolean> {
        private Bitmap panoramaImage;
        @Override
        protected Boolean doInBackground(Void... params) {
            AssetManager assetManager = getAssets();
            InputStream inputStream;
            try {
                inputStream = assetManager.open("image_sample.jpg");
            } catch (IOException e) {
                e.printStackTrace();
                return  false;
            }
            panoramaImage = BitmapFactory.decodeStream(inputStream);
            try {
                inputStream.close();
            } catch (IOException e) {
                e.printStackTrace();
            }
            return true;
        }

        @Override
        protected void onPostExecute(Boolean aBoolean) {
            super.onPostExecute(aBoolean);

            VrPanoramaView.Options options = new VrPanoramaView.Options();
            options.inputType = VrPanoramaView.Options.TYPE_MONO;
            panoramaView.loadImageFromBitmap(panoramaImage, options);
        }
    }

    private class PanoramaEventListener extends VrPanoramaEventListener {

        @Override
        public void onLoadSuccess() {
            // コンテンツの読み込みに成功。
            super.onLoadSuccess();
            Log.d("VR", "Content Load Success.");
        }

        @Override
        public void onLoadError(String errorMessage) {
            // コンテンツの読み込みに失敗。
            super.onLoadError(errorMessage);
            Log.d("VR", errorMessage);
        }

        @Override
        public void onClick() {
            // View がタップされた時に呼ばれる。
            super.onClick();
            Log.d("VR", "Click");
        }

        @Override
        public void onDisplayModeChanged(int newDisplayMode) {
            // 表示モードが切り替わった時に呼ばれる。
            super.onDisplayModeChanged(newDisplayMode);
            String displayModeName;
            switch (newDisplayMode) {
                case VrWidgetView.DisplayMode.EMBEDDED:
                    displayModeName = "EMBEDDED";
                    break;
                case VrWidgetView.DisplayMode.FULLSCREEN_MONO:
                    displayModeName = "FULLSCREEN_MONO";
                    break;
                case VrWidgetView.DisplayMode.FULLSCREEN_VR:
                    displayModeName = "FULLSCREEN_VR";
                    break;
                default:
                    displayModeName = "UNKNOWN";
                    break;
            }
            Log.d("VR", "Display Mode = " + displayModeName);
        }
    }
}
動画の表示
iOS
GVRVideoView を利用します。
こちらも GVRPanoramaView と同じように配置、設定します。
# import "VrVideoViewController.h"
# import <GVRVideoView.h>

@interface VrVideoViewController () <GVRWidgetViewDelegate> {

}

@end

@implementation VrVideoViewController

- (void)viewDidLoad {
    [super viewDidLoad];
    // Do any additional setup after loading the view.

    CGRect viewFrame = CGRectZero;
    viewFrame.origin.x = 8;
    viewFrame.origin.y = 128;
    viewFrame.size.width = self.view.frame.size.width - viewFrame.origin.x * 2;
    viewFrame.size.height = floor(viewFrame.size.width * self.view.frame.size.width / self.view.frame.size.height);

    GVRVideoView *videoView = [[GVRVideoView alloc] initWithFrame:viewFrame];
    videoView.delegate = self;  // Delegate の内容は GVRPanoramaView とほぼ同じだが、再生位置が取得できるようになっている。
    videoView.enableFullscreenButton = YES;
    videoView.enableCardboardButton = YES;
    [self.view addSubview:videoView];

    // 再生する動画ファイルをURL形式で指定する。
    NSURL *videoUrl = [[NSBundle mainBundle] URLForResource:@"video_sample" withExtension:@"mp4"];
    // HLS 配信の場合はこのようにURLを直接指定する。
    // NSURL *videoUrl = [NSURL URLWithString:@"https://vr.cloudfront.net/sample.m3u8"];
    [videoView loadFromUrl:videoUrl ofType:kGVRVideoTypeMono];
}

# pragma mark - Google VR Video View Delegate

- (void)widgetViewDidTap:(GVRWidgetView *)widgetView
{
    // View がタップされた時に呼ばれる。
    NSLog(@"%s", __PRETTY_FUNCTION__);
}

- (void)widgetView:(GVRWidgetView *)widgetView didChangeDisplayMode:(GVRWidgetDisplayMode)displayMode
{
    // 表示モードが切り替わった時に呼ばれる。
    NSString *displayModeName = nil;
    switch (displayMode) {
        case kGVRWidgetDisplayModeEmbedded:
            // 埋め込み表示
            displayModeName = @"Embedded";
            break;
        case kGVRWidgetDisplayModeFullscreen:
            // 全画面表示
            displayModeName = @"Fullscreen";
            break;
        case kGVRWidgetDisplayModeFullscreenVR:
            // VR表示
            displayModeName = @"FullscreenVR";
            break;
        default:
            displayModeName = @"Unknown";
            break;
    }
    NSLog(@"%s - %@", __PRETTY_FUNCTION__, displayModeName);
}

- (void)widgetView:(GVRWidgetView *)widgetView didLoadContent:(id)content
{
    // コンテンツの読み込みが完了した時に呼ばれる。
    NSLog(@"%s - %@", __PRETTY_FUNCTION__, content);
}

- (void)widgetView:(GVRWidgetView *)widgetView didFailToLoadContent:(id)content withErrorMessage:(NSString *)errorMessage
{
    // コンテンツの読み込みに失敗した時に呼ばれる。
    NSLog(@"%s\n%@", __PRETTY_FUNCTION__, errorMessage);
}

- (void)videoView:(GVRVideoView *)videoView didUpdatePosition:(NSTimeInterval)position
{
    // 再生位置を取得
    NSLog(@"%s - %lf", __PRETTY_FUNCTION__, position);
}

@end
Android
VrVideoView を利用します。
VrPanoramaView と違い、動画ファイルをそのまま指定することができます。
<?xml version="1.0" encoding="utf-8"?>
<RelativeLayout xmlns:android="http://schemas.android.com/apk/res/android"
    xmlns:tools="http://schemas.android.com/tools"
    android:layout_width="match_parent"
    android:layout_height="match_parent"
    android:paddingBottom="@dimen/activity_vertical_margin"
    android:paddingLeft="@dimen/activity_horizontal_margin"
    android:paddingRight="@dimen/activity_horizontal_margin"
    android:paddingTop="@dimen/activity_vertical_margin"
    tools:context="jp.co.ienter.vrsample.MainActivity">

    <TextView
        android:layout_width="wrap_content"
        android:layout_height="wrap_content"
        android:text="Hello World!"
        android:id="@+id/textView" />

    <com.google.vr.sdk.widgets.video.VrVideoView
        android:layout_width="match_parent"
        android:layout_height="256dp"
        android:layout_below="@+id/textView"
        android:layout_alignParentStart="true"
        android:layout_marginTop="16dp"
        android:id="@+id/vr_video_view">

    </com.google.vr.sdk.widgets.video.VrVideoView>
</RelativeLayout>
public class MainActivity extends AppCompatActivity {

    private VrVideoView videoView;

    @Override
    protected void onCreate(Bundle savedInstanceState) {
        super.onCreate(savedInstanceState);
        setContentView(R.layout.activity_main);

        videoView = (VrVideoView) findViewById(R.id.vr_video_view);
        videoView.setEventListener(new VideoEventListener());
        try {
            VrVideoView.Options videoOptions = new VrVideoView.Options();
            videoOptions.inputType = VrVideoView.Options.TYPE_MONO;

            // HLS 配信の場合は、inputFormat に FORMAT_HLS を指定する。
            videoOptions.inputFormat = VrVideoView.Options.FORMAT_HLS;
            Uri uri = Uri.parse("https://vr.cloudfront.net/sample.m3u8");
            videoView.loadVideo(uri, videoOptions);

            // HLS 配信以外は FORMAT_DEFAULT を指定する。
            videoOptions.inputFormat = VrVideoView.Options.FORMAT_DEFAULT;
            videoView.loadVideoFromAsset("video_sample.mp4", videoOptions);
        } catch (IOException e) {
            e.printStackTrace();
            Log.d("VR", "Video Load Error.");
        }
    }

    private class VideoEventListener extends VrVideoEventListener {
        @Override
        public void onLoadSuccess() {
            // コンテンツの読み込みに成功。
            super.onLoadSuccess();
            Log.d("VR", "Content Load Success.");
        }

        @Override
        public void onLoadError(String errorMessage) {
            // コンテンツの読み込みに失敗。
            super.onLoadError(errorMessage);
            Log.d("VR", errorMessage);
        }

        @Override
        public void onClick() {
            // View がタップされた時に呼ばれる。
            super.onClick();
            Log.d("VR", "Click");
        }

        @Override
        public void onDisplayModeChanged(int newDisplayMode) {
            // 表示モードが切り替わった時に呼ばれる。
            super.onDisplayModeChanged(newDisplayMode);
            String displayModeName;
            switch (newDisplayMode) {
                case VrWidgetView.DisplayMode.EMBEDDED:
                    displayModeName = "EMBEDDED";
                    break;
                case VrWidgetView.DisplayMode.FULLSCREEN_MONO:
                    displayModeName = "FULLSCREEN_MONO";
                    break;
                case VrWidgetView.DisplayMode.FULLSCREEN_VR:
                    displayModeName = "FULLSCREEN_VR";
                    break;
                default:
                    displayModeName = "UNKNOWN";
                    break;
            }
            Log.d("VR", "Display Mode = " + displayModeName);
        }

        @Override
        public void onNewFrame() {
            // 動画再生位置を取得
            super.onNewFrame();
            Log.d("VR", "Position : " + videoView.getCurrentPosition());
        }

        @Override
        public void onCompletion() {
            // 動画再生が完了
            super.onCompletion();
        }
    }
}
まとめ
このように画像や動画を表示させるだけであれば、あまり考えることなく実現できます。
メモリの使用量などを考慮する必要はありますが、複数のコンテンツを並べて表示することも可能でしたので、サムネイルを一覧で表示させることもできそうです。
また、HLS 配信に対応しているので、環境を整えればライブ配信もできそうです。