開発環境
HoloLens の OS は Windows 10 なので、Windows 10 環境が必要。
エミュレーターは Hyper-V 上で動くので、Hyper-V に対応した端末が必要。
メモリーは8GBでは心もとないので、16GBはあったほうがいい。
開発ツール
こちら から各種ツールをダウンロードしてインストールする。
- Visual Studio 2015
Community Edition でも問題はないが、ライセンスには注意する。
Express for Windows 10 では開発できなかった。 - HoloLens Emulator
実行時にメモリ不足のエラーが発生することがあるが、エラーメッセージにあるリンクを参考にレジストリを設定する。
もしくは、Hyper-V マネージャーで2GiB以上を設定する。(こちらは試していない) - Unity 5.5
HoloLens へのアクセス
ブラウザ経由でデバイスポータルにアクセスできる。
- USB接続している場合は
http://127.0.0.1:10080/ - 無線LANでは
https://<HoloLens IP Address>/(httpsであることに注意。)
HoloLens のIPアドレスは、HoloLens内で Settings -> Networok & Internet -> Wi-Fi -> Advanced options で確認できる。
Unity の設定
詳しいことは、こちら に。
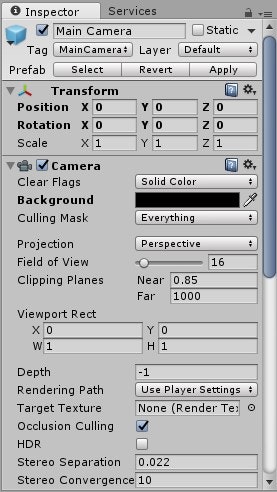
メインカメラ
- メインカメラの位置を0,0,0 に設定する。
- 背景を黒の透明(RGBA = 0,0,0,0)の単色(Solid Color)に設定する。
- Clipping Planes の Near の値を 0.85 に設定する。
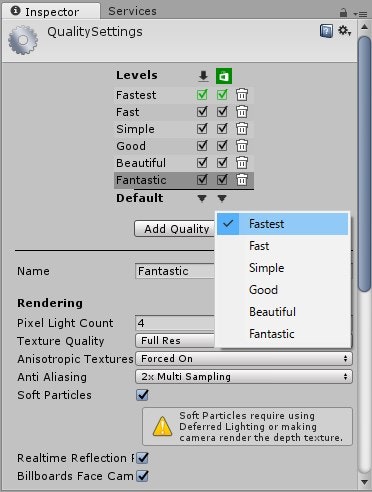
パフォーマンス
- Edit -> Project Settings -> Quality を選択。
- Windows Store の Default を Fastest にする。
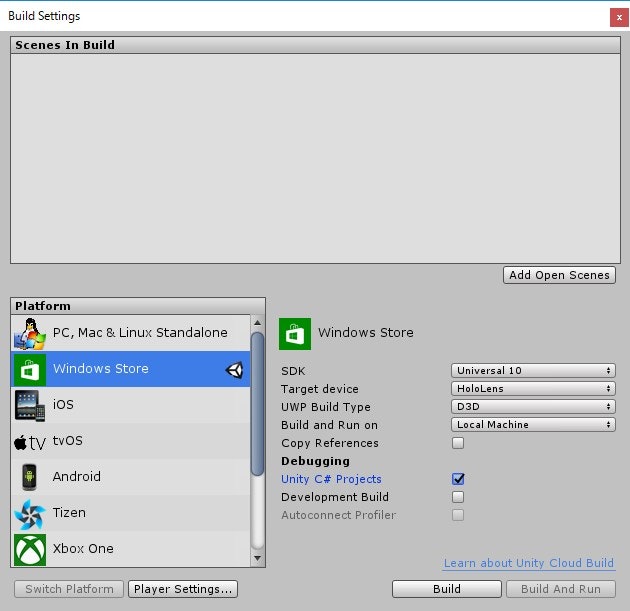
ビルド
- File -> Build Settings... を選択。
- Windows Store に切り替える。
- SDK を Universal 10 に設定する。
- Build Type を D3D に設定する。
- Unity C# Projects にチェックをつける。
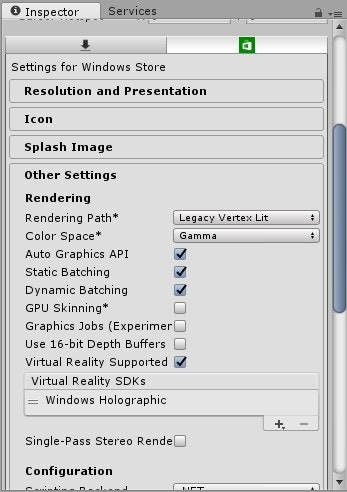
プレイヤー
- Build Settings 画面から Player Settings... を開く。
- Windows Store タブを開き、Other Settings グループを展開する。
- Rendering セクションにあるVirtual Reality Supported を有効にする。
- Virtual Reality Devices 一覧から "Windows Holographic" を選択する。
HoloToolkit-Unity
後述する HoloToolkit-Unity をインポートするとこれらの設定を簡単に行えるようになる。
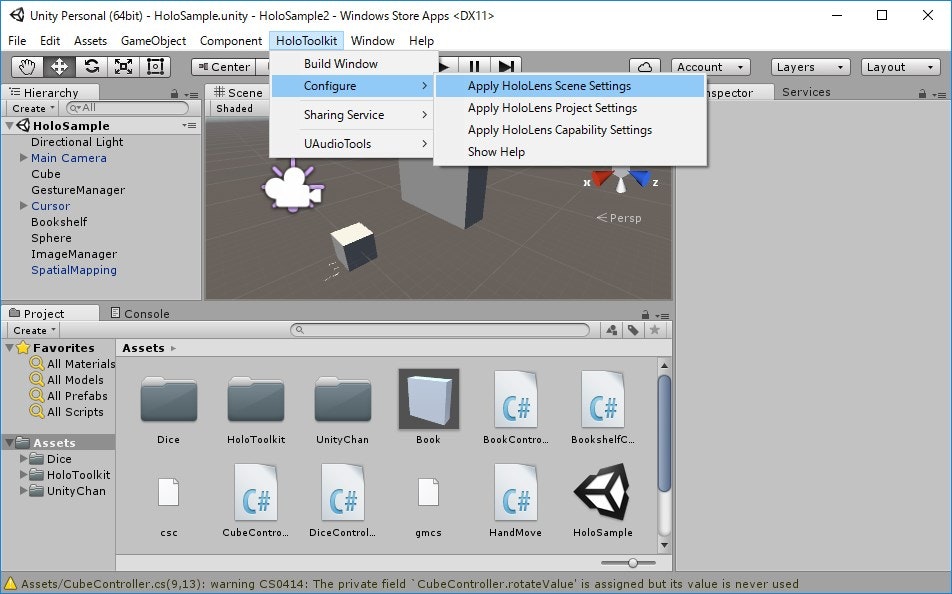
HoloToolkit -> Configure から Apply ... をそれぞれ実行すると、上記で説明した内容が反映される。
実行
実機にしてもエミュレーターにしても、アーキテクチャは x86 を選択する。
- エミュレーターで実行させる場合は、ターゲットデバイスを HoloLens Emulator ... にする。
- 実機で実行させる場合はUSB経由かWi-Fi経由かでターゲットデバイスが異なる。
- USB経由の場合は、Device を選択する。
- Wi-Fi経由の場合は、Remote Machine を選択し、アドレスに HoloLens のIPアドレスを入力する。
また、事前に HoloLens とペアリングを行っておく。
コーディング
HoloToolkit-Unity
Microsoft が公式にカーソル表示やジェスチャー制御などを行うライブラリを公開している。
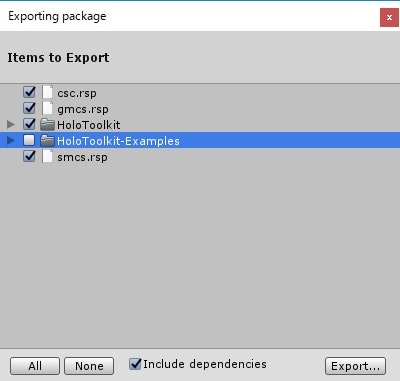
ここ からプロジェクト一式をダウンロードして、Assets 配下を HoloToolkit-Examples を除き、パッケージとしてエクスポートする。
このエクスポートしたものをそれぞれのプロジェクトにインポートする。
視線の制御
GazeManager.cs を適当なオブジェクトに追加して利用するが、後述する InputManager.prefab を利用するのであれば、特にこちらを利用しなくてもよい。
プロパティとして以下のものが用意されている。
- HitObject
視点が当たっているオブジェクトを取得する。 - GazeOrigin
視点の位置
イベントとして以下のものが用意されている。
- FocusedObjectChanged
視点が当たっているオブジェクトが変わったときに呼ばれる。
メインカメラ
プロジェクト作成時にある Main Camera をそのまま利用してもよいが、HoloLensCamera.prefab に視線の制御に関するものが含まれているので、こちらを利用する。
カーソル表示
カーソルを表示させるには以下のものが用意されている。
- BasicCursor.prefab
オブジェクトに視線が当たっていると、円形のカーソルを表示する。 - Cursor.prefab
BasicCursor.prefabに加えて、どのオブジェクトにも視線が当たっていない場合はでも、視線の位置がわかるようにカーソルが表示される。 - CursorWithFeedback.prefab
BasicCursor.prefabに加えて、手を認識すると手の形をしたカーソルが表示される。 - DefaultCursor.prefab
システム標準のものと同じ動きをするもの。
ジェスチャー制御
InputManager.prefab を利用して行う。これ自体をシーンに追加する。
操作したいオブジェクトにスクリプトを追加し、以下のインターフェースからイベントを実装する。
- IFocusable
フォーカスイベントを実装する場合に利用。
フォーカスの取得/解放が取得できる。 - IHoldHandle
ホールドイベントを実装する場合に利用。 - IInputHandler
オブジェクトを「つまむ」、「放す」というイベントを実装する場合に利用。
(ウィンドウズフォームでいえば、OnMouseDown、OnMouseUp に相当するイベント。) - IInputClickHandler
オブジェクトへのクリックイベントを実装する場合に利用。 - IManipulationHandler
操作ジェスチャーイベントを実装する場合に利用。 - INavigationHandler
ナビゲーションジェスチャーイベントを実装する場合に利用。 - ISourceStateHandler
手の認識のイベントを実装する場合に利用。 - ISpeechHandler
音声入力イベントを実装する場合に利用。
SpeechInputSource.csと併せて利用する。
音声入力制御
KeywordManager.cs か SpeechInputSource.csを利用する。
KeywordManager.cs は制御したいオブジェクトにフォーカスが当たっていなくても実行されるので、SpeechInputSource. cs を利用する方がいいかもしれない。
KeywordManager.cs
KeywordRecognizer に関する処理がまとまっている。
音声入力で制御したいオブジェクトのコンポーネントにこれを追加する。
    private KeywordManager keywordManager;

    void Start()
    {
        SetupKeywordManager();
        // ManualStart の場合は、任意のタイミングで StartKeywordRecognizer を実行する。
        keywordManager.StartKeywordRecognizer();
    }

    private void SetupKeywordManager()
    {
        // 認識させたいキーワードの一覧を作成する。
        var keywordList = new List<KeywordManager.KeywordAndResponse>();
        KeywordManager.KeywordAndResponse keyword;
        keyword = new KeywordManager.KeywordAndResponse();
        // キーワードを指定する。
        keyword.Keyword = "Voice Input";
        // 実行させるメソッドを指定する。
        keyword.Response = new UnityEngine.Events.UnityEvent();
        keyword.Response.AddListener(VoiceInputCommand);
        keywordList.Add(keyword);

        // KeywordManager のコンポーネントを取得する。
        keywordManager = gameObject.GetComponent<KeywordManager>();
        // キーワード一覧を設定する。
        keywordManager.KeywordsAndResponses = keywordList.ToArray();
        // 音声認識を開始する条件を設定。
        // 自動で開始させる場合は特に必要ないが、任意のタイミングで開始する場合は ManualStart を指定する。
        keywordManager.RecognizerStart = KeywordManager.RecognizerStartBehavior.ManualStart;
    }

    public void VoiceInputCommand()
    {
        Debug.Log("Voice Input");
    }
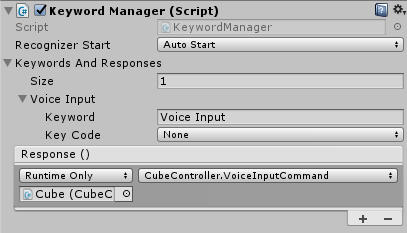
Unity Editor でも認識させたいキーワードと実行させるメソッドを指定することができる。
SpeechInputSource.cs
こちらも音声入力の制御を行うもの。ISpeechHandler と併せて利用する。
KeywordManager と同様に、制御したいオブジェクトのコンポーネントに追加する。
こちらは、対象のオブジェクトにフォーカスが当たっている場合にのみ実行される。
キーワードが認識されると OnSpeechKeywordRecognized が実行される。
    private SpeechInputSource speechInput;

    // Use this for initialization
    void Start()
    {
        SetupSpeechInputSource();
        // ManualStart の場合は、任意のタイミングで StartKeywordRecognizer を実行する。
        speechInput.StartKeywordRecognizer();
    }

    private void SetupSpeechInputSource()
    {
        // 認識させたいキーワード一覧を作成する。
        var keywords = new List<SpeechInputSource.KeywordAndKeyCode>();
        var keywordVoiceInput = new SpeechInputSource.KeywordAndKeyCode();
        keywordTakeBook.Keyword = "Voice Input";
        keywords.Add(keywordTakeBook);

        // SpeechInputSource のコンポーネントを取得
        speechInput = gameObject.GetComponent<SpeechInputSource>();
        // キーワード一覧を設定する。
        speechInput.Keywords = keywords.ToArray();
        // 音声認識を開始する条件を設定。
        // 自動で開始させる場合は特に必要ないが、任意のタイミングで開始する場合は ManualStart を指定する。
        speechInput.RecognizerStart = SpeechInputSource.RecognizerStartBehavior.ManualStart;
    }

    public void OnSpeechKeywordRecognized(SpeechKeywordRecognizedEventData eventData)
    {
        // 指定したキーワードを認識すると、このメソッドが呼ばれる。
        OutputLog("Keyword -> " + eventData.RecognizedText);
    }
Unity Editor でも認識させたいキーワードを指定することができる。
空間認識
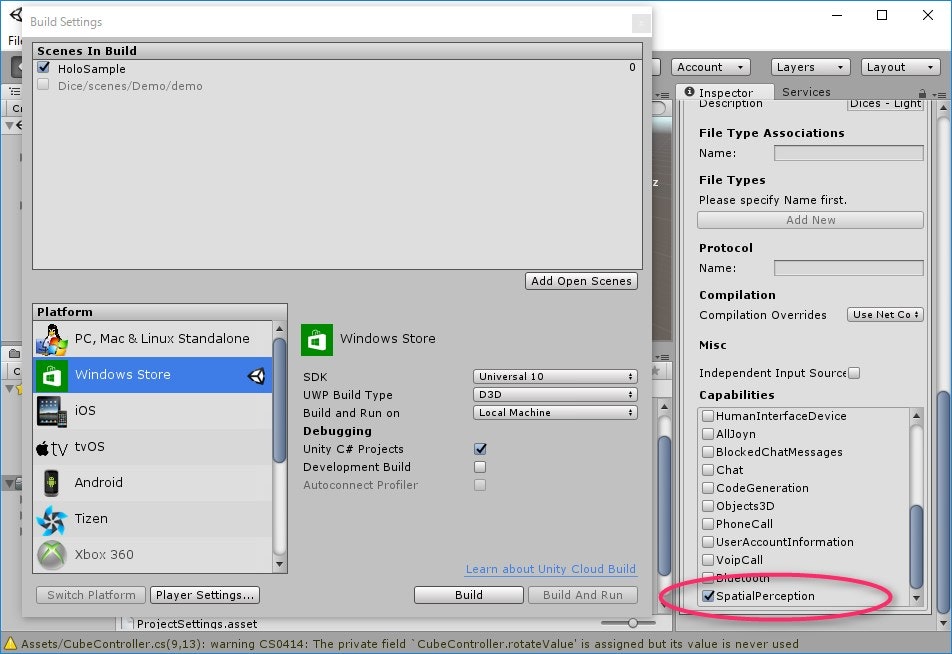
SpatialMapping.prefabをシーンに追加し、このように PlayerSettings -> Publishing Settings -> Capabilities の SpatialPerception にチェックをつけます。
標準ライブラリ
HoloToolkit-Unity は標準的な操作を想定しているので、少しこだわった操作をしたい場合は Unity 標準のライブラリを利用することになる。
ジェスチャー
ジェスチャー制御は GestureRecognizer を利用する。
using HoloToolkit.Unity;
using System.Collections.Generic;
using System.Linq;
using UnityEngine;
using UnityEngine.VR.WSA.Input;

public class ObjectController : MonoBehaviour
{
    private GestureRecognizer navigationRecognizer;
    private bool isNavigating;
    private Vector3 navigationPosition;
    private float rotationSensitivity = 10.0f;

    private void Awake()
    {
        navigationRecognizer = new GestureRecognizer();
        navigationRecognizer.SetRecognizableGestures(GestureSettings.Tap | GestureSettings.NavigationX | GestureSettings.NavigationY | GestureSettings.NavigationZ);
        navigationRecognizer.TappedEvent += NavigationRecognizer_TappedEvent;
        navigationRecognizer.NavigationStartedEvent += NavigationRecognizer_NavigationStartedEvent;
        navigationRecognizer.NavigationUpdatedEvent += NavigationRecognizer_NavigationUpdatedEvent;
        navigationRecognizer.NavigationCompletedEvent += NavigationRecognizer_NavigationCompletedEvent;
        navigationRecognizer.NavigationCanceledEvent += NavigationRecognizer_NavigationCanceledEvent;
    }

    private void OnDestroy()
    {
        keywordRecognizer.OnPhraseRecognized -= KeywordRecognizer_OnPhraseRecognized;
        keywordRecognizer.Dispose();

        navigationRecognizer.TappedEvent -= NavigationRecognizer_TappedEvent;
        navigationRecognizer.NavigationStartedEvent -= NavigationRecognizer_NavigationStartedEvent;
        navigationRecognizer.NavigationUpdatedEvent -= NavigationRecognizer_NavigationUpdatedEvent;
        navigationRecognizer.NavigationCompletedEvent -= NavigationRecognizer_NavigationCompletedEvent;
        navigationRecognizer.NavigationCanceledEvent -= NavigationRecognizer_NavigationCanceledEvent;
    }

    // Use this for initialization
    void Start()
    {
        navigationRecognizer.StartCapturingGestures();
    }

    // Update is called once per frame
    void Update()
    {
        if (isNavigating)
        {
            float rotationFactor = navigationPosition.x * -rotationSensitivity;
            var rotationValue = navigationPosition * rotationSensitivity;
            transform.Rotate(rotationValue);
        }
        else
        {
            transform.Rotate(Vector3.zero);
        }
    }

    #region Gestuer Recogniser Delegate

    private void NavigationRecognizer_TappedEvent(InteractionSourceKind source, int tapCount, Ray headRay)
    {
    }

    private void NavigationRecognizer_NavigationStartedEvent(InteractionSourceKind source, Vector3 normalizedOffset, Ray headRay)
    {
        isNavigating = true;
        navigationPosition = normalizedOffset;
    }

    private void NavigationRecognizer_NavigationUpdatedEvent(InteractionSourceKind source, Vector3 normalizedOffset, Ray headRay)
    {
        isNavigating = true;
        navigationPosition = normalizedOffset;
    }

    private void NavigationRecognizer_NavigationCompletedEvent(InteractionSourceKind source, Vector3 normalizedOffset, Ray headRay)
    {
        isNavigating = false;
    }

    private void NavigationRecognizer_NavigationCanceledEvent(InteractionSourceKind source, Vector3 normalizedOffset, Ray headRay)
    {
        isNavigating = false;
    }

    #endregion
}
音声入力
音声入力制御は KeywordRecognizer を利用する。
using HoloToolkit.Unity;
using System.Collections.Generic;
using System.Linq;
using UnityEngine;
using UnityEngine.Windows.Speech;

public class ObjectController : MonoBehaviour
{
    // KeywordRecognizer object.
    KeywordRecognizer keywordRecognizer;

    // Defines which function to call when a keyword is recognized.
    delegate void KeywordAction(PhraseRecognizedEventArgs args);
    Dictionary<string, KeywordAction> keywordCollection;

    private void Awake()
    {
    }

    // Use this for initialization
    void Start()
    {
        keywordCollection = new Dictionary<string, KeywordAction>();
        keywordCollection.Add("Movable", CommandMovable);
        keywordCollection.Add("Stretchable", CommandStretchable);
        keywordCollection.Add("Rotatable", CommandRotatable);

        keywordRecognizer = new KeywordRecognizer(keywordCollection.Keys.ToArray());
        keywordRecognizer.OnPhraseRecognized += KeywordRecognizer_OnPhraseRecognized;
        keywordRecognizer.Start();
    }

    // Update is called once per frame
    void Update()
    {

    }

    #region hoge

    private void OnPressed()
    {
    }

    #endregion

    #region Keyword Actions

    private void KeywordRecognizer_OnPhraseRecognized(PhraseRecognizedEventArgs args)
    {
        if (GazeManager.Instance.FocusedObject != gameObject)
        {
            return;
        }

        KeywordAction keywordAction;
        if (keywordCollection.TryGetValue(args.text, out keywordAction))
        {
            keywordAction.Invoke(args);
        }
    }

    private void CommandMovable(PhraseRecognizedEventArgs args)
    {

    }

    private void CommandStretchable(PhraseRecognizedEventArgs args)
    {

    }

    private void CommandRotatable(PhraseRecognizedEventArgs args)
    {

    }

    #endregion
}
その他
あとは、Unity を利用した開発と同じなので、比較的簡単に開発することができる。
