今更ながら、iOS の通知表示をカスタマイズできるようになったことを調べていたら、まったく変わっていたので、個人的に整理する。
準備
- APNs SSL 証明書の作成
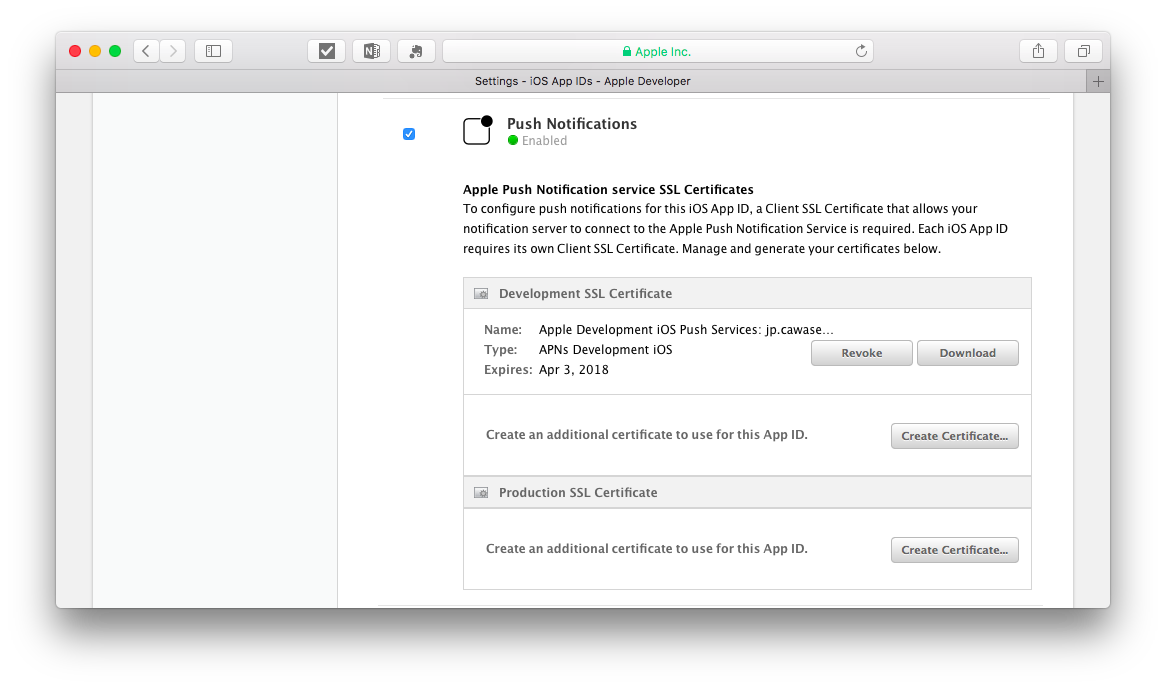
Apple Developer のサイトにて対象となるアプリの Push Notification を有効にして開発用(Development)と製品用(Production)のSSL証明書を作成します。
ここで作成したSSL証明書を使ってメッセージを送信するので、Google Firebase や Amazon SNS などに登録しておきます。
- プロジェクトの設定
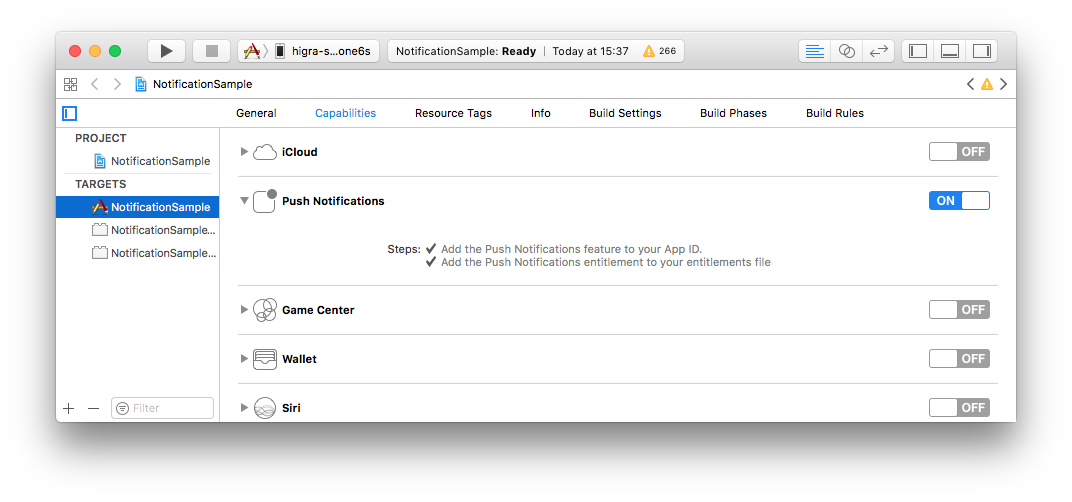
このようにプロジェクトの Capabilities にある Push Notifications を有効にします。
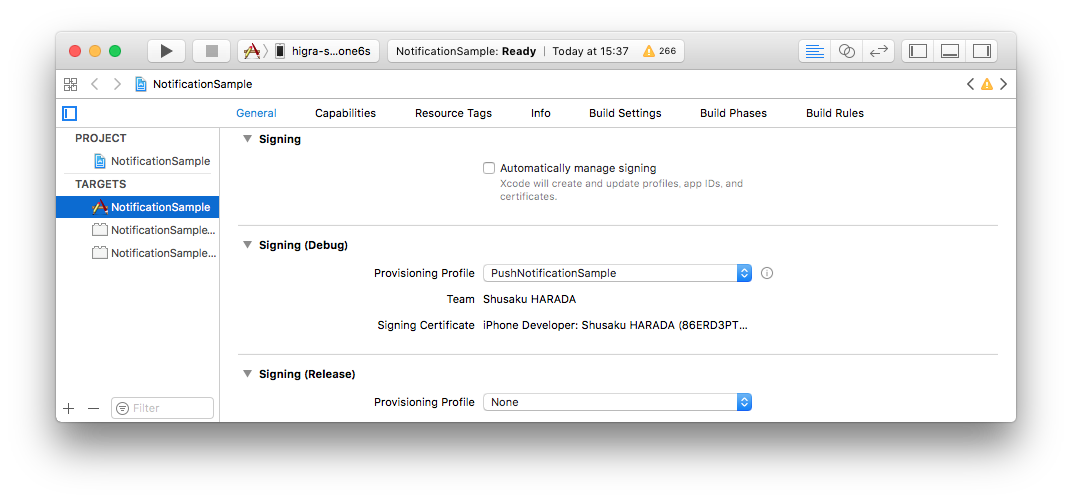
環境によっては、 Provisioning Profile が対象のものとは違うものが設定されることがあるので、Signing の Automatically manage signing を無効にして個別に設定します。
実装
プッシュ通知
Google Firebase の サンプル などを参考にすると、以下のようなコードになると思います。
大きく変わったのは UserNotifications を使うようになったこと。
AppDelegate.swift
import UIKit
import UserNotifications

@UIApplicationMain
class AppDelegate: UIResponder, UIApplicationDelegate {

    var window: UIWindow?

    func application(_ application: UIApplication, didFinishLaunchingWithOptions launchOptions: [UIApplicationLaunchOptionsKey: Any]?) -> Bool {
        // Override point for customization after application launch.

        if #available(iOS 10.0, *) {
            // iOS 10 以降の設定
            UNUserNotificationCenter.current().delegate = self

            let authOptions: UNAuthorizationOptions = [.alert, .badge, .sound]
            UNUserNotificationCenter.current().requestAuthorization(
                options: authOptions,
                completionHandler: {_, _ in })
        } else {
            // iOS 10 より前の設定
            let settings: UIUserNotificationSettings =
                UIUserNotificationSettings(types: [.alert, .badge, .sound], categories: nil)
            application.registerUserNotificationSettings(settings)
        }

        application.registerForRemoteNotifications()

        return true
    }

    func application(_ application: UIApplication, didReceiveRemoteNotification userInfo: [AnyHashable: Any]) {
        // アプリが起動している間に通知を受け取った場合の処理を行う。
    }

    func application(_ application: UIApplication, didReceiveRemoteNotification userInfo: [AnyHashable: Any],
                     fetchCompletionHandler completionHandler: @escaping (UIBackgroundFetchResult) -> Void) {
        // アプリがバックグラウンド状態の時に通知を受け取った場合の処理を行う。
        completionHandler(UIBackgroundFetchResult.newData)
    }

    func application(_ application: UIApplication, didFailToRegisterForRemoteNotificationsWithError error: Error) {
        // システムへのプッシュ通知の登録が失敗した時の処理を行う。
    }

    func application(_ application: UIApplication, didRegisterForRemoteNotificationsWithDeviceToken deviceToken: Data) {
        // Device Token を取得した時の処理を行う。
        print("APNs token retrieved: \(deviceToken)")
    }
}

@available(iOS 10, *)
extension AppDelegate : UNUserNotificationCenterDelegate {

    // iOS 10 以降では通知を受け取るとこちらのデリゲートメソッドが呼ばれる。
    func userNotificationCenter(_ center: UNUserNotificationCenter,
                                willPresent notification: UNNotification,
                                withCompletionHandler completionHandler: @escaping (UNNotificationPresentationOptions) -> Void) {
        completionHandler([])
    }

    func userNotificationCenter(_ center: UNUserNotificationCenter,
                                didReceive response: UNNotificationResponse,
                                withCompletionHandler completionHandler: @escaping () -> Void) {
        completionHandler()
    }
}
ローカル通知
ローカル通知を設定するには、以下のクラスを利用します。
- UNMutableNotificationContent
これで通知する内容を設定する。 - UNNotificationTrigger
これで通知する条件を設定する。 - UNNotificationRequest
これで通知のリクエストを作成する。
通知の条件で指定できるものは以下の三つがあります。
-
UNTimeIntervalNotificationTrigger
経過時間を指定する。 -
UNCalendarNotificationTrigger
日時を指定する。 -
UNLocationNotificationTrigger
場所を指定する。
5秒後に通知を行いたい場合は、以下のようなコードになります。
NotificationManager.swift
    func setLocalNotification() {
        let dateString = currentDateString()
        let notificationId = "Local-\(dateString.hashValue)"

        // 通知の内容を設定する
        let content = UNMutableNotificationContent()
        content.title = "Local"
        content.body = dateString
        content.userInfo = ["id": notificationId]

        // 通知の条件を設定する
        let trigger = UNTimeIntervalNotificationTrigger(timeInterval: 5, repeats: false)

        // 通知のリクエストを生成する
        let request = UNNotificationRequest(identifier: notificationId, content: content, trigger: trigger)
        // 通知をシステムに登録する
        UNUserNotificationCenter.current().add(request)
    }
今から三日後の午前10時に通知させたい場合は、このようなコードになります。
NotificationManager.swift
    func setLocalNotification() {
        let dateString = currentDateString()
        let notificationId = "Local-\(dateString.hashValue)"

        // 通知の内容を設定する
        let content = UNMutableNotificationContent()
        content.title = "Local"
        content.body = dateString
        content.userInfo = ["id": notificationId]

        // 今から三日後の午前10時を設定する
        let calender = Calendar.current
        var dateComponents = calender.dateComponents([.year, .month, .day, .hour, .minute, .second], from: Date())
        if let day = dateComponents.day {
            dateComponents.day = day + 3
        }
        dateComponents.hour = 10
        dateComponents.minute = 0
        dateComponents.second = 0

        // 通知の条件を設定する
        let trigger = UNCalendarNotificationTrigger(dateMatching: dateComponents, repeats: false)

        // 通知のリクエストを生成する
        let request = UNNotificationRequest(identifier: notificationId, content: content, trigger: trigger)
        // 通知をシステムに登録する
        UNUserNotificationCenter.current().add(request)
    }
毎日、午後8時に通知させたい場合は、このようなコードになります。
NotificationManager.swift
    func setLocalNotification() {
        let dateString = currentDateString()
        let notificationId = "Local-\(dateString.hashValue)"

        // 通知の内容を設定する
        let content = UNMutableNotificationContent()
        content.title = "Local"
        content.body = dateString
        content.userInfo = ["id": notificationId]

        // 午後8時を設定する
        var dateComponents = DateComponents(hour: 20)
        // 通知の条件を設定する
        // 繰り返すので repeats を有効にする
        let trigger = UNCalendarNotificationTrigger(dateMatching: dateComponents, repeats: true)

        // 通知のリクエストを生成する
        let request = UNNotificationRequest(identifier: notificationId, content: content, trigger: trigger)
        // 通知をシステムに登録する
        UNUserNotificationCenter.current().add(request)
    }
まとめ
通知処理の実装はコロコロ変わっているという印象があります。
次回は通知表示のカスタマイズについて整理したいと思います。
参考