Electronで管理画面とか作ったりしたら、サーバー側の認証とかセキュリティとかきにしなくてええやん。
と思い最近Electronにモチベーションを震わさせています。
とは言えいくらデスクトップアプリケーションといえど、最低限のセキュリティはつけなアカンでしょ。
ということでElectronで
- Google google+ APIを使ってユーザー情報を取得
- 該当するユーザーならアプリケーションを起動
上記の事を試しに作って見た時のメモになります。
今回やること
- Electronアプリを起動
- renderer-processからmain-processに対して認証確認を行う
- main-processが認証情報(google+ API plus.people.get)を確認して起動してよいユーザーか否かを判定
- 起動してはいけないユーザーの場合はアプリを落とす
- 起動していいユーザーの場合はアプリを継続起動する
参考にしたサイト
- Electron ドキュメント(日本語版)
-
Electron API Demos
- 上記アプリケーションをDLして起動するとElectronでできることが一通りわかる
環境
- OSX ElCapitan 10.11
事前準備に必要なもの
- NodeJS v5.1.0 - v7.2.0
- v5.1.0で最初作っていたのでその間のバージョンなら多分大丈夫
- NodeJSが入っていな方は OSXでnodebrewインストールメモ を参考にしていれてください
- electron v1.4.8
- 入れていない人は
npm install -g electronと打とう
- 入れていない人は
- Google API Console から google+ APIリクエストの許可をしておく
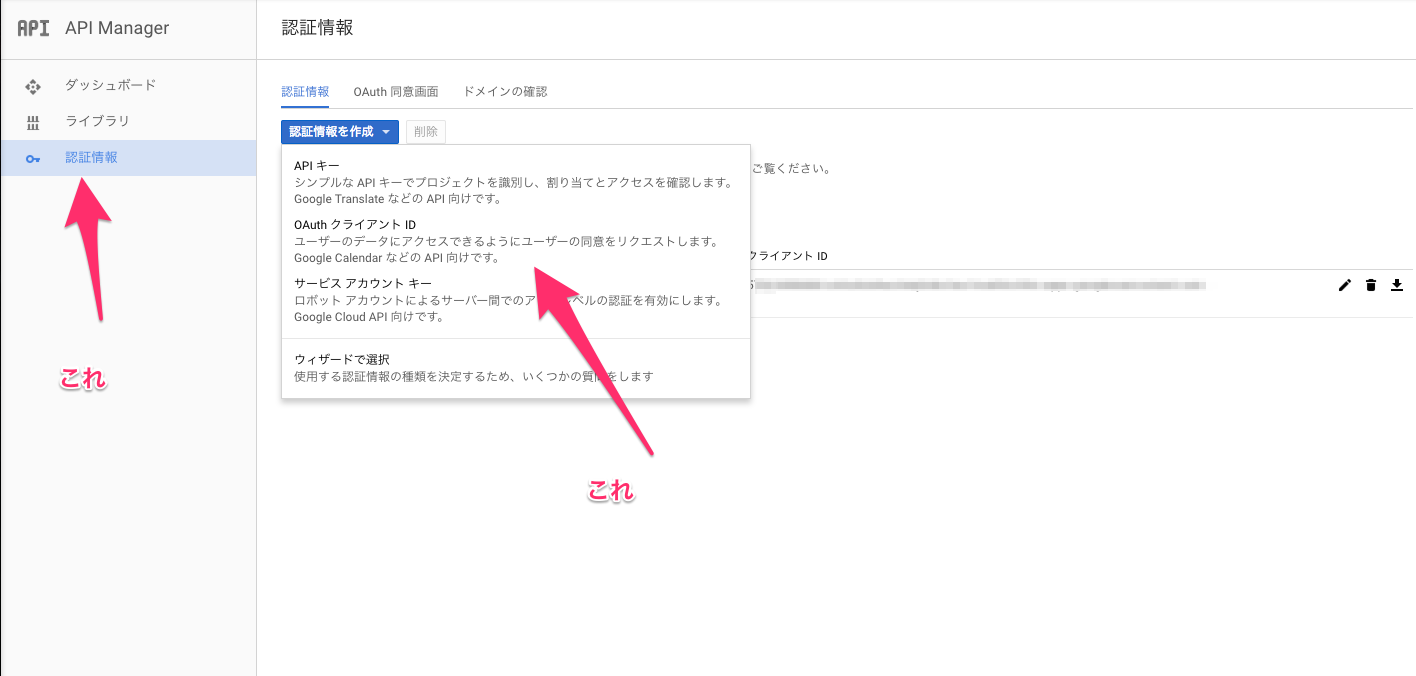
Google認証の準備をする
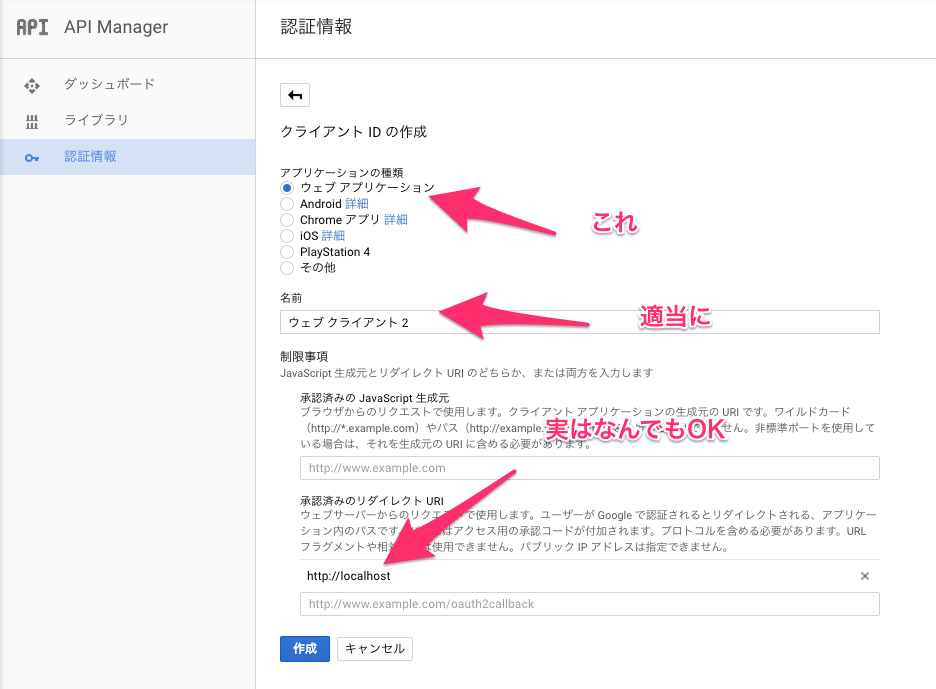
下記のような感じで認証情報を追加
- OAuth クライアントID
- webアプリケーション
- リダイレクト先なんだけどもelectronでリクエストを送るときは browserのloadURLで実行するのでどんなURLでも結局戻ってくるので何でもOK(なのでhttp://localhostにしている)
上記設定が完了したら認証情報ページから「JSONをダウンロード」ボタンを押して保存しておいてください。
(後で使います)
API Managerから Google+ APIを有効しておく
ライブラリから google+で検索してAPIを有効にしておいてください。
ここからが本題
electronのセットアップから始めます
Electronアプリを起動する
まずはここから
mkdir path/to/project
cd path/to/project
# 適当に答えてpackage.jsonを作る
npm init

# electron-json-storageは
# ~/Library/Application Support/<package.json[name]> にjsonファイルを保存してstorageとして扱えるライブラリ
# is-emptyは空のオブジェクトの判定用ライブラリ(地味に空オブジェクトの判定がダルいので)
npm install electron-json-storage googleapis is-empty --save
touch main.js
touch index.html
# google API叩く時に必要
mkdir config
mv <googleの認証情報JSON>.json config/google-secret.json
# 認証情報を間違えてpushとかしないように・・・
echo 'config/google-secret.json' >> .gitignore
main-process
公式のQuickStartをコピー
const {app, BrowserWindow} = require('electron')

const path = require('path')
const Url = require('url')

let win

function createWindow () {
  win = new BrowserWindow({width: 800, height: 600})

  win.loadURL(Url.format({
    pathname: path.join(__dirname, 'index.html'),
    protocol: 'file:',
    slashes: true
  }))

  // Open the DevTools.
  win.webContents.openDevTools()


  // Emitted when the window is closed.
  win.on('closed', () => {
    // Dereference the window object, usually you would store windows
    // in an array if your app supports multi windows, this is the time
    // when you should delete the corresponding element.
    win = null
  })
}

app.on('ready', createWindow)

app.on('window-all-closed', () => {
  if (process.platform !== 'darwin') {
    app.quit()
  }
})

app.on('activate', () => {
  if (win === null) {
    createWindow()
  }
})
renderer-process
別に何でもよい
<!DOCTYPE html>
<html>
  <head>
    <meta charset="UTF-8">
    <title>Hello World!</title>
  </head>
  <body>
    <h1>hello Electron</h1>
    <script type="text/javascript">
    //@todo ここにgoogle認証の処理を書いていく
    </script>
  </body>
</html>
main-processとrendererプロセスがわからない方は下記を参考
Electron(日本語版Document) クイックスタート
Electronを起動してみる
cd path/to/project
electron .
アプリケーションが立ち上がり hello World!が表示されたらElectronのセットアップは完了
Renderer-ProcessからMain-Processに認証確認を確認する
index.htmlに下記を追記する(Renderer-Process)
  <body>
    <h1>hello Electron</h1>
    <script type="text/javascript">
    // 追加
    const ipc = require('electron').ipcRenderer
    ipc.send('auth', 'ping')
    ipc.on('auth-reply', function (event, arg) {
        console.log(arg) //pongが帰ってくればOK
    })
    </script>
  </body>
Main-Process側からRenderer-Process受信イベントを追加する
.
.
.
app.on('activate', () => {
  if (win === null) {
    createWindow()
  }
})

ipc.on('auth', function (event, _) {
  event.sender.send('auth-reply', 'pong')
})
上記の状態で electron . を実行してDevelopperToolsのconsoleにpongと表示されればOKです。
上記でRenderer-Process -> Main-Process -> Renderer-Process のイベントの流れができました。
Main-Processを認証情報を返すように修正してみる
GoogleのOAuth2でトークン情報を取得するところとかあるので少し長め
const {app, BrowserWindow} = require('electron')
const ipc = require('electron').ipcMain

const path = require('path')
const Url = require('url')

// 追加(ディレクトリ構成はAtomのディレクトリ構成を参考にした)
const Auth = require('./src/main-process/auth')

let win //<= BrowserWindowのオブジェクト
.
. (中略)
.
ipc.on('auth', function (event, _) {
  auth = new Auth(win)
  // googleの認証画面設定だとfile://プロトコルは設定できないのでロジック側で再度リダイレクトさせる必要がある
  auth.setCallbackUrl(path.join(__dirname, 'index.html'))
  // 許可するドメインを指定する
 auth.authorizationDomains.allow = ['hoge.co.jp']
  auth.authenticate(function(error, response){
    // 認証失敗時はアプリを落とす
    if (error) app.quit()
    event.sender.send('auth-reply', {
      user: response,
      error: error
    })
  })
})
const empty = require('is-empty')
const storage = require('electron-json-storage')
const OAuth2 = require('googleapis').auth.OAuth2
const plus   = require('googleapis').plus('v1')
const googleSecret = require('../../config/google-secret.json')
const Url          = require('url')
const queryString  = require('querystring')

class Auth {
  constructor (browser) {
    this.oAuth2Client = new OAuth2(
      googleSecret.web.client_id,
      googleSecret.web.client_secret,
      googleSecret.web.redirect_uris[0]
    )
    this.browser = browser
    this.scopes  = [
      'https://www.googleapis.com/auth/plus.login',
      'https://www.googleapis.com/auth/plus.me',
      'https://www.googleapis.com/auth/userinfo.email',
      'https://www.googleapis.com/auth/userinfo.profile'
    ]
    this.authorizationDomains = { allow: [], deny: [] }
  }

  allowAuthorizationDomain(domains = []) {
    this.authorizationDomains.allow = domains
  }

  denyAuthorizationDomain(domains = []) {
    this.authorizationDomains.deny = domains
  }

  setCallbackUrl(url) {
    this.callbackUrl = url
  }

  authenticate (callback) {
    Promise.resolve()
    .then(() => {
      //アプリケーションにトークン情報があるか確認する
      return this.loadTokenFromApplicationStorage()
    })
    .then((tokenAndAuthenticated) => {
      //アプリケーションにトークン情報を保存する
      return this.setAuthenticatedAndCredentials(tokenAndAuthenticated)
    })
    .catch(() => {
      //アプリケーションにトークン情報がない場合はgoogleからトークン情報を取得する
      return this.tryFetchTokenFromGoogle()
    })
    .then(() => {
      //ユーザー情報を取得する
      return this.fetchUserMeFromGoogle()
    })
    .then((response) => {
      return callback(null, response)
    })
    .catch((err) => {
      return callback(err, null)
    })
  }

  setAuthenticatedAndCredentials (tokenAndAuthenticated) {
    return new Promise((resolve) => {
      this.authenticated = tokenAndAuthenticated.authenticated
      this.oAuth2Client.setCredentials({
        access_token: tokenAndAuthenticated.token.access_token,
        refresh_token: tokenAndAuthenticated.token.id_token
      })
      resolve()
    })
  }

  //Google+ API people.getを実行
  fetchUserMeFromGoogle () {
    return new Promise((resolve, reject) => {
      plus.people.get({
        userId: 'me',
        auth: this.oAuth2Client
      }, (err, response) => {
        if (err) {
          if (this.authenticated == false && err.code == 401) return this.retryAuthenticate()
          return reject(err)
        }
        /**
         * レスポンス
         * {
         *   emails: [ { value: 'xxxxxxx@hoge.co.jp', type: 'account' } ],
         *    .
         *    .
         *    .
         *   domain: 'hoge.co.jp'
         * }
         **/
         // domainsで拒否したいドメインがあった場合エラーにする
        if (this.authorizationDomains.deny.length > 0) {
          for (let i = 0; i < this.authorizationDomains.deny.length; i++) {
            if (response.domain == this.authorizationDomains.deny[i]) return reject(new Error('Authorization Domains deny Error'))
          }
          return resolve({
              email: response.emails[0].value,
              name:  response.displayName,
              thumbnail: response.image.url
          })
        }

         // domainsで許容したいドメインがあった場合レスポンスを返す
        if (this.authorizationDomains.allow.length > 0) {
          for (let i = 0; i < this.authorizationDomains.allow.length; i++) {
            if (response.domain == this.authorizationDomains.allow[i]) return resolve({
              email: response.emails[0].value,
              name:  response.displayName,
              thumbnail: response.image.url
            })
          }
          return reject(new Error('Authorization Domains allow Error'))
        }

        resolve({
          email: response.emails[0].value,
          name:  response.displayName,
          thumbnail: response.image.url
        })
      })
    })
  }

  # アクセストークンの期限切れの場合に呼び出される
  retryAuthenticate () {
    Promise.resolve()
    .then(() => {
      return this.tryFetchTokenFromGoogle()
    })
    .then((tokenAndAuthenticated) => {
      return this.setAuthenticatedAndCredentials(tokenAndAuthenticated)
    })
  }

  // GoogleのOAuth2を実行してtoken情報を取得する
  tryFetchTokenFromGoogle () {
    return new Promise((resolve, reject) => {
      Promise.resolve()
      .then(() => {
        return this.requestOAuthCode()
      })
      .then((code) => {
        return this.fetchTokenFromGoogle(code)
      })
      .then((tokens) => {
        storage.set('tokens', tokens, function(error) {
          return resolve({ token: tokens, authenticated: true })
        })
      })
      .catch((err) => {
        reject(err)
      })

    })
  }

  // Googleのtoken情報を取得する
  fetchTokenFromGoogle (code) {
    return new Promise((resolve, reject) => {
      this.oAuth2Client.getToken(code, (err, tokens) => {
        if (err) return reject(err)
        return resolve(tokens)
      })
    })
  }

  // Googleのtoken情報を取得するためのcodeを取得する
  requestOAuthCode (reject, resolve) {
    return new Promise((resolve, reject) => {
      let url = this.oAuth2Client.generateAuthUrl({ access_type: 'offline', scope: this.scopes})
       // chrominumからHTTPアクセスをしてGoogle認証確認画面を表示させる
      this.browser.loadURL(url)
      // Google API 認証情報で設定したリダイレクト先が表示されたときのイベント
      this.browser.webContents.on('did-get-redirect-request', (event, oldUrl, newUrl) => {
        let query = queryString.parse(Url.parse(newUrl).query)
        if (query.error || !query.code) return reject(query.error, null)
        this.browser.loadURL(Url.format({
            pathname: this.callbackUrl,
            protocol: 'file:',
            slashes: true
        }))
        return resolve(query.code)
      })
    })
  }
  // ~/Library/Application Support/<package.json[name]>/tokens.jsonというファイルが存在すればそのtoken情報を取得する
  loadTokenFromApplicationStorage () {
    return new Promise((resolve, reject) => {
      // path ~/Library/Application Support/<package.json[name]>
      storage.get('tokens', function(error, tokens) {
        if (empty(tokens)) return reject()
        return resolve({token: tokens, authenticated: false})
      })
    })
  }
}

module.exports = Auth
authenticateのメソッドみれば大体したいことはわかるはず
取得したユーザー情報をRenderer-Processに表示させる
取得できてるので後は簡単ですね
  <body>
    <h1>hello Electron</h1>
    # 追加
    <div id="username"></div>
    # 追加
    <img id="userthumb" src="" />
    <script type="text/javascript">
    const ipc = require('electron').ipcRenderer
    ipc.send('auth', 'ping')
    ipc.on('auth-reply', function (event, arg) {
      # 追加
      document.getElementById('username').innerHTML = arg.user.name
      # 追加
      document.getElementById('userthumb').src = arg.user.thumbnail
    })
    </script>
  </body>
サムネイルとユーザー名が表示されればOKです。
最後に
今回はtoken情報等はローカルアプリケーションのファイル・ディレクトリにしまっていますが、
これをDBとかに格納すればもうちょいセキュリティが強固になります。
Electron自体にハマらず、NodeJSの非同期処理を綺麗に書こうとハマっていたのは内緒です・・・・・
(あ・・・・・・・・言ってる・・・・・・・)