ユーザーの閲覧の邪魔をすることなく、ローディング中、もしくは通信中みたいな状態を可視化したいことが多々あると思います。
今回Qittaroを開発している時もこの状況に陥りました。
具体例で言うと、WebViewでQiitaの記事を表示している画面で記事をストックするときにQiitaのAPIに値を渡さなければなりません。
ローディング画面は一般的にこんな感じを採用するのではないでしょうか
- ダイアログにプログレスバーを表示して、ユーザーの行動を制限する
- 一旦画面を
setVisibility(View.GONE)を使って非表示にして、プログレスバー(くるくるまわるやつ)を表示する
でも上記を採用するとその間、ユーザーさんの行動を制限することになり、結果感じの悪いアプリと評価されてしまうかもしれません。
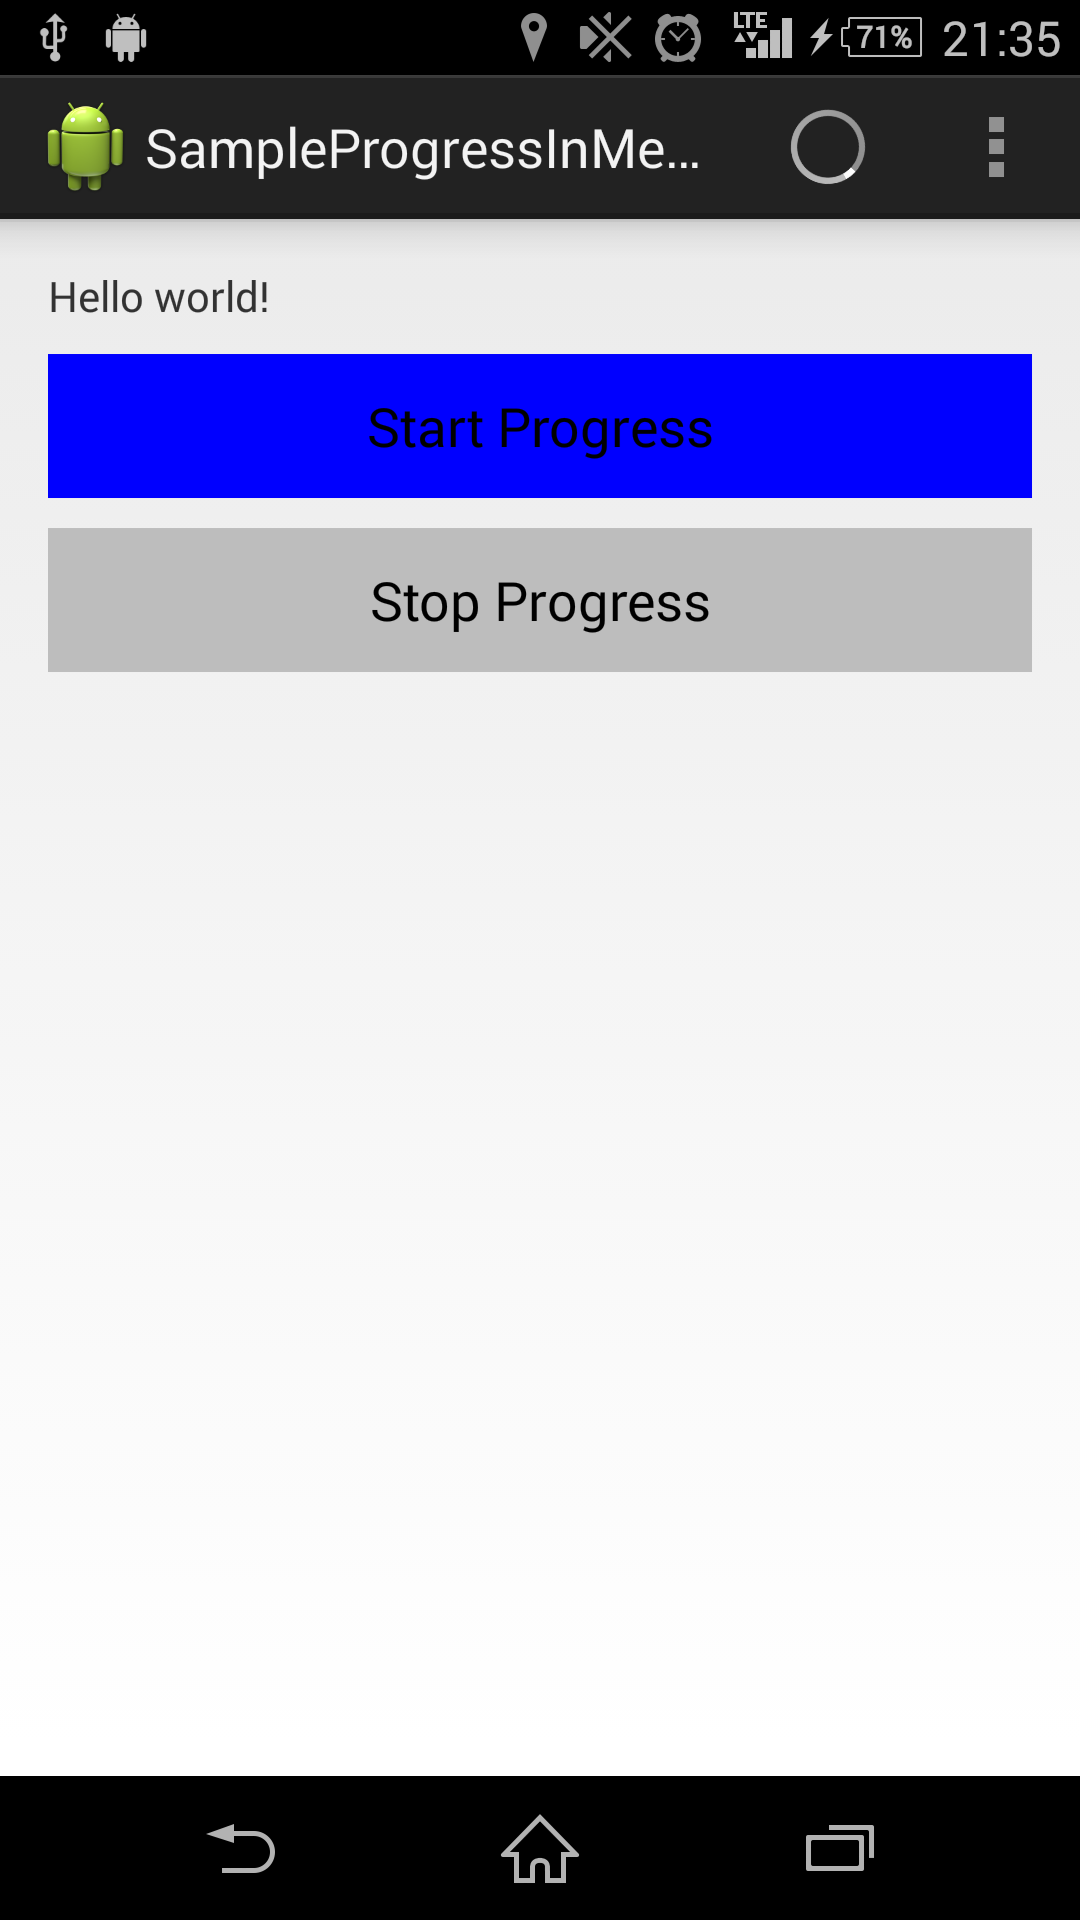
ということで、今回ActionBarにプログレスバーを表示して、ユーザーさんに通信中なのを意識させない様にしました。
なので今回はこの実装を紹介したいと思います。
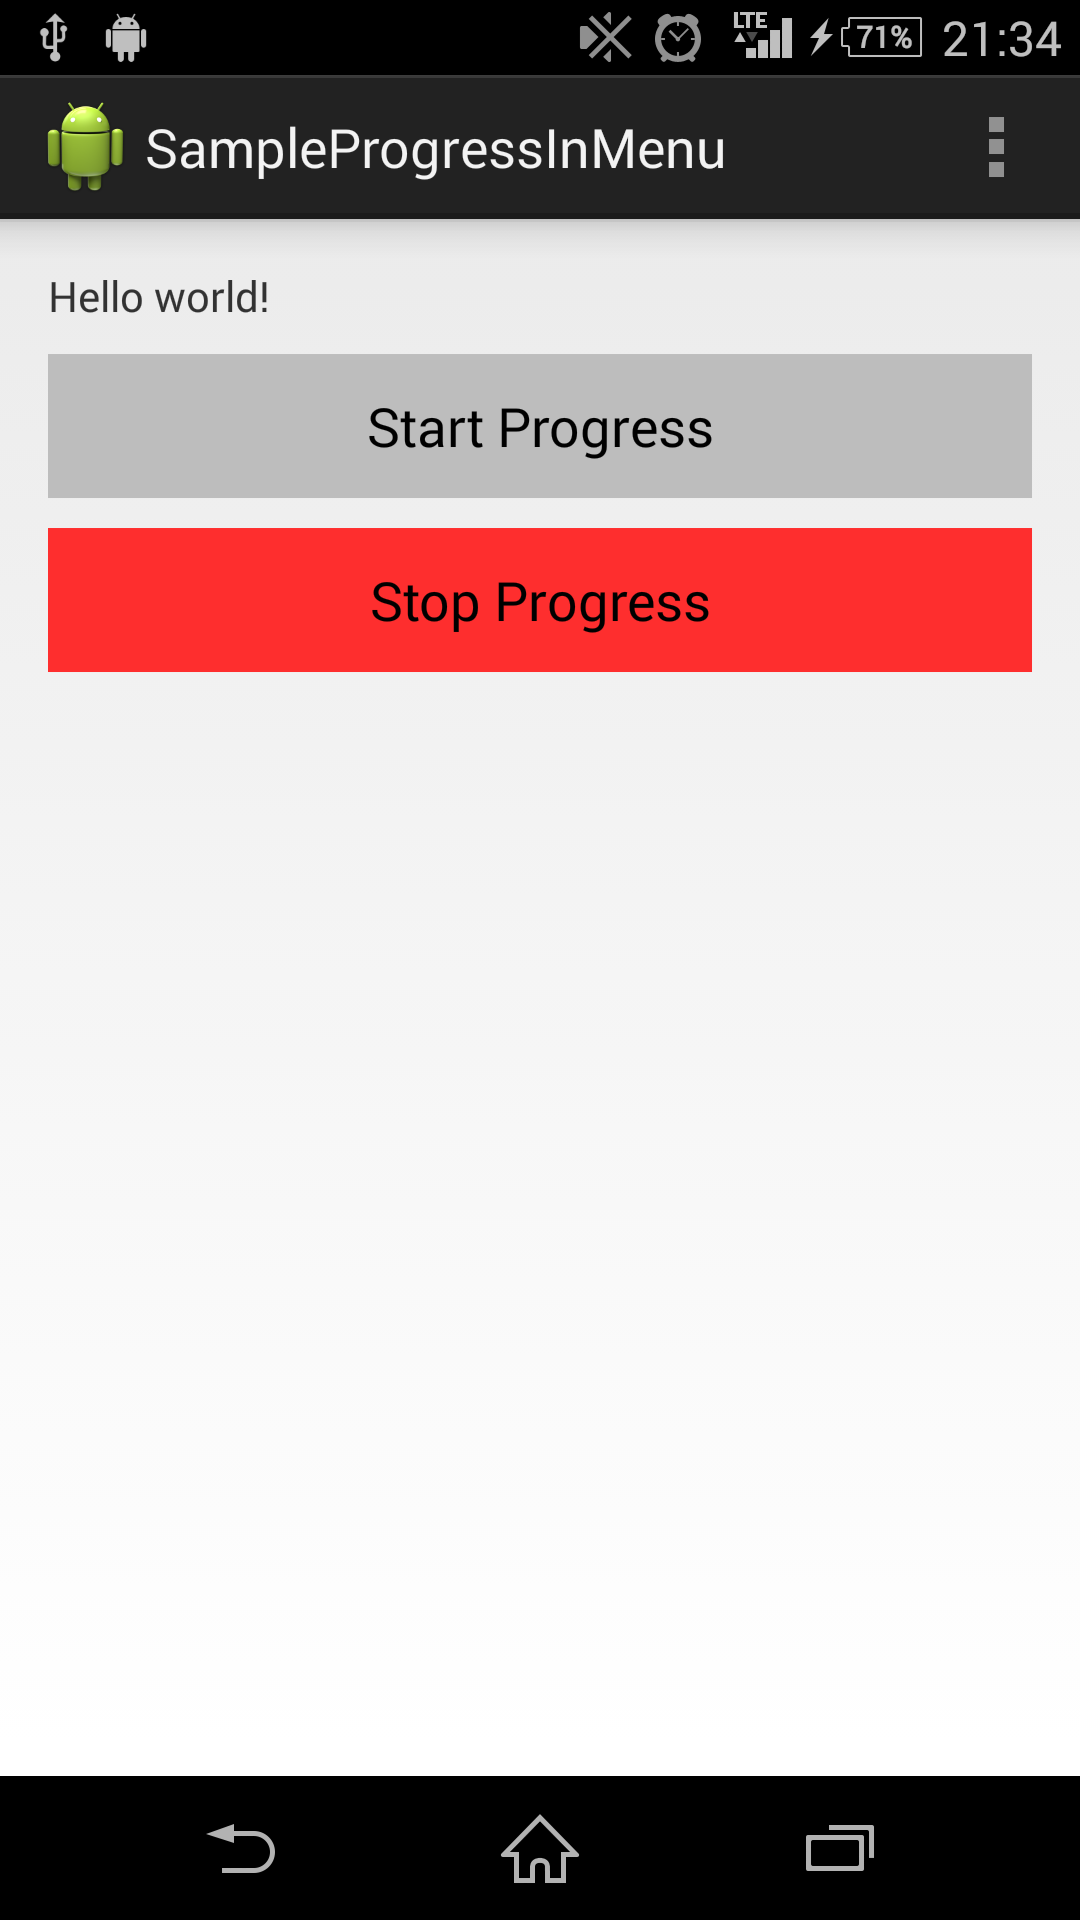
1. スクリーンショット
まずは見た目のイメージです。
スクリーンショットはこんな感じです。
停止状態(初期画面)
ローディング状態
2. ソースコード
こんな感じで実装しました。
まずは表示するプログレスバーのレイアウトファイルです。
<?xml version="1.0" encoding="utf-8"?>

<FrameLayout xmlns:android="http://schemas.android.com/apk/res/android"
    android:layout_height="56dp"
    android:layout_width="56dp"
    android:minWidth="56dp"
    >

    <ProgressBar
        android:layout_width="32dp"
        android:layout_height="32dp"
        android:layout_gravity="center"
        />

</FrameLayout>
サイズは56dpに固定しています。
他はなんにも特別なことはしていません。
真ん中でくるくる回っているだけです。
メニューは以下のソースになります。
<menu xmlns:android="http://schemas.android.com/apk/res/android"
    xmlns:app="http://schemas.android.com/apk/res-auto"
    xmlns:tools="http://schemas.android.com/tools"
    tools:context=".MainActivity" >
    <item android:id="@+id/action_settings"
        android:title="@string/action_settings"
        android:orderInCategory="100"
        app:showAsAction="never" />
    <item android:id="@+id/progress"
        android:title="@string/action_progress"
        android:visible="true"
        app:showAsAction="always"
        />
</menu>
このファイルをこんな感じで使います。
package xyz.ryochin.sampleprogressinmenu;

import android.os.Bundle;
import android.support.v4.app.Fragment;
import android.support.v4.view.MenuItemCompat;
import android.support.v7.app.ActionBarActivity;
import android.view.LayoutInflater;
import android.view.Menu;
import android.view.MenuInflater;
import android.view.MenuItem;
import android.view.View;
import android.view.ViewGroup;
import android.widget.Button;


public class MainActivity extends ActionBarActivity {

    @Override
    protected void onCreate(Bundle savedInstanceState) {
        super.onCreate(savedInstanceState);
        setContentView(R.layout.activity_main);
        if (savedInstanceState == null) {
            getSupportFragmentManager().beginTransaction()
                    .add(R.id.container, new PlaceholderFragment())
                    .commit();
        }
    }

    /**
     * A placeholder fragment containing a simple view.
     */
    public static class PlaceholderFragment extends Fragment {

        private final PlaceholderFragment self = this;
        private boolean loading;

        public PlaceholderFragment() {
        }

        @Override
        public void onCreate(Bundle savedInstanceState) {
            super.onCreate(savedInstanceState);
            this.loading = false;
            this.setHasOptionsMenu(true);
        }

        @Override
        public View onCreateView(LayoutInflater inflater, ViewGroup container,
                Bundle savedInstanceState) {
            View rootView = inflater.inflate(R.layout.fragment_main, container, false);
            return rootView;
        }

        @Override
        public void onActivityCreated(Bundle savedInstanceState) {
            super.onActivityCreated(savedInstanceState);
            Button start = (Button)this.getView().findViewById(R.id.startBtn);
            Button stop = (Button)this.getView().findViewById(R.id.stopBtn);
            start.setOnClickListener(new View.OnClickListener() {
                @Override
                public void onClick(View v) {
                    self.loading = true;
                    self.getActivity().supportInvalidateOptionsMenu();
                    self.changeBtnColor();
                }
            });
            stop.setOnClickListener(new View.OnClickListener() {
                @Override
                public void onClick(View v) {
                    self.loading = false;
                    self.getActivity().supportInvalidateOptionsMenu();
                    self.changeBtnColor();
                }
            });
            this.changeBtnColor();
        }

        @Override
        public void onCreateOptionsMenu(Menu menu, MenuInflater inflater) {
            super.onCreateOptionsMenu(menu, inflater);
            inflater.inflate(R.menu.main, menu);
        }

        @Override
        public void onPrepareOptionsMenu(Menu menu) {
            super.onPrepareOptionsMenu(menu);
            MenuItem progressMenuItem = menu.findItem(R.id.progress);
            if (this.loading) {
                // MenuItemを可視化
                progressMenuItem.setVisible(true);
                // ProgressLayoutを設定する
                MenuItemCompat.setActionView(progressMenuItem, R.layout.menu_progress_layout);
            } else {
                // MenuItemを不可視化
                progressMenuItem.setVisible(false);
                // ProgressLayoutを削除
                MenuItemCompat.setActionView(progressMenuItem, null);
            }
        }

        @Override
        public boolean onOptionsItemSelected(MenuItem item) {
            // Handle action bar item clicks here. The action bar will
            // automatically handle clicks on the Home/Up button, so long
            // as you specify a parent activity in AndroidManifest.xml.
            int id = item.getItemId();
            if (id == R.id.action_settings) {
                return true;
            }
            return super.onOptionsItemSelected(item);
        }

        private void changeBtnColor() {
            Button start = (Button)this.getView().findViewById(R.id.startBtn);
            Button stop = (Button)this.getView().findViewById(R.id.stopBtn);
            if (this.loading) {
                start.setBackgroundColor(this.getResources().getColor(R.color.color_blue));
                stop.setBackgroundColor(this.getResources().getColor(R.color.color_light_gray));
            } else {
                start.setBackgroundColor(this.getResources().getColor(R.color.color_light_gray));
                stop.setBackgroundColor(this.getResources().getColor(R.color.color_red));
            }
        }
    }
}
長くなってしまいました。
3. 処理の要約
簡単に要約すると以下の流れで実装されています。
-
Start Progressボタンが押されます。(onClick) -
this.loading = trueにしてローディング中にします。 -
getActivity().supportInvalidateOptionsMenu();をcallしてonPrepareOptionsMenu(Menu menu)が呼ばれます。 -
this.loadingの状態によってMenuItemを修正しています。
またonPrepareOptionsMenu(Menu menu)のところでは以下の感じで処理されます。
this.login = trueの状態で説明します。
-
MenuItem progressMenuItem = menu.findItem(R.id.progress);でMenuからandroid:id="@+id/progress"のitemを取得します。 -
progressMenuItem.setVisible(true);でvisibility = trueにします。 -
MenuItemCompat.setActionView(progressMenuItem, R.layout.menu_progress_layout);でprogressmenuItemにR.layout.menu_progress_layoutを埋め込みます。
こんな感じです。
4. 備考
今回はサポートライブラリで実装したので、以下の2つのところでSupportLibraryのMethodを使用しています。
- supportInvalidateOptionsMenu()
- MenuItemCompat.setActionView()
1. supportInvalidateOptionsMenu()
このメソッドはAPI level 11 以上でしたらinvalidateOptionsMenu()に置き換わります。
ActionBarActivityなどに実装されています。
なので呼び出すときにgetActivity().supportInvalidateOptionsMenu()と呼び出しました。
このメソッドを呼び出すと、Activity#onPrepareOptionsMenu(Menu menu)が呼び出されます。
なので、なにかMenuの状態を変更したい時はonPrepareOptionsMenuを呼び出して、変更するようにしましょう。
2. MenuItemCompat.setActionView()
このメソッドはAPI level 14 以上の場合はMenuItem#setActionViewとして使ってください。
5. 終わりに
今回のサンプルをGitHubにあげましたので、分からないことがありましたら、触ってみてください。
ryokosuge/SampleProgressInMenu
自分でアプリを作ってから、書くことが増えたなーと実感しています。

