概要
ThymeleafをSpring-Bootのビューテンプレートエンジンとして使用した場合の機能(使い方)メモです。
環境
- Windows7 (64bit)
- Java 1.8.0_65
- Spring-Boot 1.3.0
- Thymeleaf 2.1.4
参考
- [thymeleaf] (http://www.thymeleaf.org/index.html)
- [What's new in Thymeleaf 2.1] (http://www.thymeleaf.org/whatsnew21.html)
- [Tutorial: Using Thymeleaf (ja)] (http://www.thymeleaf.org/doc/tutorials/2.1/usingthymeleaf_ja.html)
変数
表示 (th:text)
変数の値をタグのテキストとして表示するにはth:text属性と${...}構文(変数式)を使用します。
String username = "rubytomato";
model.addAttribute("username", username);
<p th:text="${username}">name</p>
<p>rubytomato</p>
unescape (th:utext)
変数の値をエスケープしないで表示するにはth:utext属性を使用します。
String message = "<p>Hello World!</p>";
model.addAttribute("message", message);
<div th:text="${message}"></div>
<div th:utext="${message}"></div>
<div><p>Hello World!</p></div>
<div><p>Hello World!</p></div>
インライン処理 (th:inline)
タグのテキスト内に変数の値を展開するにはth:inline属性を使用し、表示したい変数を[[...]]で囲みます。
<p th:inline="text">Hello, [[${session.user.name}]]!</p>
<p>Hello, rubytomato</p>
文字列の連結
文字列と変数を+演算子で連結することができます。
<p th:text="'Hello, ' + ${username}"></p>
<p>Hello, rubytomato</p>
置換処理
|${...}|を使用するとテキスト内に変数の値を埋め込むことができます。
<p th:text="|Hello, ${username}|"></p>
<p>Hello, rubytomato</p>
デフォルト値
変数の値がnullと評価される場合、代わりにデフォルト値を表示することができます。
デフォルト値を定義するには?:か、#stringsユーティリティーオブジェクトを使用します。
?:
String username = null;
<p th:text="${username}?: 'unknown'"></p>
<p>unknown</p>
#strings.defaultString
<p th:text="${#strings.defaultString(username, 'unknown')}"></p>
<p>unknown</p>
フォーマット
変数の値をフォーマットして表示するには式ユーティリティオブジェクトを使用すると便利です。
日付 (#dates)
Date date = new Date();
model.addAttribute("date", date);
<p th:text="${#dates.format(date, 'yyyy/MM/dd HH:mm:ss')}"></p>
<p th:text="|${#dates.day(date)}日|"></p>
<p th:text="|${#dates.month(date)}月|"></p>
<p th:text="${#dates.monthName(date)}"></p>
<p th:text="|${#dates.year(date)}年|"></p>
<p>2015/12/14 20:26:07</p>
<p>14日</p>
<p>12月</p>
<p>12月</p>
<p>2015年</p>
現在日時 (#dates.createNow())
現在日時は#dates.createNow()で取得できます。
<p th:text="${#dates.format(#dates.createNow(), 'yyyy年MM月dd日 HH時mm分ss秒')}"></p>
<p>2015年12月14日 20時26分08秒</p>
数値 (#numbers)
整数値のフォーマットには#numbers.formatInteger、浮動小数点のフォーマットには#numbers.formatDecimalを使用します。
<p th:text="${#numbers.formatInteger(1000000, 3, 'COMMA')}"></p>
<p th:text="${#numbers.formatDecimal(123456.789, 3, 'COMMA', 2, 'POINT')}"></p>
<p>1,000,000</p>
<p>123,456.79</p>
メッセージリソース
メッセージリソースファイルの値を表示するには#{...}構文(メッセージ式)か、#messagesユーティリティオブジェクトを使用します。
メッセージ式
メッセージリソースにプレースホルダーがある場合は、メッセージキーの後に続けて(パラメータ1,パラメータ2,...)のように記述します。
app.message1=Hello
app.message2=Hello, {0}!
app.message3=Hello, {0}{1}
<p th:text="#{app.message1}"></p>
<p th:text="#{app.message2(${username})}"></p>
<p th:text="#{app.message3(${username},${suffix})}"></p>
<p>Hello</p>
<p>Hello, rubytomato!</p>
<p>Hello, rubytomato!?</p>
メッセージキー
メッセージキーの全部または一部を変数で指定することができます。
app.am.message=Good morning!
app.pm.message=Good afternoon!
String messageKey ="app.am.message";
model.addAttribute("messageKey", messageKey);
String ap = "pm";
model.addAttribute("ap", ap);
<p th:text="#{${messageKey}(${username})}"></p>
<p th:text="#{|app.${ap}.message|(${username})}"></p>
<p>Good morning! rubytomato</p>
<p>Good afternoon! rubytomato</p>
#messagesユーティリティオブジェクト
<p th:text="${#messages.msg('app.message1')}"></p>
<p th:text="${#messages.msg('app.message2', username)}"></p>
<p th:text="${#messages.msg('app.message3', username, suffix)}"></p>
<p th:text="${#messages.msg(messageKey, username)}"></p>
<p th:text="${#messages.msg('app.' + ap + '.message', username)}"></p>
<p>Hello</p>
<p>Hello, rubytomato!</p>
<p>Hello, rubytomato!?</p>
<p>Good morning! rubytomato</p>
<p>Good afternoon! rubytomato</p>
リンクURL式
リンクURLの組み立てに@{...}構文(リンクURL式)を使用すると便利です。
クエリ形式
変数の値をクエリのパラメータ値にするには(パラメータ名=${'変数名'})とします。パラメータが複数ある場合はカンマで区切って記述します。
<a href="/user/profile" th:href="@{/user/profile(id=${'ab123'})}">profile</a>
<a href="/user/profile" th:href="@{/user/profile(id=${'ab123'},role=${'admin'})}">profile</a>
<a href="/user/profile?id=ab123">profile</a>
<a href="/user/profile?id=ab123&role=admin">profile</a>
REST形式
変数の値をURLの一部として組み立てるにはプレースホルダを{プレースホルダ名}で定義し、そこへ差し込む値を(プレースホルダ名=${'変数名'})とします。
<a href="index.html" th:href="@{/user/profile/{id}/{seq}(id=${'abc'},seq=${'1000'})}">profile</a>
<a href="/user/profile/abc/1000">profile</a>
選択変数式
通常、変数の値を表示するには${...}構文(変数式)を使用しますが、*{...}構文(選択変数式)でも変数の値を表示することができます。(選択されているオブジェクトがない場合)
下記のテンプレートは同じ結果になります。
<p th:text="${username}"></p>
<p th:text="*{username}"></p>
<p>rubytomato</p>
<p>rubytomato</p>
th:object属性でオブジェクトを選択すると、選択変数式はそのオブジェクトを対象にします。
public class Item {
  private Long id;
  private String name;
  private Integer price;
  private Date createAt;

  public Item(Long id, String name, Integer price, Date createAt) {
    this.id = id;
    this.name = name;
    this.price = price;
    this.createAt = createAt;
  }
  ...getter/setterは省略...
}
Item item = new Item(10000L, "うまい棒", 10, new Date());
model.addAttributes("item", item);
<div th:object="${item}">
  <dl>
    <dt>ID</dt>
    <dd th:text="*{id}"></dd>
    <dt>NAME</dt>
    <dd th:text="*{name}"></dd>
    <dt>PRICE</dt>
    <dd th:text="*{price}"></dd>
  </dl>
</div>
<div>
  <dl>
    <dt>ID</dt>
    <dd>10000</dd>
    <dt>NAME</dt>
    <dd>うまい棒</dd>
    <dt>PRICE</dt>
    <dd>10</dd>
  </dl>
</div>
上記の選択変数式を使わないで記述すると次のようになります。
<div>
  <dl>
    <dt>ID</dt>
    <dd th:text="*{item.id}"></dd>
    <dt>NAME</dt>
    <dd th:text="*{item.name}"></dd>
    <dt>PRICE</dt>
    <dd th:text="*{item.price}"></dd>
  </dl>
</div>
繰り返し処理 (th:each)
th:each属性を使用してコレクションを操作することができます。
List<Item> items = new ArrayList<>();
items.add(new Item(10000L, "うまい棒", 10, new Date()));
items.add(new Item(10001L, "ポテトフライ", 30, new Date()));
items.add(new Item(10002L, "きなこ棒", 10, new Date()));
items.add(new Item(10003L, "生いきビール", 40, new Date()));
model.addAttribute("items", items);
<table class="table table-sprite">
  <tr>
    <th>count</th>
    <th>id</th>
    <th>name</th>
    <th>price</th>
    <th>create</th>
    <th>current.id</th>
  </tr>
  <tr th:each="item, stat : ${items}" th:object="${item}">
    <td th:text="*{id}">id</td>
    <td th:text="*{name}">name</td>
    <td th:text="*{price}">price</td>
    <td th:text="*{createAt}">createAt</td>
    <td th:text="${stat.current.id}"></td>
  </tr>
</table>
<table class="table table-sprite">
  <tr>
    <th>count</th>
    <th>id</th>
    <th>name</th>
    <th>price</th>
    <th>create</th>
    <th>current.id</th>
  </tr>
  <tr>
    <td>1</td>
    <td>10000</td>
    <td>うまい棒</td>
    <td>10</td>
    <td>Sun Jan 10 00:39:13 JST 2016</td>
    <td>10000</td>
  </tr>
  <tr>
    <td>2</td>
    <td>10001</td>
    <td>ポテトフライ</td>
    <td>30</td>
    <td>Sun Jan 10 00:39:13 JST 2016</td>
    <td>10001</td>
  </tr>
  <tr>
    <td>3</td>
    <td>10002</td>
    <td>きなこ棒</td>
    <td>10</td>
    <td>Sun Jan 10 00:39:13 JST 2016</td>
    <td>10002</td>
  </tr>
  <tr>
    <td>4</td>
    <td>10003</td>
    <td>生いきビール</td>
    <td>40</td>
    <td>Sun Jan 10 00:39:13 JST 2016</td>
    <td>10003</td>
  </tr>
</table>
#numbers.sequence
#numbers.sequenceは引数に指定した2つの数値の範囲で配列を生成します。
<th:block th:each="seq : ${#numbers.sequence(1,10)}">
  <p th:text="${seq}">0</p>
</th:block>
<p>1</p>
<p>2</p>
<p>3</p>
<p>4</p>
<p>5</p>
<p>6</p>
<p>7</p>
<p>8</p>
<p>9</p>
<p>10</p>
ステータス変数
| ステータス変数 | 内容 |
|---|---|
| index | 0から始まる現在の繰り返し位置 |
| count | 1から始まる現在の繰り返し位置 |
| size | 全要素数 |
| current | 現在のオブジェクト |
| even | 現在の繰り返し位置が奇数の場合、true |
| odd | 現在の繰り返し位置が偶数の場合、true |
| first | 現在の繰り返し位置が最初の場合、true |
| last | 現在の繰り返し位置が最後の場合、true |
<table class="table table-sprite">
  <tr>
    <th>index</th>
    <th>count</th>
    <th>size</th>
    <th>current</th>
    <th>even</th>
    <th>odd</th>
    <th>first</th>
    <th>last</th>
    <th>seq</th>
  </tr>
  <tr th:each="seq, stat : ${#numbers.sequence(1,3)}">
    <td th:text="${stat.index}"></td>
    <td th:text="${stat.count}"></td>
    <td th:text="${stat.size}"></td>
    <td th:text="${stat.current}"></td>
    <td th:text="${stat.even}"></td>
    <td th:text="${stat.odd}"></td>
    <td th:text="${stat.first}"></td>
    <td th:text="${stat.last}"></td>
    <td th:text="${seq}"></td>
  </tr>
</table>
<table class="table table-sprite">
  <tr>
    <th>index</th>
    <th>count</th>
    <th>size</th>
    <th>current</th>
    <th>even</th>
    <th>odd</th>
    <th>first</th>
    <th>last</th>
    <th>seq</th>
  </tr>
  <tr>
    <td>0</td>
    <td>1</td>
    <td>3</td>
    <td>1</td>
    <td>true</td>
    <td>false</td>
    <td>true</td>
    <td>false</td>
    <td>1</td>
  </tr>
  <tr>
    <td>1</td>
    <td>2</td>
    <td>3</td>
    <td>2</td>
    <td>false</td>
    <td>true</td>
    <td>false</td>
    <td>false</td>
    <td>2</td>
  </tr>
  <tr>
    <td>2</td>
    <td>3</td>
    <td>3</td>
    <td>3</td>
    <td>true</td>
    <td>false</td>
    <td>false</td>
    <td>true</td>
    <td>3</td>
  </tr>
</table>
ローカル変数 (th:with)
th:with属性を使用するとブロック内でのみ有効なローカル変数を定義することができます。
<div th:with="x=${100},y=${200}">
  <p th:text="${x}"></p>
  <p th:text="${y}"></p>
</div>
<div>
  <p>100</p>
  <p>200</p>
</div>
擬似ブロック (th:block)
擬似的にブロックを定義するth:block属性は、thymeleafバージョン2.1より導入された比較的新しい属性です。
<th:block th:with="x=${100},y=${200}">
  <p th:text="${x}"></p>
  <p th:text="${y}"></p>
</th:block>
<p>100</p>
<p>200</p>
#idsユーティリティオブジェクト
#idsユーティリティオブジェクトは入力フォームのinputタグのid属性とlabelタグのfor属性を関連付ける場合に便利です。
<form>
  <th:block th:each="seq : ${#numbers.sequence(1,3)}">
  <input type="text" name="hobby" th:id="${#ids.seq('id_hobby_')}" value="" />
  <label th:text="|hobby_${seq}|" th:for="${#ids.prev('id_hobby_')}">field</label>
  </th:block>
</form>
<form>
  <input type="text" name="hobby" value="" id="id_hobby_1">
  <label for="id_hobby_1">hobby_1</label>
  <input type="text" name="hobby" value="" id="id_hobby_2">
  <label for="id_hobby_2">hobby_2</label>
  <input type="text" name="hobby" value="" id="id_hobby_3">
  <label for="id_hobby_3">hobby_3</label>
</form>
| function | description |
|---|---|
| #ids.seq | カウンターの値を返した後にカウントアップします。 |
| #ids.prev | 前のカウンターの値を返します。 |
| #ids.next | 次のカウンターの値を返します。 |
Spring Bean
Spring Frameworkで管理されているbeanをThymeleafから参照することができます。
@Configuration(value="appConfig")
public class AppConfig {
  @Value("${app.mode}")
  private String mode;
  public String getMode() {
    return mode;
  }
  public void setMode(String mode) {
    this.mode = mode;
  }
  public String getCurrentDate() {
    FastDateFormat df = FastDateFormat.getInstance("yyyy/MM/dd");
    return df.format(new Date());
  }
}
<p th:text="${@appConfig.getMode()}"></p>
<p th:text="${@appConfig.getCurrentDate()}"></p>
<p>dev</p>
<p>2016/01/10</p>
Spring Type Conversion
${{...}}や*{{...}}のように2重ブラケットを使用するとSpring Type Conversionを利用して変数の値を変換して表示します。
@DateTimeFormat(pattern = "yyyy-MM-dd")
private Date createAt;
<td th:text="*{{createAt}}">createAt</td>
<td>2016-01-10</td>
Eclipse Plugin
[thymeleaf/thymeleaf-extras-eclipse-plugin] (https://github.com/thymeleaf/thymeleaf-extras-eclipse-plugin)
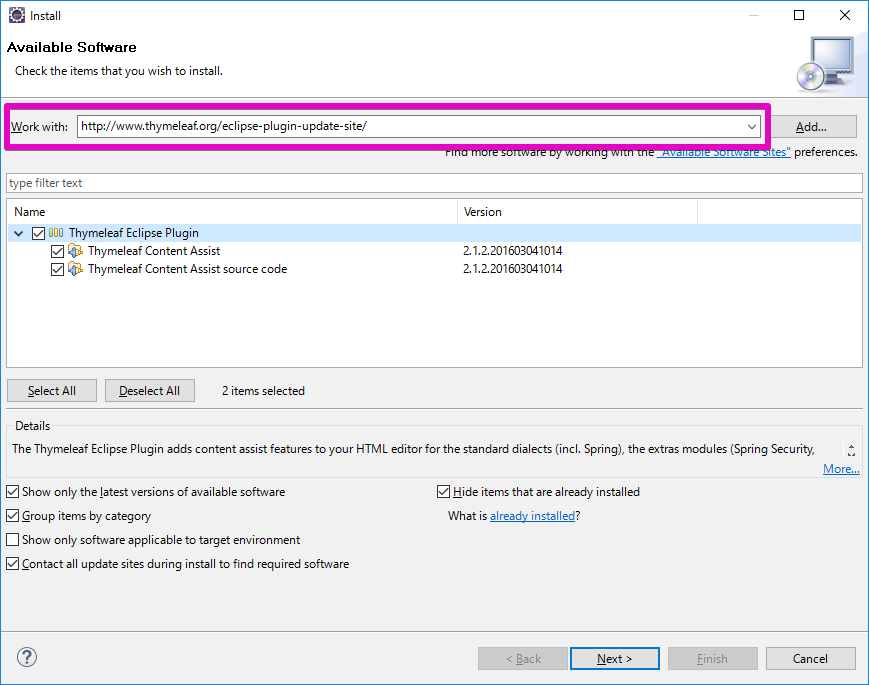
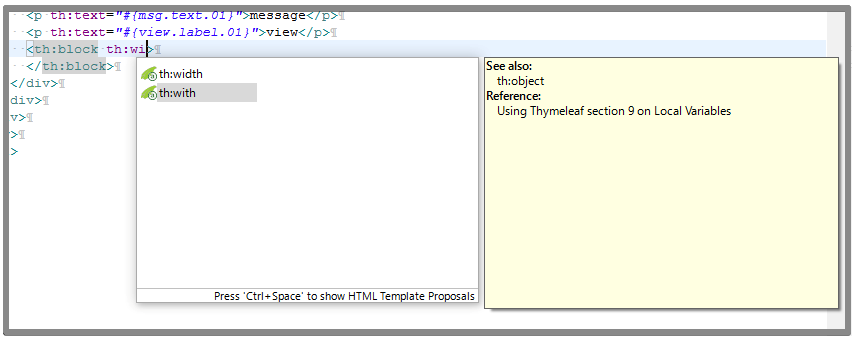
eclipse pluginをインストールするとHTMLエディターでコンテントアシストが使えるようになります。
Update Site URL: http://www.thymeleaf.org/eclipse-plugin-update-site/
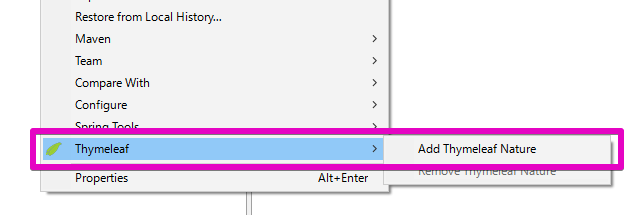
プラグインをインストール後、プロジェクト名を右クリックし"Thymeleaf"→"Add Thymeleaf Nature"を選択して有効にします。
Ctrl + Spaceでコンテントアシストを呼び出します。


