概要
meteorで作成したアプリケーションをherokuへデプロイするまでの設定のまとめです。
環境
- Windows7 (64bit)
- Meteor 1.2.0.2
- heroku toolbelt 3.42.20
- heroku
- MongoLab (Add-ons)
参考
- [Heroku Dev Center] (https://devcenter.heroku.com/)
- [Introducing Session Affinity] (https://blog.heroku.com/archives/2015/4/28/introducing_session_affinity)
- [Heroku buildpack for meteor] (https://github.com/jordansissel/heroku-buildpack-meteor)
herokuの準備
herokuのアカウントを取得します。
Add-onsの利用条件に「クレジットカード情報の登録」があるようなので、クレジットカード情報を登録しますが、free planを利用するので課金は発生しません。
heroku toolbelt
heroku toolbeltはherokuを操作するコマンドラインツールです。
[heroku toolbelt] (https://toolbelt.heroku.com/)よりインストーラーをダウンロードしてインストールします。
(インストールするとruby-1.9.3-p448も同時にインストールされます)
ダウンロードファイル: heroku-toolbelt.exe
login
heroku toolbeltからログインします。
ですが、Windows環境ではエラーが発生しますのでbatファイルを修正します。
(こちらの記事 [Windows環境でHeroku toolbeltがエラーになる場合の対処方法] (http://qiita.com/mobilebiz/items/f333772622ac28d58e95)を参考にさせて頂きました。)
> heroku login
Installing Heroku Toolbelt v4... done.
For more information on Toolbelt v4: https://github.com/heroku/heroku-cli
Setting up node-v4.2.1... done
Installing core plugins heroku-cli-addons, heroku-apps, heroku-fork, heroku-git, heroku-local, heroku-run, heroku-status... done
 !    Heroku client internal error.
 !    Search for help at: https://help.heroku.com
 !    Or report a bug at: https://github.com/heroku/heroku/issues/new

    Error:       "\x80" on Windows-31J (Encoding::InvalidByteSequenceError)
    Command:     heroku login
    Version:     heroku/toolbelt/3.42.16 (i386-mingw32) ruby/1.9.3
    Error ID:    879c62c2f79c4542becf079183df94dd
heroku.batを修正する
> where heroku
C:\Program Files (x86)\Heroku\bin\heroku
C:\Program Files (x86)\Heroku\bin\heroku.bat
heroku.batを下記の通り修正します。
- @ruby.exe "%~dpn0" %*
+ @ruby.exe -Eutf-8 "%~dpn0" %*
もう一度ログインコマンドを実行し、下記のようにメールアドレスとパスワードを使ってログインします。
> heroku login
Enter your Heroku credentials.
Email: <mail_address>
Password (typing will be hidden): <heroku_password>
Logged in as <mail_address>
version
バージョンを確認します。
> heroku version
heroku/toolbelt/3.42.20 (i386-mingw32) ruby/1.9.3
heroku-cli/4.25.3-15cf54c (386-windows) go1.5.1
=== Installed Plugins
heroku-apps@0.3.2
heroku-cli-addons@0.0.2
heroku-fork@4.0.0
heroku-git@2.4.3
heroku-local@4.1.5
heroku-run@2.9.1
heroku-status@1.2.2
update
toolbeltを最新の状態に更新します。
> heroku update
Updating plugins... done
デプロイするアプリケーションの準備
herokuにデプロイするアプリケーションの準備を行います。
今回は雛形のアプリケーションをそのままデプロイします。
アプリケーション名: rubytomato-todos
雛形のアプリケーションを作成
> meteor create --example todos rubytomato-todos
Created a new Meteor app in 'rubytomato-todos' (from 'todos' template).

To run your new app:
  cd rubytomato-todos
  meteor

If you are new to Meteor, try some of the learning resources here:
  https://www.meteor.com/learn
動作確認
> cd rubytomato-todos
> meteor
[[[[[ ~\D\dev\meteor_workspace\rubytomato-todos ]]]]]

=> Started proxy.
=> Started MongoDB.
=> Started your app.

=> App running at: http://localhost:3000/
   Type Control-C twice to stop.
アプリケーションが起動したら下記のURLにアクセスします。
このアプリケーションをherokuにデプロイすることが目的になります。
herokuへデプロイ
gitリポジトリ化する
上記で生成した雛形のアプリケーションをgitリポジトリ化します。
> git init
> git add .
> git commit -m "first commit"
create app
ここからはheroku toolbeltを使用します。
createコマンドでherokuにアプリケーションを作成します。
引数で任意のアプリケーション名を指定することもできます。省略した場合は適当な名前を付けてくれます。
> heroku create
Creating immense-temple-3143... done, stack is cedar-14
https://immense-temple-3143.herokuapp.com/ | https://git.heroku.com/immense-temple-3143.git
Git remote heroku added
Updating Heroku CLI... done.
buildpacksにheroku-buildpack-meteorを使用します。
> heroku buildpacks:set https://github.com/TFarla/heroku-buildpack-meteor.git
Buildpack set. Next release on immense-temple-3143 will use https://github.com/TFarla/heroku-buildpack-meteor.git.
Run `git push heroku master` to create a new release using this buildpack.
MongoLabのアドオンを追加します。(sandboxはfree planです)
> heroku addons:create mongolab:sandbox
Creating mongolab-encircled-8451... done, (free)
Adding mongolab-encircled-8451 to immense-temple-3143... done
Setting MONGOLAB_URI and restarting immense-temple-3143... done, v3
Welcome to MongoLab.  Your new subscription is being created and will be available shortly.  Please consult the MongoLab Add-on Admin UI to check on its progress.
Use `heroku addons:docs mongolab` to view documentation.
MongoDBのURLを設定します。
まず、MONGOLAB_URIの設定値を調べます。
MONGOLAB_URIはmongodb://<user>:<password>@xxxxxxx.mongolab.com:<port>/<dbname>の形式になっています。
> heroku config | findstr MONGOLAB_URI
MONGOLAB_URI: mongodb://uuuuu:ppppppppp@xxxxxxx.mongolab.com:99999/dddddd
- 情報はマスクしています。
その設定値をMONGO_URLとして設定します。
> heroku config:add MONGO_URL=mongodb://uuuuu:ppppppppp@xxxxxxx.mongolab.com:99999/dddddd
Setting config vars and restarting immense-temple-3143... done, v4
MONGO_URL: mongodb://uuuuu:ppppppppp@xxxxxxx.mongolab.com:99999/dddddd
アプリケーションのROOT_URLを設定します。
> heroku config:set ROOT_URL=https://immense-temple-3143.herokuapp.com/
Setting config vars and restarting immense-temple-3143... done, v5
ROOT_URL: https://immense-temple-3143.herokuapp.com/
タイムゾーンを設定します。
> heroku config:add TZ=Asia/Tokyo
Setting config vars and restarting rubytomato-todos... done, v6
TZ: Asia/Tokyo
設定を確認します。
> heroku config
http-session-affinityを有効にするとユーザーのアクセスが同じDynoに向かうようになります。
1 Dynoでは不要と思いますが念のため設定します。
> heroku labs:enable http-session-affinity
Enabling http-session-affinity for immense-temple-3143... done
WARNING: This feature is experimental and may change or be removed without notice.
For more information see: https://devcenter.heroku.com/articles/session-affinity
gitリポジトリ化からここまでの設定は1度だけ行います。
herokuへデプロイする
> git push heroku master
Counting objects: 113, done.
Delta compression using up to 8 threads.
Compressing objects: 100% (108/108), done.
Writing objects: 100% (113/113), 247.66 KiB | 0 bytes/s, done.
Total 113 (delta 3), reused 0 (delta 0)
remote: Compressing source files... done.
remote: Building source:
remote:
remote: -----> Fetching custom git buildpack... done
remote: -----> meteor app detected
remote:
remote: -----> Moving app source into a subdirectory
remote:
remote:        Node engine:         0.10.40
remote:        Npm engine:          unspecified
remote:        Start mechanism:     none
remote:        node_modules source: none
remote:        node_modules cached: false
remote:
remote:        NPM_CONFIG_PRODUCTION=true
remote:        NODE_MODULES_CACHE=true
remote:
remote:        PRO TIP: Use 'npm init' and 'npm install --save' to define dependencies
remote:        See https://devcenter.heroku.com/articles/nodejs-support
remote:
remote:        PRO TIP: Include a Procfile, package.json start script, or server.js file to start your app
remote:        See https://devcenter.heroku.com/articles/nodejs-support#runtime-behavior
remote:
remote: -----> Installing binaries
remote:        Downloading and installing node 0.10.40...
remote:
remote: -----> Building dependencies
remote:        Skipping dependencies (no source for node_modules)
remote:
remote: -----> Checking startup method
remote:
remote: -----> Finalizing build
remote:        Creating runtime environment
remote:        Exporting binary paths
remote:        Cleaning up build artifacts
remote:        Build successful!
remote:        /tmp/build_d78cb8c07909d6f7967814be4f76f460
remote:        └── (empty)
remote:
remote:
remote: -----> Fetching Meteor 1.2.0.2
remote:   % Total    % Received % Xferd  Average Speed   Time    Time     Time  Current
remote:                                  Dload  Upload   Total   Spent    Left  Speed
remote: 100  137M  100  137M    0     0  48.7M      0  0:00:02  0:00:02 --:--:-- 48.7M
remote:
remote: -----> Unpacking Meteor 1.2.0.2
remote:        Meteor 1.2.0.2 is installed
remote:
remote: -----> Building Meteor App Bundle
remote:        ios: removed platform
remote:        android: removed platform
remote:
remote: -----> Installing App's NPM Dependencies
remote:        npm WARN package.json meteor-dev-bundle@0.0.0 No description
remote:        npm WARN package.json meteor-dev-bundle@0.0.0 No repository field.
remote:        npm WARN package.json meteor-dev-bundle@0.0.0 No README data
remote:
remote:        > fibers@1.0.5 install /tmp/build_d78cb8c07909d6f7967814be4f76f460/build/bundle/programs/server/node_modules/fibers
remote:        > node ./build.js
remote:
remote:        `linux-x64-v8-3.14` exists; testing
remote:        Binary is fine; exiting
remote:        ansi-regex@0.2.1 node_modules/ansi-regex
remote:
remote:        ansi-styles@1.1.0 node_modules/ansi-styles
remote:
remote:        escape-string-regexp@1.0.3 node_modules/escape-string-regexp
remote:
remote:        chalk@0.5.1 node_modules/chalk
remote:
remote:        has-ansi@0.1.0 node_modules/has-ansi
remote:
remote:        supports-color@0.2.0 node_modules/supports-color
remote:
remote:        strip-ansi@0.3.0 node_modules/strip-ansi
remote:
remote:        eachline@2.3.3 node_modules/eachline
remote:
remote:        type-of@2.0.1 node_modules/type-of
remote:
remote:        amdefine@1.0.0 node_modules/amdefine
remote:
remote:        asap@2.0.3 node_modules/asap
remote:
remote:        underscore@1.5.2 node_modules/underscore
remote:
remote:        meteor-promise@0.5.0 node_modules/meteor-promise
remote:
remote:        promise@7.0.4 node_modules/promise
remote:
remote:        source-map-support@0.3.2 node_modules/source-map-support
remote:
remote:        semver@4.1.0 node_modules/semver
remote:
remote:        source-map@0.1.32 node_modules/source-map
remote:
remote:        fibers@1.0.5 node_modules/fibers
remote: -----> Discovering process types
remote:        Procfile declares types  -> (none)
remote:        Default types for meteor -> web
remote:
remote: -----> Compressing... done, 156.1MB
remote: -----> Launching... done, v6
remote:        https://immense-temple-3143.herokuapp.com/ deployed to Heroku
remote:
remote: Verifying deploy.... done.
To https://git.heroku.com/immense-temple-3143.git
 * [new branch]      master -> master
デプロイが完了したらアプリケーションに割り当てられたURLにアクセスしてページが表示されることを確認します。
> heroku open
heroku Dashboard
Dashboardよりアプリケーションの状態を確認することができます。
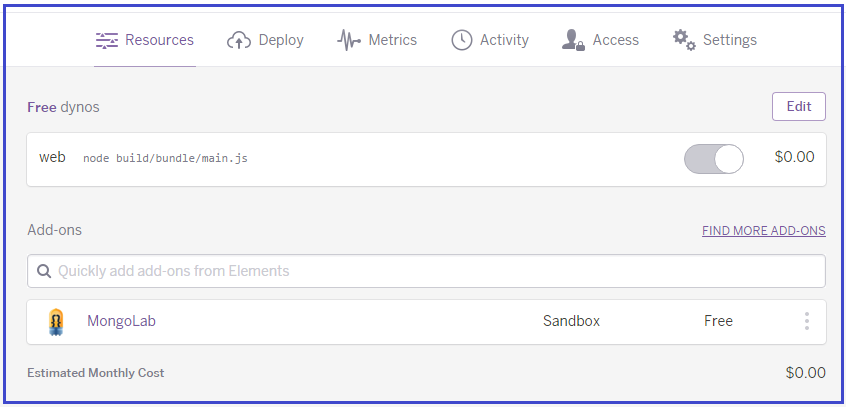
MongoLabの管理画面
"Dashboard" -> "アプリケーション"を選択 -> "Resources" -> "Add-ons" -> "MongoLab"を選択します。
MongoLabの管理画面が表示されます。(これはherokuの機能ではありません。)
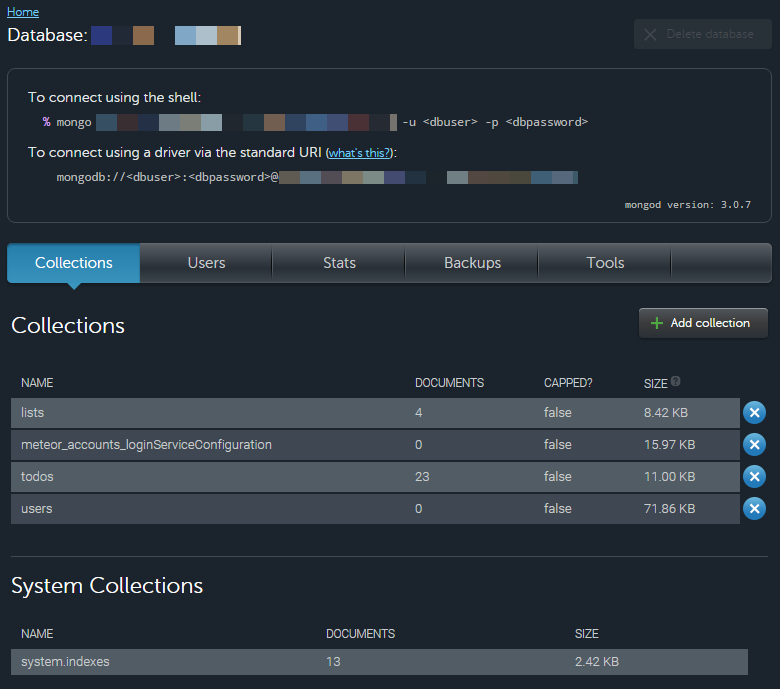
データベースの削除
管理画面の右上あたりに"Delete database"ボタンがあります(色が薄くて見えにくいです)が、無効化されていてここからは削除できません。
herokuのDashboardでアプリケーションを削除するとデータベースも同時に削除されます。
mongo shell
ローカルのmongo shellよりMongoLabのデータベースに接続することができます。
接続先のアドレスは管理画面のtopに記載されています。
例
ここで指定するuserとdbpasswordは、MONGOLAB_URIのuserとpasswordです。(またはMongoLab管理画面で追加したユーザー)
> mongo.exe dsxxxxxx.mongolab.com:99999/dddddd -u <user> -p <dbpassword>
rs-dsxxxxxx:PRIMARY> show collections;
lists
meteor_accounts_loginServiceConfiguration
system.indexes
todos
users
アプリケーションのログ
アプリケーションのログはlogsコマンドで確認できます。
> heroku help logs
Usage: heroku logs

 display recent log output

 -n, --num NUM        # the number of lines to display
 -p, --ps PS          # only display logs from the given process
 -s, --source SOURCE  # only display logs from the given source
 -t, --tail           # continually stream logs
 --force-colors       # Force use of ANSI color characters (even on non-tty outputs)

Example:

 $ heroku logs
 2012-01-01T12:00:00+00:00 heroku[api]: Config add EXAMPLE by email@example.com
 2012-01-01T12:00:01+00:00 heroku[api]: Release v1 created by email@example.com
例
> heroku logs -t
dynoにアタッチする
dynoに対して任意のコマンドを実行するにはrunコマンドを使用します。
> heroku help run
Usage: heroku run

run a one-off process inside a heroku dyno

 -s, --size SIZE     # dyno size
 --exit-code         # passthrough the exit code of the remote command
 --env ENV           # environment variables to set (use ';' to split multiple vars)
 -a, --app APP       # app to run command against
 -r, --remote REMOTE # git remote of app to run command against

Examples:

  $ heroku run bash
  Running bash on app... up, run.1
  ~ $

  $ heroku run -s hobby -- myscript.sh -a arg1 -s arg2
  Running myscript.sh -a arg1 -s arg2 on app... up, run.1

Additional commands, type "heroku help COMMAND" for more details:

  run:detached COMMAND           #  run a detached dyno, where output is sent to your logs
  run:rake COMMAND               #  WARNING: `heroku run:rake` has been deprecated. Please use `heroku run rake` instead."
例
> heroku run bash
Running bash on immense-temple-3143... up, run.9961
~ $ ls -laF
total 24
drwx------  6 u12325 12325 4096 Oct 16 07:16 ./
drwxr-xr-x 15 root   root  4096 Sep  9 04:00 ../
drwx------  3 u12325 12325 4096 Oct 16 07:06 .heroku/
drwx------  4 u12325 12325 4096 Sep 29 07:34 .meteor_tool/
drwx------  2 u12325 12325 4096 Oct 16 07:06 .profile.d/
drwx------  3 u12325 12325 4096 Oct 16 07:09 build/
~ $ cat /etc/issue
Ubuntu 14.04.3 LTS \n \l
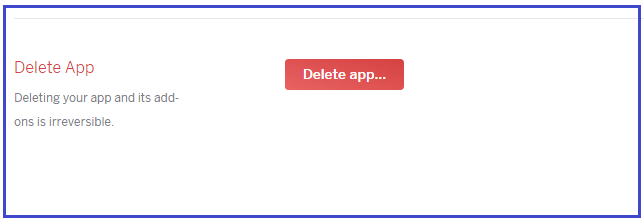
アプリケーションの削除
"Dashboard" -> "アプリケーション"を選択 -> "Settings" -> "Delete app..."ボタンをクリックします。
アプリケーションを削除するとAdd-onsで追加したmongodbとherokuのgitリポジトリも同時に削除されます。
もう一度アプリケーションをherokuにデプロイしたい場合、プロジェクトのルートディレクトリ下にある.gitを削除した後に、もう一度git initからはじめる必要があります。
メモ
heroku
> heroku
Usage: heroku COMMAND [--app APP] [command-specific-options]

Primary help topics, type "heroku help TOPIC" for more details:

  addons    #  manage add-on resources
  apps      #  manage apps (create, destroy)
  auth      #  authentication (login, logout)
  config    #  manage app config vars
  domains   #  manage domains
  logs      #  display logs for an app
  ps        #  manage dynos (dynos, workers)
  releases  #  manage app releases
  run       #  run one-off commands (console, rake)
  sharing   #  manage collaborators on an app

Additional topics:

  2fa          #  manage two-factor authentication settings
  buildpacks   #  manage the buildpack for an app
  certs        #  manage ssl endpoints for an app
  drains       #  display drains for an app
  features     #  manage optional features
  fork         #  clone an existing app
  git          #  manage local git repository for app
  help         #  list commands and display help
  keys         #  manage authentication keys
  labs         #  manage optional features
  local        #  run heroku app locally
  login        #  Login with your Heroku credentials.
  maintenance  #  manage maintenance mode for an app
  members      #  manage membership in organization accounts
  orgs         #  manage organization accounts
  pg           #  manage heroku-postgresql databases
  pgbackups    #  manage backups of heroku postgresql databases
  plugins      #  manage plugins to the heroku gem
  regions      #  list available regions
  stack        #  manage the stack for an app
  status       #  Status of Heroku Platform
  twofactor    #  manage two-factor authentication settings
  update       #  update the heroku client
  version      #  display version

Updating Heroku CLI... done.
Dyno
[構築・運用の必須知識! Herokuアプリケーションの実行プラットフォーム「Dyno」を徹底的に理解する] (http://codezine.jp/article/detail/8344)
Dynoとは、Herokuアプリケーションが実際に実行されるプラットフォームのことです。その実体は、Amazon EC2の巨大インスタンス上で動作する軽量Linuxコンテナです。
METEOR_SETTINGS
> heroku config:add METEOR_SETTINGS="$(cat settings.json)"