React+Reduxで何かを作ろうとしたが、実装の仕方がよくわからない人向けの記事。
現在進行形で何かを作ってる人、そもそも理解している人にはあまり役に立ちません。
React+Reduxにおける実装において、それぞれの概念を一つ一つ分かりやすく解説する試みです。
※どちらかというとReduxの解説になるのでReactの作法については触れません。
環境を用意する
gitとnpmがインストールされていればすぐにできます。
本家Reduxから好きなサンプルを選んで動かしてみましょう。
https://github.com/reactjs/redux/blob/master/docs/introduction/Examples.md
以下に解説するコードは上記のサンプルでいうとsrcディレクトリ配下のファイルにあたります。
中のコードを置き換えれば、当記事のコードもすぐに動かして確認することができます。
エントリーポイントとコンポーネント
まずは、お決まりのHello worldを作ってみましょう。
表示用のDOM(HTML)を記述する
import React from 'react'

let divStyle = {
  backgroundColor: 'mintcream'
}

const Hello = () => (
  <div style={ divStyle }>
    <h1>Hello, world.</h1>
  </div>
)

export default Hello
componentsというディレクトリ配下にあるコードはコンポーネントと呼ばれ、MVCにおけるViewの要素にあたります。
エントリーポイントを作成する
作成したコンポーネントをReact+Reduxに埋め込みます。
import React from 'react'
import { render } from 'react-dom'
import { Provider } from 'react-redux'
import Hello from './components/Hello'

render(
  <Provider>
    <Hello />
  </Provider>,
  document.getElementById('root')
)
ProviderがReactとReduxをつなげたフレームワークとなります。
その中にさきほど作ったコンポーネント(Hello)を配置します。
ここまでのファイル構成
src
├── components
│   └── Hello.js
└── index.js
ここまでの概念図
ストアとリデューサー
上記の実装だとWarning: Failed prop type: The prop `store` is marked as required in `Provider`, but its value is `undefined`.という警告が出ます。
Providerにはstoreが必要で、storeにはreducerが必要なので、次にこの2つを用意します。
簡単に説明すると、storeはstateを入れる箱でreducerはstateを吐き出す装置です。
少々乱暴な例えですが、stateはWebアプリケーションにおけるDBのようなものです。
フレームワークの構造上、write権限はリデューサーにしかなく、read権限はコンテナにしかありません。
reducerの作成
まだ中身は何も作りませんが、非公式のFluxコーディング規約に合わせるため、redux-actionsを利用します。
package.jsonのdependenciesにredux-actionsを追加してnpm installしておきましょう。
import { handleActions } from 'redux-actions'

const bar = handleActions({}, 0)

export default bar
上記の実装だとこのreducerは0が入ったstateを返却します。
すなわち、reducerの戻り値がstateの構造を決めます。
storeの作成
Providerにstoreを登録します。
import React from 'react'
import { render } from 'react-dom'
import { Provider } from 'react-redux'
import { createStore } from 'redux'
import Hello from './components/Hello'
import bar from './reducers/bar'

let store = createStore(bar)

render(
  <Provider store={store}>
    <Hello />
  </Provider>,
  document.getElementById('root')
)
これで警告は消えました。
storeはstateを保持しており、このstateには0が入っています。
ここまでのファイル構成
src
├── components
│   └── Hello.js
├── index.js
└── reducers
    └── bar.js
ここまでの概念図
アクションとコンテナ
最後にアクションを発生させてViewの更新を行います。
これで基本的な概念は出揃います。
アクションの作成
アクションはゲームコントローラのボタンを定義するようなものです。
この定義がないとそもそもゲーム内のキャラを動かすことができません。
import { createAction } from "redux-actions";

export const clickActionCI = createAction('CIRCLE')
export const clickActionT = createAction('TRIANGLE')
export const clickActionS = createAction('SQUARE')
export const clickActionCR = createAction('CROSS')
createAction()でPSコントローラの各ボタンを設計したと仮定してください。
リデューサーにアクションごとの新しいstateの返却内容を実装する
上記で定義したアクションが発生した場合、新しいstate(もとのstateをいじってはいけない)をどのような内容にするか、を記述します。
import { handleActions } from 'redux-actions'

const bar = handleActions({
  CIRCLE: (state, action) => {
    return 'decide'
  },
  TRIANGLE: (state, action) => {
    return state + 't'
  },
  SQUARE: (state, action) => {
    return state + 's'
  },
  CROSS: (state, action) => {
    return state.substr(0, state.length - 1)
  }
}, 'default')

export default bar
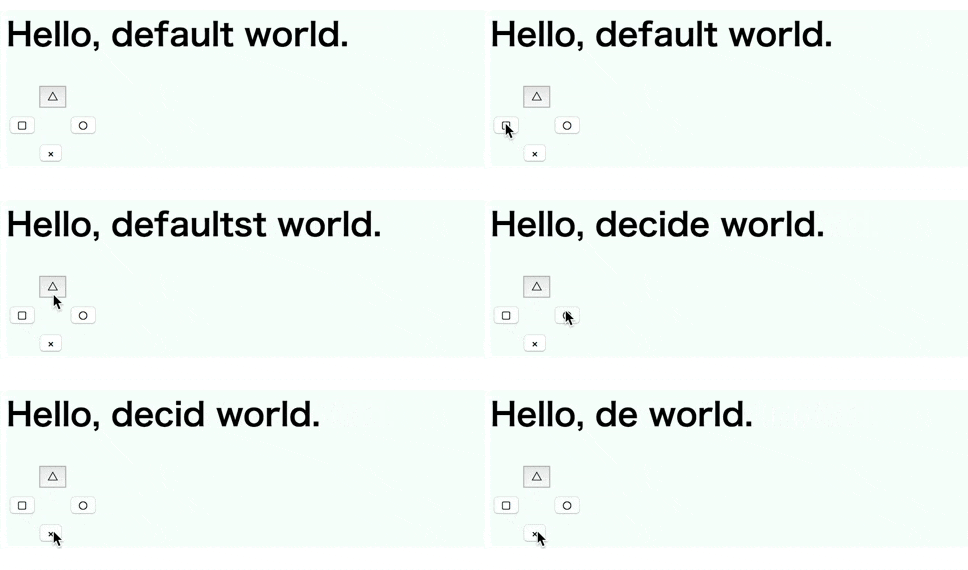
次のような実装にしてみました。
- 「default」を初期文字列とします。
- 丸ボタンの入力を検知すると「decide」を返却します。
- 三角ボタンの入力を検知すると現在の
stateの文字列の後ろにtを追加します。 - 四角ボタンの入力を検知すると現在の
stateの文字列の後ろにsを追加します。 - バツボタンの入力を検知すると現在の
stateの文字列の後ろ1文字を削ります。
コンポーネントにボタンを追加
アクションを発生させるオブジェクトとしてボタンを作っておきます。
またボタンごとにonclickイベントを仕込み、クリックされた際に呼ばれる関数のインターフェースをPropTypesに登録しておきます。
あと、stateを表示するためのオブジェクトをHello, world.の間に仕込んでおきます。
import React, { PropTypes } from 'react'

let divStyle = {
  backgroundColor: 'mintcream'
}

const Hello = ({ moji, clickTriangle, clickSquare, clickCircle, clickCross }) => (
  <div style={ divStyle }>
    <h1>Hello, {moji} world.</h1>
    <table>
      <tbody>
        <tr>
          <td></td>
          <td>
            <button onClick={ clickTriangle }>△</button>
          </td>
          <td></td>
        </tr>
        <tr>
          <td>
            <button onClick={ clickSquare }>□</button>
          </td>
          <td></td>
          <td>
            <button onClick={ clickCircle }>○</button>
          </td>
        </tr>
        <tr>
          <td></td>
          <td>
            <button onClick={ clickCross }>×</button>
          </td>
          <td></td>
        </tr>
      </tbody>
    </table>
  </div>
)

Hello.propTypes = {
  moji: PropTypes.string,
  clickTriangle: PropTypes.func.isRequired,
  clickSquare: PropTypes.func.isRequired,
  clickCircle: PropTypes.func.isRequired,
  clickCross: PropTypes.func.isRequired
}

export default Hello
コンテナの作成
stateの値と各アクションをコンポーネントに関連付けます。
import { connect } from 'react-redux'
import { clickActionCI, clickActionT, clickActionS, clickActionCR } from '../actions'
import Hello from '../components/Hello'

const mapStateToProps = (state) => {
  return {
    moji: state
  }
}

const mapDispatchToProps = (dispatch) => {
  return {
    clickTriangle: () => dispatch(clickActionT()),
    clickSquare: () => dispatch(clickActionS()),
    clickCircle: () => dispatch(clickActionCI()),
    clickCross: () => dispatch(clickActionCR())
  }
}

const Ps = connect(
  mapStateToProps,
  mapDispatchToProps
)(Hello)

export default Ps
コンポーネントのpropTypesのmojiはmapStateToProps()のmojiと
コンポーネントのpropTypesの各関数はmapDispatchToProps()のそれぞれのキー名と関連づいています。
これで
component(ボタン) --> container --> action --> reducer --> state --> container --> component(文字)
という流れができました。
コンテナを配置
最初はPrividerの中にコンポーネントを直接置いていましたが、コンテナに置き換えます。
また、stateの中身がわかるようにredux-loggerも追加しています。(事前にpackage.jsonのdependenciesにredux-loggerを追加してnpm installする必要あり)
import React from 'react'
import { render } from 'react-dom'
import { Provider } from 'react-redux'
import { applyMiddleware, createStore } from 'redux'
import createLogger from 'redux-logger'
import Ps from './containers/Ps'
import bar from './reducers/bar'

let store = createStore(bar, applyMiddleware(createLogger()))

render(
  <Provider store={store}>
    <Ps />
  </Provider>,
  document.getElementById('root')
)
以上で一通り出来上がりました。
動かすと以下のような表示と挙動になります。

ここまでのファイル構成
src
├── actions
│   └── index.js
├── components
│   └── Hello.js
├── containers
│   └── Ps.js
├── index.js
└── reducers
    └── bar.js
ここまでの概念図
redux-actionsにあまり言及できませんでしたが、今回はここまでです。


