前回の続きです。
6.Better Code For More Children
ここでは一旦今までのコードを見直してみます。
オブジェクトのPositionとRotationの部分をもう少し分かりやすく記述してみます。
//子オブジェクトの方向を定義
private static Vector3[] childDirections = {
	Vector3.up,
	Vector3.right,
	Vector3.left
};

//子オブジェクトの向きを定義
private static Quaternion[] childOrientations = {
	Quaternion.identity,
	Quaternion.Euler(0f, 0f, -90f),
	Quaternion.Euler(0f, 0f, 90f)
};

//子オブジェクトの作成コルーチン
// 0.5sec毎にオブジェクトを作成
private IEnumerator CreateChildren () {
	for (int i = 0; i < childDirections.Length; i++) {
		yield return new WaitForSeconds(0.5f);
		new GameObject("Fractal Child").AddComponent<Fractal>().
			Initialize(this, i);
	}
}

// 子オブジェクトの初期化
private void Initialize (Fractal parent, int childIndex) {
	…
	transform.localPosition =
		childDirections[childIndex] * (0.5f + 0.5f * childScale);
	transform.localRotation = childOrientations[childIndex];
}
VectorとQuaternionを配列で持っておき、それを使用するように変更しました。これにより配列を追加することでオブジェクトを追加することが出来ます。
では、他の方向も追加しましょう。
private static Vector3[] childDirections = {
	Vector3.up,
	Vector3.right,
	Vector3.left,
	Vector3.forward,
	Vector3.back
};

private static Quaternion[] childOrientations = {
	Quaternion.identity,
	Quaternion.Euler(0f, 0f, -90f),
	Quaternion.Euler(0f, 0f, 90f),
	Quaternion.Euler(90f, 0f, 0f),
	Quaternion.Euler(-90f, 0f, 0f)
};
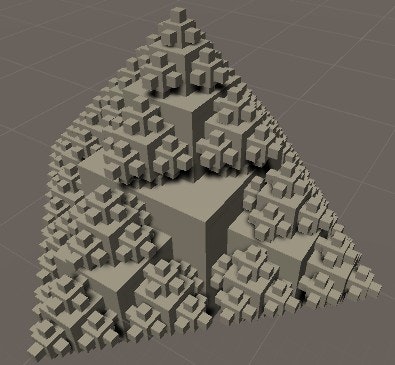
7.Explosice Growth
そういえば、今いくつの子が作られているのでしょうか
max depth = 0の時はルートのキューブが1つ、つまりf(0) = 1
max depth = 1の時はルートに加え子が5つ、f(1) = 6
max depth = nの時を式にするとf(n) = 5 x f(n-1) + 1
となります。
作られるオブジェクトの数は 1, 6, 31, 156, 781, 3906, 19531, 97656増えていきますね。
Unityの場合最大が4か5ぐらいにしておきましょう。これ以上の数字を入れるとオブジェクトの数が多すぎて、非常に処理が重くなります。。
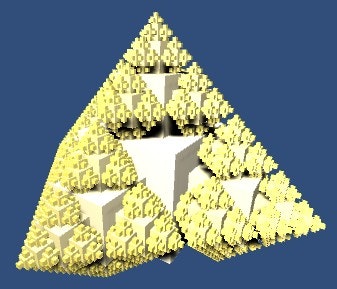
今は子の作成に0.5秒のウェイトを入れている為、規則正しくフラクタルが成長しています。
これをランダムにすると、不規則にフラクタルが成長し、より面白い動きをします。。
private IEnumerator CreateChildren () {
	for (int i = 0; i < childDirections.Length; i++) {
		yield return new WaitForSeconds(Random.Range(0.1f, 0.5f));
		new GameObject("Fractal Child").AddComponent<Fractal>().
			Initialize(this, i);
	}
}
Random.Range(0.1f, 0.5f)とすることで、子オブジェクトが作成される時間が0.1~0.5秒の間で変化します。
8.Adding Color
このフラクタルは少し地味なので、色をつけてみましょう。
まず小さい子ほど黄色くなるように色をつけます。
今回はUnityにはColor.Lerpという便利なメソッドがあるのでこれを利用します。
private void Start () {
	gameObject.AddComponent<MeshFilter>().mesh = mesh;
	gameObject.AddComponent<MeshRenderer>().material = material;
	GetComponent<MeshRenderer>().material.color =
		Color.Lerp(Color.white, Color.yellow, (float)depth / maxDepth);
	if (depth < maxDepth) {
		StartCoroutine(CreateChildren());
	}
}
Lerp(a, b, t)はtを[0-1]の範囲で取り、1に近いほどbの値を、0に近いほどaの値を返します。
例えば0.5で貼ればWhiteとYellowが半々ということになります。
これにより、depthの値がmaxDepthに近いほど色が黄色くなりました。
これらの処理には問題があり、複数のアイテムに等価なマテリアルを使用しているものはバッチ処理がされ、負荷を低減させていますが、全く同じマテリアルである必要があり、等価性の確認は行われていません(非常に高価な処理だと書かれています)。
つまり今回の場合は同じ色を使用していても、動的に作られたマテリアルの等価性は確認されず、バッチ処理は行われません。
ですので、同じレベルのcubeに適用されるマテリアルは同一のマテリアルを使用するようにしましょう。
StartでInitializeMaterialsを呼び、マテリアルを配列で作成します。
private Material[] materials;

//階層の数だけマテリアルを定義
private void InitializeMaterials () {
	materials = new Material[maxDepth + 1];
	for (int i = 0; i <= maxDepth; i++) {
		materials[i] = new Material(material);
		materials[i].color =
			Color.Lerp(Color.white, Color.yellow, (float)i / maxDepth);
	}
}

private void Start () {
	if (materials == null) {
		InitializeMaterials();
	}
	gameObject.AddComponent<MeshFilter>().mesh = mesh;
	gameObject.AddComponent<MeshRenderer>().material = materials[depth];
	if (depth < maxDepth) {
		StartCoroutine(CreateChildren());
	}
}
親のマテリアルの参照を、作成した配列に変更します。
private void Initialize (Fractal parent, int childIndex) {
	mesh = parent.mesh;
	materials = parent.materials;
	…
}
次に一番小さい子の色をマゼンタにしてみます。
また、黄色の変わっていく遷移がより分かりやすくなるように、値を2乗します。
private void InitializeMaterials () {
	materials = new Material[maxDepth + 1];
	for (int i = 0; i <= maxDepth; i++) {
		float t = i / (maxDepth - 1f);
		t *= t;
		materials[i] = new Material(material);
		materials[i].color = Color.Lerp(Color.white, Color.yellow, t);
	}
	materials[maxDepth].color = Color.magenta;
}

次は同じように白からシアンに変わり、一番小さな子を赤にする配列を、先ほど作成したものと合わせて2次元配列で作成します。
この2つの配列をランダムで選択肢、色を選択するようにすると、起動するたびに色が変わります。
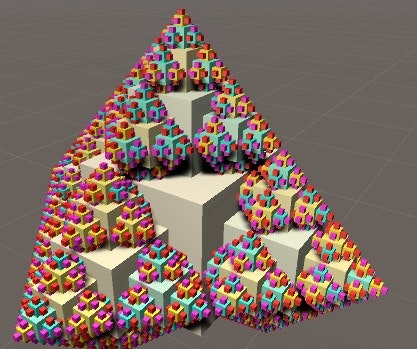
(彩度がかなり低かったので、materialのshininessを上げました)
9.Randomizeing Meshes
ここまでは、作成されるメッシュは1つの形(cubeやsphere)でしたが、これを無作為に選ばれるようにしてみましょう。
マテリアルに登録するmeshを配列で持っておき、meshに代入するときに、配列内からランダムで選択するようにします。
public Mesh[] meshes;

private void Start () {
	if (materials == null) {
		InitializeMaterials();
	}
	gameObject.AddComponent<MeshFilter>().mesh =
		meshes[Random.Range(0, meshes.Length)];
	…
}

private void Initialize (Fractal parent, int childIndex) {
	meshes = parent.meshes;
	…
}
次にインスペクターからSizeを入れ、meshを割り当てます。
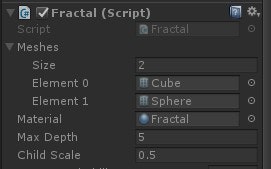
Sizeを1にし、ElementにCubeを選択すると以前と同様の結果が得られます。
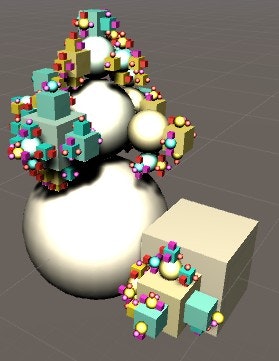
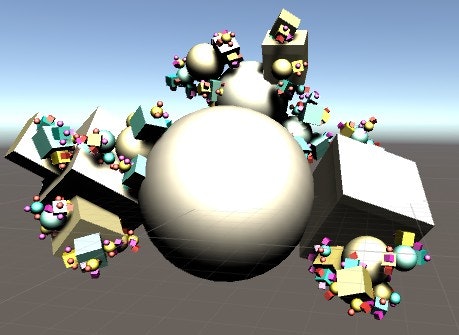
図のようにSizeを2にし、Element 1にSphereを選択すると50%の確率でCubeとSphereのどちらかが作成されます。
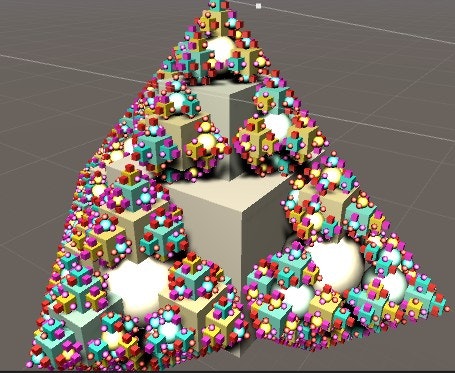
10.Making the Fractal Irregular
9では作成されるMeshをランダムで選ばれるようにしましたが、今回はオブジェクトが作成されるかどうかをランダムで選択されるようにします。
これにより、実行するたびに全く違う形のオブジェクトが生成されます。
[Range(0, 1)]public float spawnProbability;

private IEnumerator CreateChildren () {
	for (int i = 0; i < childDirections.Length; i++) {
		if (Random.value < spawnProbability) {
			yield return new WaitForSeconds(Random.Range(0.1f, 0.5f));
			new GameObject("Fractal Child").AddComponent<Fractal>().
				Initialize(this, i);
		}
	}
}

private void Initialize (Fractal parent, int childIndex) {
	…
	spawnProbability = parent.spawnProbability;
	…
}
Random.valueは0-1の範囲で値を返します。
spawnProbablityは0-1の範囲なので、Range(0,1)を使いその範囲内でのみ値を操作できるようにしています。
spawnProbabilityは子が生成される確率で、0の場合はルートのcubeしか作成されず、1の場合は以前通り、全てにおいて子が作成されます。
今回はspawnProbabilityを0.7として実行してみました。

11.Rotating the Fractal
次はオブジェクトを回転させてみます。
Updateに以下のコードを追加するだけです。
private void Update () {
	transform.Rotate(0f, 30f * Time.deltaTime, 0f);
}
deltaTimeは前フレームのと時間差です。
これにより、フレーム単位でなく、時間単位で回転を行うことが出来ます。
https://docs.unity3d.com/jp/540/ScriptReference/Time-deltaTime.html
今は一定速度で回転しています。もうお分かりかと思いますが、次はこれをランダムにします。
また回転速度の最大値はInspectorから操作できるようにします。
public float maxRotationSpeed;

private float rotationSpeed;

private void Start () {
	rotationSpeed = Random.Range(-maxRotationSpeed, maxRotationSpeed);
	…
}

private void Initialize (Fractal parent, int childIndex) {
	…
	maxRotationSpeed = parent.maxRotationSpeed;
	…
}

private void Update () {
	transform.Rotate(0f, rotationSpeed * Time.deltaTime, 0f);
}
ここではrootのオブジェクトも回転させるため、Start内で初期化を行っています。
これにより独自の回転速度を持ったオブジェクトがそれぞれ生成されます。
12.Addubg Nire Chaos
最後にフラクタルに別方向の回転を加えることで、整列の乱れた回転を行ってみます。
public float maxTwist;

private void Start () {
	rotationSpeed = Random.Range(-maxRotationSpeed, maxRotationSpeed);
	transform.Rotate(Random.Range(-maxTwist, maxTwist), 0f, 0f);
	…
}

private void Initialize (Fractal parent, int childIndex) {
	…
	maxTwist = parent.maxTwist;
	…
}
ほとんど内容は11と同じですが、今度はX軸に対して回転させます。
これによりそれぞれのオブジェクトはそれぞれ無作為な動作を行います。
なんだかとても面白い(不思議な)オブジェクトが完成しました。