はじめに
CommandBufferの理解を深めるため、CommandBufferを使って画面にポストエフェクトをかけるだけのシンプルなものを作ってみました。
環境
Windows 10
Unity5.6.1f1
作ったものについて
シーンを再生すると画面の色が反転するだけのシンプルなものを作りました。

C# スクリプト
コマンドバッファで画面にポストエフェクトをかけるスクリプトです
TestCommandBuffer.cs
using UnityEngine;
using UnityEngine.Rendering;

public class TestCommandBuffer : MonoBehaviour
{
    [SerializeField] Shader shader; // ポストエフェクト用のShader

    void Start()
    {
        if (shader == null) { return; }

        var cam = Camera.main;
        if (cam == null) { return; }

        var mat = new Material(this.shader); // Shaderからマテリアルを作成する
        var buf = new CommandBuffer();

        // 適当な名前のTemporaryRTを作成
        int temp = Shader.PropertyToID("_Temp");
        buf.GetTemporaryRT(temp, -1, -1, 0, FilterMode.Bilinear);

        // ポストエフェクトをかける
        buf.Blit(BuiltinRenderTextureType.CurrentActive, temp);
        buf.Blit(temp, BuiltinRenderTextureType.CurrentActive, mat);

        // TemporaryRTを解放
        buf.ReleaseTemporaryRT(temp);

        // カメラへCommandBufferを追加
        cam.AddCommandBuffer(CameraEvent.AfterEverything, buf);
    }
}
イメージエフェクト用のシェーダー
色を反転させるポストエフェクト用シェーダーです。
Shader "Hidden/NewImageEffectShader"
{
	Properties
	{
		_MainTex ("Texture", 2D) = "white" {}
	}
	SubShader
	{
		Cull Off ZWrite Off ZTest Always

		Pass
		{
			CGPROGRAM
			#pragma vertex vert
			#pragma fragment frag

			#include "UnityCG.cginc"

			struct appdata
			{
				float4 vertex : POSITION;
				float2 uv : TEXCOORD0;
			};

			struct v2f
			{
				float2 uv : TEXCOORD0;
				float4 vertex : SV_POSITION;
			};

			v2f vert (appdata v)
			{
				v2f o;
				o.vertex = UnityObjectToClipPos(v.vertex);

				// プラットフォームによってはUVの上下が逆になるので補正をいれる
				#if UNITY_UV_STARTS_AT_TOP
				o.uv = float2(v.uv.x, 1.0 - v.uv.y);
				#else
				o.uv = v.uv;
				#endif

				return o;
			}

			sampler2D _MainTex;

			fixed4 frag (v2f i) : SV_Target
			{
				fixed4 col = tex2D(_MainTex, i.uv);
				return 1 - col; // 色を反転させる
			}
			ENDCG
		}
	}
}
使う
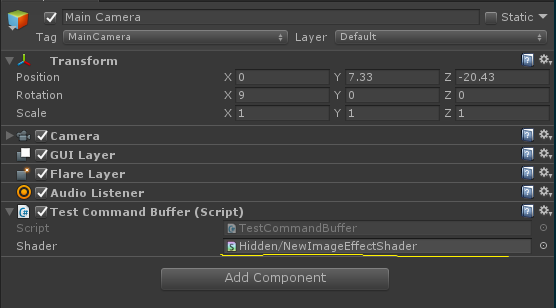
シーンの適当なオブジェクトにTestCommandBuffer.csをアタッチして、シェーダーを
割り当てます。
参考URL
Unity 5 の CommandBuffer を利用したレンダリングパイプラインの拡張について調べてみた
http://tips.hecomi.com/entry/2016/02/19/090000
