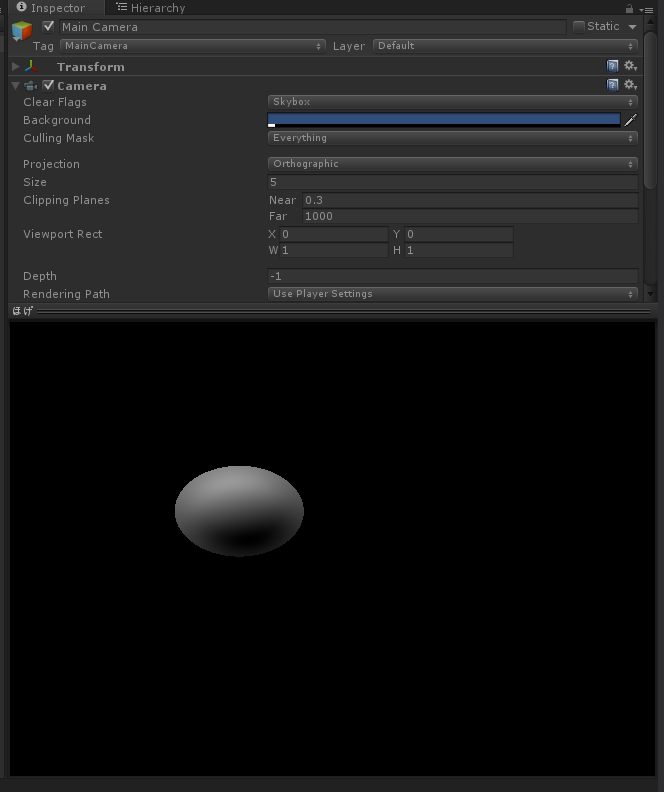
※この記事で使っているUnityのバージョンは Unity5.2.1p3 です。
C#コード
以下のスクリプトを作成して適当なオブジェクトにアタッチ
NewBehaviourScript.cs
using UnityEngine;
using System.Collections;

public class NewBehaviourScript : MonoBehaviour
{

}
以下のスクリプトを作成してEditorフォルダ内へ入れる
NewBehaviourScriptEditor.cs
using UnityEngine;
using UnityEditor;
using System.Collections;

[CustomEditor(typeof(NewBehaviourScript))]
public class NewBehaviourScriptEditor : Editor
{
  private Material material = null;
  public override bool HasPreviewGUI()
  {
    return true;
  }

  public override GUIContent GetPreviewTitle()
  {
    return new GUIContent("ほげ");
  }

  public override void OnPreviewGUI(Rect r, GUIStyle background)
  {
    if (material == null)
    {
      Shader shader = Resources.Load<Shader>("Shader/RayMarch");
      this.material = new Material(shader);
    }

    base.OnPreviewGUI(r, background);
    Graphics.DrawTexture(r, Texture2D.whiteTexture, this.material);
    Repaint();

  }

}
シェーダーコード
レイマーチングは 全能感UP! GLSLで進めレイマーチング を参考にしました.
光と法線の内積をとって影をつけています.
ファイルパスがAssets/Resources/Shader/RayMarch.shaderとなるように
配置します.
RayMarch.shader
Shader "Unlit/RayMarch"
{
	Properties
	{
		_MainTex("Texture", 2D) = "white" {}
	}

		SubShader
	{
		Tags{ "RenderType" = "Opaque" }

		Pass
	{
CGPROGRAM
#pragma vertex vert
#pragma fragment frag

#include "UnityCG.cginc"

	struct appdata
	{
		float4 vertex : POSITION;
		float2 uv : TEXCOORD0;
	};

	struct v2f
	{
		float2 uv : TEXCOORD0;
		float4 vertex : SV_POSITION;
		float4 screenPos : TEXCOORD1;
	};

	sampler2D _MainTex;
	float4 _MainTex_ST;

	v2f vert(appdata v)
	{
		v2f o;
		o.vertex = mul(UNITY_MATRIX_MVP, v.vertex);
		o.uv = TRANSFORM_TEX(v.uv, _MainTex);
		return o;
	}

	float distanceFunc(float3 p) {
		float sphereSize = 0.1;
		float3 spherePos = float3(0.0, 0.0, -4.0);
		return length(p - spherePos) - sphereSize;
	}

	float3 getNormal(float3 p)
	{
		const float d = 0.0001;
		return
			normalize
			(
				float3
				(
					distanceFunc(p + float3(d, 0.0, 0.0)) - distanceFunc(p + float3(-d, 0.0, 0.0)),
					distanceFunc(p + float3(0.0, d, 0.0)) - distanceFunc(p + float3(0.0, -d, 0.0)),
					distanceFunc(p + float3(0.0, 0.0, d)) - distanceFunc(p + float3(0.0, 0.0, -d))
					)
				);
	}

	fixed4 frag(v2f i) : SV_Target
	{
		// fragment position
		float2 p = i.uv - 0.5;
		p *= 0.3;

		// camera
		float3 cPos = float3(0.0, 0.0, 2.0);
		float3 cDir = float3(0.0, 0.0, -1.0);
		float3 cUp = float3(0.0, 1.0, 0.0);
		float3 cSide = cross(cDir, cUp);
		float targetDepth = 1.0;

		// ray
		float3 ray = normalize(cSide * p.x + cUp * p.y + cDir * targetDepth);

		// marching loop
		float distance = 0.0; // レイとオブジェクト間の最短距離
		float rLen = 0.0;     // レイに継ぎ足す長さ
		float3  rPos = cPos;  // レイの先端位置
		for (int i = 0; i < 4; i++) {
			distance = distanceFunc(rPos);
			rLen += distance;
			rPos = cPos + ray * rLen;

		}

		// hit check
		if (abs(distance) < 0.1) {
			float t = _Time.z;
			float3 normal = getNormal(rPos);
			float3 light = float3(0.3 * cos(t), 0.3 * sin(t), 0.0);
			float env = 0.3; // 環境光
			float diffuse = dot(normal, light);
			float color = env + diffuse;
			return float4(color, color, color, 1.0);
		}else
		{
			return float4(0.0, 0.0, 0.0, 1.0);
		}
	}

ENDCG
	}
	}
}
#参考
全能感UP! GLSLで進めレイマーチング
http://www.demoscene.jp/?p=811

