※記事の内容が古くなっています
https://github.com/puku0x/angular-onsenui2-webpack2
を参照してください。
この記事は、Onsen UI Advent Calendar 2016 の11日目の記事として作成しました。
はじめに
OnsenUI2とAngular2のリリースからしばらく経ちましたが、皆さん両方使っていますか?
Angular2と組み合わせたサンプルが少なく、どこから始めて良いかわからない時や、これからAngular2でモバイルアプリを作るときの参考として、この記事では「OnsenUI2 + Angular2 + PhoneGap」の雛形の作り方を紹介します。
開発環境は以下を想定しています。
- Node.js 4.x インストール済み
- PhoneGap/Cordova インストール済み
エディタはお好きなものをお使いください。
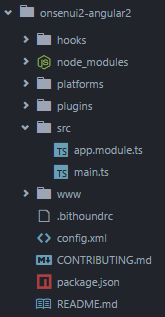
1. 空のプロジェクトを作る
phonegap createで空のプロジェクトを作ります。
$ phonegap create onsenui2-angular2
PhoneGap/Cordovaがインストールされていない場合は、
npmでインストールしてください。
$ npm install -g phonegap
2. 依存ライブラリのインストール
npm initコマンドで空のpackage.jsonを作ります。
$ npm init -y
{
  "name": "onsenui2-angular2",
  "version": "1.0.0",
  "description": "",
  "main": "index.js",
  "scripts": {
    "test": "echo \"Error: no test specified\" && exit 1"
  },
  "keywords": [],
  "author": "",
  "license": "ISC"
}
生成されたpackage.jsonを下記のように変更します。
変更点は3つです。
-
scriptsにビルド用スクリプト追加 -
dependenciesにOnsenUI2とAngular2関連を追加 -
devDependenciesにTypeScriptとWebpack関連を追加
{
  "name": "onsenui2-angular2",
  "version": "1.0.0",
  "description": "",
  "main": "index.js",
  "scripts": {
    "tsc": "tsc -p .",
    "bundle": "webpack src/main.js www/js/bundle.js",
    "build": "npm run tsc && npm run bundle",
    "start": "static .",
    "postinstall": "cpx node_modules/onsenui/**/* www/lib/onsenui",
    "postbuild": "cpx src/**/*.html www/src"
  },
  "keywords": [],
  "author": "",
  "license": "ISC",
  "dependencies": {
    "@angular/common": "^2.2.4",
    "@angular/compiler": "^2.2.4",
    "@angular/core": "^2.2.4",
    "@angular/platform-browser": "^2.2.4",
    "@angular/platform-browser-dynamic": "^2.2.4",
    "angular2-onsenui": "1.0.0-rc.2",
    "core-js": "^2.4.1",
    "onsenui": "^2.0.4",
    "rxjs": "5.0.0-beta.12",
    "zone.js": "0.6.21",
    "cpx": "^1.5.0"
  },
  "devDependencies": {
    "node-static": "^0.7.9",
    "typescript": "^2.0.10",
    "webpack": "^1.13.3"
  }
}
※angular2-onsenuiの最新版はRC3ですが、pushPageのアニメーションが再生されない不具合があるため、今回は一つ前のバージョンを採用しています。アシアルさん修正はよ。
変更が終わったらnpm installで依存ライブラリのインストールを実行しましょう。
$ npm install
3. index.htmlを書く
www/index.htmlを下記のように修正します。
<!DOCTYPE html>
<html>
<head>
    <meta charset="utf-8" />
    <meta name="format-detection" content="telephone=no" />
    <meta name="msapplication-tap-highlight" content="no" />
    <meta name="viewport" content="user-scalable=no, initial-scale=1, maximum-scale=1, minimum-scale=1, width=device-width" />
    <!-- This is a wide open CSP declaration. To lock this down for production, see below. -->
    <meta http-equiv="Content-Security-Policy" content="default-src * gap: ws: https://ssl.gstatic.com;style-src 'self' 'unsafe-inline' data: blob:;script-src * 'unsafe-inline' 'unsafe-eval' data: blob:;">
    <link rel="stylesheet" href="./lib/onsenui/css/onsen-css-components-default.css">
    <link rel="stylesheet" href="./lib/onsenui/css/onsenui.css">

    <title>Hello world</title>
</head>
<body>
    <my-app></my-app>
    <script src="./lib/onsenui/js/onsenui.min.js"></script>
    <script src="./js/bundle.js"></script>
</body>
</html>
おや?bundle.jsとは何でしょう?(後ほど出てきます)
my-appという見慣れないタグがありますが、これがアプリ本体です。
4. アプリの中身を作る
それでは早速作っていきましょう。
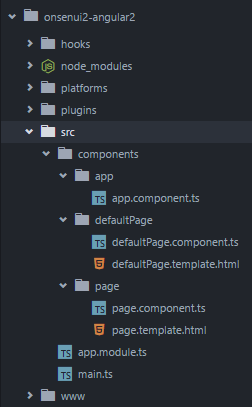
src/app.module.tsを新規作成してアプリのモジュールを定義します。
「モジュール」とはアプリの機能をひとまとめにしたものです。
@NgModule内に利用するライブラリ(Angular2やOnsenUI2)や、アプリの各ページを構成するコンポーネントが書かれてあるのでなんとなくわかると思います。
import {OnsenModule} from 'angular2-onsenui';
import {NgModule, CUSTOM_ELEMENTS_SCHEMA} from '@angular/core';

import {AppComponent}         from './components/app/app.component';
import {DefaultPageComponent} from './components/defaultPage/defaultPage.component';
import {PageComponent}        from './components/page/page.component';

@NgModule({
  imports:         [OnsenModule],
  declarations:    [AppComponent, DefaultPageComponent, PageComponent],
  entryComponents: [DefaultPageComponent, PageComponent],
  bootstrap:       [AppComponent],
  schemas:         [CUSTOM_ELEMENTS_SCHEMA]
})
export class AppModule {

}
次に、src/main.tsを新規作成して起動処理を書きます。
import 'core-js/shim';
import 'zone.js/dist/zone';

import {platformBrowserDynamic} from '@angular/platform-browser-dynamic';
import {AppModule} from './app.module';

platformBrowserDynamic().bootstrapModule(AppModule);
フォルダの構成が以下の通りになっていればOKです。
5. 各コンポーネントを作る
5.1 AppComponent
最初の画面のコンポーネントを作ります。
今回はOnsenUIのページ遷移サンプルを作るので、ons-navigatorだけ書きます。
import {Component} from '@angular/core';
import {DefaultPageComponent} from '../defaultPage/defaultPage.component';
@Component({
selector: 'my-app',
template: '<ons-navigator [page]="page"></ons-navigator>'
})
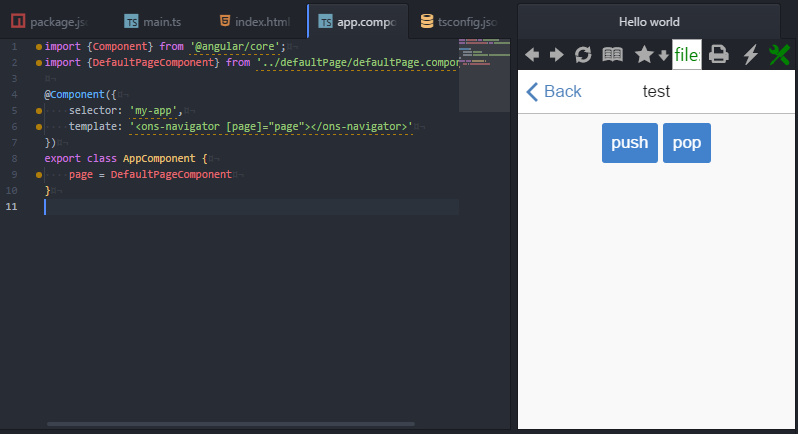
export class AppComponent {
page = DefaultPageComponent
}
初期表示のページにDefaultPageComponentを指定していますね。
このDefaultPageComponentの中に最初に表示されるページを作っていきます。
5.2 DefaultPageComponent
DefaultPageComponent の中身はこのようになっています。
pushPageの第1引数は遷移先のページであり、第2引数は遷移先に渡す任意のオブジェクトです。
import {Component} from '@angular/core';
import {OnsNavigator, Params} from 'angular2-onsenui';

import {PageComponent} from '../page/page.component';

@Component({
    selector: 'ons-page',
    templateUrl: './src/components/defaultPage/defaultPage.template.html'
})
export class DefaultPageComponent {
    constructor(private _navigator: OnsNavigator, private _params: Params) {
        console.log('parameters:', _params.data);
    }
    push() {
        // 遷移
        this._navigator.element.pushPage(PageComponent, {data: {hoge: 'fuga'}});
    }
}
AppComponent ではテンプレートを直に書いていましたが、別ファイルに分けるときはtemplateURLを使います。
<ons-toolbar>
    <div class="center">test</div>
</ons-toolbar>
<div class="content">
    <div style="text-align: center; margin: 10px">
        <ons-button (click)="push()">push</ons-button>
    </div>
</div>
このテンプレート内のons-buttonをタップすると、次のPageComponentへと遷移します。
5.3 PageComponent
「前の画面に戻る」処理が入っていること以外はDefaultPageComponentと同じです。
import {Component} from '@angular/core';
import {OnsNavigator, Params} from 'angular2-onsenui';

@Component({
    selector: 'ons-page',
    templateUrl: './src/components/page/page.template.html'
})
export class PageComponent {
    constructor(private _navigator: OnsNavigator, private _params: Params) {
        console.log('parameters:', _params.data);
    }

    push() {
        this._navigator.element.pushPage(PageComponent, {animation: 'slide', data: {foo: 'bar'}});
    }

    pop() {
        this._navigator.element.popPage();
    }
}
<ons-toolbar>
    <div class="left">
      <ons-back-button>Back</ons-back-button>
    </div>
    <div class="center">test</div>
</ons-toolbar>
<div class="content">
    <div style="text-align: center; margin: 10px">
        <ons-button (click)="push()">push</ons-button>
        <ons-button (click)="pop()">pop</ons-button>
    </div>
</div>
フォルダの構成はこんな感じになっていると思います。確認できたら次へ行きましょう。
TypeScriptを変換(トランスパイル)する
今回はTypeScriptで書いたので、通常のブラウザで実行できるようにJavaScriptに変換する必要があります。
変換用の設定ファイルtsconfig.jsonを作り、package.jsonと同じディレクトリに保存しましょう。
{
  "compilerOptions": {
    "module": "commonjs",
    "target": "es5",
    "lib": ["es6", "dom"],
    "moduleResolution": "node",
    "noImplicitAny": true,
    "sourceMap": false,
    "emitDecoratorMetadata": true,
    "experimentalDecorators": true
  },
  "compileOnSave": false,
  "include": [
    "src/**/*.ts"
  ],
  "exclude": [
    "node_modules"
  ]
}
TypeScriptの変換に必要なコマンドはpackage.jsonに記述済みです。早速実行してみましょう
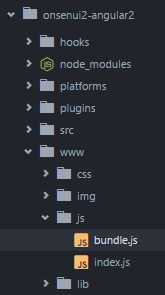
$ npm run build
www/js/bundle.jsが生成されていれば成功です!
ブラウザで確認
コンパイルが終わったらブラウザで確認してみましょう。
アプリのサーバを起動して、
$ phonegap serve
http://localhost:3000 にアクセスすると、先ほど作ったアプリが表示されます。
↑Atomでも確認できます。
終わりに
お疲れ様でした!
今回のサンプルは https://github.com/puku0x/onsenui2-angular2 に置いています。
Angular2 + OnsenUI2で遊びたいときにご利用ください。