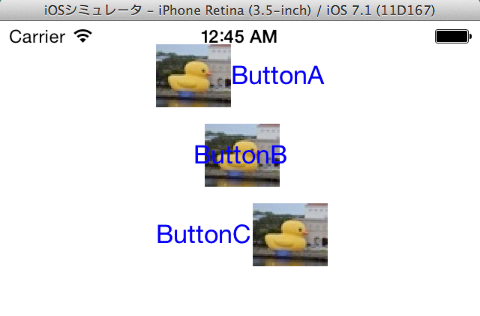
通常、UIButtonのタイトルは右側、画像は左側です。これの左右を入れ替えたいと試していました。
タイトルの位置はtitleEdgeInsetsで、画像の位置はimageEdgeInsetsで調整できます。なので、「画像のサイズ分だけタイトルを左側に」、「タイトルのサイズ分だけ画像を右側に」調整すれば、タイトルと画像が左右入れ替わるはずです。
ですが実際にやってみたら、タイトルと画像が重なってしまいました。
xxxEdgeInsetsで動かしたい量を、Left/Right両方に指定しないと、思った位置に移動しない?
タイトルと画像を設定したbuttonA〜Cを用意して、以下を試してみます。
-(void)viewDidAppear:(BOOL)animated
{
    [super viewDidAppear:animated];
    // ボタンの画像とtitleを入れ替え
    // ButtonAは入れ替えない。
    NSLog(@"self.buttonA.titleLabel=%@",self.buttonA.titleLabel);
    NSLog(@"self.buttonA.imageView=%@",self.buttonA.imageView);

    // ButtonBは、「移動させる方向に-1*サイズ分」設定してみる
    CGFloat titleWidthB = self.buttonB.titleLabel.bounds.size.width;
    CGFloat imageWidthB = self.buttonB.imageView.bounds.size.width;
    self.buttonB.titleEdgeInsets=UIEdgeInsetsMake(0,
                                                  -imageWidthB,
                                                  0,
                                                  0);
    self.buttonB.imageEdgeInsets=UIEdgeInsetsMake(0,
                                                  0,
                                                  0,
                                                  -titleWidthB);
    NSLog(@"self.buttonB.titleLabel=%@",self.buttonB.titleLabel);
    NSLog(@"self.buttonB.imageView=%@",self.buttonB.imageView);

    // ButtonCは「移動させる方向に-1*サイズ分、反対方向にサイズ分」設定してみる
    CGFloat titleWidthC = self.buttonC.titleLabel.bounds.size.width;
    CGFloat imageWidthC = self.buttonC.imageView.bounds.size.width;
    self.buttonC.titleEdgeInsets=UIEdgeInsetsMake(0,
                                                  -imageWidthC,
                                                  0,
                                                  imageWidthC);
    self.buttonC.imageEdgeInsets=UIEdgeInsetsMake(0,
                                                  titleWidthC,
                                                  0,
                                                  -titleWidthC);
    NSLog(@"self.buttonC.titleLabel=%@",self.buttonC.titleLabel);
    NSLog(@"self.buttonC.imageView=%@",self.buttonC.imageView);
}
この場合、buttonBの指定だと、タイトルと画像が重なってしまいます。

当初自分は、buttonBの指定(動かしたい方向に-1*サイズ指定だけ)で左右入れ替わると思っていました。しかし実際には重なります。移動量が足らないようです(半分程度しか移動しない)。
意図したサイズ動かしたい場合は、「動かしたい方向に引っ張って」「反対方向から押し出して」とLeft/Right両方を指定する必要があるようです。
結局自分はUIEdgeInsetsがよく分かっていない
なぜこうなるのか、自分はまだ理解できてません。 このあたりの考え方を勉強できる資料とかあったら教えてくださいm(_ _)m
2014/07/10追記 教えてもらったUIEdgeInsetsInsetRectを使っていろいろと試した
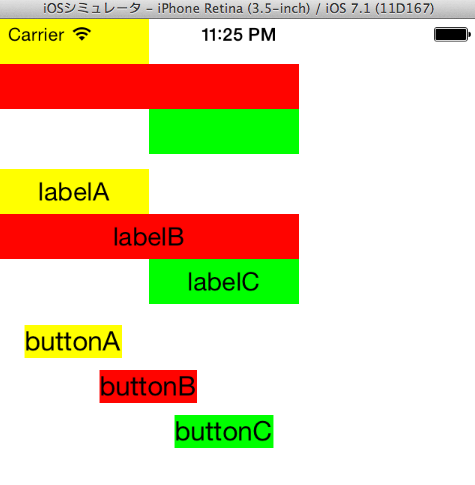
UIEdgeInsetsInsetRectを使って、UIView、UILabel、UIButtonのtitleそれぞれを、以下のパターンで動かします。
- 初期位置で動かさないパターン(黄)
- 「右に-100」入り込むパターン(赤)
- 「右に-100」「左から100」入り込むパターン(緑)
UIViewとUILabelは、frameそのものが「右に100分広がった」「左は100分狭くなった」と変わるので、理解しやすいです。
同じようにbuttonのtitleに設定すると、titleLabelのframeは「広がらない」が、テキストの位置は「センタリングしているUILabelの位置」と同じになりました。
内部の実装がどうなっているのかは不明ですが、こんな風になっていると思えば、辻褄が合います。
- UIButtonのtitleLabelは、テキストがセンタリングされている
- titleEdgeInsetsで、button.titleLabelの「frameが広がる/狭まる」
- センタリングした文字を中心に、sizeToFitが行われ、文字は動かずframeのサイズが元に戻る
- (void)viewDidLoad {
	[super viewDidLoad];

	self.viewA = [[UIView alloc]initWithFrame:CGRectMake(0, 0, 100, 30)];
	self.viewB = [[UIView alloc]initWithFrame:CGRectMake(0, 30, 100, 30)];
	self.viewC = [[UIView alloc]initWithFrame:CGRectMake(0, 60, 100, 30)];
	self.viewA.backgroundColor = [UIColor yellowColor];
	self.viewB.backgroundColor = [UIColor redColor];
	self.viewC.backgroundColor = [UIColor greenColor];

	self.labelA = [[UILabel alloc]initWithFrame:CGRectMake(0, 100, 100, 30)];
	self.labelB = [[UILabel alloc]initWithFrame:CGRectMake(0, 130, 100, 30)];
	self.labelC = [[UILabel alloc]initWithFrame:CGRectMake(0, 160, 100, 30)];
	self.labelA.backgroundColor = [UIColor yellowColor];
	self.labelB.backgroundColor = [UIColor redColor];
	self.labelC.backgroundColor = [UIColor greenColor];
	self.labelA.text = @"labelA";
	self.labelB.text = @"labelB";
	self.labelC.text = @"labelC";
	self.labelA.textAlignment = NSTextAlignmentCenter;
	self.labelB.textAlignment = NSTextAlignmentCenter;
	self.labelC.textAlignment = NSTextAlignmentCenter;

	self.buttonA = [UIButton buttonWithType:UIButtonTypeCustom];
	self.buttonB = [UIButton buttonWithType:UIButtonTypeCustom];
	self.buttonC = [UIButton buttonWithType:UIButtonTypeCustom];
	self.buttonA.frame = CGRectMake(0, 200, 100, 30);
	self.buttonB.frame = CGRectMake(0, 230, 100, 30);
	self.buttonC.frame = CGRectMake(0, 260, 100, 30);
	self.buttonA.titleLabel.backgroundColor = [UIColor yellowColor];
	self.buttonB.titleLabel.backgroundColor = [UIColor redColor];
	self.buttonC.titleLabel.backgroundColor = [UIColor greenColor];
	[self.buttonA setTitle:@"buttonA" forState:UIControlStateNormal];
	[self.buttonB setTitle:@"buttonB" forState:UIControlStateNormal];
	[self.buttonC setTitle:@"buttonC" forState:UIControlStateNormal];
	[self.buttonA setTitleColor:[UIColor blackColor] forState:UIControlStateNormal];
	[self.buttonB setTitleColor:[UIColor blackColor] forState:UIControlStateNormal];
	[self.buttonC setTitleColor:[UIColor blackColor] forState:UIControlStateNormal];

	[self.view addSubview:self.viewA];
	[self.view addSubview:self.viewB];
	[self.view addSubview:self.viewC];
	[self.view addSubview:self.labelA];
	[self.view addSubview:self.labelB];
	[self.view addSubview:self.labelC];
	[self.view addSubview:self.buttonA];
	[self.view addSubview:self.buttonB];
	[self.view addSubview:self.buttonC];
}

- (void)viewDidAppear:(BOOL)animated {
	[super viewDidAppear:animated];

	// View
	// ViewAはそのまま
	// ViewBは「右に-100」
	self.viewB.frame = UIEdgeInsetsInsetRect(self.viewB.frame,
	                                         UIEdgeInsetsMake(0, 0, 0, -100));

	// ViewCは「右に-100」「左に100」
	self.viewC.frame = UIEdgeInsetsInsetRect(self.viewC.frame,
	                                         UIEdgeInsetsMake(0, 100, 0, -100));

	// label
	// labelAはそのまま
	// labelBは「右に-100」
	self.labelB.frame = UIEdgeInsetsInsetRect(self.labelB.frame,
	                                          UIEdgeInsetsMake(0, 0, 0, -100));
	// labelCは「右に-100」「左に100」
	self.labelC.frame = UIEdgeInsetsInsetRect(self.labelC.frame,
	                                          UIEdgeInsetsMake(0, 100, 0, -100));

	// Button
	// buttonB.titleは「右に-100」
	self.buttonB.titleEdgeInsets = UIEdgeInsetsMake(0, 0, 0, -100);

	// buttonC.titleは「右に-100」
	self.buttonC.titleEdgeInsets = UIEdgeInsetsMake(0, 100, 0, -100);
}
