はじめに
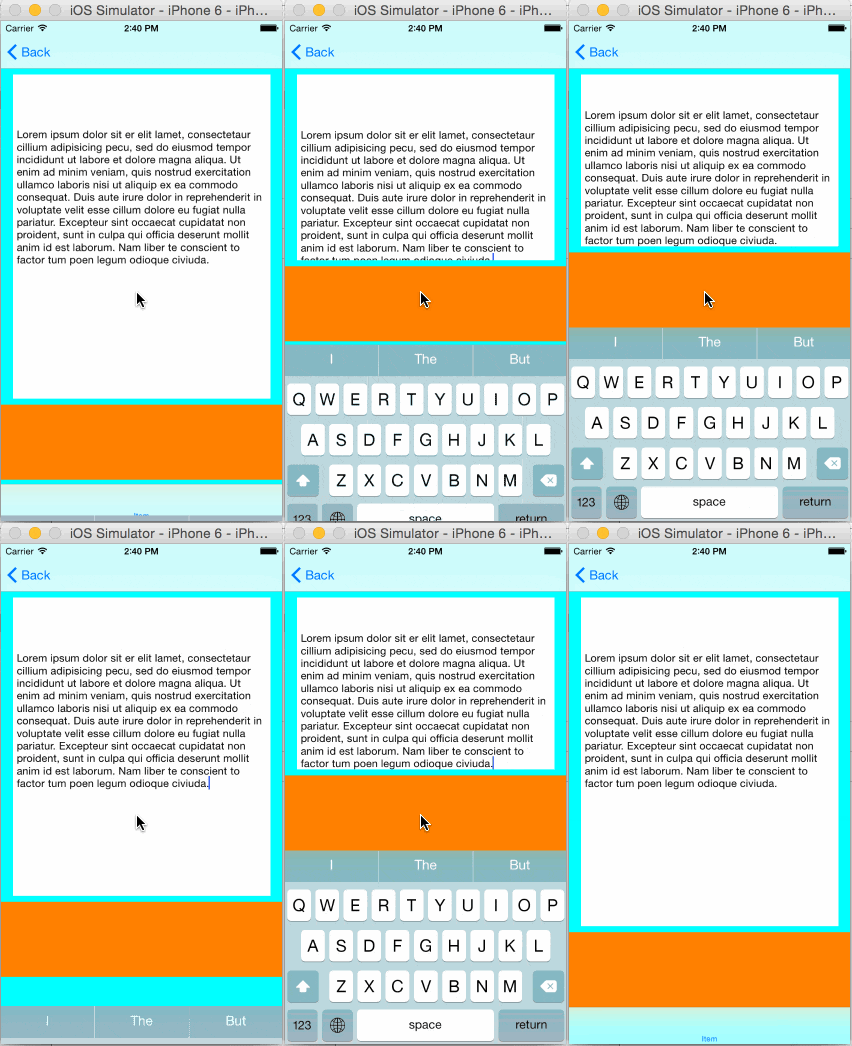
キーボード非表示時には画面下に配置され、キーボードが表示された時には「キーボードの移動に追従して」移動するViewを作ってみました。
キーボードが表示/非表示された事をNSNotificationCenterで拾って、その後UIView.animationWithDuration()にてアニメーションしながらViewが移動します。このアニメーションにはAutolayoutの制約を使います。

サンプルコード
Storyboardの構成
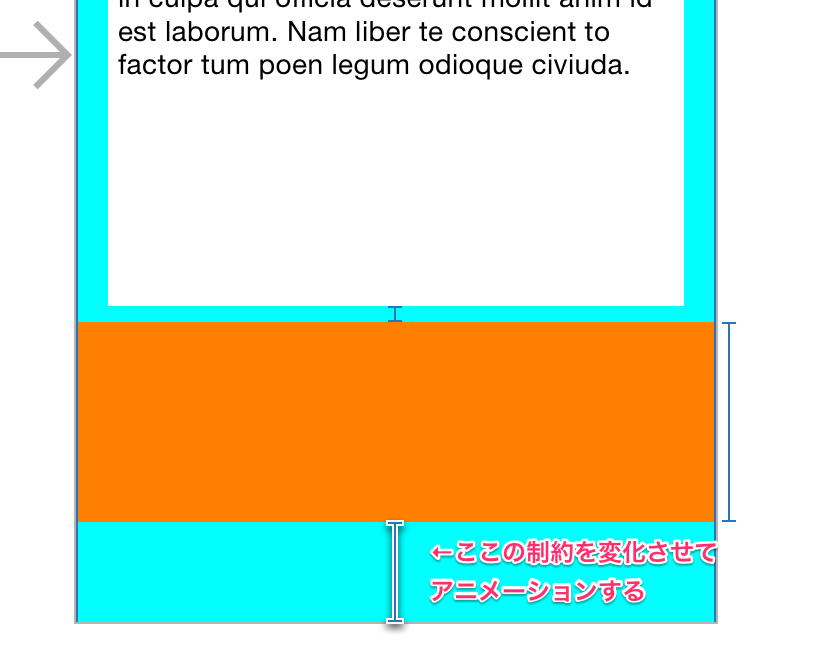
Storyboard上の構成では、「アニメーションで移動するViewの底」と「ViewControllerの底(Bottom Layout Guide)」の間に、高さの制約を作ります。またこれをIBOutletとしてViewControllerに接続しておきます。
この高さ制約の値は0としておきます。キーボードが表示された時には、この値をアニメーションで変化させる事で、キーボードに追従してViewを動かします。

キーボードが表示される、隠れる際のNotificationの監視
キーボードが表示される時にはUIKeyboardWillShowNotificationが、非表示になる時にはUIKeyboardWillHideNotificationが飛びます。なのでこれを監視(addObserver)します。
この監視は、ViewControllerが表示されている間のみ必要なので、viewDidAppear〜viewWillDisappearの間のみ監視します。
Autolayoutの制約を使ったアニメーション
Autolayoutの制約でアニメーションを行うには、まず「制約の値を書き換えてから」、UIView.animateWithDuration()の中でlayoutIfNeeded()を使います。
参考:Qiita:AutoLayout制約値を変更したアニメーションで勘違いしていた件
タブバーの高さについて
タブバーが表示されている場合、Viewの移動量が変わります。
- タブバー非表示の場合:Viewの移動量=キーボードの高さ
- タブバー表示の場合:Viewの移動量=キーボードの高さ-タブバーの高さ
タブバーの高さも考慮しないと、キーボードとViewの間に隙間が出来てしまいます。
このタブバーの高さですが、UIViewControllerのbottomLayoutGuideで取得できます。タブバーが非表示の場合にはここが0になるので、if文での分岐等は不要です。
ソース
import UIKit

class ViewController: UIViewController {
    @IBOutlet weak var textView: UITextView!
    @IBOutlet weak var bottomConstraint: NSLayoutConstraint!

    override func viewDidLoad() {
        super.viewDidLoad()
        // Do any additional setup after loading the view, typically from a nib.
    }
    override func viewDidAppear(animated: Bool) {
        super.viewDidAppear(animated)
        self.startObserveKeyboardNotification()
    }

    override func viewWillDisappear(animated: Bool) {
        super.viewWillDisappear(animated)
        self.stopOberveKeyboardNotification()
    }

    /** キーボードを閉じるIBAction */
    @IBAction func tapView(sender: AnyObject) {
        self.textView.resignFirstResponder()
    }
}

/** キーボード追従に関連する処理をまとめたextenstion */
extension ViewController{
    /** キーボードのNotificationを購読開始 */
    func startObserveKeyboardNotification(){
        let notificationCenter = NSNotificationCenter.defaultCenter()
        notificationCenter.addObserver(self, selector:"willShowKeyboard:", name: UIKeyboardWillShowNotification, object: nil)
        notificationCenter.addObserver(self, selector:"willHideKeyboard:", name: UIKeyboardWillHideNotification, object: nil)
    }
    /** キーボードのNotificationの購読停止 */
    func stopOberveKeyboardNotification(){
        let notificationCenter = NSNotificationCenter.defaultCenter()
        notificationCenter.removeObserver(self, name: UIKeyboardWillShowNotification, object: nil)
        notificationCenter.removeObserver(self, name: UIKeyboardWillHideNotification, object: nil)
    }

    /** キーボードが開いたときに呼び出されるメソッド */
    func willShowKeyboard(notification:NSNotification){
        NSLog("willShowKeyboard called.")
        let duration = notification.duration()
        let rect     = notification.rect()
        if let duration=duration,rect=rect {
            // ここで「self.bottomLayoutGuide.length」を使っている理由:
            // tabBarの表示/非表示に応じて制約の高さを変えないと、
            // viewとキーボードの間にtabBar分の隙間が空いてしまうため、
            // ここでtabBar分の高さを計算に含めています。
            // - tabBarが表示されていない場合、self.bottomLayoutGuideは0となる
            // - tabBarが表示されている場合、self.bottomLayoutGuideにはtabBarの高さが入る

            // layoutIfNeeded()→制約を更新→UIView.animationWithDuration()の中でlayoutIfNeeded() の流れは
            // 以下を参考にしました。
            // http://qiita.com/caesar_cat/items/051cda589afe45255d96
            self.view.layoutIfNeeded()
            self.bottomConstraint.constant=rect.size.height - self.bottomLayoutGuide.length;
            UIView.animateWithDuration(duration, animations: { () -> Void in
                self.view.layoutIfNeeded()  // ここ、updateConstraint()でも良いのかと思ったけど動かなかった。
            })
        }
    }
    /** キーボードが閉じたときに呼び出されるメソッド */
    func willHideKeyboard(notification:NSNotification){
        NSLog("willHideKeyboard called.")
        let duration = notification.duration()
        if let duration=duration {
            self.view.layoutIfNeeded()
            self.bottomConstraint.constant=0
            UIView.animateWithDuration(duration,animations: { () -> Void in
                self.view.layoutIfNeeded()
            })
        }
    }
}
/** キーボード表示通知の便利拡張 */
extension NSNotification{
    /** 通知から「キーボードの開く時間」を取得 */
    func duration()->NSTimeInterval?{
        let duration:NSTimeInterval? = self.userInfo?[UIKeyboardAnimationDurationUserInfoKey] as? Double
        return duration;
    }
    /** 通知から「表示されるキーボードの表示位置」を取得 */
    func rect()->CGRect?{
        let rowRect:NSValue? = self.userInfo?[UIKeyboardFrameEndUserInfoKey] as? NSValue
        let rect:CGRect? = rowRect?.CGRectValue()
        return rect
    }

}
UITableViewControllerでは、この方法が使えなかった
UITableViewControllerは、tableViewの外側にViewを配置する事が出来ないので、ここで書いたやり方では対応出来ませんでした。StoryboardでViewを配置しようとすると「tableHeader/Footer」か「Cell」に割り振られてしまいます。
この場合、UIViewControllerの中にUITableViewを貼り付ける事で対応出来ました。