環境
- 安定のCloud9で構築
Discover Meteor
- 以下のURLを参照
http://ja.discovermeteor.com/
Meteorの準備
Meteorインストール
$ curl https://install.meteor.com | sh
プロジェクトの作成
$ meteor create microscope
プロジェクトの起動
$ cd microscope
$ meteor --port $IP:$PORT
(Cloud9の場合、IPやPORTが制限されているので、--portオプションを付けて起動しないと動かない)
- Meteorのサンプル画面がプレビューで見れることを確認する。
その他の準備
パッケージ追加
- bootstrapとunderscoreを使うので、Meteorに追加する。
$ meteor add mizzao:bootstrap-3
$ meteor add underscore
アプリの作成
ルートディレクトリ作成
- 以下のディレクトリをプロジェクトルート下に作成する。
/client,
/server,
/public,
/lib
(/collectionsもとりあえずプロジェクトルート直下に作っておく)
CSSスタイルシートの作成
- 今回のDiscoveryではスコープ外のCSSはコピペで以下に作成。
client/stylesheets/style.css
.grid-block, .main, .post, .comments li, .comment-form {
  background: #fff;
  -webkit-border-radius: 3px;
  -moz-border-radius: 3px;
  -ms-border-radius: 3px;
  -o-border-radius: 3px;
  border-radius: 3px;
  padding: 10px;
  margin-bottom: 10px;
  -webkit-box-shadow: 0 1px 1px rgba(0, 0, 0, 0.15);
  -moz-box-shadow: 0 1px 1px rgba(0, 0, 0, 0.15);
  box-shadow: 0 1px 1px rgba(0, 0, 0, 0.15); }

body {
  background: #eee;
  color: #666666; }

.navbar {
  margin-bottom: 10px; }
  /* line 32, ../sass/style.scss */
  .navbar .navbar-inner {
    -webkit-border-radius: 0px 0px 3px 3px;
    -moz-border-radius: 0px 0px 3px 3px;
    -ms-border-radius: 0px 0px 3px 3px;
    -o-border-radius: 0px 0px 3px 3px;
    border-radius: 0px 0px 3px 3px; }

# spinner {
  height: 300px; }

.post {
  /* For modern browsers */
  /* For IE 6/7 (trigger hasLayout) */
  *zoom: 1;
  position: relative;
  opacity: 1; }
  .post:before, .post:after {
    content: "";
    display: table; }
  .post:after {
    clear: both; }
  .post.invisible {
    opacity: 0; }
  .post.instant {
    -webkit-transition: none;
    -moz-transition: none;
    -o-transition: none;
    transition: none; }
  .post.animate{
    -webkit-transition: all 300ms 0ms;
    -webkit-transition-delay: ease-in;
    -moz-transition: all 300ms 0ms ease-in;
    -o-transition: all 300ms 0ms ease-in;
    transition: all 300ms 0ms ease-in; }
  .post .upvote {
    display: block;
    margin: 7px 12px 0 0;
    float: left; }
  .post .post-content {
    float: left; }
    .post .post-content h3 {
      margin: 0;
      line-height: 1.4;
      font-size: 18px; }
      .post .post-content h3 a {
        display: inline-block;
        margin-right: 5px; }
      .post .post-content h3 span {
        font-weight: normal;
        font-size: 14px;
        display: inline-block;
        color: #aaaaaa; }
    .post .post-content p {
      margin: 0; }
  .post .discuss {
    display: block;
    float: right;
    margin-top: 7px; }

.comments {
  list-style-type: none;
  margin: 0; }
  .comments li h4 {
    font-size: 16px;
    margin: 0; }
    .comments li h4 .date {
      font-size: 12px;
      font-weight: normal; }
    .comments li h4 a {
      font-size: 12px; }
  .comments li p:last-child {
    margin-bottom: 0; }

.dropdown-menu span {
  display: block;
  padding: 3px 20px;
  clear: both;
  line-height: 20px;
  color: #bbb;
  white-space: nowrap; }

.load-more {
  display: block;
  -webkit-border-radius: 3px;
  -moz-border-radius: 3px;
  -ms-border-radius: 3px;
  -o-border-radius: 3px;
  border-radius: 3px;
  background: rgba(0, 0, 0, 0.05);
  text-align: center;
  height: 60px;
  line-height: 60px;
  margin-bottom: 10px; }
  .load-more:hover {
    text-decoration: none;
    background: rgba(0, 0, 0, 0.1); }

.posts .spinner-container{
  position: relative;
  height: 100px;
}

.not-found{
  text-align: center;
}
.not-found h2{
  font-size: 60px;
  font-weight: 100;
}

@-webkit-keyframes fadeOut {
  0% {opacity: 0;}
  10% {opacity: 1;}
  90% {opacity: 1;}
  100% {opacity: 0;}
}

@keyframes fadeOut {
  0% {opacity: 0;}
  10% {opacity: 1;}
  90% {opacity: 1;}
  100% {opacity: 0;}
}

.errors{
  position: fixed;
  z-index: 10000;
  padding: 10px;
  top: 0px;
  left: 0px;
  right: 0px;
  bottom: 0px;
  pointer-events: none;
}
.alert {
          animation: fadeOut 2700ms ease-in 0s 1 forwards;
  -webkit-animation: fadeOut 2700ms ease-in 0s 1 forwards;
     -moz-animation: fadeOut 2700ms ease-in 0s 1 forwards;
  width: 250px;
  float: right;
  clear: both;
  margin-bottom: 5px;
  pointer-events: auto;
}
Template作成
- デフォルトで作成される3つのクライアント用ファイルは不要なので削除
- main.css
- main.html
- main.js
posts_listとpostItemの作成
posts_list.html
<template name="postsList">
    <div class ="posts">
        {{#each posts}}
            {{> postItem}}
        {{/each}}
    </div>
</template>
post_item.html
<template name="postItem">
    <div class="posts">
        <div class="post-content">
            <h3><a href="{{url}}">{{title}}</a><span>{{domain}}</span></h3>
        </div>
    </div>
</template>
Spacebarsについて。
- 上記で作成したテンプレートにある、{{#each xxx}} のような記述はSpacebarstという機能。これはHandlebarsとほぼ同じ機能ということ。以下のリンクを参考にする。
- http://qiita.com/sassy_watson/items/f9947624876bf75a9eff
Template helper
- 作成したテンプレートを使うためのスクリプトを作成します。
- サンプルデータは、ここでstaticに定義します。(postsData)
- 最後のセクションでhelperを定義。
posts_list.js
var postsData = [
        {
            title: "Introducing Telescope",
            aurhor: "test taro",
            url: "http://test_taro.com/"
        },
        {
            title: "Meteor",
            aurhor: "jiro-san",
            url: "http://jiro-san.com/"
        },
        {
            title: "The Meteor Book",
            aurhor: "saburo-san",
            url: "http://test_saburo.com/"
        }

    ];

Template.postsList.helpers({
    posts: postsData
});
- リストにドメイン名を表示させるための{{domain}}に対応するスクリプトを書きます。
post_item.js
Template.postItem.helpers({
    domain: function(){
        var a = document.createElement('a');
        a.href = this.url;
        return a.hostname;
    }
});
- これで以下のような画面となります。
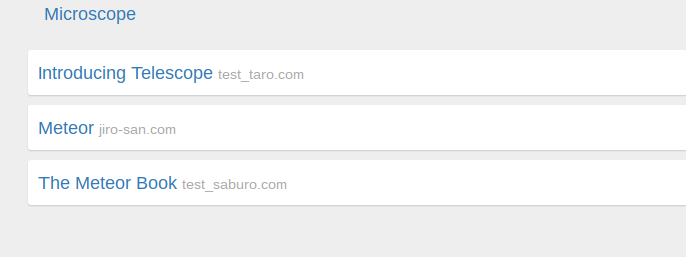
※最上部のナビゲーションセクションのCSSが適用されていないので修正が必要です。後で。
ポイント
- ここでのポイントは、特に文字列操作などをせずともドメイン名を取得して表示てきていることです。これは、post_item.jsで生成した"a"オブジェクトに対してい、"return a.hostname"をすることで、url情報からドメイン名だけを取得して返しています。なので、"return a.href"とすると、URLのフルパスが表示されるようになります。
Meteorコレクション
準備
- Collectionsを使えるように以下のスクリプトを書く。
lib/collections/posts.js
Posts = new Meteor.Collection('posts');
コレクション
- Meteorでは、コレクションを3つのデータストアに格納できる。
- ブラウザのメモリ領域
- ブラウザのストレージ
- サーバサイドのデータベース
- Meteorで動的なデータ更新をする際に、データはmongoDBに入れて扱う。mongoDBへのアクセスは以下のコマンドでアクセスできる。
$ meteor mongo
- mongoDBへコレクションを追加する。
> db.posts.insert({title: "A new post"});
- mongoDBのコレクションを参照する。
> db.posts.find();
{ "_id" : ObjectId("57ac2b8aa326f404f88d3eec"), "title" : "a new post" }
クライアントコレクション
-
コレクションの一部はクライアントのブラウザキャッシュ上にmongoDBコレクションとして格納されているため、データを呼び出す際には高速にアクセスできるようになっている。(クライアント側のmongoDBをminiMongoというそうです)
-
クライアントのブラウザコンソールでminiMongoを検索すると、サーバサイドのmongoDBと同じデータが格納されていて、クライアント側のminiMongoにデータを追加すると、サーバサイドのmongoDBにもデータが格納される。(すごい!!)
動的なデータ更新
- 今までは静的なデータを使ってコレクションをWebページに表示していたが、実際にmongoDBへデータを入れて動的なページ更新をしてみる。
- まずは、meteorを終了さえて、その後に以下のコマンドでmeteorをリセットする。
$ meteor reset
- リセットが終わったらmeteorを起動
$ meteor --port $IP:$PORT
- 以下のスクリプトを/server下に作成することで、空のpostsを見つけると3つのデータが入るようになる。
server/fixtures.js
if(Posts.find().count() === 0){
    Posts.insert({
        title: "Introducing Telescope",
        aurhor: "test taro",
        url: "http://test_taro.com/"
    });

    Posts.insert({
        title: "Meteor",
        aurhor: "jiro-san",
        url: "http://jiro-san.com/"
    });

    Posts.insert({
        title: "The Meteor Book",
        aurhor: "saburo-san",
        url: "http://test_saburo.com/"
    });
}
-
もう一度、meteorを再起動すると、上記スクリプトが読み込まれる。
-
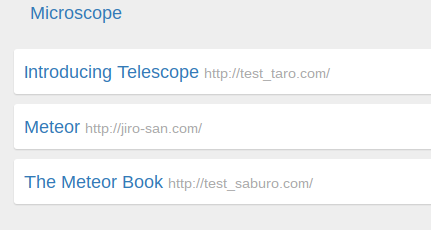
ブラウザコンソールから以下のコマンドを入力すると、データがminiMongoに上記のデータが格納されていることがわかる。
> Posts.find().fetch();
- ここで、静的なデータを削除して、以下のようにヘルパーを書き換える。
client/templates/posts/posts_list.js
Template.postItem.helpers({
    domain: function(){
        var a = document.createElement('a');
        a.href = this.url;
        return a.hostname;
    }
});
ポイント
ここでのポイントは、meteorで扱うデータ型のおはなし。meteorでは、Posts.find();と入力すると、カーソルを返す。カーソルで配列と同様に処理できるので問題ないが、どうしても配列で返してほしい場合は、Posts.find().fetch()を使うと配列で返ってくる。
データ追加
- クライアントコンソールから以下のコマンドを入力して、miniMongoにデータを追加すると、動的にページ更新がされる。
Posts.insert({
  title: 'Meteor Docs',
  author: 'Tom Coleman',
  url: 'http://docs.meteor.com'
});
autopublish
- meteorには、autopublishという機能があり、サーバサイドのdbとクライアントサイドのdbと、とりあえずバンバン同期してしまうという素敵な機能がある。ただ、セキュリテイ上よろしくないので無効化する。
- はじめにautopublishを削除する。
$ meteor remove autopublish
- すると、ブラウザ上のコレクションは一旦クリアされる。で、次に見せたいコレクションだけをクライアントに渡すために、サーバサイドにpublish関数を作る。とはいえ、練習なのですべて見せる設定で。
server/publications.js
Meteor.publish('posts', function(){
    return Posts.find();
});
- クライアント側ではサブスクライブの設定をする必要があるので、clinet/main.jsに以下のスクリプトを追加する。これでブラウザの表示は元に戻る。
client/main.js
Meteor.subscribe('posts');
パブリケーションとサブスクリプション
- なんとなくMeteorの非常に重要な機能だと思いますが、シンプルなので読むとわかるため割愛。
ルーティング
- サンプルページだけではなく、別のページも作成する。まずはiron:routeをインストールする。
Meteo DIscoverの手順だとうまくいかないので、http://qiita.com/m0a/items/90d05c22353d9c271fbf に記載されている手順で実施。
$ meteor add iron:router
レイアウトの作成
- 既存のファイルを書き換えるために、まずはmain.htmlをスリムに。
main.html
<head>
    <title>Microscope</title>
</head>
- layout部分だけ別ファイルに書き出す。
client/views/application/layout.html
<template name="layout">
    <div class="container">
        <header class="navbar navbar-default" role="navigation">
            <div class="navbar-inner">
                <a class="brand" href="{{pathFor 'postsList'}}">Microscope</a>
            </div>
        </header>
        <div id="main" class="row-fluid">
            {{> yield}}
        </div>
    </div>
</template>
-
新しく {{> yield}}というヘルパーを入力した。yieldヘルパーは特殊ヘルパーらしく、このヘルパーがルートテンプレートとなる(?)
-
ルーティングをするための、router.jsを作成する。
lib/router.js
Router.configure({
    layoutTemplate: 'layout'
});

Router.map(function() {
  this.route('postsList', {path: '/'});
});
ポイント
- ここで、libフォルダにrouterファイルを入れたのがポイント。libフォルダは何よりもはじめに読み込まれるファイルを置いておく。
waiting on data
- コレクションのロード待ちを表示させるスピナーも簡単。
- Iron Routerの方で実装できるので、まずは、router.jsを書き換え。
lib/router.js
Router.configure({
    layoutTemplate: 'layout',
    loadingTemplate: 'loading', //①
    waitOn: function(){
        return Meteor.subscribe('posts');  //②
    }
});

Router.map(function() {
  this.route('postsList', {path: '/'});
});
- ②で、main.jsにあった読み込みスクリプトをrouter.jsにもってくる。
- ①で、ローディング中に表示したいテンプレートを指定する。
- 以下のコマンドでspinnerをモジュールを追加する。
$ meteor add sacha:spin
- loadingテンプレートを作成。
client/templates/includes/loading.html
<template name="loading">
    {{> spinner}}
</template>
- これで、コレクション取得中にスピンの画面が表示されるようになった。
続きは後日。
参考文献