DFP(DoubleClick for Publishers)でiOSアプリに広告を出すサンプルが日本語、英語どちらにも見当たらず、試行錯誤したのでこれからDFPをiOSアプリで使う人の参考になれば幸いです。
UITableViewのセルにGADNativeContentAdを表示するサンプルです。
DFPを使うことでiosでネイティブ広告や、自社広告の管理が出来るようになります。
なお、DFPの設定方法についてはここでは割愛します。
サンプルソース
https://github.com/nishiyamaosamu/DFPNaiveContentAdInTableViewCellSample
画面はこんな感じ
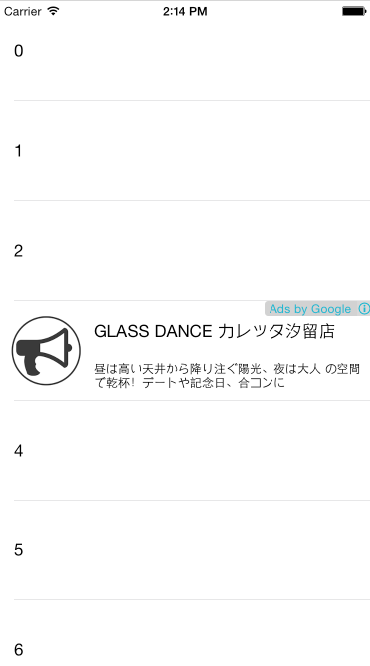
↑これはAdsense広告がサンプルとして配信されていますが、DFPを使って、自社広告を入れることも可能です。その場合右上の[Ads by Google]は表示されません。
要点解説
自分が工夫したり、ハマったりしたところの要点を解説します。
まずはViewControllerのソースです。
import UIKit
import GoogleMobileAds

class ViewController: UITableViewController,UITableViewDelegate,UITableViewDataSource,GADAdLoaderDelegate,
    GADNativeContentAdLoaderDelegate
{

    let firstAdsPositionInCells = 3
    let frequencyAdsInCells = 10
    var adLoader : GADAdLoader!
    var nativeContentAdView : GADNativeContentAdView!

    override func viewDidLoad() {
        super.viewDidLoad()
        // Do any additional setup after loading the view, typically from a nib.
        tableView.delegate = self
        tableView.dataSource = self

        //DFP
        self.adLoader = GADAdLoader(adUnitID: "/6499/example/native", rootViewController: self, adTypes: [kGADAdLoaderAdTypeNativeContent], options: [])
        self.adLoader.delegate = self
        let request = DFPRequest()
        request.testDevices = [ kGADSimulatorID ]
        self.adLoader.loadRequest(request)


        nativeContentAdView = UINib(nibName: "NativeContentAdView", bundle: nil).instantiateWithOwner(self, options: nil)[0] as! GADNativeContentAdView

    }

    override func didReceiveMemoryWarning() {
        super.didReceiveMemoryWarning()
        // Dispose of any resources that can be recreated.
    }

    func adLoader(adLoader: GADAdLoader!, didFailToReceiveAdWithError error: GADRequestError!) {
    }

    func adLoader(adLoader: GADAdLoader!, didReceiveNativeContentAd nativeContentAd: GADNativeContentAd!) {
        nativeContentAdView.nativeContentAd = nativeContentAd
        (nativeContentAdView.headlineView as! UILabel).text = nativeContentAd.headline
        (nativeContentAdView.bodyView as! UILabel).text = nativeContentAd.body
        if let nativeAdImage = nativeContentAd!.images.first as? GADNativeAdImage {
            (nativeContentAdView.imageView as! UIImageView).image = nativeAdImage.image
        }

        self.tableView.reloadData()
    }

    override func tableView(tableView: UITableView, heightForRowAtIndexPath indexPath: NSIndexPath) -> CGFloat {
        return 100.0
    }

    override func tableView(tableView: UITableView, numberOfRowsInSection section: Int) -> Int {
        return 100
    }


    override func tableView(tableView: UITableView, cellForRowAtIndexPath indexPath: NSIndexPath) ->  UITableViewCell {
        var cell = tableView.dequeueReusableCellWithIdentifier("Cell", forIndexPath: indexPath) as! UITableViewCell

        let isAdsPosition = (indexPath.row % frequencyAdsInCells - firstAdsPositionInCells) == 0

        if isAdsPosition && self.nativeContentAdView.nativeContentAd != nil {
            nativeContentAdView.frame = cell.contentView.frame
            cell.contentView.addSubview(nativeContentAdView)
        }else{
            if self.nativeContentAdView.isDescendantOfView(cell.contentView) {
                nativeContentAdView.removeFromSuperview()
            }
            cell.textLabel?.text = indexPath.row.description
        }
        return cell
    }


}
・まずはViewControllerのViewDidLoadで広告のリクエストを行います。本番ではrequest.testDevicesは除いてください。
・リクエスト後の結果についてデリゲートしたメソッドで受け取ります。リクエスト後に、tableView.reloadData()でテーブルを更新します。
    func adLoader(adLoader: GADAdLoader!, didReceiveNativeContentAd nativeContentAd: GADNativeContentAd!) {
        nativeContentAdView.nativeContentAd = nativeContentAd
        (nativeContentAdView.headlineView as! UILabel).text = nativeContentAd.headline
        (nativeContentAdView.bodyView as! UILabel).text = nativeContentAd.body
        if let nativeAdImage = nativeContentAd!.images.first as? GADNativeAdImage {
            (nativeContentAdView.imageView as! UIImageView).image = nativeAdImage.image
        }

        self.tableView.reloadData()
    }
・DPFはクリックイベントを取得するために、GADNativeContentAdViewというのをaddViewする必要があります。CustomCellをつくるのではなく、GADNativeContentAdViewのViewファイルを作り、それをcell.contentViewにaddViewする必要があります。
override func tableView(tableView: UITableView, cellForRowAtIndexPath indexPath: NSIndexPath) ->  UITableViewCell {

...

nativeContentAdView.frame = cell.contentView.frame
cell.contentView.addSubview(nativeContentAdView)

...
}
・UITableViewCellは再利用されるので、addViewすると延々と追加されてしまいます。そのため単一のGADNativeContentAdViewを使うべく、ViewControllerにGADNativeContentAdViewのメンバ変数を作って、それを使い回します。
var nativeContentAdView : GADNativeContentAdView!
※こちらのAdmobの例を参考にしました
http://googleadsdeveloper.blogspot.jp/2012/03/embedding-google-admob-ads-within.html
・GADNativeContentAdViewが再度表示されてくるタイミングで再利用されますが、再利用される前に、GADNativeContentAdViewが入ったセルが再利用されると残ってしまうので、広告表示ではないセルに、GADNativeContentAdViewが含まれている場合にはremoveFromSuperViewで削除するように工夫しています。
override func tableView(tableView: UITableView, cellForRowAtIndexPath indexPath: NSIndexPath) ->  UITableViewCell {

...

if self.nativeContentAdView.isDescendantOfView(cell.contentView) {
        nativeContentAdView.removeFromSuperview()
}

...

}
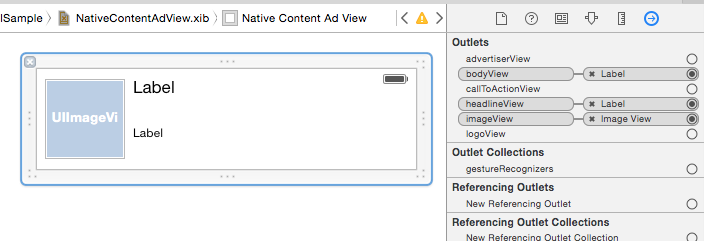
・GADNativeContentAdViewをViewファイルで作ります。クラスにGADNativeContentAdViewを指定します。
・それぞれのUILabelやUIImageViewはGADNativeContentAdViewのOutletと結びつけます。
以上、おおまかに要点のみ記述しました。
あとは、公式のマニュアルと照らしあわせて貰えればと思います。
ハマったところ
・GADNativeContentAdViewをcell.contentViewにaddSubviewせずに、カスタムセルを作ってやろうとしたら、クリック出来ないことを知った。
・GADNativeContentAdViewをcellの更新の都度生成し、addSubviewしてたら、延々とViewが増えてしまった。
・上記に書いた「Embedding Google AdMob Ads Within A UITableView」の記事で、GADBannerViewが再利用されるということでやったが、再利用のタイミングによっては、removeFromSubviewをしないとViewが存在したままでダメだった。