基本
ダウンロード
ここ から zip をダウンロードする。
HTML で読み込む
<!DOCTYPE html>
<html ng-app="mine">
  <head>
    <script src="http://ajax.googleapis.com/ajax/libs/angularjs/1.2.16/angular.min.js"></script>
    <script src="ui-utils.min.js"></script>
    <script src="script.js"></script>
  </head>
- AngularJS と
ui-utils.min.jsを読み込む。
モジュールをロードする
angular
.module('mine', ['ui.utils'])
(以下略)
-
ui.utilsモジュールをロードする。
Event Binder
<!DOCTYPE html>
<html ng-app="mine">
  <head>
    <script src="angular.min.js"></script>
    <script src="ui-utils.min.js"></script>
    <script src="script.js"></script>

    <style>
      div {
        width: 300px;
        height: 200px;
        border: 1px solid black;
        overflow: auto;
      }
    </style>
  </head>
  <body>
    <div ui-event="{scroll: 'onscroll($event)'}">
      <ul>
        <li ng-repeat="value in array">{{value}}</li>
      </ul>
    </div>
    <p>scrollTop : {{scrollTop}} px</p>
  </body>
</html>
script.js
angular
.module('mine', ['ui.utils'])
.run(function($rootScope) {
    var array = [],
        i;

    for (i=0; i<1000; i++) {
        array.push(i);
    }

    $rootScope.array = array;
    $rootScope.scrollTop = 0;

    $rootScope.onscroll = function(event) {
        $rootScope.scrollTop = event.target.scrollTop;
    };
});
- AngularJS が標準ではサポートしていないイベントでもバインドできるようにするためのディレクティブ。
- 内部では jQuery の
bind()関数を使っているので、イベント名はそれの仕様に合わせて指定することになる。
Format
<!DOCTYPE html>
<html ng-app="mine">
  <head>
    <script src="http://ajax.googleapis.com/ajax/libs/angularjs/1.2.16/angular.min.js"></script>
    <script src="ui-utils.min.js"></script>
    <script src="script.js"></script>
  </head>
  <body>
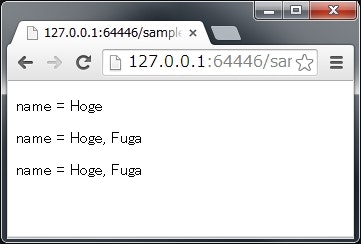
    <p>{{ 'name = $0' | format:'Hoge' }}</p>

    <p>{{ 'name = $0, $1' | format:['Hoge', 'Fuga'] }}</p>

    <p>{{ 'name = :hoge, :fuga' | format:{hoge: 'Hoge', fuga: 'Fuga'} }}</p>
  </body>
</html>
script.js
angular
.module('mine', ['ui.utils']);
- 文字の埋め込みができるフィルター。
-
$0, $1のように順番で指定する方法と、:hoge, :fugaのように名前で指定する方法がある。
Highlight
<!DOCTYPE html>
<html ng-app="mine">
  <head>
    <script src="http://ajax.googleapis.com/ajax/libs/angularjs/1.2.16/angular.min.js"></script>
    <script src="http://ajax.googleapis.com/ajax/libs/angularjs/1.2.16/angular-sanitize.min.js"></script>
    <script src="ui-utils.min.js"></script>
    <script src="script.js"></script>

    <style>
      .ui-match {
        background-color: yellow;
      }
    </style>
  </head>
  <body>
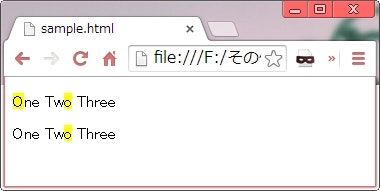
    <p ng-bind-html="'One Two Three' | highlight:'o'"></p>

    <p ng-bind-html="'One Two Three' | highlight:'o':true"></p>
  </body>
</html>
script.js
angular
.module('mine', ['ui.utils', 'ngSanitize']);
- 文字のハイライト用フィルター。
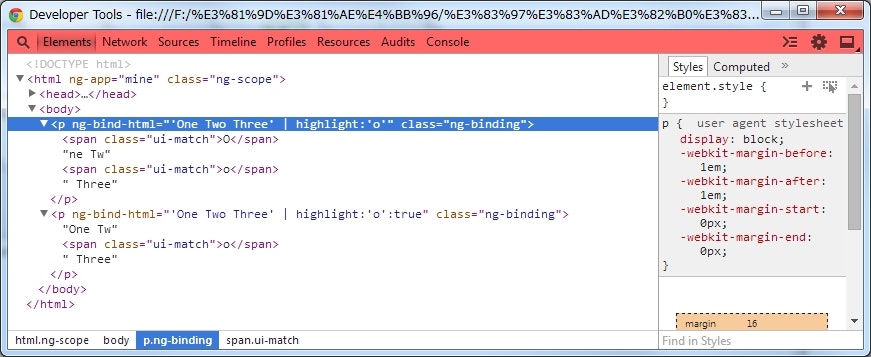
- フィルターの引数で指定した文字列にマッチする部分を
spanタグで括った HTML を出力する。 - フィルターの第二引数に true を指定すると、大文字小文字を区別するようになる。
-
spanタグには.ui-matchクラスが設定されているので、 css でこのクラスのスタイルを指定すれば、ハイライト表現が実現できる。 - 出力がサニタイズされないように、
ng-bind-htmlを使って出力する。 -
ng-bind-htmlを使用するには、ngSanitizeモジュールをロードする必要がある(angular-sanitize.min.js)
Include Fragment
<!DOCTYPE html>
<html ng-app="mine">
  <head>
    <script src="http://ajax.googleapis.com/ajax/libs/jquery/2.1.1/jquery.min.js"></script>
    <script src="http://ajax.googleapis.com/ajax/libs/angularjs/1.2.16/angular.min.js"></script>
    <script src="ui-utils.min.js"></script>
    <script src="script.js"></script>
  </head>
  <body>
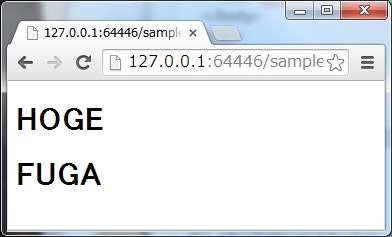
    <ui-include src="'other.html'" fragment="'#hoge'"></ui-include>
    <div ui-include="'other.html'" fragment="'#fuga'"></div>
  </body>
</html>
script.js
angular
.module('mine', ['ui.utils']);
other.html
<h1 id="hoge">HOGE</h1>
<h1 id="fuga">FUGA</h1>
- ページの一部に他の HTML を読み込むためのディレクティブ。
-
ng-includeディレクティブは HTML をまるごと埋め込むが、このui-includeはfragment属性でさらに読み込む部分を限定できる。 -
fragment属性には jQuery のセレクタを指定する。 - jQuery のセレクタを全て使用できるようにするためには、 jQuery 本体を読み込む必要がある。
- その場合、jQuery は AngularJS より先に読み込むようにしなければならない。
-
src及びfragmentに渡す値は Angular 式なので、文字列を指定する場合はシングルクォーテーション'で括ることを忘れないように注意。
Indeterminate checkbox
<!DOCTYPE html>
<html ng-app="mine">
  <head>
    <script src="http://ajax.googleapis.com/ajax/libs/angularjs/1.2.16/angular.min.js"></script>
    <script src="ui-utils.min.js"></script>
    <script src="script.js"></script>
  </head>
  <body>
    <table border="1" style="text-align: center;">
      <tr>
        <th></th>
        <th>ng-model</th>
        <th>ui-indeterminate</th>
      </tr>
      <tr>
        <td><input type="checkbox" ui-indeterminate="true" /></td>
        <td>-</td>
        <td>true</td>
      </tr>
      <tr>
        <td><input type="checkbox" ng-model="checked" ui-indeterminate="true" /></td>
        <td>true</td>
        <td>true</td>
      </tr>
      <tr>
        <td><input type="checkbox" ng-model="checked" ui-indeterminate="false" /></td>
        <td>true</td>
        <td>false</td>
      </tr>
      <tr>
        <td><input type="checkbox" ng-model="unchecked" ui-indeterminate="true" /></td>
        <td>false</td>
        <td>true</td>
      </tr>
      <tr>
        <td><input type="checkbox" ng-model="unchecked" ui-indeterminate="false" /></td>
        <td>false</td>
        <td>false</td>
      </tr>
    </table>
  </body>
</html>
script.js
angular
.module('mine', ['ui.utils'])
.run(function($rootScope) {
    $rootScope.checked = true;
    $rootScope.unchecked = false;
});
-
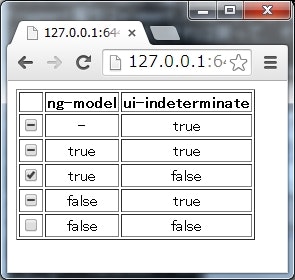
checkboxにindeterminate(不確定)の状態を設定するためのディレクティブ。 -
indeterminateが使用できるのは HTML5 から。 - 本来
indeterminateは JavaScript から DOM のプロパティに直接アクセスしないと設定できないが、ui-indeterminateディレクティブを使えば HTML 上で指定ができるようになる。
Inflector
<!DOCTYPE html>
<html ng-app="mine">
  <head>
    <script src="http://ajax.googleapis.com/ajax/libs/angularjs/1.2.16/angular.min.js"></script>
    <script src="ui-utils.min.js"></script>
    <script src="script.js"></script>
  </head>
  <body>
    <p>{{'Here Is my_phoneNumber' | inflector:'humanize'}}</p>
    <p>{{'Here Is my_phoneNumber' | inflector:'underscore'}}</p>
    <p>{{'Here Is my_phoneNumber' | inflector:'variable'}}</p>
  </body>
</html>
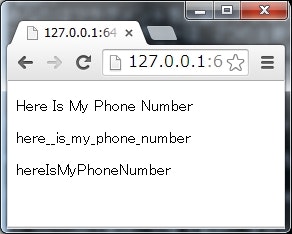
- 指定した文字のフォーマットを変更する。
- 正直使い道が分からない(公式サイトに
Why?がない)。
jQuery Passthrough
<!DOCTYPE html>
<html ng-app="mine">
  <head>
    <script src="http://ajax.googleapis.com/ajax/libs/jquery/2.1.1/jquery.min.js"></script>
    <script src="http://ajax.googleapis.com/ajax/libs/jqueryui/1.10.4/jquery-ui.min.js"></script>
    <script src="http://ajax.googleapis.com/ajax/libs/angularjs/1.2.16/angular.min.js"></script>
    <script src="ui-utils.min.js"></script>
    <script src="script.js"></script>

    <link rel="stylesheet" href="http://ajax.googleapis.com/ajax/libs/jqueryui/1.10.4/themes/smoothness/jquery-ui.css" />
  </head>
  <body>
    <input type="text" ui-jq="datepicker" />
    <input type="text" ui-jq="datepicker" ui-options="{changeYear: true}" />
  </body>
</html>
angular
.module('mine', ['ui.utils'])
.value('uiJqConfig', {
    datepicker: {
        changeMonth: true
    }
});
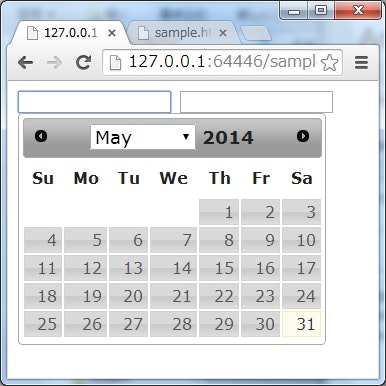
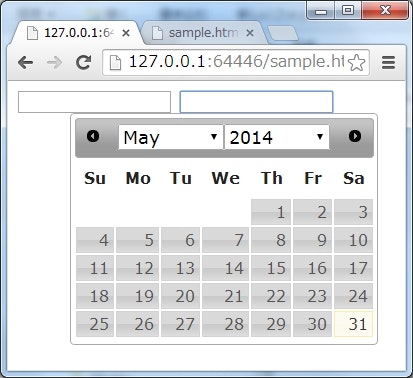
- JavaScript を記述することなく、 jQuery のメソッドを実行できる。
-
ui-jqディレクティブで指定した jQuery のメソッドが、そのタグに対して実行される。 - 実行するメソッドに渡すオプションは、
ui-optionsで指定する(Angular 式)。 - デフォルトで指定したいオプションがある場合は、
uiJqConfigという名前のvalueをモジュールに定義する。 -
uiJqConfigは次のフォーマットで指定する。
module.value('uiJqConfig', {
    <jQueryのメソッド名>: <デフォルトのオプション>
});
Keypress
コードが長いので Plunker サンプル を参照。
- 具体的なキーを指定してキーイベントを設定する。
-
ui-keypress,ui-keyup,ui-keydownの3つがある。 - 半角スペース区切りで複数のキーを設定できる。
- 半角ハイフン
-区切りでCtrl + Shift + Enterのような複合キーを設定できる。 -
enterやescのように、一部のキーは名前で指定できる。 -
shift,ctrl,altは複合キーのときだけ名前で指定できる。
Mask
<!DOCTYPE html>
<html ng-app="mine">
  <head>
    <meta charset="UTF-8" />
    <script src="http://ajax.googleapis.com/ajax/libs/angularjs/1.2.16/angular.min.js"></script>
    <script src="ui-utils.min.js"></script>
    <script src="script.js"></script>
  </head>
  <body>
    <h1>placeholder なし</h1>
    <div>
      Number : <input ng-model="a" ui-mask="9999 - 9999 - 9999" />
    </div>
    <div>
      Alphabet : <input ng-model="b" ui-mask="AAAA - AAAA - AAAA" />
    </div>
    <div>
      Any : <input ng-model="c" ui-mask="**** - **** - ****" />
    </div>
  </body>
</html>
- 入力にマスクを指定できる。
-
ng-modelとui-maskの両方を指定する必要がある。 - マスクのフォーマットは、以下のとおり。
-
A:任意のアルファベット。 -
9:任意の数値。 -
*:任意のアルファベットまたは数値。 - それ以外の文字・記号:非入力。固定文字。
-
Reset
解読不能
Route Checking
基本
-
ui-routeで指定したパスが現在表示されているかどうかを$uiRoute変数を通じて boolean 値で取得できる。
正規表現で指定する
-
ui-routeは正規表現が使える。
ui-route と href を合わせて設定する
-
ui-routeとhreforng-hrefを合わせて設定した場合、ui-routeは値の指定を省略できる。
$uiRoute の代わりに任意の変数を指定する
-
ui-routeとng-modelを一緒に設定すれば、任意の変数に$uiRouteと同じ値を設定できる。
Scroll till you drop
基本
<!DOCTYPE html>
<html ng-app="mine">
  <head>
    <meta charset="UTF-8" />
    <script src="http://ajax.googleapis.com/ajax/libs/angularjs/1.2.16/angular.min.js"></script>
    <script src="ui-utils.min.js"></script>
    <script src="script.js"></script>
  </head>
  <body>
    <div ng-scroll="value in datasource">{{value}}</div>
  </body>
</html>
angular
.module('mine', ['ui.utils'])
.service('datasource', function() {
    this.get = function(index, count, success) {
        var data = [],
            i,
            from = index,
            to = index + (count - 1);

        for (i=from; i<to; i++) {
            if (1 <= i && i <= 300) {
                data.push(i);
            }
        }

        success(data);
    };
});
- 仮想スクロール(見えているところだけ DOM を実際に生成して、見えない部分はスクロールして見えるようになる時に動的に生成する仕組み)を実現できる。
- 非表示になった部分の DOM は順次削除されるので、表示したいデータ量が大量でもリソースを圧迫しない。
- 2014/06/01 現在 ここ からダウンロードできる ver0.1.1 は、
ng-scrollで指定する(ui-scrollじゃない)。- ただし、2014/05/20 のコミット で、名前が
ui-scrollに変更になっている。 - なので、たぶん以後のバージョンでは
ui-scrollで指定する。
- ただし、2014/05/20 のコミット で、名前が
- 読み込むデータの取得元(上記例の
datasource)は、 AngularJS の Service として定義する。- Service には
getという名前のメソッドを定義する。 -
getには、index,count,successの3つの値が渡される。 -
indexは、次に読み込むデータの先頭を示すインデックス値。 -
countは、次に読み込むデータの数。 -
successは、読み込みが完了したときに実行しなければならない関数。引数に、読み込み結果を配列で渡す。1件も読み込むデータがない場合は、空の配列を渡す。
- Service には
ビューポートを指定する
<!DOCTYPE html>
<html ng-app="mine">
  <head>
    <meta charset="UTF-8" />
    <script src="http://ajax.googleapis.com/ajax/libs/angularjs/1.2.16/angular.min.js"></script>
    <script src="ui-utils.min.js"></script>
    <script src="script.js"></script>
  </head>
  <body>
    <div style="height: 300px; border: 1px solid black;" ng-scroll-viewport>
      <div ng-scroll="value in datasource">{{value}}</div>
    </div>
  </body>
</html>
JavaScript は同じ。
- 標準では、ブラウザの Window 全体がスクロールされる。
- スクロール領域を限定したい場合は、
ng-scroll-viewportを指定したブロック要素でng-scrollを括る。
Scrollfix
- スクロールしたら
.ui-scrollfixクラスを設定する。 - 使い道はよくわからない。
Show, Hide and Toggle Alternatives
<!DOCTYPE html>
<html ng-app="mine">
  <head>
    <meta charset="UTF-8" />
    <script src="http://ajax.googleapis.com/ajax/libs/angularjs/1.2.16/angular.min.js"></script>
    <script src="ui-utils.min.js"></script>
    <script src="script.js"></script>

    <style>
      .show {
        opacity: 1.0;
      }

      .hide {
        opacity: 0.0;
      }

      .ui-show {
        transition: all 0.5s linear 0s;
        opacity: 1.0;
      }

      .ui-hide {
        transition: all 0.5s linear 0s;
        opacity: 0.0;
      }
    </style>
  </head>
  <body>
    <label>
      <input type="checkbox" ng-model="flag" /> flag
    </label>

    <div ui-show="flag" class="hide">ui-show</div>
    <div ui-hide="flag" class="show">ui-hide</div>
    <div ui-toggle="flag">ui-toggle</div>
  </body>
</html>
-
ui-showに指定している値が true の場合は.ui-showクラスが、 -
ui-hideに指定している値が true の場合は.ui-hideクラスが、 -
ui-toggleに指定している値が true の場合は.ui-showクラスが、 false の場合は.ui-hideクラスが設定される。 -
ng-showだと単純な表示・非表示の切り替えになるが、このディレクティブなら CSS3 の transition を利用してアニメーションを定義できたりする。 -
ng-class="{'hoge': flag}"みたいなことをしたい場合の簡易表現として利用できる。
Unique
<!DOCTYPE html>
<html ng-app="mine">
  <head>
    <meta charset="UTF-8" />
    <script src="http://ajax.googleapis.com/ajax/libs/angularjs/1.2.16/angular.min.js"></script>
    <script src="ui-utils.min.js"></script>
    <script src="script.js"></script>
  </head>
  <body>
    <pre>{{array | unique:'age' | json}}</pre>
  </body>
</html>
script.js
angular
.module('mine', ['ui.utils'])
.run(function($rootScope) {
    $rootScope.array = [
        {
            name: 'Takeshi',
            age: 17
        },
        {
            name: 'Koji',
            age: 18
        },
        {
            name: 'Yuji',
            age: 17
        },
        {
            name: 'Hiroshi',
            age: 19
        },
        {
            name: 'Yamato',
            age: 18
        },
        {
            name: 'Akira',
            age: 17
        }
    ];
});
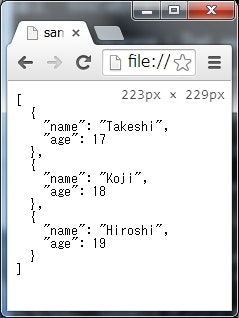
- オブジェクトの配列から、指定したプロパティの値が重複する要素を取り除く。
Validate
基本
<!DOCTYPE html>
<html ng-app="mine">
  <head>
    <meta charset="UTF-8" />
    <script src="http://ajax.googleapis.com/ajax/libs/angularjs/1.2.16/angular.min.js"></script>
    <script src="ui-utils.min.js"></script>
    <script src="script.js"></script>
  </head>
  <body>
    <form name="myForm">
      <input type="text" name="hoge" ng-model="hoge" ui-validate=" '$value.length == 5' "/>
      <p>myForm.hoge.$error.validator = {{myForm.hoge.$error.validator}}</p>

      <input type="text" name="fuga" ng-model="fuga" ui-validate=" 'validateFuga($value)' "/>
      <p>myForm.fuga.$error.validator = {{myForm.fuga.$error.validator}}</p>
    </form>
  </body>
</html>
script.js
angular
.module('mine', ['ui.utils'])
.run(function($rootScope) {
    $rootScope.validateFuga = function(value) {
        return 18 <= value;
    };
});
- 任意のチェックルールを追加できる。
- 文字列で式または関数の実行を記述する。
- 評価結果が true の場合は非エラー、 false の場合はエラー扱いになる。
- エラー状態を参照するときは、
validatorというルール名で参照できる(myForm.fuga.$error.validator) 。
ルール名を指定する
<!DOCTYPE html>
<html ng-app="mine">
  <head>
    <meta charset="UTF-8" />
    <script src="http://ajax.googleapis.com/ajax/libs/angularjs/1.2.16/angular.min.js"></script>
    <script src="ui-utils.min.js"></script>
    <script src="script.js"></script>
    </style>
  </head>
  <body>
    <form name="myForm">
      <input type="text" name="hoge" ng-model="hoge" ui-validate=" {hogeError: 'validateHoge($value)'} "/>
      <p>myForm.hoge.$error.hogeError = {{myForm.hoge.$error.hogeError}}</p>
    </form>
  </body>
</html>
script.js
angular
.module('mine', ['ui.utils'])
.run(function($rootScope) {
    $rootScope.validateHoge = function(value) {
        return angular.isString(value) ? value.match(/^[a-g]+$/) : false;
    };
});
-
ui-validateにオブジェクトを渡せば、プロパティの名前がルール名になり、値がチェックロジックになる。 - 複数のチェック(プロパティ)を指定することも可能。
他のモデルの変更を監視する
<!DOCTYPE html>
<html ng-app="mine">
  <head>
    <meta charset="UTF-8" />
    <script src="http://ajax.googleapis.com/ajax/libs/angularjs/1.2.16/angular.min.js"></script>
    <script src="ui-utils.min.js"></script>
    <script src="script.js"></script>
  </head>
  <body>
    <form name="myForm">
      <input type="text" name="hoge" ng-model="x" />
      <input type="text" name="fuga" ng-model="y" ui-validate=" 'validateFuga(x, $value)' " ui-validate-watch=" 'x' " />

      <p>myForm.fuga.$error.validator = {{myForm.fuga.$error.validator}}</p>
    </form>
  </body>
</html>
angular
.module('mine', ['ui.utils'])
.run(function($rootScope) {
    $rootScope.validateFuga = function(x, y) {
        return x === y;
    };
});
-
ui-validate-watchにモデルの名前を文字列で指定すると、そのモデルの変更も監視するようになる。
