Spring Boot とは
- Spring プロジェクトが提供する様々なライブラリやフレームワークを、手っ取り早く使えるようにしたフレームワーク。
- Dropwizard の Spring 版みたいなの。
- ビルドすると単独の jar ファイルができあがる。
- Web アプリの場合は、組み込みの Tomcat が起動する(Jetty や Undertow に切り替え可)。
- Web アプリでなく、普通の Java プログラムとしても動かせる。
- Maven や Gradle などのビルドツールを利用する(Ant でもできなくはない)。
- 使用したいコンポーネントを依存関係に追加するだけで、結合に必要な設定などが自動で行われる。
環境
Java
- 1.8.0_45
Gradle
- 2.3
Spring Boot
- 1.2.3
Hello World
実装
buildscript {
    repositories {
        mavenCentral()
    }
    dependencies {
        classpath 'org.springframework.boot:spring-boot-gradle-plugin:1.2.3.RELEASE'
    }
}

apply plugin: 'java'
apply plugin: 'spring-boot' // 新しいバージョンのプラグインを使うと、 'spring-boot' ではなく 'org.springframework.boot' を使ってと警告が出るので注意

sourceCompatibility = '1.8'
targetCompatibility = '1.8'

repositories {
    mavenCentral()
}

dependencies {
    compile 'org.springframework.boot:spring-boot-starter'
}

jar.baseName = 'spring-boot-sample'
package sample.springboot;

import org.springframework.boot.SpringApplication;
import org.springframework.boot.autoconfigure.SpringBootApplication;
import org.springframework.context.ConfigurableApplicationContext;

@SpringBootApplication
public class Main {

    public static void main(String[] args) {
        try (ConfigurableApplicationContext ctx = SpringApplication.run(Main.class, args)) {
            Main m = ctx.getBean(Main.class);
            m.hello();
        }
    }

    public void hello() {
        System.out.println("Hello Spring Boot!!");
    }
}
Gradle から実行
$ gradle bootRun
:compileJava
:processResources UP-TO-DATE
:classes
:findMainClass
:bootRun

  .   ____          _            __ _ _
 /\\ / ___'_ __ _ _(_)_ __  __ _ \ \ \ \
( ( )\___ | '_ | '_| | '_ \/ _` | \ \ \ \
 \\/  ___)| |_)| | | | | || (_| |  ) ) ) )
  '  |____| .__|_| |_|_| |_\__, | / / / /
 =========|_|==============|___/=/_/_/_/
 :: Spring Boot ::        (v1.2.3.RELEASE)

(略)

Hello Spring Boot!!

(略)

2015-04-29 12:45:26.542  INFO 5792 --- [           main] o.s.j.e.a.AnnotationMBeanExporter        : Unregistering JMX-exposed beans on shutdown

BUILD SUCCESSFUL

Total time: 4.639 secs
ビルドして実行
$ gradle build

$ java -jar build/libs/spring-boot-sample.jar

(略)

Hello Spring Boot!!

(略)
説明
build.gradle の設定
Spring Boot 用の Gradle プラグインが用意されているので、最初にそれを読み込む。
buildscript {
    repositories {
        mavenCentral()
    }
    dependencies {
        classpath 'org.springframework.boot:spring-boot-gradle-plugin:1.2.3.RELEASE'
    }
}

apply plugin: 'spring-boot'
そして、通常の Java プログラムを作るだけなら、 spring-boot-starter を依存関係に追加する。
repositories {
    mavenCentral()
}

dependencies {
    compile 'org.springframework.boot:spring-boot-starter'
}
Spring Boot の起動
Spring Boot の起動には、 SpringApplication クラスを使う。
最も単純な方法が、 SpringApplication#run(Object, String...) を使う方法。
import org.springframework.boot.SpringApplication;
import org.springframework.boot.autoconfigure.SpringBootApplication;
import org.springframework.context.ConfigurableApplicationContext;

@SpringBootApplication
public class Main {

    public static void main(String[] args) {
        try (ConfigurableApplicationContext ctx = SpringApplication.run(Main.class, args)) {
            Main m = ctx.getBean(Main.class);
            m.hello();
        }
    }

    public void hello() {
        System.out.println("Hello Spring Boot!!");
    }
}
-
run()メソッドの第一引数には、@EnableAutoConfigurationでアノテートしたクラスのClassオブジェクトを渡す。-
Mainクラスは@SpringBootApplicationでアノテートされているが、これは@Configuration,@EnableAutoConfiguration,@ComponentScanの3つでクラスをアノテートしたのと同じ扱いになる。 -
@Configurationは、 Spring の色々な設定を Java コード上で行えるようにするためのアノテーション。- 昔の Spring は XML で設定を書いていたが、今は Java コード上で設定を行うのが主流になっているっぽい。
-
@EnableAutoConfigurationは、 Spring の設定を自動化するためのアノテーション。- これがあることで、依存関係を追加するだけで Spring MVC などのライブラリを設定記述なしで使えるようになる。
-
@ComponentScanは、 DI コンテナが管理する Bean を自動登録するためのアノテーション。- これでアノテートされたクラスを起点として、配下のパッケージを再帰的にスキャンして、
@Componentでアノテートされたクラスを Bean としてコンテナに登録する。
- これでアノテートされたクラスを起点として、配下のパッケージを再帰的にスキャンして、
- この3つはだいたい一緒に使うことが多いので、
@SpringBootApplicationを使うと少し楽になる。
-
- 第二引数には、コマンドラインの引数を渡す。
Gradle での実行・ビルド
- アプリケーションの起動は、 spring-boot-gradle-plugin が提供する
bootRunタスクを使用する。 - jar の作成は、普通に
buildタスクで OK。 - 作成した jar は、普通に
jar -jar <jarファイル>で実行できる。
Java コード上で Bean を定義する
CDI で言うところの Provider 的なやつ。
基本
package sample.springboot;

public class Hoge {

    private String name;

    public Hoge(String name) {
        this.name = name;
    }

    @Override
    public String toString() {
        return "Hoge [name=" + name + "]";
    }
}
package sample.springboot;

import org.springframework.boot.SpringApplication;
import org.springframework.boot.autoconfigure.SpringBootApplication;
import org.springframework.context.ConfigurableApplicationContext;
import org.springframework.context.annotation.Bean;

@SpringBootApplication
public class Main {

    public static void main(String[] args) {
        try (ConfigurableApplicationContext ctx = SpringApplication.run(Main.class, args)) {
            Hoge h = ctx.getBean(Hoge.class);
            System.out.println(h);
        }
    }

    @Bean
    public Hoge getHoge() {
        System.out.println("Main#getHoge()");
        return new Hoge("hoge");
    }
}
Main#getHoge()
Hoge [name=hoge]
-
@Beanでメソッドをアノテートすると、そのメソッドを通じて Bean のインスタンスを生成できるようになる。 - このような Bean を定義するメソッドは、
@Configurationでアノテートしたクラスに宣言できる。-
@SpringBootApplicationは@Configurationでアノテートしたのと同じ効果がある。
-
@Configuration でアノテートしたクラスを別途作成する
package sample.springboot;

import org.springframework.context.annotation.Bean;
import org.springframework.context.annotation.Configuration;

@Configuration
public class HogeProvider {

    @Bean
    public Hoge getHoge() {
        System.out.println("HogeProvider#getHoge()");
        return new Hoge("hoge provider");
    }
}
package sample.springboot;

import org.springframework.boot.SpringApplication;
import org.springframework.boot.autoconfigure.SpringBootApplication;
import org.springframework.context.ConfigurableApplicationContext;

@SpringBootApplication
public class Main {

    public static void main(String[] args) {
        try (ConfigurableApplicationContext ctx = SpringApplication.run(Main.class, args)) {
            Hoge h = ctx.getBean(Hoge.class);
            System.out.println(h);
        }
    }
}
HogeProvider#getHoge()
Hoge [name=hoge provider]
-
@Configurationでクラスをアノテートし、@Beanでメソッドをアノテートすれば、任意のクラスで Bean を生成するメソッドを定義できる。
Web アプリを作る
Hello World
実装
dependencies {
-   compile 'org.springframework.boot:spring-boot-starter'
+   compile 'org.springframework.boot:spring-boot-starter-web'
}
package sample.springboot;

import org.springframework.boot.SpringApplication;
import org.springframework.boot.autoconfigure.SpringBootApplication;

@SpringBootApplication
public class Main {

    public static void main(String[] args) {
        SpringApplication.run(Main.class, args);
    }
}
package sample.springboot.web;

import org.springframework.web.bind.annotation.RequestMapping;
import org.springframework.web.bind.annotation.RequestMethod;
import org.springframework.web.bind.annotation.RestController;

@RestController
@RequestMapping("/hello")
public class HelloController {

    @RequestMapping(method=RequestMethod.GET)
    public String hello() {
        return "Hello Spring MVC";
    }
}
動作確認
$ gradle bootRun
(略)
2015-04-29 18:29:29.317  INFO 5772 --- [           main] s.b.c.e.t.TomcatEmbeddedServletContainer : Tomcat started on port(s): 8080 (http)
2015-04-29 18:29:29.318  INFO 5772 --- [           main] sample.springboot.Main                   : Started Main in 2.244 seconds (JVM running for 2.531)
> Building 80% > :bootRun
$ curl http://localhost:8080/hello
Hello Spring MVC
説明
Web アプリ用の依存関係
dependencies {
-   compile 'org.springframework.boot:spring-boot-starter'
+   compile 'org.springframework.boot:spring-boot-starter-web'
}
- Web アプリを作る場合は、
spring-boot-starter-webモジュールを使用する。 - デフォルトでは、 Spring MVC を使って Web アプリを作ることになる。
起動方法の変更
    public static void main(String[] args) {
-       try (ConfigurableApplicationContext ctx = SpringApplication.run(Main.class, args)) {
-           ....
-       }
+       SpringApplication.run(Main.class, args);
- サーバー起動後にコンテナがシャットダウンしてしまうので、try-with-resources 文は使わないように変更する。
Spring MVC のコントローラクラス
@RestController
@RequestMapping("/hello")
public class HelloController {

    @RequestMapping(method=RequestMethod.GET)
    public String hello() {
        return "Hello Spring MVC";
    }
}
- Web API のエントリポイントとなるクラスを作る場合は、
@RestControllerでクラスをアノテートする。- Web API ではなく、 MVC の C となるコントローラにしたい場合は
@Controllerでアノテートする(詳細後述)。
- Web API ではなく、 MVC の C となるコントローラにしたい場合は
-
@RequestMappingで、パスや HTTP メソッドのマッピングをする(だいたい JAX-RS と同じノリ)。
サーバーのポート番号を変更する
server.port=1598
$ gradle bootRun
(略)

2015-05-02 00:09:11.201  INFO 5968 --- [           main] s.b.c.e.t.TomcatEmbeddedServletContainer : Tomcat started on port(s): 1598 (http)

(略)
-
server.portでポート番号を指定できる。 -
application.propertiesについての説明は こちら。 - 他にも以下のような変更ができる。
-
server.address:リスアンドレス(localhostにすれば、ローカルからしかアクセスできなくなる)。 -
server.sessionTimeout:セッションタイムアウト時間。
-
リクエストとレスポンスのマッピング
package sample.springboot.web;

public class Hoge {

    public int id;
    public String value;

    @Override
    public String toString() {
        return "Hoge [id=" + id + ", value=" + value + "]";
    }
}
package sample.springboot.web;

import org.springframework.web.bind.annotation.RequestBody;
import org.springframework.web.bind.annotation.RequestMapping;
import org.springframework.web.bind.annotation.RequestMethod;
import org.springframework.web.bind.annotation.RestController;

@RestController
@RequestMapping("/hello")
public class HelloController {

    @RequestMapping(method=RequestMethod.POST)
    public Hoge hello(@RequestBody Hoge param) {
        System.out.println(param);

        Hoge hoge = new Hoge();
        hoge.id = 20;
        hoge.value = "Response";

        return hoge;
    }
}
$ curl -H "Content-type: application/json" -X POST -d '{"id": 10, "value": "Request"}' http://localhost:8080/hello
{"id":20,"value":"Response"}
Hoge [id=10, value=Request]
- デフォルトでは、リクエスト・レスポンスともに JSON によるマッピングが有効になっている。
- マッピングは Jackson がやっている(なので、マッピングの調整は Jackson のアノテーションでできる)。
Spring MVC の簡単な使い方メモ
URL のマッピング
package sample.springboot.web;

import org.springframework.web.bind.annotation.RequestMapping;
import org.springframework.web.bind.annotation.RequestMethod;
import org.springframework.web.bind.annotation.RestController;

@RestController
@RequestMapping("/hello")
public class HelloController {

    @RequestMapping(method=RequestMethod.GET)
    public String getMethod() {
        return "get";
    }

    @RequestMapping(method=RequestMethod.POST)
    public String postMethod1() {
        return "post";
    }

    @RequestMapping(value="/hey", method=RequestMethod.POST)
    public String postMethod2() {
        return "hey post";
    }
}
$ curl http://localhost:8080/hello
get

$ curl http://localhost:8080/hello -X POST
post

$ curl http://localhost:8080/hello/hey -X POST
hey post
-
@RequestMappingでメソッド(クラス)とパスをマッピングする。 -
value属性にパスを指定する。 -
method属性に、 HTTP メソッドを指定する。
パスパラメータの取得
package sample.springboot.web;

import org.springframework.web.bind.annotation.PathVariable;
import org.springframework.web.bind.annotation.RequestMapping;
import org.springframework.web.bind.annotation.RequestMethod;
import org.springframework.web.bind.annotation.RestController;

@RestController
@RequestMapping("/hello")
public class HelloController {

    @RequestMapping(value="/{id}/{name}", method=RequestMethod.GET)
    public void getMethod(@PathVariable int id, @PathVariable String name) {
        System.out.println("id=" + id + ", name=" + name);
    }
}
$ curl http://localhost:8080/hello/100/hoge
id=100, name=hoge
- パスの定義に波括弧(
{})で括ったパラメータを定義し、メソッドのパラメータに同名の引数を定義して@PathVariableでアノテートする。
クエリパラメータの取得
package sample.springboot.web;

import java.util.Map;

import org.springframework.util.MultiValueMap;
import org.springframework.web.bind.annotation.RequestMapping;
import org.springframework.web.bind.annotation.RequestMethod;
import org.springframework.web.bind.annotation.RequestParam;
import org.springframework.web.bind.annotation.RestController;

@RestController
@RequestMapping("/hello")
public class HelloController {

    @RequestMapping(method=RequestMethod.GET)
    public void getMethod(
            @RequestParam String id,
            @RequestParam Map<String, String> queryParameters,
            @RequestParam MultiValueMap<String, String> multiMap) {

        System.out.println("id=" + id);
        System.out.println(queryParameters);
        System.out.println(multiMap);
    }
}
$ curl "http://localhost:8080/hello?id=100&name=hoge&name=fuga"
id=100
{id=100, name=hoge}
{id=[100], name=[hoge, fuga]}
-
@RequestParamでメソッドの引数をアノテートすることで、クエリパラメータを取得できる。 - 引数の型が
Mapの場合は、クエリパラメータの情報をMap形式で取得できる。 - 1つのパラメータに複数の値が設定されている場合は、 Spring が提供する
MultiValueMapで受け取ることができる。
リクエストヘッダーを取得する
package sample.springboot.web;

import org.springframework.web.bind.annotation.RequestHeader;
import org.springframework.web.bind.annotation.RequestMapping;
import org.springframework.web.bind.annotation.RequestMethod;
import org.springframework.web.bind.annotation.RestController;

@RestController
@RequestMapping("/hello")
public class HelloController {

    @RequestMapping(method=RequestMethod.GET)
    public void getMethod(@RequestHeader("Test-Header") String value) {
        System.out.println("Test-Header=" + value);
    }
}
$ curl -H "Test-Header: hoge" http://localhost:8080/hello
Test-Header=hoge
-
@RequestHeaderでヘッダー情報を取得できる。
リクエストボディの値を取得する
package sample.springboot.web;

import org.springframework.web.bind.annotation.RequestBody;
import org.springframework.web.bind.annotation.RequestMapping;
import org.springframework.web.bind.annotation.RequestMethod;
import org.springframework.web.bind.annotation.RestController;

@RestController
@RequestMapping("/hello")
public class HelloController {

    @RequestMapping(method=RequestMethod.POST)
    public void getMethod(@RequestBody String body) {
        System.out.println("body=" + body);
    }
}
$ curl http://localhost:8080/hello -X POST -d "Request Body"
body=Request+Body=
-
@RequestBodyでリクエストボディを取得できる。
レスポンスのステータスコードを指定する
package sample.springboot.web;

import org.springframework.http.HttpStatus;
import org.springframework.web.bind.annotation.RequestMapping;
import org.springframework.web.bind.annotation.RequestMethod;
import org.springframework.web.bind.annotation.ResponseStatus;
import org.springframework.web.bind.annotation.RestController;

@RestController
@RequestMapping("/hello")
public class HelloController {

    @RequestMapping(method=RequestMethod.GET)
    @ResponseStatus(HttpStatus.BAD_REQUEST)
    public void getMethod() {
    }
}
$ curl http://localhost:8080/hello -v
(略)

< HTTP/1.1 400 Bad Request
* Server Apache-Coyote/1.1 is not blacklisted
< Server: Apache-Coyote/1.1
< Content-Length: 0
< Date: Wed, 29 Apr 2015 11:50:08 GMT
< Connection: close

(略)
- メソッドを
@ResponseStatusでアノテートし、valueにステータスコードを指定すると、そのレスポンスのステータスコードを指定できる。 - 何も指定しない場合は
200 OKが返される。
レスポンスの返し方色々
Java - Spring MVCのコントローラでの戻り値いろいろ - Qiita
@tag1216 さんの上記ページに、分かりやすくまとめられていました。
例外ハンドリング
デフォルトだと、以下のように例外がハンドリングされる。
- REST のクライアントの場合
- スローされた例外の情報や、 HTTP のステータスコードを保持した JSON 文字列。
{"timestamp":1430484452755,"status":500,"error":"Internal Server Error","exception":"sample.springboot.web.MyException","message":"No message available","path":"/hello"}
- ブラウザの場合
- デフォルトのエラーページ(Whilelabel Error Page)
特定の例外がスローされたときのステータスコードを指定する
package sample.springboot.web;

import org.springframework.http.HttpStatus;
import org.springframework.web.bind.annotation.ResponseStatus;

@ResponseStatus(HttpStatus.BAD_REQUEST)
public class MyException extends RuntimeException {
    private static final long serialVersionUID = 1L;

    public MyException(String msg) {
        super(msg);
    }
}
package sample.springboot.web;

import org.springframework.web.bind.annotation.RequestMapping;
import org.springframework.web.bind.annotation.RequestMethod;
import org.springframework.web.bind.annotation.RestController;

@RestController
@RequestMapping("/api")
public class WebApiController {

    @RequestMapping(method=RequestMethod.GET)
    public void method1() {
        throw new MyException("test exception");
    }
}
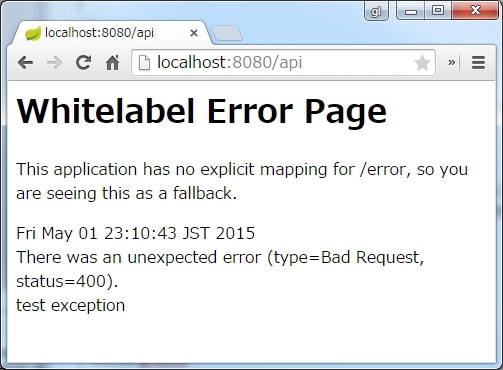
$ curl http://localhost:8080/api
{"timestamp":1430489386562,"status":400,"error":"Bad Request","exception":"sample.springboot.web.MyException","message":"test exception","path":"/api"}
- 自作の例外クラスを
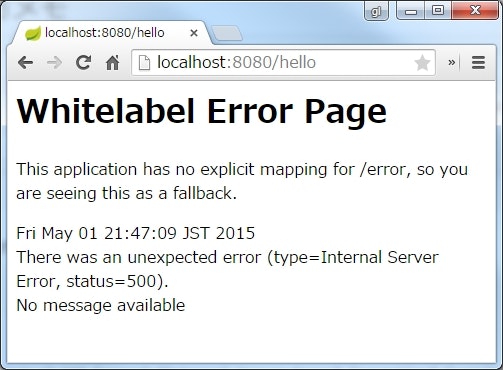
@ResponseStatusでアノテートすることで、その例外がスローされたときのステータスコードを指定できる。 - ブラウザからアクセスした場合は、デフォルトのエラーページが表示される。
ほぼ全ての例外をハンドリングする
package sample.springboot.web;

import javax.servlet.http.HttpServletRequest;
import javax.servlet.http.HttpServletResponse;

import org.springframework.stereotype.Component;
import org.springframework.web.servlet.HandlerExceptionResolver;
import org.springframework.web.servlet.ModelAndView;

@Component
public class MyExceptionResolver implements HandlerExceptionResolver {

    @Override
    public ModelAndView resolveException(HttpServletRequest request, HttpServletResponse response, Object handler, Exception ex) {
        System.out.println(ex.getClass() + " : " + ex.getMessage());

        ModelAndView mv = new ModelAndView();
        mv.setViewName("my-error");

        return mv;
    }
}
<h1>My Error Page</h1>
package sample.springboot.web;

import org.springframework.web.bind.annotation.RequestMapping;
import org.springframework.web.bind.annotation.RequestMethod;
import org.springframework.web.bind.annotation.RestController;

@RestController
@RequestMapping("/api")
public class WebApiController {

    @RequestMapping(method=RequestMethod.GET)
    public void method1() {
        throw new MyException("test exception");
    }

    @RequestMapping(value="/null", method=RequestMethod.GET)
    public void method2() {
        throw new NullPointerException("test exception");
    }
}
$ curl http://localhost:8080/api
{"timestamp":1430490625809,"status":400,"error":"Bad Request","exception":"sample.springboot.web.MyException","message":"test exception","path":"/api"}

$ curl http://localhost:8080/api/null
<h1>My Error Page</h1>
class java.lang.NullPointerException : test exception
-
HandlerExceptionResolverを実装したクラスを作成し、@Componentでコンテナに登録する。 - すると、コントローラで例外が発生すると登録したクラスの
resolveException()メソッドが呼ばれるようになる。- ただし、
@ResponseStatusでアノテートされたクラスがスローされた場合は呼ばれない。
- ただし、
-
resolveException()メソッドはModelAndViewを返すようになっているので、任意のページを表示させることができる。
Web API のアクセスの場合は json で返したい
package sample.springboot.web;

import javax.servlet.http.HttpServletRequest;
import javax.servlet.http.HttpServletResponse;

import org.springframework.stereotype.Component;
import org.springframework.web.bind.annotation.RestController;
import org.springframework.web.method.HandlerMethod;
import org.springframework.web.servlet.HandlerExceptionResolver;
import org.springframework.web.servlet.ModelAndView;

@Component
public class MyExceptionResolver implements HandlerExceptionResolver {

    @Override
    public ModelAndView resolveException(HttpServletRequest request, HttpServletResponse response, Object handler, Exception ex) {
        if (isRestController(handler)) {
            return null;
        }

        ModelAndView mv = new ModelAndView();
        mv.setViewName("my-error");

        return mv;
    }

    private boolean isRestController(Object handler) {
        if (handler instanceof HandlerMethod) {
            HandlerMethod method = (HandlerMethod)handler;

            return method.getMethod().getDeclaringClass().isAnnotationPresent(RestController.class);
        }

        return false;
    }
}
$ curl http://localhost:8080/api
{"timestamp":1430490748092,"status":400,"error":"Bad Request","exception":"sample.springboot.web.MyException","message":"test exception","path":"/api"}

$ curl http://localhost:8080/api/null
{"timestamp":1430490749586,"status":500,"error":"Internal Server Error","exception":"java.lang.NullPointerException","message":"test exception","path":"/api/null"}
- コントローラが
@RestControllerでアノテートされている場合は、resolveException()で null を返すようにする。 - すると、レスポンスがデフォルトのハンドリング方法で処理されるようになる(クライアントが curl のような非ブラウザなら json になる)。
- ブラウザでアクセスした場合は、デフォルトのエラーページ(Whitelabel Error Page)が表示される。
- ブラウザから画面遷移でアクセスする場合は、
@Controllerでアノテートされたコントローラクラスにアクセスするようにし、resolveException()で適切なエラーページに飛ばしてあげるようにする。
コントローラ単位で例外ハンドリングを定義する
package sample.springboot.web;

import org.springframework.web.bind.annotation.ExceptionHandler;
import org.springframework.web.bind.annotation.RequestMapping;
import org.springframework.web.bind.annotation.RequestMethod;
import org.springframework.web.bind.annotation.RestController;

@RestController
@RequestMapping("/api")
public class WebApiController {

    @RequestMapping(method=RequestMethod.GET)
    public void method1() {
        throw new MyException("test exception");
    }

    @RequestMapping(value="/null", method=RequestMethod.GET)
    public void method2() {
        throw new NullPointerException("test exception");
    }

    @ExceptionHandler(NullPointerException.class)
    public String handling(NullPointerException e) {
        return "{\"message\":\"" + e.getMessage() + "\"}";
    }
}
$ curl http://localhost:8080/api/null
{"message":"test exception"}
-
@ExceptionHandlerでアノテートしたメソッドを定義すると、そのコントローラ内でだけ有効な例外ハンドリングができる。 -
@ExceptionHandlerのvalueには、ハンドリングしたい例外のClassオブジェクトを渡す。
静的ファイルを配置する
|-build.gradle
`-src/main/resources/
  |-static/
  | `-static.html
  |-public/
  | `-public.html
  |-resources/
  | `-resources.html
  `-META-INF/resources/
    `-m-resourceshtml
各 HTML ファイルの中身は、ファイル名が書かれただけのプレーンテキスト。
この状態で Spring Boot を起動して、以下のようにアクセスする。
$ curl http://localhost:8080/static.html
static.html

$ curl http://localhost:8080/public.html
public.html

$ curl http://localhost:8080/resources.html
resources.html

$ curl http://localhost:8080/m-resources.html
m-resources.html
- クラスパス以下の、次のフォルダにファイルを配置すると、静的ファイルとしてアクセスできる。
staticpublicresourcesMETA-INF/resources
WebJars を利用する
WebJars とは
jQuery とか Bootstrap のようなクライアントサイドのライブラリを jar に固めて、 Java のライブラリと同じ要領で Maven や Gradle で依存管理できるようにしたサービス。
WebJars - Web Libraries in Jars
jQuery UI を入れてみる
ここ で、利用できるライブラリを調べられる。
dependencies {
    compile 'org.springframework.boot:spring-boot-starter-web'
+   compile 'org.webjars:jquery-ui:1.11.4'
}
<!DOCTYPE html>
<html>
  <head>
    <meta charset="UTF-8" />
    <title>jQuery UI by WebJars</title>

    <link rel="stylesheet" href="/webjars/jquery-ui/1.11.4/jquery-ui.min.css" />

    <script src="/webjars/jquery/1.11.1/jquery.min.js"></script>
    <script src="/webjars/jquery-ui/1.11.4/jquery-ui.min.js"></script>
    <script>
    $(function() {
        $('button')
          .button()
          .on('click', function() {
              alert('Hello WebJars!!');
          });
    });
    </script>
  </head>
  <body>
    <button>Hello</button>
  </body>
</html>
サーバーを起動して、ブラウザで http://localhost:8080/ にアクセスする。

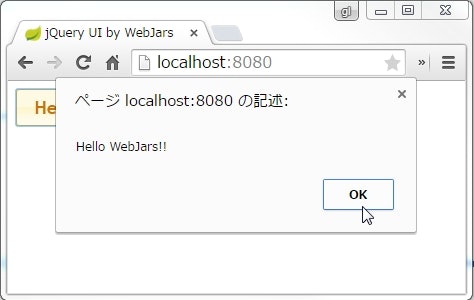
- WebJars で追加したライブラリは、
webjars/以下のパスからアクセスできる。 - フォルダ構成は、 jar の中を見るか前述のページの右端にある
Filesのリンクをクリックすれば分かる。
テンプレートエンジンを利用する
Spring Boot 的には JSP はおすすめしないらしい。
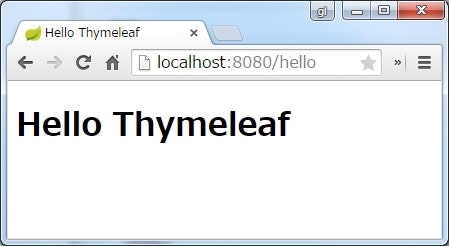
はじめてのSpring Boot でも紹介されてる Thymeleaf を使ってみる。
Hello World
実装
dependencies {
    compile 'org.springframework.boot:spring-boot-starter-web'
+   compile 'org.springframework.boot:spring-boot-starter-thymeleaf'
    compile 'org.webjars:jquery-ui:1.11.4'
}
package sample.springboot.web;

import org.springframework.stereotype.Controller;
import org.springframework.web.bind.annotation.RequestMapping;
import org.springframework.web.bind.annotation.RequestMethod;

@Controller
@RequestMapping("/hello")
public class HelloController {

    @RequestMapping(method=RequestMethod.GET)
    public String hello() {
        return "hello";
    }
}
<!DOCTYPE html>
<html>
  <head>
    <meta charset="UTF-8" />
    <title>Hello Thymeleaf</title>
  </head>
  <body>
    <h1>Hello Thymeleaf</h1>
  </body>
</html>
動作確認
ブラウザで http://localhost:8080/hello にアクセスする。
説明
依存関係の追加
dependencies {
    compile 'org.springframework.boot:spring-boot-starter-web'
+   compile 'org.springframework.boot:spring-boot-starter-thymeleaf'
    compile 'org.webjars:jquery-ui:1.11.4'
}
- Thymeleaf を使えるように依存関係を追加する。
コントローラの実装
@Controller
@RequestMapping("/hello")
public class HelloController {

    @RequestMapping(method=RequestMethod.GET)
    public String hello() {
        return "hello";
    }
}
- テンプレートを返す場合は、
@RestControllerではなく@Controllerでクラスをアノテートする。 - メソッドの戻り値に、表示するテンプレートのパスを指定する。
- テンプレートファイルは、クラスパス上の
templatesパッケージの下に配置する。 - コントローラのメソッドが返した文字列は、この
templatesパッケージからの相対パスになる(拡張子は省略可)。
- テンプレートファイルは、クラスパス上の
画面に値を埋め込む
package sample.springboot.web;

public class Hoge {

    public int id;
    public String value;

    @Override
    public String toString() {
        return "Hoge [id=" + id + ", value=" + value + "]";
    }
}
package sample.springboot.web;
import org.springframework.stereotype.Controller;
import org.springframework.ui.Model;
import org.springframework.web.bind.annotation.RequestMapping;
import org.springframework.web.bind.annotation.RequestMethod;
@Controller
@RequestMapping("/hello")
public class HelloController {
@RequestMapping(method=RequestMethod.GET)
public String hello(Model model) {
Hoge hoge = new Hoge();
hoge.id = 10;
hoge.value = "hoge";
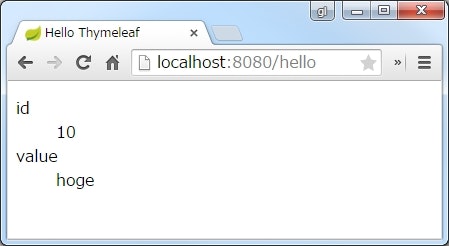
model.addAttribute("myData", hoge);
return "hello";
}
}
<!DOCTYPE html>
<html xmlns:th="http://www.thymeleaf.org">
  <head>
    <meta charset="UTF-8" />
    <title>Hello Thymeleaf</title>
  </head>
  <body>
    <dl>
      <dt>id</dt>
      <dd th:text="${myData.id}"></dd>

      <dt>value</dt>
      <dd th:text="${myData.value}"></dd>
    </dl>
  </body>
</html>
ブラウザで http://localhost:8080/hello にアクセスする。
- コントローラのメソッドで
Modelを引数に受け取るようにする。 - この
ModelのaddAttribute()メソッドを使って、画面で出力したい情報を設定する。 - 画面側では、まず Thymeleaf 用の名前空間を定義する(
xmlns:th)-
th:text属性で、指定した値をテキストとして出力する。 -
th:textの値には、${...}のように EL 式っぽく出力する値を指定する。
-
繰り返し出力
package sample.springboot.web;

import java.util.Arrays;
import java.util.List;

import org.springframework.stereotype.Controller;
import org.springframework.ui.Model;
import org.springframework.web.bind.annotation.RequestMapping;
import org.springframework.web.bind.annotation.RequestMethod;

@Controller
@RequestMapping("/hello")
public class HelloController {

    @RequestMapping(method=RequestMethod.GET)
    public String hello(Model model) {
        List<Hoge> list = Arrays.asList(
                            new Hoge() {{
                                id = 10;
                                value = "hoge";
                            }},
                            new Hoge() {{
                                id = 20;
                                value = "fuga";
                            }},
                            new Hoge() {{
                                id = 30;
                                value = "piyo";
                            }});

        model.addAttribute("hogeList", list);

        return "hello";
    }
}
<!DOCTYPE html>
<html xmlns:th="http://www.thymeleaf.org">
  <head>
    <meta charset="UTF-8" />
    <title>Hello Thymeleaf</title>
  </head>
  <body>
    <dl th:each="hoge : ${hogeList}">
      <dt>id</dt>
      <dd th:text="${hoge.id}"></dd>

      <dt>value</dt>
      <dd th:text="${hoge.value}"></dd>
    </dl>
  </body>
</html>
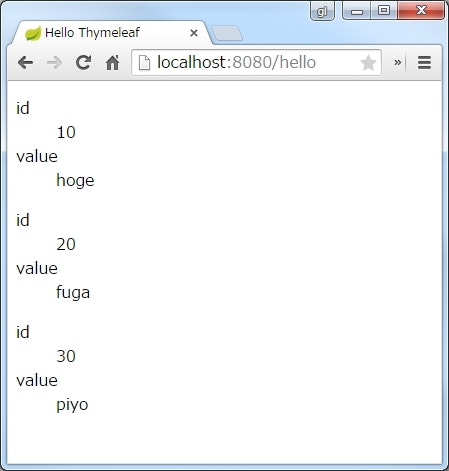
-
th:eachで、指定したコレクションを繰り返し処理できる。
その他の使い方
ここに書いてたらキリがないので、 公式ドキュメント を参照。
気が向いたら別途まとめる。
ホットデプロイ
buildscript {
    repositories {
        mavenCentral()
    }
    dependencies {
        classpath 'org.springframework.boot:spring-boot-gradle-plugin:1.2.3.RELEASE'
+       classpath 'org.springframework:springloaded:1.2.1.RELEASE'
    }
}

apply plugin: 'java'
apply plugin: 'spring-boot'

sourceCompatibility = '1.8'
targetCompatibility = '1.8'

repositories {
    mavenCentral()
}

dependencies {
    compile 'org.springframework.boot:spring-boot-starter-web'
}

jar.baseName = 'spring-boot-sample'
buildscript の依存関係に org.springframework:springloaded:1.2.1.RELEASE を追加する。
あとは、普通に gradle bootRun すれば、ホットデプロイが有効になる。
テンプレートエンジンに Thymeleaf を利用している場合は、キャッシュ機能をオフにしておく必要がある。
spring.thymeleaf.cache=false
Thymeleaf 以外のテンプレートエンジンを利用している場合は、 このページ を参照。
IntelliJ IDEA を使用している場合
build.gradle に以下を追記する必要がある。
apply plugin: 'idea'

idea {
    module {
        inheritOutputDirs = false
        outputDir = file("$buildDir/classes/main/")
    }
}
デフォルトだと、 IlleliJ がコンパイル結果を出力する先が Gradle の出力先と異なるためファイルの監視がうまくいかないらしく、そのへんを変更しているらしい。
データベースアクセス
Hello World
dependencies {
    compile 'org.hsqldb:hsqldb'
    compile 'org.springframework.boot:spring-boot-starter-jdbc'
}
package sample.springboot;
import java.util.List;
import java.util.Map;
import org.springframework.beans.factory.annotation.Autowired;
import org.springframework.boot.SpringApplication;
import org.springframework.boot.autoconfigure.SpringBootApplication;
import org.springframework.context.ConfigurableApplicationContext;
import org.springframework.jdbc.core.JdbcTemplate;
@SpringBootApplication
public class Main {
public static void main(String[] args) {
try (ConfigurableApplicationContext ctx = SpringApplication.run(Main.class, args)) {
Main m = ctx.getBean(Main.class);
m.method();
}
}
@Autowired
private JdbcTemplate jdbc;
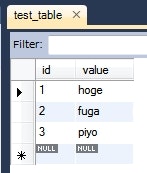
public void method() {
this.jdbc.execute("CREATE TABLE TEST_TABLE (ID INTEGER NOT NULL IDENTITY, VALUE VARCHAR(256))");
this.jdbc.update("INSERT INTO TEST_TABLE (VALUE) VALUES (?)", "hoge");
this.jdbc.update("INSERT INTO TEST_TABLE (VALUE) VALUES (?)", "fuga");
this.jdbc.update("INSERT INTO TEST_TABLE (VALUE) VALUES (?)", "piyo");
List<Map<String, Object>> list = this.jdbc.queryForList("SELECT * FROM TEST_TABLE");
list.forEach(System.out::println);
}
}
{ID=0, VALUE=hoge}
{ID=1, VALUE=fuga}
{ID=2, VALUE=piyo}
- 依存関係に
spring-boot-starter-jdbcと、使用する DB (org.hsqldb:hsqldb)を追加する。 - すると、指定した DB をオンメモリで利用できるようになる。
- オンメモリなので、 JVM が停止するとデータは失われる。
- HSQLDB の他に H2 と Derby を同じく組み込みで利用できる。
データをファイルに永続化する
spring.datasource.url=jdbc:hsqldb:file:./db/testdb;shutdown=true
-
プロパティファイルで
spring.datasource.urlを定義することで、 JDBC 接続するときの URL を指定できる。 - HSQLDB の場合は、 URL でデータをファイルに保存するかどうかを指定できるので、上記のように設定すればデータをファイルに永続化できる。
外部のデータベースを利用する
ローカルの MySQL を利用する。
MySQL のテーブル
実装
dependencies {
    compile 'org.springframework.boot:spring-boot-starter-jdbc'
    compile 'mysql:mysql-connector-java:5.1.35'
}
spring.datasource.url=jdbc:mysql://localhost/test
spring.datasource.username=test
spring.datasource.password=test
spring.datasource.driver-class-name=com.mysql.jdbc.Driver
package sample.springboot;

import java.util.List;
import java.util.Map;

import org.springframework.beans.factory.annotation.Autowired;
import org.springframework.boot.SpringApplication;
import org.springframework.boot.autoconfigure.SpringBootApplication;
import org.springframework.context.ConfigurableApplicationContext;
import org.springframework.jdbc.core.JdbcTemplate;

@SpringBootApplication
public class Main {

    public static void main(String[] args) {
        try (ConfigurableApplicationContext ctx = SpringApplication.run(Main.class, args)) {
            Main m = ctx.getBean(Main.class);
            m.method();
        }
    }

    @Autowired
    private JdbcTemplate jdbc;

    public void method() {
        List<Map<String, Object>> list = this.jdbc.queryForList("SELECT * FROM TEST_TABLE");
        list.forEach(System.out::println);
    }
}
{id=1, value=hoge}
{id=2, value=fuga}
{id=3, value=piyo}
-
application.propertiesに接続設定を記述することで、外部の DB に接続できる。
JPA を利用する
基本
dependencies {
-   compile 'org.springframework.boot:spring-boot-starter-jdbc'
+   compile 'org.springframework.boot:spring-boot-starter-data-jpa'
    compile 'org.hsqldb:hsqldb'
}
spring.datasource.url=jdbc:hsqldb:file:./db/testdb;shutdown=true
spring.jpa.hibernate.ddl-auto=update
package sample.springboot.jpa;

import javax.persistence.Entity;
import javax.persistence.GeneratedValue;
import javax.persistence.Id;

@Entity
public class MyEntity {

    @Id @GeneratedValue
    private Long id;
    private String value;

    public MyEntity(String value) {
        this.value = value;
    }

    private MyEntity() {}

    @Override
    public String toString() {
        return "MyEntity [id=" + id + ", value=" + value + "]";
    }
}
package sample.springboot.jpa;

import org.springframework.data.jpa.repository.JpaRepository;

public interface MyEntityRepository extends JpaRepository<MyEntity, Long> {
}
package sample.springboot;

import org.springframework.beans.factory.annotation.Autowired;
import org.springframework.boot.SpringApplication;
import org.springframework.boot.autoconfigure.SpringBootApplication;
import org.springframework.context.ConfigurableApplicationContext;

import sample.springboot.jpa.MyEntity;
import sample.springboot.jpa.MyEntityRepository;

@SpringBootApplication
public class Main {

    public static void main(String[] args) {
        try (ConfigurableApplicationContext ctx = SpringApplication.run(Main.class, args)) {
            Main m = ctx.getBean(Main.class);
            m.method();
        }
    }

    @Autowired
    private MyEntityRepository repository;

    public void method() {
        this.repository.save(new MyEntity("test"));

        this.repository.findAll().forEach(System.out::println);
    }
}
$ gradle bootRun
MyEntity [id=1, value=test]

$ gradle bootRun
MyEntity [id=1, value=test]
MyEntity [id=2, value=test]

$ gradle bootRun
MyEntity [id=1, value=test]
MyEntity [id=2, value=test]
MyEntity [id=3, value=test]
- JPA を使う場合は、
org.springframework.boot:spring-boot-starter-data-jpaを依存関係に追加する。 - JPA の実装には Hibernate が利用される。
- デフォルトだとテーブルが毎回作りなおされるので、
spring.jpa.hibernate.ddl-auto=updateを設定している。
- デフォルトだとテーブルが毎回作りなおされるので、
-
JpaRepositoryを継承したインターフェースを定義すると、 Spring が良しなにデータアクセスの実装を作ってくれる。
メソッド名からのクエリ自動生成
データベース
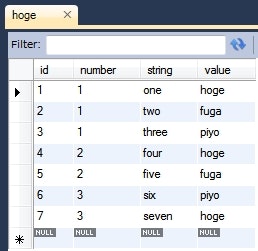
エンティティ
package sample.springboot.jpa;

import javax.persistence.Embedded;
import javax.persistence.Entity;
import javax.persistence.GeneratedValue;
import javax.persistence.GenerationType;
import javax.persistence.Id;

@Entity
public class Hoge {

    @Id @GeneratedValue(strategy=GenerationType.IDENTITY)
    private Long id;
    private int number;
    private String string;
    @Embedded
    private Fuga fuga;

    @Override
    public String toString() {
        return "Hoge [id=" + id + ", number=" + number + ", string=" + string + ", fuga=" + fuga + "]";
    }
}
package sample.springboot.jpa;

import javax.persistence.Embeddable;

@Embeddable
public class Fuga {

    private String value;

    @Override
    public String toString() {
        return "Fuga [value=" + value + "]";
    }
}
リポジトリインターフェース
package sample.springboot.jpa;

import java.util.List;

import org.springframework.data.jpa.repository.JpaRepository;

public interface HogeRepository extends JpaRepository<Hoge, Long> {

    List<Hoge> findByNumber(int number);

    List<Hoge> findByNumberOrderByIdDesc(int number);

    List<Hoge> findByStringLike(String string);

    List<Hoge> findByNumberLessThan(int number);

    List<Hoge> findByStringIgnoreCase(String string);

    List<Hoge> findByFugaValue(String string);

    long countByStringLike(String string);

    List<Hoge> findByNumberAndStringLike(int number, String string);

    List<Hoge> findByNumberOrString(int number, String string);
}
動作確認
package sample.springboot;

import java.util.List;

import org.springframework.beans.factory.annotation.Autowired;
import org.springframework.boot.SpringApplication;
import org.springframework.boot.autoconfigure.SpringBootApplication;
import org.springframework.context.ConfigurableApplicationContext;

import sample.springboot.jpa.Hoge;
import sample.springboot.jpa.HogeRepository;

@SpringBootApplication
public class Main {

    public static void main(String[] args) {
        try (ConfigurableApplicationContext ctx = SpringApplication.run(Main.class, args)) {
            Main m = ctx.getBean(Main.class);
            m.method();
        }
    }

    @Autowired
    private HogeRepository repository;

    public void method() {
        print("findByNumber",              repository.findByNumber(1));
        print("findByNumberAndStringLike", repository.findByNumberAndStringLike(1, "%e"));
        print("findByNumberOrString",      repository.findByNumberOrString(2, "seven"));
        print("findByNumberOrderByIdDesc", repository.findByNumberOrderByIdDesc(2));
        print("findByStringLike",          repository.findByStringLike("t%"));
        print("findByNumberLessThan",      repository.findByNumberLessThan(3));
        print("findByStringIgnoreCase",    repository.findByStringIgnoreCase("FIVE"));
        print("findByFugaValue",           repository.findByFugaValue("hoge"));
        print("countByStringLike",         repository.countByStringLike("%o%"));
    }

    private void print(String methodName, List<Hoge> list) {
        System.out.println("<<" + methodName + ">>");
        list.forEach(System.out::println);
        System.out.println();
    }

    private void print(String methodName, long number) {
        System.out.println("<<" + methodName + ">>");
        System.out.println(number);
        System.out.println();
    }
}
<<findByNumber>>
Hoge [id=1, number=1, string=one, fuga=Fuga [value=hoge]]
Hoge [id=2, number=1, string=two, fuga=Fuga [value=fuga]]
Hoge [id=3, number=1, string=three, fuga=Fuga [value=piyo]]

<<findByNumberOrderByIdDesc>>
Hoge [id=5, number=2, string=five, fuga=Fuga [value=fuga]]
Hoge [id=4, number=2, string=four, fuga=Fuga [value=hoge]]

<<findByStringLike>>
Hoge [id=2, number=1, string=two, fuga=Fuga [value=fuga]]
Hoge [id=3, number=1, string=three, fuga=Fuga [value=piyo]]

<<findByNumberLessThan>>
Hoge [id=1, number=1, string=one, fuga=Fuga [value=hoge]]
Hoge [id=2, number=1, string=two, fuga=Fuga [value=fuga]]
Hoge [id=3, number=1, string=three, fuga=Fuga [value=piyo]]
Hoge [id=4, number=2, string=four, fuga=Fuga [value=hoge]]
Hoge [id=5, number=2, string=five, fuga=Fuga [value=fuga]]

<<findByStringIgnoreCase>>
Hoge [id=5, number=2, string=five, fuga=Fuga [value=fuga]]

<<findByFugaValue>>
Hoge [id=1, number=1, string=one, fuga=Fuga [value=hoge]]
Hoge [id=4, number=2, string=four, fuga=Fuga [value=hoge]]
Hoge [id=7, number=3, string=seven, fuga=Fuga [value=hoge]]

<<countByStringLike>>
3

<<findByNumberAndStringLike>>
Hoge [id=1, number=1, string=one, fuga=Fuga [value=hoge]]
Hoge [id=3, number=1, string=three, fuga=Fuga [value=piyo]]

<<findByNumberOrString>>
Hoge [id=4, number=2, string=four, fuga=Fuga [value=hoge]]
Hoge [id=5, number=2, string=five, fuga=Fuga [value=fuga]]
Hoge [id=7, number=3, string=seven, fuga=Fuga [value=hoge]]
-
Repositoryを継承したインターフェースにfind~~のようなメソッドを定義すると、 Spring が良しなに解釈してクエリを自動生成してくれる。 - 基本は、
findBy<条件とするプロパティの名前>で定義する。 -
AndやOrで連結できる。 -
OrderBy<プロパティ名><Asc | Desc>で、ソートを指定できる。 -
Likeをつければ文字列のあいまい検索ができる。 -
LessThan,GreaterThan,Betweenなども使える。 -
IgnoreCaseをつければ、大文字小文字の区別なしで比較できる。 -
count~~とすると、検索結果のエンティティ数を取得できる。 - 組み込み可能クラスのプロパティを条件にする場合は、
findBy<組み可能クラス><組み込み可能クラスのプロパティ>と繋げる。
JPQL を使用する
package sample.springboot.jpa;

import java.util.List;

import org.springframework.data.jpa.repository.JpaRepository;
import org.springframework.data.jpa.repository.Query;

public interface HogeRepository extends JpaRepository<Hoge, Long> {

    @Query("SELECT h FROM Hoge h WHERE (h.id % 2) = 0")
    List<Hoge> findEvenIdEntities();
}
package sample.springboot;

import org.springframework.beans.factory.annotation.Autowired;
import org.springframework.boot.SpringApplication;
import org.springframework.boot.autoconfigure.SpringBootApplication;
import org.springframework.context.ConfigurableApplicationContext;

import sample.springboot.jpa.HogeRepository;

@SpringBootApplication
public class Main {

    public static void main(String[] args) {
        try (ConfigurableApplicationContext ctx = SpringApplication.run(Main.class, args)) {
            Main m = ctx.getBean(Main.class);
            m.method();
        }
    }

    @Autowired
    private HogeRepository repository;

    public void method() {
        this.repository.findEvenIdEntities().forEach(System.out::println);
    }
}
Hoge [id=2, number=1, string=two, fuga=Fuga [value=fuga]]
Hoge [id=4, number=2, string=four, fuga=Fuga [value=hoge]]
Hoge [id=6, number=3, string=six, fuga=Fuga [value=piyo]]
-
@Queryでメソッドをアノテートすることで、 JPQL を指定することができる。 - JPQL は、
@Queryのvalueに設定する。
EntityManager を取得する
package sample.springboot;

import javax.persistence.EntityManager;
import javax.persistence.TypedQuery;

import org.springframework.beans.factory.annotation.Autowired;
import org.springframework.boot.SpringApplication;
import org.springframework.boot.autoconfigure.SpringBootApplication;
import org.springframework.context.ConfigurableApplicationContext;

import sample.springboot.jpa.Hoge;

@SpringBootApplication
public class Main {

    public static void main(String[] args) {
        try (ConfigurableApplicationContext ctx = SpringApplication.run(Main.class, args)) {
            Main m = ctx.getBean(Main.class);
            m.method();
        }
    }

    @Autowired
    private EntityManager em;

    public void method() {
        TypedQuery<Hoge> query = this.em.createQuery("SELECT h FROM Hoge h WHERE h.id=:id", Hoge.class);
        query.setParameter("id", 3L);

        Hoge hoge = query.getSingleResult();

        System.out.println(hoge);
    }
}
Hoge [id=3, number=1, string=three, fuga=Fuga [value=piyo]]
-
@Autowiredを使って普通にEntityManagerをインジェクションできる。
宣言的トランザクションを使用する
package sample.springboot.jpa;

import org.springframework.beans.factory.annotation.Autowired;
import org.springframework.stereotype.Component;
import org.springframework.transaction.annotation.Transactional;

@Component
public class MyService {

    @Autowired
    private HogeRepository repository;

    public void save(String value) {
        Hoge hoge = new Hoge(value);
        this.repository.save(hoge);
    }

    public void saveAndThrowRuntimeException(String value) {
        this.save(value);
        throw new RuntimeException("test");
    }

    @Transactional
    public void saveAndThrowRuntimeExceptionWithTransactional(String value) {
        this.saveAndThrowRuntimeException(value);
    }

    @Transactional
    public void saveAndThrowExceptionWithTransactional(String value) throws Exception {
        this.save(value);
        throw new Exception("test");
    }

    public void show() {
        this.repository.findAll().forEach(System.out::println);
    }
}
package sample.springboot;

import org.springframework.boot.SpringApplication;
import org.springframework.boot.autoconfigure.SpringBootApplication;
import org.springframework.context.ConfigurableApplicationContext;

import sample.springboot.jpa.MyService;

@SpringBootApplication
public class Main {

    public static void main(String[] args) throws Exception {
        try (ConfigurableApplicationContext ctx = SpringApplication.run(Main.class, args)) {
            MyService s = ctx.getBean(MyService.class);

            s.save("normal");

            try {
                s.saveAndThrowRuntimeException("runtime exception without @Transactional");
            } catch (Exception e) {}

            try {
                s.saveAndThrowRuntimeExceptionWithTransactional("runtime exception with @Transactional");
            } catch (Exception e) {}

            try {
                s.saveAndThrowExceptionWithTransactional("exception with @Transactional");
            } catch (Exception e) {}

            s.show();
        }
    }
}
Hoge [id=1, value=normal]
Hoge [id=2, value=runtime exception without @Transactional]
Hoge [id=4, value=exception with @Transactional]
-
@Transactionalでメソッドをアノテートすると、そのメソッドの前後がトランザクション境界になる。 - トランザクション境界内で
RuntimeExceptionおよびそのサブクラスがスローされると、トランザクションはロールバックされる。 -
@Transactionalでアノテートされていなかったり、Exceptionおよびそのサブクラスがスローされた場合は、ロールバックされない。 -
Exceptionがスローされた場合もロールバックして欲しい場合は、@Transactional(rollbackFor=Exception.class)のように設定する。
Flyway でマイグレーションする
dependencies {
    compile 'org.springframework.boot:spring-boot-starter-data-jpa'
    compile 'org.hsqldb:hsqldb'
+   compile 'org.flywaydb:flyway-core'
}
spring.jpa.hibernate.ddl-auto=none
CREATE TABLE HOGE (
    ID INTEGER NOT NULL IDENTITY,
    VALUE VARCHAR(256)
);

INSERT INTO HOGE (VALUE) VALUES ('HOGE');
INSERT INTO HOGE (VALUE) VALUES ('FUGA');
INSERT INTO HOGE (VALUE) VALUES ('PIYO');
package sample.springboot;

import org.springframework.beans.factory.annotation.Autowired;
import org.springframework.boot.SpringApplication;
import org.springframework.boot.autoconfigure.SpringBootApplication;
import org.springframework.context.ConfigurableApplicationContext;

import sample.springboot.jpa.HogeRepository;

@SpringBootApplication
public class Main {

    public static void main(String[] args) throws Exception {
        try (ConfigurableApplicationContext ctx = SpringApplication.run(Main.class, args)) {
            Main m = ctx.getBean(Main.class);
            m.method();
        }
    }

    @Autowired
    private HogeRepository repository;

    public void method() {
        this.repository.findAll().forEach(System.out::println);
    }
}
Hoge [id=0, value=HOGE]
Hoge [id=1, value=FUGA]
Hoge [id=2, value=PIYO]
- Flyway を依存関係に追加するだけで、サーバー起動時にマイグレーションを実行してくれるようになる。
- JPA を使う場合は、 JPA が DB を自動生成しないようにしないといけないので、
spring.jpa.hibernate.ddl-auto=noneを指定する。 - Flyway 自体の使い方については こちら を参照。
複数のデータソースを使用する
基本
実装
package sample.springboot;

import javax.sql.DataSource;

import org.springframework.boot.autoconfigure.jdbc.DataSourceBuilder;
import org.springframework.context.annotation.Bean;
import org.springframework.context.annotation.Configuration;
import org.springframework.context.annotation.Primary;
import org.springframework.jdbc.core.JdbcTemplate;

@Configuration
public class PrimaryDataSourceConfiguration {

    @Bean @Primary
    public DataSource createPrimaryDataSource() {
        return DataSourceBuilder
            .create()
            .driverClassName("org.hsqldb.jdbcDriver")
            .url("jdbc:hsqldb:mem:primary")
            .username("SA")
            .password("")
            .build();
    }

    @Bean @Primary
    public JdbcTemplate createPrimaryJdbcTemplate(DataSource ds) {
        return new JdbcTemplate(ds);
    }
}
package sample.springboot;

import javax.sql.DataSource;

import org.springframework.boot.autoconfigure.jdbc.DataSourceBuilder;
import org.springframework.context.annotation.Bean;
import org.springframework.context.annotation.Configuration;
import org.springframework.jdbc.core.JdbcTemplate;

@Configuration
public class SecondaryDataSourceConfiguration {

    @Bean @MySecondary
    public DataSource createSecondaryDataSource() {
        return DataSourceBuilder
                .create()
                .driverClassName("org.hsqldb.jdbcDriver")
                .url("jdbc:hsqldb:mem:secondary")
                .username("SA")
                .password("")
                .build();
    }

    @Bean @MySecondary
    public JdbcTemplate createSecondaryJdbcTemplate(@MySecondary DataSource ds) {
        return new JdbcTemplate(ds);
    }
}
package sample.springboot;

import java.lang.annotation.ElementType;
import java.lang.annotation.Retention;
import java.lang.annotation.RetentionPolicy;
import java.lang.annotation.Target;

import org.springframework.beans.factory.annotation.Qualifier;

@Qualifier
@Retention(RetentionPolicy.RUNTIME)
@Target({ElementType.METHOD, ElementType.FIELD, ElementType.PARAMETER, ElementType.TYPE})
public @interface MySecondary {
}
package sample.springboot;

import org.springframework.beans.factory.annotation.Autowired;
import org.springframework.jdbc.core.JdbcTemplate;
import org.springframework.stereotype.Component;

@Component
public class MyDatabaseAccess {

    private static final String CREATE_TABLE_SQL = "CREATE TABLE TEST_TABLE (VALUE VARCHAR(256))";
    private static final String INSERT_SQL = "INSERT INTO TEST_TABLE VALUES (?)";
    private static final String SELECT_SQL = "SELECT * FROM TEST_TABLE";

    @Autowired
    private JdbcTemplate primary;

    @Autowired @MySecondary
    private JdbcTemplate secondary;

    public void initialize() {
        this.primary.execute(CREATE_TABLE_SQL);
        this.secondary.execute(CREATE_TABLE_SQL);
    }

    public void insertPrimary(String value) {
        this.primary.update(INSERT_SQL, value);
    }

    public void insertSecondary(String value) {
        this.secondary.update(INSERT_SQL, value);
    }

    public void showRecords() {
        System.out.println("Primary >>>>");
        this.primary.queryForList(SELECT_SQL).forEach(System.out::println);

        System.out.println("Secondary >>>>");
        this.secondary.queryForList(SELECT_SQL).forEach(System.out::println);
    }
}
package sample.springboot;

import org.springframework.boot.SpringApplication;
import org.springframework.boot.autoconfigure.SpringBootApplication;
import org.springframework.context.ConfigurableApplicationContext;

@SpringBootApplication
public class Main {

    public static void main(String[] args) {
        try (ConfigurableApplicationContext ctx = SpringApplication.run(Main.class, args)) {
            MyDatabaseAccess db = ctx.getBean(MyDatabaseAccess.class);

            db.initialize();

            db.insertPrimary("primary!!");
            db.insertSecondary("secondary!!");

            db.showRecords();
        }
    }
}
動作確認
Primary >>>>
{VALUE=primary!!}

Secondary >>>>
{VALUE=secondary!!}
説明
    @Bean @Primary
    public DataSource createPrimaryDataSource() {
        return DataSourceBuilder
            .create()
            .driverClassName("org.hsqldb.jdbcDriver")
            .url("jdbc:hsqldb:mem:primary")
            .username("SA")
            .password("")
            .build();
    }

    @Bean @Primary
    public JdbcTemplate createPrimaryJdbcTemplate(DataSource ds) {
        return new JdbcTemplate(ds);
    }
-
@Beanを使って、DataSourceのビーンを定義している(createPrimaryDataSource())。 - 作成した
DataSourceを引数に受け取りつつ、さらにJdbcTemplateのビーンを定義している(createPrimaryJdbcTemplate())。 -
DataSourceを複数定義するときは、一方の定義を@Primaryでアノテートする。-
@Primaryは、デフォルトでインジェクションされるビーンを指定するためのアノテーション。 - ビーンの候補が複数存在する状態で限定子を指定しないと、
@Primaryでアノテートされたビーンがインジェクションされる。
-
-
DataSourceのインスタンスは、DataSourceBuilderを使って作成できる。
    @Bean @MySecondary
    public DataSource createSecondaryDataSource() {
        return DataSourceBuilder
                .create()
                .driverClassName("org.hsqldb.jdbcDriver")
                .url("jdbc:hsqldb:mem:secondary")
                .username("SA")
                .password("")
                .build();
    }

    @Bean @MySecondary
    public JdbcTemplate createSecondaryJdbcTemplate(@MySecondary DataSource ds) {
        return new JdbcTemplate(ds);
    }
- 2つ目の
DataSourceの定義には、自作の限定子を付与している。- 限定子については こちら を参照。
    @Autowired
    private JdbcTemplate primary;

    @Autowired @MySecondary
    private JdbcTemplate secondary;
- インジェクションするときに、
@Autowiredだけなら@Primaryでアノテートした方のビーンが、
自作限定子でアノテートすれば、対応するビーンがインジェクションされる。 - あとは、だいたい今まで通りにデータベースアクセスができる。
宣言的トランザクション
複数の DataSource を定義した場合、そのままだと @Primary じゃない方のデータソースについて、宣言的トランザクションが使用できない。
@Primary でない方のデータソースでも宣言的トランザクションを使用する場合は、以下のように実装する。
実装
package sample.springboot;

import javax.sql.DataSource;

import org.springframework.boot.autoconfigure.jdbc.DataSourceBuilder;
import org.springframework.context.annotation.Bean;
import org.springframework.context.annotation.Configuration;
import org.springframework.context.annotation.Primary;
import org.springframework.jdbc.core.JdbcTemplate;
+ import org.springframework.jdbc.datasource.DataSourceTransactionManager;
+ import org.springframework.transaction.PlatformTransactionManager;

@Configuration
public class PrimaryDataSourceConfiguration {

    @Bean @Primary
    public DataSource createPrimaryDataSource() {
        return DataSourceBuilder
            .create()
            .driverClassName("org.hsqldb.jdbcDriver")
            .url("jdbc:hsqldb:mem:primary")
            .username("SA")
            .password("")
            .build();
    }

    @Bean @Primary
    public JdbcTemplate createPrimaryJdbcTemplate(DataSource ds) {
        return new JdbcTemplate(ds);
    }

+   @Bean @Primary
+   public PlatformTransactionManager createTransactionManager(DataSource ds) {
+       return new DataSourceTransactionManager(ds);
+   }
}
package sample.springboot;

import javax.sql.DataSource;

import org.springframework.boot.autoconfigure.jdbc.DataSourceBuilder;
import org.springframework.context.annotation.Bean;
import org.springframework.context.annotation.Configuration;
import org.springframework.jdbc.core.JdbcTemplate;
+ import org.springframework.jdbc.datasource.DataSourceTransactionManager;
+ import org.springframework.transaction.PlatformTransactionManager;

@Configuration
public class SecondaryDataSourceConfiguration {

+   public static final String TRANSACTION_MANAGER_NAME = "secondary-tx-manager";

    @Bean @MySecondary
    public DataSource createSecondaryDataSource() {
        return DataSourceBuilder
                .create()
                .driverClassName("org.hsqldb.jdbcDriver")
                .url("jdbc:hsqldb:mem:secondary")
                .username("SA")
                .password("")
                .build();
    }

    @Bean @MySecondary
    public JdbcTemplate createSecondaryJdbcTemplate(@MySecondary DataSource ds) {
        return new JdbcTemplate(ds);
    }

+   @Bean(name=SecondaryDataSourceConfiguration.TRANSACTION_MANAGER_NAME)
+   public PlatformTransactionManager createTransactionManager(@MySecondary DataSource ds) {
+       return new DataSourceTransactionManager(ds);
+   }
}
package sample.springboot;

import org.springframework.beans.factory.annotation.Autowired;
import org.springframework.jdbc.core.JdbcTemplate;
import org.springframework.stereotype.Component;
+ import org.springframework.transaction.annotation.Transactional;

@Component
public class MyDatabaseAccess {

    private static final String CREATE_TABLE_SQL = "CREATE TABLE TEST_TABLE (VALUE VARCHAR(256))";
    private static final String INSERT_SQL = "INSERT INTO TEST_TABLE VALUES (?)";
    private static final String SELECT_SQL = "SELECT * FROM TEST_TABLE";

    @Autowired
    private JdbcTemplate primary;

    @Autowired @MySecondary
    private JdbcTemplate secondary;

    public void initialize() {
        this.primary.execute(CREATE_TABLE_SQL);
        this.secondary.execute(CREATE_TABLE_SQL);
    }

-   public void insertPrimary(String value) {
-       this.primary.update(INSERT_SQL, value);
-   }
-
-   public void insertSecondary(String value) {
-       this.secondary.update(INSERT_SQL, value);
-   }

+   @Transactional
+   public void insertPrimary(String value, boolean rollback) {
+       this.primary.update(INSERT_SQL, value);
+       if (rollback) throw new RuntimeException("test exception");
+   }
+
+   @Transactional(SecondaryDataSourceConfiguration.TRANSACTION_MANAGER_NAME)
+   public void insertSecondary(String value, boolean rollback) {
+       this.secondary.update(INSERT_SQL, value);
+       if (rollback) throw new RuntimeException("test exception");
+   }

    public void showRecords() {
        System.out.println("Primary >>>>");
        this.primary.queryForList(SELECT_SQL).forEach(System.out::println);

        System.out.println("Secondary >>>>");
        this.secondary.queryForList(SELECT_SQL).forEach(System.out::println);
    }

}
package sample.springboot;

import org.springframework.boot.SpringApplication;
import org.springframework.boot.autoconfigure.SpringBootApplication;
import org.springframework.context.ConfigurableApplicationContext;

@SpringBootApplication
public class Main {

    public static void main(String[] args) {
        try (ConfigurableApplicationContext ctx = SpringApplication.run(Main.class, args)) {
            MyDatabaseAccess db = ctx.getBean(MyDatabaseAccess.class);

            db.initialize();

            db.insertPrimary("primary commit!!", false);
            db.insertSecondary("secondary commit!!", false);

            try {
                db.insertPrimary("primary rollback!!", true);
            } catch (Exception e) {}

            try {
                db.insertSecondary("secondary rollback!!", true);
            } catch (Exception e) {}

            db.showRecords();
        }
    }
}
動作確認
Primary >>>>
{VALUE=primary commit!!}

Secondary >>>>
{VALUE=secondary commit!!}
説明
    @Bean @Primary
    public PlatformTransactionManager createTransactionManager(DataSource ds) {
        return new DataSourceTransactionManager(ds);
    }
    public static final String TRANSACTION_MANAGER_NAME = "secondary-tx-manager";

    ...

    @Bean(name=SecondaryDataSourceConfiguration.TRANSACTION_MANAGER_NAME)
    public PlatformTransactionManager createTransactionManager(@MySecondary DataSource ds) {
        return new DataSourceTransactionManager(ds);
    }
- 複数データソースを定義したうえで宣言的トランザクションを使用する場合は、
PlatformTransactionManagerのビーンを定義する。 -
@Primaryの方は@Primaryでアノテートするだけでいいが、そうでない方はビーン名を指定しておく。
    @Transactional
    public void insertPrimary(String value, boolean rollback) {
        this.primary.update(INSERT_SQL, value);
        if (rollback) throw new RuntimeException("test exception");
    }

    @Transactional(SecondaryDataSourceConfiguration.TRANSACTION_MANAGER_NAME)
    public void insertSecondary(String value, boolean rollback) {
        this.secondary.update(INSERT_SQL, value);
        if (rollback) throw new RuntimeException("test exception");
    }
-
@PrimaryのDataSourceを使用する場合は、従来通り@Transactionalでアノテートすることで宣言的トランザクションが使用できる。 -
@Primaryでない方のDataSourceを使用する場合は、@Transactionalのvalueに、PlatformTransactionManagerのビーン名を指定しなければならない。
参考
- Transactions with JdbcTemplate | Java Creed
- Spring Boot Reference Guide
- java - Spring Boot Multiple Datasource - Stack Overflow
外部設定(Externalized Configuration)を利用する
プロパティファイルを使用する
基本
|-build.gradle
`-src/main/
  |-java/sample/springboot/
  |  `-Main.java
  `-resources/
    `-application.properties
package sample.springboot;

import org.springframework.beans.factory.annotation.Value;
import org.springframework.boot.SpringApplication;
import org.springframework.boot.autoconfigure.SpringBootApplication;
import org.springframework.context.ConfigurableApplicationContext;

@SpringBootApplication
public class Main {

    public static void main(String[] args) {
        try (ConfigurableApplicationContext ctx = SpringApplication.run(Main.class, args)) {
            Main m = ctx.getBean(Main.class);
            m.hello();
        }
    }

    @Value("${sample.value}")
    private String value;

    public void hello() {
        System.out.println("sample.value = " + this.value);
    }
}
sample.value = Hello Properties File!!
- クラスパス直下に
application.propertiesという名前でプロパティファイルを配置する。 - すると、 Spring Boot が自動でそのファイルを読み込んでくれる。
- プロパティファイルの値は、
@Valueアノテーションを使うことで Bean にインジェクションできる。-
${プロパティ名}という形式で取得したい値を指定する。
-
ファイルの置き場所
プロパティファイルの置き場はいくつかあり、読み込みの優先順位が存在する。
- 起動時に
--spring.config.locationで指定したファイル。 - カレントディレクトリ直下の
configディレクトリにあるファイル。 - カレントディレクトリにあるファイル。
- クラスパス直下の
configパッケージにあるファイル。 - クラスパス直下にあるファイル。
数字が若い方が、優先順位が高い。
優先順位が下位の設定は、上位の設定で上書きされる。
|-application.properties
|-config/
|  `-application.properties
`-sample/springboot/
   `-Main.class
|-application.properties
|-other.properties
|-config/
| `-application.properties
`-build/libs/
  `-spring-boot-sample.jar
value5=other
value4=currentdir/config
value5=currentdir/config
value3=currentdir/
value4=currentdir/
value5=currentdir/
value2=classpath/config
value3=classpath/config
value4=classpath/config
value5=classpath/config
value1=classpath/
value2=classpath/
value3=classpath/
value4=classpath/
value5=classpath/
package sample.springboot;

import org.springframework.beans.factory.annotation.Value;
import org.springframework.boot.SpringApplication;
import org.springframework.boot.autoconfigure.SpringBootApplication;
import org.springframework.context.ConfigurableApplicationContext;

@SpringBootApplication
public class Main {

    public static void main(String[] args) {
        try (ConfigurableApplicationContext ctx = SpringApplication.run(Main.class, args)) {
            Main m = ctx.getBean(Main.class);
            m.hello();
        }
    }

    @Value("${value1}") private String value1;
    @Value("${value2}") private String value2;
    @Value("${value3}") private String value3;
    @Value("${value4}") private String value4;
    @Value("${value5}") private String value5;

    public void hello() {
        System.out.println("value1=" + value1);
        System.out.println("value2=" + value2);
        System.out.println("value3=" + value3);
        System.out.println("value4=" + value4);
        System.out.println("value5=" + value5);
    }
}
$ java -jar build/libs/spring-boot-sample.jar --spring.config.location=other.properties

value1=classpath/
value2=classpath/config
value3=currentdir/
value4=currentdir/config
value5=other
優先順位に合わせて設定が上書きされていっている。
プロファイルを指定する
|-application.properties
|-application-develop.properties
`-build/libs/
   `-spring-boot-sample.jar
value=release module
value=develop module
$ java -jar build/libs/spring-boot-sample.jar

value=release module

$ java -jar build/libs/spring-boot-sample.jar --spring.profiles.active=develop

value=develop module
- プロパティファイルを
application-<プロファイル名>.propertiesという形式で作成する。 - コマンドライン引数などで、
spring.profiles.activeに有効にしたいプロファイル名を指定する。- コマンドライン引数以外にも、システムプロパティや OS の環境変数でも指定可能。
- すると、指定されたプロファイルに該当するプロパティファイルが読み込まれる。
同じプレフィックスを持つプロパティを Bean にマッピングする
person.firstName=Sato
person.last-name=Taro
person.age=18
package sample.springboot;

import org.springframework.boot.context.properties.ConfigurationProperties;
import org.springframework.stereotype.Component;

@Component
@ConfigurationProperties(prefix="person")
public class Person {

    private String firstName;
    private String lastName;
    private int age;

    public void setFirstName(String firstName) {
        this.firstName = firstName;
    }

    public void setLastName(String lastName) {
        this.lastName = lastName;
    }

    public void setAge(int age) {
        this.age = age;
    }

    public void hello() {
        System.out.println(firstName + " " + lastName + " : " + age);
    }
}
package sample.springboot;

import org.springframework.boot.SpringApplication;
import org.springframework.boot.autoconfigure.SpringBootApplication;
import org.springframework.boot.context.properties.EnableConfigurationProperties;
import org.springframework.context.ConfigurableApplicationContext;

@SpringBootApplication
@EnableConfigurationProperties
public class Main {

    public static void main(String[] args) {
        try (ConfigurableApplicationContext ctx = SpringApplication.run(Main.class, args)) {
            Person person = ctx.getBean(Person.class);
            person.hello();
        }
    }
}
Sato Taro : 18
-
@ConfigurationPropertiesを使うことで、特定のプレフィックスを持つプロパティたちを Bean にマッピングできる。- Bean にはセッターメソッドが必要になる。
- フィールドの名前は、キャメルケース以外にもハイフン区切りやスネークケースでもマッピングしてくれる。
- この仕組を有効にするには、
@EnableConfigurationPropertiesアノテーションを追加する必要がある。- 厳密には、
@Configurationでアノテートされたクラスに追加する。
- 厳密には、
Yaml を使用する
設定ファイルを application.yaml にすれば、 Yaml が使用できる。
aaa:
    bbb:
        ccc: Hoge
        ddd: Fuga
    eee:
        fff: Piyo
package sample.springboot;

import org.springframework.beans.factory.annotation.Value;
import org.springframework.boot.SpringApplication;
import org.springframework.boot.autoconfigure.SpringBootApplication;
import org.springframework.context.ConfigurableApplicationContext;

@SpringBootApplication
public class Main {

    public static void main(String[] args) {
        try (ConfigurableApplicationContext ctx = SpringApplication.run(Main.class, args)) {
            Main m = ctx.getBean(Main.class);
            m.hello();
        }
    }

    @Value("${aaa.bbb.ccc}") private String ccc;
    @Value("${aaa.bbb.ddd}") private String ddd;
    @Value("${aaa.eee.fff}") private String fff;

    public void hello() {
        System.out.println("ccc=" + ccc);
        System.out.println("ddd=" + ddd);
        System.out.println("fff=" + fff);
    }
}
ccc=Hoge
ddd=Fuga
fff=Piyo
リストをマッピングする
myconf:
    list:
        - hoge
        - fuga
        - piyo
package sample.springboot;

import java.util.List;

import org.springframework.boot.context.properties.ConfigurationProperties;
import org.springframework.stereotype.Component;

@Component
@ConfigurationProperties(prefix="myconf")
public class MyConfig {

    private List<String> list;

    public List<String> getList() {
        return list;
    }

    public void setList(List<String> list) {
        this.list = list;
    }
}
package sample.springboot;

import org.springframework.boot.SpringApplication;
import org.springframework.boot.autoconfigure.SpringBootApplication;
import org.springframework.boot.context.properties.EnableConfigurationProperties;
import org.springframework.context.ConfigurableApplicationContext;

@SpringBootApplication
@EnableConfigurationProperties
public class Main {

    public static void main(String[] args) {
        try (ConfigurableApplicationContext ctx = SpringApplication.run(Main.class, args)) {
            MyConfig conf = ctx.getBean(MyConfig.class);
            System.out.println(conf.getList());
        }
    }
}
[hoge, fuga, piyo]
- Bean へのマッピングを利用すれば、 List へのマッピングも可能になる。
プロパティファイル以外から設定値を渡す
package sample.springboot;

import org.springframework.beans.factory.annotation.Value;
import org.springframework.boot.SpringApplication;
import org.springframework.boot.autoconfigure.SpringBootApplication;
import org.springframework.context.ConfigurableApplicationContext;

@SpringBootApplication
public class Main {

    public static void main(String[] args) {
        try (ConfigurableApplicationContext ctx = SpringApplication.run(Main.class, args)) {
            Main m = ctx.getBean(Main.class);
            m.hello();
        }
    }

    @Value("${value}") private String value;

    public void hello() {
        System.out.println("value=" + value);
    }
}
コマンドライン引数
$ java -jar build/libs/spring-boot-sample.jar --value=commandline

value=commandline
-
--<プロパティ名>=<値>で、コマンドライン引数から設定値を渡せる。
Java のシステムプロパティ
$ java -Dvalue=systemproperty -jar build/libs/spring-boot-sample.jar

value=systemproperty
-
--D<プロパティ名>=<値>で、システムプロパティから設定値を渡せる。
OS の環境変数
$ set value=osenvironment

$ java -jar build/libs/spring-boot-sample.jar

value=osenvironment
- ※OS は Windows です。
デフォルトプロパティ
package sample.springboot;

import java.util.HashMap;
import java.util.Map;

import org.springframework.beans.factory.annotation.Value;
import org.springframework.boot.SpringApplication;
import org.springframework.boot.autoconfigure.SpringBootApplication;
import org.springframework.context.ConfigurableApplicationContext;

@SpringBootApplication
public class Main {

    public static void main(String[] args) {
        Map<String, Object> properties = new HashMap<>();
        properties.put("value", "default property");

        SpringApplication app = new SpringApplication(Main.class);
        app.setDefaultProperties(properties);

        try (ConfigurableApplicationContext ctx = app.run(args)) {
            Main m = ctx.getBean(Main.class);
            m.hello();
        }
    }

    @Value("${value}") private String value;

    public void hello() {
        System.out.println("value=" + value);
    }
}
value=default property
-
SpringApplication#setDefaultProperties(Map<String, Object>)で、デフォルトの設定を指定できる。
優先順位
プロパティファイルの場合と同じように、設定値の渡し方には優先順位があり、優先度が上位の方法が、下位の方法で指定された設定値を上書きする。
優先順位は以下のようになっている。
- コマンドライン引数
- JNDI の
java:comp/envから取得した属性 - システムプロパティ
- OS の環境変数
- jar の外にあるプロファイル指定されたプロパティファイル
- jar の中にあるプロファイル指定されたプロパティファイル
- jar の外にあるプロパティファイル
- jar の中にあるプロパティファイル
-
@PropertySourceで指定されたプロパティファイル - デフォルトプロパティ
数字が小さいほうが、優先度が高い。
メール送信
Gmail を使ってメールを送信してみる。
アプリパスワードの生成
2段階認証を有効にしている場合は、先にアプリパスワードを生成しておく必要がある。
依存 jar を取得する
Java Mail と JavaBeans Activation Framework をダウンロードしてくる。
依存関係の追加
dependencies {
    compile 'org.springframework.boot:spring-boot-starter'
+   compile 'org.springframework.boot:spring-boot-starter-mail'
+   compile fileTree(dir: 'libs', include: '*.jar')
}
|-build.gradle
|-libs/
|  |-activation.jar
|  `-javax.mail.jar
`-src/
実装
spring.mail.host=smtp.gmail.com
spring.mail.port=587
spring.mail.username=<Gmail のアドレス>
spring.mail.password=<パスワード※>
spring.mail.properties.mail.smtp.auth=true
spring.mail.properties.mail.smtp.starttls.enable=true
※2段階認証を有効にしている場合は「アプリパスワード」を、そうでない場合は普通のログインパスワードを設定する
package sample.springboot;

import org.springframework.beans.factory.annotation.Autowired;
import org.springframework.boot.SpringApplication;
import org.springframework.boot.autoconfigure.SpringBootApplication;
import org.springframework.context.ConfigurableApplicationContext;
import org.springframework.mail.MailSender;
import org.springframework.mail.SimpleMailMessage;

@SpringBootApplication
public class Main {

    public static void main(String[] args) {
        try (ConfigurableApplicationContext ctx = SpringApplication.run(Main.class, args)) {
            ctx.getBean(Main.class).sendMail();
        }
    }

    @Autowired
    private MailSender sender;

    public void sendMail() {
        SimpleMailMessage msg = new SimpleMailMessage();

        msg.setFrom("test@mail.com");
        msg.setTo("宛先メールアドレス");
        msg.setSubject("Send mail from Spring Boot");
        msg.setText("Spring Boot からメールを送信するよ!");

        this.sender.send(msg);
    }
}
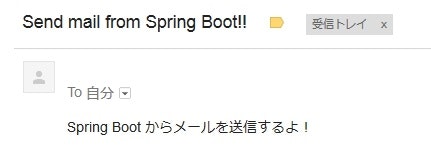
受信結果
ロギング
ロギングには、 Commons Logging, Log4j, Slf4j, Logback などなど色々使えるようになっているっぽい。
package sample.springboot;

import org.slf4j.Logger;
import org.slf4j.LoggerFactory;
import org.springframework.boot.SpringApplication;
import org.springframework.boot.autoconfigure.SpringBootApplication;
import org.springframework.boot.context.properties.EnableConfigurationProperties;
import org.springframework.context.ConfigurableApplicationContext;

@SpringBootApplication
@EnableConfigurationProperties
public class Main {

    private static final Logger logger = LoggerFactory.getLogger(Main.class);

    public static void main(String[] args) {
        try (ConfigurableApplicationContext ctx = SpringApplication.run(Main.class, args)) {
            logger.error("error log");
            logger.warn("warn log");
            logger.info("info log");
            logger.debug("debug log");
            logger.trace("trace log");
        }
    }
}
2015-04-29 17:31:25.023 ERROR 8872 --- [           main] sample.springboot.Main                   : error log
2015-04-29 17:31:25.023  WARN 8872 --- [           main] sample.springboot.Main                   : warn log
2015-04-29 17:31:25.023  INFO 8872 --- [           main] sample.springboot.Main                   : info log
- デフォルトでは、 INFO レベル以上だけが出力される。
- フォーマットは、
日付 エラーレベル PID --- [スレッド名] ロガー名 : ログメッセージ。
ファイルに出力する
デフォルトでは標準出力にしかログが出力されないが、ログファイルを指定すればファイルにも出力されるようになる。
ログファイルは、 10MB ずつローテーションされる。
ファイル名指定
$ java -jar build/libs/spring-boot-sample.jar --logging.file=sample.log

$ dir /b *.log
sample.log
-
logging.fileで、出力するファイルの名前を指定できる。- 便宜上コマンドライン引数で指定しているが、プロパティファイル などでも指定できる。
- ファイルの出力先にディレクトリが存在しない場合は、勝手に作成される。
フォルダ指定
$ java -jar build/libs/spring-boot-sample.jar --logging.path=logs

$ dir /b logs
spring.log
-
logging.pathで、ログファイルの出力先を指定できる。 - ログファイルの名前は、
spring.logになる。 - ディレクトリが存在しない場合は勝手に作成される。
ロガーごとにログレベルを指定する
$ java -jar build/libs/spring-boot-sample.jar --logging.level.sample.springboot.Main=TRACE

2015-04-29 18:14:17.969 ERROR 8288 --- [           main] sample.springboot.Main                   : error log
2015-04-29 18:14:17.970  WARN 8288 --- [           main] sample.springboot.Main                   : warn log
2015-04-29 18:14:17.970  INFO 8288 --- [           main] sample.springboot.Main                   : info log
2015-04-29 18:14:17.970 DEBUG 8288 --- [           main] sample.springboot.Main                   : debug log
2015-04-29 18:14:17.970 TRACE 8288 --- [           main] sample.springboot.Main                   : trace log
-
logging.level.<ロガー>=<ログレベル>で、ロガーごとのログレベルを指定できる。 - ロガー名が FQCN になるようにしているなら、
--logging.level.sample.springboot=DEBUGのようにしてパッケージ単位での指定もできる。
エンドポイント
spring-boot-starter-actuator を依存関係に追加すると、システムの状態を Web API で取得できるようになる。
dependencies {
    compile 'org.springframework.boot:spring-boot-starter-web'
    compile 'org.springframework.boot:spring-boot-starter-actuator'
}
package sample.springboot;

import org.springframework.boot.SpringApplication;
import org.springframework.boot.autoconfigure.SpringBootApplication;

@SpringBootApplication
public class Main {

    public static void main(String[] args) throws Exception {
        SpringApplication.run(Main.class, args);
    }
}
アプリケーションを起動して、いくつかの URL にアクセスしてみる。
$ curl http://localhost:8080/health
{"status":"UP"}

$ curl http://localhost:8080/metrics
{"mem":253440,"mem.free":127785,"processors":8,"instance.uptime":51033,"uptime":53546,"systemload.average":-1.0,"heap.committed":253440,"heap.init":262144,"heap.used":125654,"heap":3717632,"threads.peak":16,"threads.daemon":14,"threads":16,"classes":5490,"classes.loaded":5490,"classes.unloaded":0,"gc.ps_scavenge.count":3,"gc.ps_scavenge.time":39,"gc.ps_marksweep.count":1,"gc.ps_marksweep.time":44,"httpsessions.max":-1,"httpsessions.active":0,"counter.status.200.health":1,"counter.status.200.metrics":1,"gauge.response.health":47.0,"gauge.response.metrics":23.0}
以下が、エンドポイントの一例。
| id | 説明 |
|---|---|
dump |
スレッドダンプ |
env |
システムプロパティ・環境変数・プロパティファイルの設定値など |
health |
アプリケーションの状態 |
metrics |
メモリ使用率やスレッド数、 GC 回数などなど |
trace |
最近のアクセス履歴 |
shutdown |
POST メソッドでアクセスすることで、アプリケーションを停止できる。デフォルトは無効。 |
他にも いろいろある。
その他
起動時のバナーを表示させないようにする
1.3.2 で確認
package sample.springboot;

import org.springframework.boot.Banner;
import org.springframework.boot.SpringApplication;
import org.springframework.boot.autoconfigure.SpringBootApplication;
import org.springframework.context.ConfigurableApplicationContext;

@SpringBootApplication
public class Main {

    public static void main(String[] args) {
        SpringApplication app = new SpringApplication(Main.class);
        app.setBannerMode(Banner.Mode.OFF);

        try (ConfigurableApplicationContext ctx = app.run(args)) {
            Main m = ctx.getBean(Main.class);
            m.hello();
        }
    }

    public void hello() {
        System.out.println("Hello Spring Boot!!");
    }
}
-
SpringApplication#setBannerMode(Banner.Mode)にBanner.Mode.OFFを設定すると、バナー表示がなくなる。
war で出力する
war で出力して、 Tomcat などの既存の AP サーバーにデプロイできるようにする。
実装
buildscript {
    repositories {
        mavenCentral()
    }
    dependencies {
        classpath 'org.springframework.boot:spring-boot-gradle-plugin:1.2.5.RELEASE'
    }
}

apply plugin: 'war'
apply plugin: 'spring-boot'

sourceCompatibility = '1.8'
targetCompatibility = '1.8'

repositories {
    mavenCentral()
}

dependencies {
    compile 'org.springframework.boot:spring-boot-starter-web'
    providedCompile 'org.springframework.boot:spring-boot-starter-tomcat'
}

war {
    baseName = 'spring-boot-war'
}
-
warプラグインを読み込む。 - デフォルトで組み込みサーバーとして使用している Tomcat の依存関係を
providedCompileに変更。
package sample.springboot;

import org.springframework.boot.SpringApplication;
import org.springframework.boot.autoconfigure.SpringBootApplication;
import org.springframework.boot.builder.SpringApplicationBuilder;
import org.springframework.boot.context.web.SpringBootServletInitializer;

@SpringBootApplication
public class Main extends SpringBootServletInitializer {

    @Override
    protected SpringApplicationBuilder configure(SpringApplicationBuilder application) {
        return application.sources(Main.class);
    }

    public static void main(String[] args) {
        SpringApplication.run(Main.class, args);
    }
}
- main メソッドを定義していたクラスは、以下のように修正する。
-
SpringBootServletInitializerを継承する。 -
configure(SpringApplicationBuilder)をオーバーライドする。
-
package sample.springboot;

import org.springframework.web.bind.annotation.RequestMapping;
import org.springframework.web.bind.annotation.RequestMethod;
import org.springframework.web.bind.annotation.RestController;

@RestController
@RequestMapping("/sample")
public class SampleResource {

    @RequestMapping(method=RequestMethod.GET)
    public String hello() {
        return "Hello Spring Boot!!";
    }
}
- 動作確認用のリソースクラス。
動作確認
$ gradle war
build/libs の下に spring-boot-war.jar が出力されるので、 Tomcat にデプロイする。
$ curl http://localhost:8080/spring-boot-war/sample
Hello Spring Boot!!
割と簡単に war 化できた。
参考
- 59.4 Packaging executable jar and war files | Spring Boot Reference Guide
- 74.1 Create a deployable war file | Spring Boot Reference Guide
- Spring BootアプリケーションをビルドしてWARファイルにする - M12i.
限定子
Boot というよりかは、 Spring 自体の使い方。
Spring にも CDI の限定子と同じようなものが用意されている。
名前で指定する
実装
package sample.springboot;

public interface MyInterface {
}
package sample.springboot;

import org.springframework.beans.factory.annotation.Qualifier;
import org.springframework.stereotype.Component;

@Component
@Qualifier("hoge")
public class Hoge implements MyInterface {
}
package sample.springboot;

import org.springframework.beans.factory.annotation.Qualifier;
import org.springframework.stereotype.Component;

@Component
@Qualifier("fuga")
public class Fuga implements MyInterface {
}
package sample.springboot;

import org.springframework.beans.factory.annotation.Autowired;
import org.springframework.beans.factory.annotation.Qualifier;
import org.springframework.boot.SpringApplication;
import org.springframework.boot.autoconfigure.SpringBootApplication;
import org.springframework.context.ConfigurableApplicationContext;

@SpringBootApplication
public class Main {

    public static void main(String[] args) {
        try (ConfigurableApplicationContext context = SpringApplication.run(Main.class, args)) {
            Main m = context.getBean(Main.class);
            System.out.println("hoge = " + m.hoge.getClass());
            System.out.println("fuga = " + m.fuga.getClass());
        }
    }

    @Autowired @Qualifier("hoge")
    private MyInterface hoge;

    @Autowired @Qualifier("fuga")
    private MyInterface fuga;
}
動作確認
hoge = class sample.springboot.Hoge
fuga = class sample.springboot.Fuga
説明
-
@Qualifierアノテーションを使って、ビーンの名前を指定できる。 -
@Autowiredと合わせて@Qualifierで名前を指定することで、特定のビーンをインジェクションできる。 - CDI でいうと
@Named的な使い方になる。
限定子を自作する
実装
package sample.springboot;

import java.lang.annotation.ElementType;
import java.lang.annotation.Retention;
import java.lang.annotation.RetentionPolicy;
import java.lang.annotation.Target;

import org.springframework.beans.factory.annotation.Qualifier;

@Qualifier
@Retention(RetentionPolicy.RUNTIME)
@Target({ElementType.FIELD, ElementType.TYPE})
public @interface MyQualifier {
    MyType value();
}
package sample.springboot;

public enum MyType {
    HOGE,
    FUGA,
}
package sample.springboot;

import org.springframework.stereotype.Component;

@Component
@MyQualifier(MyType.HOGE)
public class Hoge implements MyInterface {
}
package sample.springboot;

import org.springframework.stereotype.Component;

@Component
@MyQualifier(MyType.FUGA)
public class Fuga implements MyInterface {
}
package sample.springboot;

import org.springframework.beans.factory.annotation.Autowired;
import org.springframework.boot.SpringApplication;
import org.springframework.boot.autoconfigure.SpringBootApplication;
import org.springframework.context.ConfigurableApplicationContext;

@SpringBootApplication
public class Main {

    public static void main(String[] args) {
        try (ConfigurableApplicationContext context = SpringApplication.run(Main.class, args)) {
            Main m = context.getBean(Main.class);
            System.out.println("hoge = " + m.hoge.getClass());
            System.out.println("fuga = " + m.fuga.getClass());
        }
    }

    @Autowired @MyQualifier(MyType.HOGE)
    private MyInterface hoge;

    @Autowired @MyQualifier(MyType.FUGA)
    private MyInterface fuga;
}
動作確認
hoge = class sample.springboot.Hoge
fuga = class sample.springboot.Fuga
説明
-
@Qualifierで自作のアノテーションをアノテートすることで、限定子を自作できる。 - CDI のカスタム限定子と同じ要領で使えるっぽい。
参考
- Getting Started · Building an Application with Spring Boot
- Spring Boot Reference Guide
- Amazon.co.jp: はじめてのSpring Boot―「Spring Framework」で簡単Javaアプリ開発 (I・O BOOKS): 槇 俊明: 本
- Spring関連の訳出記事まとめ - M12i.
- BootstrapやjQueryをWebJarsで簡単管理 - DENの思うこと
- Spring Data JPA - Reference Documentation
- Spring Framework Reference Documentation
- どこよりも早い Spring Boot 1.2 解説 #渋谷Java