Auto Layout勘所
1.まず基礎を学ぶ
参考:iOS 7 Xcode 5 で始める Auto Layout 入門 #1 – 基礎知識編
2.viewのcontentSizeは、viewDidLayoutSubviewsで決まる
参考:UIScrollviewをStoryboardで設定する場合
やっぱり標準Document
- 赤色が駄目制約とかを学ぶ、点線が優先度低い制約
- ScrollViewに気をつけろ
- Debugの仕方について学ぶ
Top Layout Guide,Bottom Layout Guideに注意する。
ナビゲーションバーの高さは、iOS6で44px, iOS7で64px
4inch,3.5inchの対応について - 最大値と最小値を使う
参考:iOSアプリを作ってみる (8) - Autolayoutに振り回される その1
Autolayout に対応した画面で UIScrollView を使う時のコツ
Debug用
	-(void)viewDidLayoutSubviews{
       NSLog(@"%@",NSStringFromCGRect(self.scrollView.frame));
       NSLog(@"%@",NSStringFromCGRect(self.webView.frame));
       [super viewDidLayoutSubviews];
	}
合わして読みたい
Adjust Scroll View InsetsとUnder Top Bar/Under Bottom Bar
追記【高さの座標まとめ】
| iphone4s | iphone5/5s | iphone6 | iphone6 Plus
------------ | ------------- | ------------ | ------------ | ------------
論理上のピクセル | 320 x 480 | 320 x 568 | 375 x 667 | 414 x 736
NavigationBar(64) | 416 | 504 | 603 | 672
Tab Bar Item(49) | 431 | 519 | 618 | 687
NBar and TBar(113) | 367 | 455 | 554 | 623
図を書いた方がいいな...orz
追記1
self.automaticallyAdjustsScrollViewInsets = NO;//コレ何やねん1
Default value is YES, which allows the view controller to adjust its scroll view insets in response to the screen areas consumed by the status bar, navigation bar, and toolbar or tab bar. Set to NO if you want to manage scroll view inset adjustments yourself, such as when there is more than one scroll view in the view hierarchy.
→NavigationVCをラップしたVCの中の、ScrollViewがちゃんと動かん時??配置されない時にこいつをNOにしよう
→Insetsとは余白のこと
self.scrollView.translatesAutoresizingMaskIntoConstraints=YES,NO//コレ何やねん2
UIViewのpropertyから抜粋
UIView
@property(nonatomic) UIViewAutoresizing autoresizingMask
Description
An integer bit mask that determines how the receiver resizes itself when its
superview’s bounds change
Maskってなんですかね
UIViewのランドスケープの為のプロパティ!autoresizingMask にだまされた!
右下に固定させるためには、
label.autoresizingMask = UIViewAutoresizingFlexibleTopMargin | UIViewAutoresizingFlexibleLeftMargin;
これで、上と左の幅だけをリサイズ。つまり右と下の幅は固定。
→superViewの変化を吸収して、Resizeしてくれる
→例えば,xibでYESにすると、_可変なView_が出来ます。
- AutoLayout だけで作るか AutoResizingMask を組み合わせるか
追記2 UIScrollViewはAutoLayoutを使用する際
- contentSizeをコードで代入する
self.scrollView.contentSize = self.subViewIntoScrollView.bounds.size;
追記3 同じ幅のオブジェクトを等間隔に設置したい
spaceViewを設置するのはしっくり来なかった。
→aspect ratioとheightやwidthの制約をつける
追記4-1 UILabelについて, prefferdWidthってなにそれ
numberOfLinesプロパティにて、2行以上の文字を入れたい時に好ましい幅を設定しとかないと文字数増える潰れてHelloWor...等になり、辛いよねって話
追記4-2 UILabelについて、AutoShrinkってなにそれ
UILabelのFrameによってFontをResizeしたいではなかろうか。
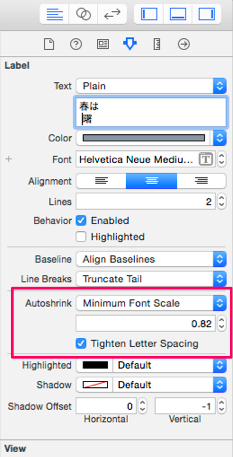
- [Automatically adjusting UILabel fontsize](Automatically adjusting UILabel fontsize): 最小Sizeを指定し、Frameが大きくなった時一緒にFontも大きくなってくれる。
- Tighten Letter Spancing...?「UIKitを使いこなそう(iOS7編)」 ーiOSアプリの正しいユーザインターフェイス構築のためにー(2)
目一杯縮小してもはみ出てしまう場合は、「Line Breaks」の指定にしたがって表示されます。なお、この「Autoshrink」欄にある「Tighten Letter Spacing」項目はオフにしておきましょう。縮小時に文字間隔を詰める設定ですが、関連するメソッドがiOS7で非推奨になっているので、触れないほうが良さそうです。なぜXcode5のStoryboardに残っているのかは不明です。
-
他にも細かい点
-
adjustsFontSizeToFitWidth: こいつはnumberOfLinesが1行の時しか動きません- コードでFontSize指定してたら出来ないので注意
-
追記5 AutoLayoutDebugの秘奥義 View Hierarchy Debug