概要
fluentdでログ転送&収集を行い、
Elasticsearchでデータを保存し、
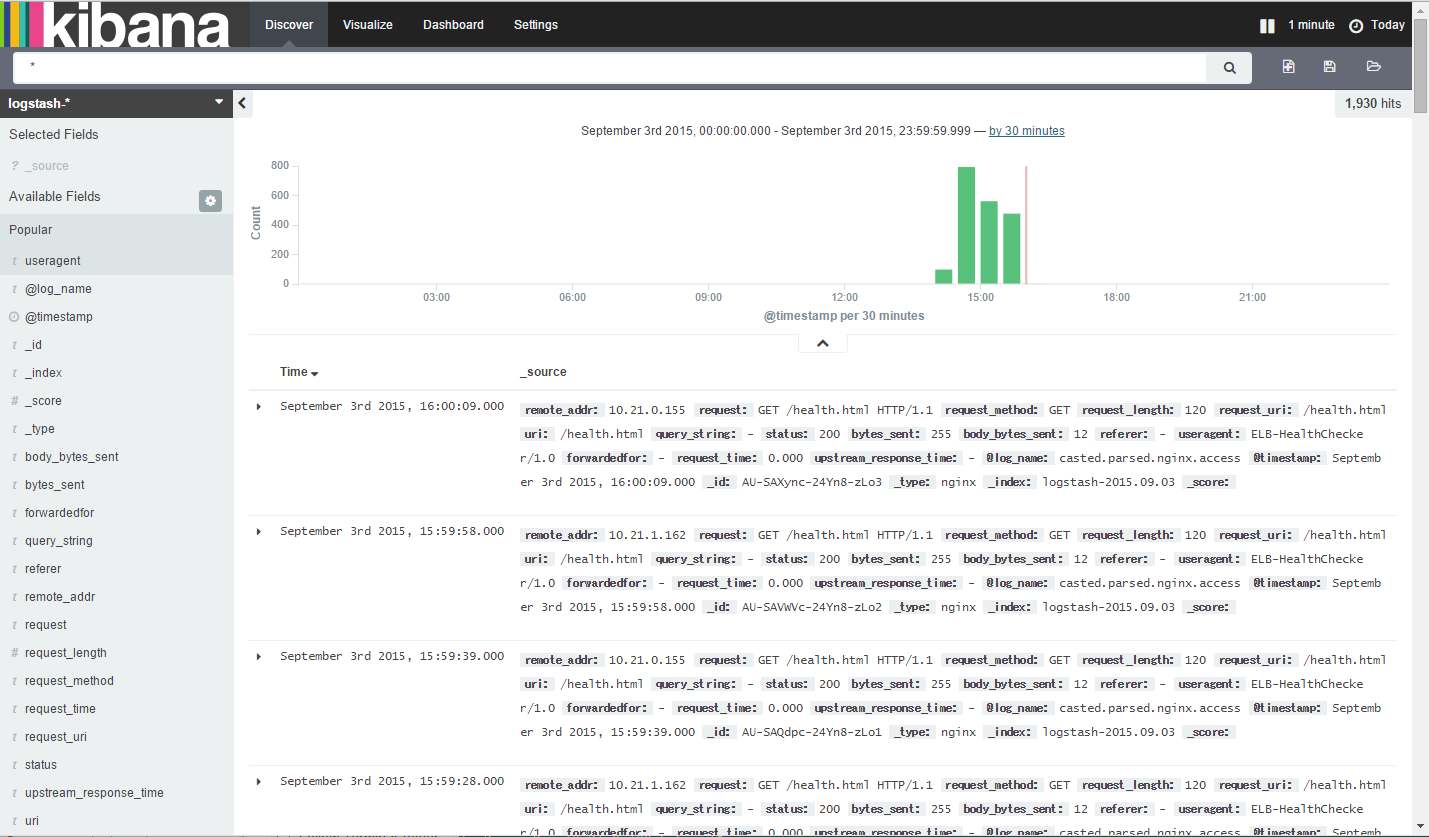
kibanaでデータの可視化を行う。
サーバー構成
-
APIサーバー(複数台)
【nginx】→【fluentd】→ログ収集サーバーへ転送 -
ログ集約サーバー(兼 解析サーバー)
APIサーバーから転送→【fluentd】→【Elasticsearch】⇔【kibana】
サーバー設定
APIサーバー
nginx
nginxはインストール済みとする。
nginxのアクセスログをltsvフォーマットにする
log_format  ltsv  'time:$time_iso8601\t'
                      'remote_addr:$remote_addr\t'
                      'request:$request\t'
                      'request_method:$request_method\t'
                      'request_length:$request_length\t'
                      'request_uri:$request_uri\t'
                      'uri:$uri\t'
                      'query_string:$query_string\t'
                      'status:$status\t'
                      'bytes_sent:$bytes_sent\t'
                      'body_bytes_sent:$body_bytes_sent\t'
                      'referer:$http_referer\t'
                      'useragent:$http_user_agent\t'
                      'forwardedfor:$http_x_forwarded_for\t'
                      'request_time:$request_time\t'
                      'upstream_response_time:$upstream_response_time';

access_log  logs/api.access.log  ltsv;
fluentd
fluentdをyumでインストール
$ sudo vi /etc/yum.repos.d/treasuredata.repo
[treasuredata]
name=TreasureData
baseurl=http://packages.treasure-data.com/redhat/$basearch
gpgcheck=0
$ sudo yum install td-agent
$ sudo chkconfig td-agent on
fluentdのプラグインをインストール
$ sudo /usr/lib64/fluent/ruby/bin/fluent-gem update
$ sudo /usr/lib64/fluent/ruby/bin/fluent-gem install
fluentdの設定
$ sudo vi /etc/td-agent/td-agent.conf
# アクセスログの取得
<source>
    type tail

    # 自動で作成されないので作成しておく必要あり。でないと起動エラーになる
    path /usr/local/nginx/logs/api.access.log

    pos_file /var/log/td-agent/buffer/api.access.log.pos

    # ここではltsvでなくnoneとする。集約サーバー側でltsvとして受け取るため。
    format none

    tag nginx.access
</source>

# 集約サーバーへ送信
<match *.**>
  type forward
  retry_limit 5
  flush_interval 5s
  <server>
    host 10.100.10.100   # <- 集約サーバーのIPアドレス(ここではローカルIP)
    port 24224
  </server>
</match>
pos_fileの作成
$ cd /var/log/td-agent
$ sudo mkdir buffer
$ sudo touch /var/log/td-agent/buffer/api.access.log.pos
$ sudo chmod 777 /var/log/td-agent/buffer/api.access.log.pos
fluentd起動
$ sudo /etc/init.d/td-agent start

# 必ずstatusで起動状態を確認する
$ sudo /etc/init.d/td-agent status
td-agent (pid  20332) is running...
集約サーバー
EC2
AWS:EC2の場合、セキュリティグループで
TCPおよびUDPの24224ポートを許可しておく必要あり。
これはfluentdで使われる。
また、kibanaではTCPの5601を使うので、
それも許可しておくこと。
fluentd
fluentdをyumでインストール
※上記のAPIサーバー側と同様。
fluentdのプラグインをインストール
$ sudo /usr/lib64/fluent/ruby/bin/fluent-gem install fluent-plugin-filter
$ sudo /usr/lib64/fluent/ruby/bin/fluent-gem install fluent-plugin-forest
$ sudo /usr/lib64/fluent/ruby/bin/fluent-gem install fluent-plugin-config-expander
$ sudo /usr/lib64/fluent/ruby/bin/fluent-gem install fluent-plugin-elasticsearch
$ sudo /usr/lib64/fluent/ruby/bin/fluent-gem install fluent-plugin-typecast
$ sudo /usr/lib64/fluent/ruby/bin/fluent-gem install fluent-plugin-parser

$ sudo yum install gcc-c++ libcurl-devel
$ sudo /usr/lib64/fluent/ruby/bin/fluent-gem install fluent-plugin-elasticsearch
fluentdの設定
$ sudo vi /etc/td-agent/td-agent.conf
# ログの受信
<source>
  type forward
  port 24224
</source>

# 1) Elasticsearch用にパース処理
<match nginx.access>
  type copy

  <store>
    type parser
    format ltsv
    time_key time
    time_format %Y-%m-%dT%H:%M:%S%:z
    add_prefix parsed
    key_name message
  </store>

  # debug時のみ
  <store>
    type stdout
  </store>

</match>

# パースしたデータをintegerにキャストする
<match parsed.nginx.access>
  type typecast
  item_types request_length:integer, status:integer, bytes_sent:integer, body_bytes_sent:integer, request_time:integer, upstream_response_time:integer
  prefix casted
</match>

# パース・キャスト済みのデータをElasticsearchへ格納する
<match casted.parsed.nginx.access>
  type_name nginx
  type elasticsearch
  include_tag_key true
  tag_key @log_name
  host localhost
  port 9200
  logstash_format true
  flush_interval 10s
  buffer_type file
  buffer_path /var/log/td-agent/buffer/casted.nginx.access.buffer
</match>
Elasticsearch
Elasticsearchインストール
ver 1.7.1
※yumでインストールすると、起動後すぐ
elasticsearch dead but subsys locked
となり、lockファイル削除して再度トライしても同様。
tar.gz版をDLしてそれを使用することにする。
$ cd /var/www
$ sudo wget https://download.elastic.co/elasticsearch/elasticsearch/elasticsearch-1.7.1.tar.gz
$ sudo tar zxvf elasticsearch-1.7.1.tar.gz
ver 2.0.0
$ sudo yum -y install https://download.elasticsearch.org/elasticsearch/release/org/elasticsearch/distribution/rpm/elasticsearch/2.0.0-beta1/elasticsearch-2.0.0-beta1.rpm
$ sudo chkconfig elasticsearch on
メモリ設定
$ sudo vim /etc/sysconfig/elasticsearch
ES_HEAP_SIZE=1g # とりあえず。EC2のスペックによりけり。
Elasticsearch起動
# 1.7.1
$ sudo /var/www/elasticsearch-1.7.1/bin/elasticsearch &

# 2.0.0
$ sudo /etc/init.d/elasticsearch start
起動確認
$ curl -X GET http://localhost:9200/
以下のようなJSONが返ってくればOK。
{
  "name" : "Jumbo Carnation",
  "cluster_name" : "elasticsearch",
  "version" : {
    "number" : "2.0.0-beta1",
    "build_hash" : "bfa3e47383d0adc690329a2fa1094ceb64cae651",
    "build_timestamp" : "2015-08-24T08:41:25Z",
    "build_snapshot" : false,
    "lucene_version" : "5.2.1"
  },
  "tagline" : "You Know, for Search"
}
Elasticsearchのデータはどんどん溜まっていくので、
定期的に削除が必要になる。
Curatorを使うと便利。
pipインストール
$ curl https://bootstrap.pypa.io/get-pip.py | sudo python
Curatorインストール
Elasticsearch 2.0.0は未対応。
$ sudo pip install elasticsearch-curator
$ curator --version
例)
30日たったら Close して、60日たったら削除するというのは以下のコマンドでできます。
$ curator --host localhost close indices --prefix logstash --older-than 30 --time-unit days --timestring %Y.%m.%d
$ curator --host localhost delete indices --prefix logstash --older-than 60 --time-unit days --timestring %Y.%m.%d
kibana
kibanaインストール
ver 4.1.1
$ cd /var/www/
$ sudo wget https://download.elastic.co/kibana/kibana/kibana-4.1.1-linux-x64.tar.gz
$ sudo tar zxvf kibana-4.1.1-linux-x64.tar.gz
$ sudo mv kibana-4.1.1-linux-x64 kibana
$ sudo chown -Rf ec2-user:ec2-user kibana
ver 4.2.0
$ cd /var/www/
$ sudo wget https://download.elastic.co/kibana/kibana/kibana-4.2.0-beta1-linux-x64.tar.gz
$ sudo tar zxvf kibana-4.2.0-beta1-linux-x64.tar.gz
$ sudo mv kibana-4.2.0-beta1-linux-x64 kibana
$ sudo chown -Rf ec2-user:ec2-user kibana
kibana設定
$ cd /var/www/kibana/
$ vi config/kibana.yml
elasticsearch.url: "http://localhost:9200"
kibana起動
$ /var/www/kibana/bin/kibana &
ブラウザでkibanaを開く
http://****:5601/
BASIC認証設定
nginxでプロキシ転送して見ることにする。
5601ポートはローカルからしか見ないので、
セキュリティグループから削除しておく。
upstream kibana {
  server 127.0.0.1:5601 fail_timeout=0;
}

server {
  listen 80;
  server_name kibana.example.com;

  location / {
    auth_basic "Restricted";
    auth_basic_user_file /path/to/.htpasswd;
    proxy_pass http://kibana;
  }
}
nginxを再起動して、閲覧できたら完了。
