背景
今日ではコンテナのDockerはよく使われるようになって来て日本語情報も増えています。
自分が2年ほど前に地元でDocker勉強会でやってた状況とは変わって来てますので、updateを兼ねた再入門を紹介して行きます。
なお、Dockerのコンテナ周辺状況は日々新しい技術が開発されている状況ですので、常に最新の情報収集と学習が欠かせません。ここの紹介も2016年時点での状況です。
※2016年11月26日(土曜日)に勉強会を開催します。
Docker 再入門 2016 update @長野県塩尻市
Docker入門
基本的なDockerの仕組みは変わらないので、入門知識は地元で実施したDocker勉強会の過去資料を考慮した前提で紹介します。情報が古いですがdockerコマンドの使い方とか基本的なことは過去資料を参照してください。
Docker 入門 (SlideShare)
動作環境
- ThinkPad X200s OS:Linux MINT 18
- ThinkPad X1 Carbon OS:Windows 10 Pro (Hyper-V)
個人的に開発環境のOSはLinuxなので、MacOSやWindowsについては優先度が低いのでご了承ください。
Windows10については後日追加で検証予定。
Windows10でのDocker for Windwosを追加記載。
Docker Engineインストール
Dockerは基本的にLinux 64bit環境にて動作しますが、MacOSやWindowsでもVirtualBoxのVM環境下で動作させるツールがあります。
Linuxの場合
LinuxでDockerをインストールする方法は2つあります。Dockerのセットアップ用スクリプトを使用する方法と、ディストリビューションのパッケージを利用する方法です。
以前はディストリビューションのパッケージではバージョンが古かったりしていましたが、今日ではそれなりに追随するようです。
常に最新版を利用するには、Dockerのセットアップ用スクリプトを使用します。
インストール方法の詳細は公式ドキュメントを参照
Install Docker Engine on Linux(docker.com)
Dockerのセットアップ用スクリプトを使用する場合
超簡単!コマンド1つでインストール出来ます。
$ curl -fsSL https://get.docker.com/ | sh
ところが、curlコマンドが無かったりsudo権限での動作とか環境によってはコマンドに細工が要る場合があります。
初心者はここで応用が出来なくて挫折する事もあるかもしれません。
ディストリビューションのパッケージを使用する場合
パッケージ管理システムを利用した方が簡単な場合もありますので、代表的なCentOSとUbuntuの場合を紹介します。
基本的にはリポジトリを登録してパッケージをインストールするだけです。
CentOS 7の場合
yumでリポジトリを最新に更新します。
$ sudo yum update
Dockerのリポジトリを追加します。
$ sudo tee /etc/yum.repos.d/docker.repo <<-'EOF'
[dockerrepo]
name=Docker Repository
baseurl=https://yum.dockerproject.org/repo/main/centos/7/
enabled=1
gpgcheck=1
gpgkey=https://yum.dockerproject.org/gpg
EOF
Docker Engineをインストールします。
$ sudo yum install docker-engine
Ubuntu 16.04の場合
aptでリポジトリを最新版に更新します。また、HTTPSの認証をインストールします。
$ sudo apt-get update
$ sudo apt-get install apt-transport-https ca-certificates
GPGの鍵を取得します。
$ sudo apt-key adv --keyserver hkp://p80.pool.sks-keyservers.net:80 --recv-keys 58118E89F3A912897C070ADBF76221572C52609D
Dockerのリポジトリファイルを作成します。
$ sudo echo "deb https://apt.dockerproject.org/repo ubuntu-xenial main" > /etc/apt/sources.list.d/docker.list
aptでリポジトリを更新して状況を確認します。
$ sudo apt-get update
$ apt-cache policy docker-engine
Docker Engineをインストールします。
$ sudo apt-get install docker-engine
Docker Engineサービスの起動と動作確認
Dockerのインストールが済んだら、Docker Engineサービスの起動と動作確認をします。
CentOS 7の場合
$ sudo systemctl enable docker.service
$ sudo systemctl start docker
$ sudo docker run --rm hello-world
Ubuntu 16.04の場合
$ sudo service docker start
$ sudo docker run hello-world
dockerコマンドとsudo
Dockerのバージョンを確認してみます。
$ docker version
ソケットファイルは一般ユーザーに書き換え権限がないため、sudoコマンドでroot権限に昇格しないと、単にdockerコマンドを実行するとエラーが表示されます。ユーザーアカウントをdockerグループに追加することで、sudoコマンドを不要に出来ます。
$ sudo gpasswd -a user docker
ここでは、-aオプションでユーザー名(user)を指定してます。適切に変えて実行してください。
グループ追加が有効になる為には一旦アカウントからログアウトして、再ログインします。
Docker Machine インストール
2015年8月にDocker Toolboxが登場して大きく状況が変わり、WindowsやMacOSではBoot2Dockerに代わりDocker Machineが推奨されています。
Docker環境の自動構築ツール、いわゆるオーケストレーションツールがこのDocker Machineです。
ローカルのVirtualboxだけではなく対応するドライバによって複数の異なる環境下でDockerが構築出来ます。
WindowsやMacOSではDocker Toolboxで一括インストール出来ますので、ここではLinux環境で単体でインストールする場合を紹介します。
Docker Machine(github)
$ curl -L https://github.com/docker/machine/releases/download/v0.8.2/docker-machine-`uname -s`-`uname -m` >/usr/local/bin/docker-machine && \
  chmod +x /usr/local/bin/docker-machine
このまま公式の例文で実行すると書き込み権限エラーになりますので、sudoで適当に補完して実行します。
バイナリの実行ファイルですので、適切なパスの通ったディレクトリにインストールして実行権限を付与してます。
コマンドを実行してバージョンと動作確認します。
$ docker-machine version
Docker for Windows
WindowsおよびMacOS環境でDockerを利用する場合には、従来ですとDocker Toolboxが用いられていました。
これは、DockerクライアントやVirtualBoxを含めた周辺ツールをまとめたものでしたが、2016年夏にリリースされたDocker for Windowsの場合では、ハイパーバイザーをVirtualBoxからHyper-Vに変えることで高速化と安定性を進めています。
ただし動作環境が最新のWindows 10 Pro が必要になり、それ以外のWindowsでは従来通りDocker Toolboxを利用します。
ここでは、Hyper-V環境のDocker for Windowsを紹介します。
Getting Started with Docker for Windows(docker.com)
詳しいインストール方法は公式ページに掲載されています。
Get Docker for Windows (stable)のボタンをクリックして実行ファイルをダウンロードして実行するだけです。
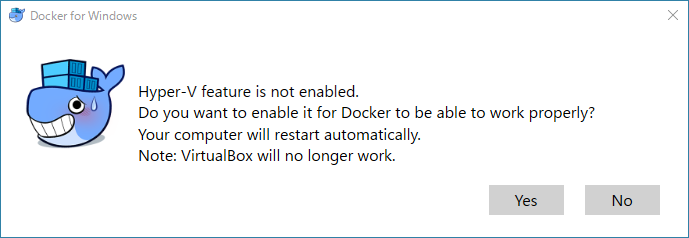
ただし、Hyper-Vを有効化する為に再起動が必要になります。
また、VirtualBoxとは併用出来ませんのでアンインストールしておきましょう。
再起動後、コマンドプロンプトを実行してDockerのバージョンを確認してみます。
C:\Users\user> docker version
Client:
 Version:      1.12.1
 API version:  1.24
 Go version:   go1.6.3
 Git commit:   23cf638
 Built:        Thu Aug 18 17:52:38 2016
 OS/Arch:      windows/amd64

Server:
 Version:      1.12.1
 API version:  1.24
 Go version:   go1.6.3
 Git commit:   23cf638
 Built:        Thu Aug 18 17:52:38 2016
 OS/Arch:      linux/amd64
動作確認でhello-worldも試してみます。
C:\Users\user> docker run hello-world
Unable to find image 'hello-world:latest' locally
latest: Pulling from library/hello-world
c04b14da8d14: Pull complete
Digest: sha256:0256e8a36e2070f7bf2d0b0763dbabdd67798512411de4cdcf9431a1feb60fd9
Status: Downloaded newer image for hello-world:latest

Hello from Docker!
This message shows that your installation appears to be working correctly.

To generate this message, Docker took the following steps:
 1. The Docker client contacted the Docker daemon.
 2. The Docker daemon pulled the "hello-world" image from the Docker Hub.
 3. The Docker daemon created a new container from that image which runs the
    executable that produces the output you are currently reading.
 4. The Docker daemon streamed that output to the Docker client, which sent it
    to your terminal.

To try something more ambitious, you can run an Ubuntu container with:
 $ docker run -it ubuntu bash

Share images, automate workflows, and more with a free Docker Hub account:
 https://hub.docker.com

For more examples and ideas, visit:
 https://docs.docker.com/engine/userguide/
Linux環境と同じようにDockerが動作していることが分かります。
