ログはアプリケーションの開発中はもちろん、運用でもとても大切な情報です。
Rails の標準機能のロギングではアクセスログやエラーログなど様々な情報が混在しています。
ログはアクセスログ・業務ログや正常系・異常系など関心事を分離して設計することが大切です。
今回はアクセスログに注目したログの入門編としてサンプルを作成しました。
Rails はスケールアウトを構成することがあるのでログは Fluentd で集めて
全文検索機能がある Elasticsearch などに登録するとよいですね。
Environment
- Ruby: v2.2.3
- Rails: v4.2.5
- Elasticsearch: v2.1.1
- Fluentd: v0.12.16
Simple Authentication
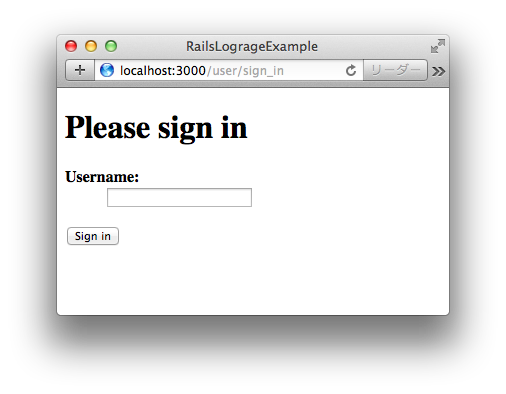
まず、ログのサンプルに単純な認証のWabアプリケーションを作ります。
Setup
-
rails newのコマンドでWabアプリケーションのプラットフォームを構築します。
$ rails new rails-lograge-example
$ cd rails-lograge-example/
-
seeds.rbにサンプルデータを準備します。
User.create_with(username: :foo).find_or_create_by(username: :foo)
User.create_with(username: :bar).find_or_create_by(username: :bar)
-
rails generateのコマンドでサインインの controller を作成します。
$ rails generate controller user/session show new
$ rails generate model user username
$ rake db:migrate
$ rake db:seed
Making
-
routes.rbにサインインのエンドポイントを記述します。
Rails.application.routes.draw do
  namespace :user do
    get    :sign_in,  to: 'session#new'
    post   :sign_in,  to: 'session#create'
    delete :sign_out, to: 'session#destroy'
  end

  root 'user/session#show'
end
-
application_controller.rbに認証の処理を記述します。
class ApplicationController < ActionController::Base
  protect_from_forgery with: :exception
  helper_method :current_user
  before_action :authenticate

  def current_user
    if session[:user_id].present?
      @current_user ||= User.find(session[:user_id])
    end
  end

  def append_info_to_payload(payload)
    super
    payload[:host] = request.host
    payload[:username] = current_user.try(:username)
  end

  private
    def authenticate
      if current_user.blank?
        session.delete :user_id
        redirect_to user_sign_in_path
      end
    end
end
-
session_controller.rbにも認証の処理を記述します。
class User::SessionController < ApplicationController
  skip_before_action :authenticate, except: :show

  def show
  end

  def new
  end

  def create
    user = User.find_by(user_params)
    if user.present?
      session[:user_id] = user.id
      redirect_to root_path
    else
      render :new
    end
  end

  def destroy
    session.delete :user_id
    redirect_to root_path
  end

  private
    def user_params
      params.permit(:username)
    end
end
-
new.html.erbに認証のフォームを記述します。
<h1>Please sign in</h1>
<%= form_tag user_sign_in_path do %>
<dl>
  <dt><strong>Username:</strong></dt>
  <dd><%= text_field_tag :username %></dd>
</dl>
<%= submit_tag 'Sign in' %>
<% end %>
-
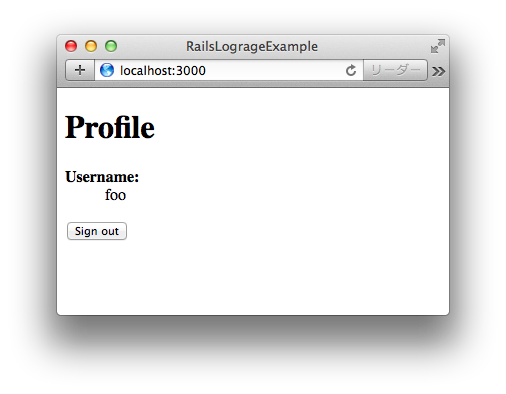
show.html.erbにプロフィールの表示を記述します。
<h1>Profile</h1>
<dl>
  <dt><strong>Username:</strong></dt>
  <dd><%= current_user.username %></dd>
</dl>
<%= button_to 'Sign out', user_sign_out_path, method: :delete %>
Run
-
rails serverのコマンドでWabアプリケーションを起動します。 -
http://localhost:3000/にアクセスをして、fooを入力してサインします。
$ rails server
サインインが成功すると...
プロフィールが表示されます。
-
development.logにアクセスログが出力されています。- 直感的に読み取れるように工夫されいますが...
Started GET "/" for ::1 at 2015-12-25 02:00:19 +0900
Processing by User::SessionController#show as HTML
  Rendered user/session/show.html.erb within layouts/application (0.7ms)
Completed 200 OK in 63ms (Views: 50.7ms | ActiveRecord: 0.6ms)
Logging by Lograge
次は、標準のログの出力内容では Elasticsearch に登録できないので調整します。
Setup
$ echo "gem 'lograge'" >> Gemfile
$ echo "gem 'logstash-event'" >> Gemfile
$ bundle
Making
-
lograge.rbに Lograge のコンフィグを記述します。 - 出力先や書式を任意に変更できます。また、出力項目を追加することができます。
Rails.application.configure do
  path = "#{Rails.root}/log/lograge_#{Rails.env}.log"
  config.lograge.logger = ActiveSupport::Logger.new path
  config.lograge.enabled = true
  config.lograge.keep_original_rails_log = true
  config.lograge.formatter = Lograge::Formatters::Logstash.new

  config.lograge.custom_options = lambda do |event|
    {
      host: event.payload[:host],
      username: event.payload[:username],
      time: event.time, timestamp: event.time
    }
  end
end
Run
-
http://localhost:3000/にアクセスすると Profile が表示されています。 -
lograge_development.logにそのアクセスログが出力されています。- JSON の形式になりました。(JSON はツールで整形しています。)
{
  "method":"GET",
  "path":"/",
  "format":"html",
  "controller":"user/session",
  "action":"show",
  "status":200,
  "duration":317.69,
  "view":289.31,
  "db":1.11,
  "host":"localhost",
  "username":"foo",
  "time":"2015-12-25T02:06:15.016+09:00",
  "timestamp":"2015-12-25T02:06:15.016+09:00",
  "@timestamp":"2015-12-24T17:06:15.334Z",
  "@version":"1",
  "message":"[200] GET / (user/session#show)"
}
Elasticsearch and Fluentd
最後は Fluentd で Lograge が出力したログを Elasticsearch に登録しましょう。
Setup
-
fluent.confのsourceに Lograge の設定をmatchに Elasticsearch の設定を記述します。-
Elasticsearch は デフォルトの
127.0.0.1:9200で起動している想定です。
-
Elasticsearch は デフォルトの
<source>
  type     tail
  format   json
  tag      lograge
  path     ./log/lograge_development.log
  pos_file ./log/lograge_development.log.pos
  time_key time
</source>

<match lograge>
  type elasticsearch
  host 127.0.0.1
  port 9200
  logstash_format true
  logstash_prefix lograge
  flush_interval  1s
</match>
-
Elasticsearch は OS X だど
brew installコマンドで簡単にインストールできます。
$ brew install elasticsearch
-
Fluentd は
Gemfileに記述するとインストールができます。- Fluentd は Ruby で実装されています。(ソースコード完全解説)
$ echo "gem 'fluentd', require: false" >> Gemfile
$ echo "gem 'fluent-plugin-elasticsearch', require: false" >> Gemfile
- Rails と Elasticsearch と Fluentd を起動するのに Foreman を利用します。
$ echo "gem 'foreman', require: false" >> Gemfile
$ echo "web: rails server" >> Procfile
$ echo "es: elasticsearch" >> Procfile
$ echo "td: bundle exec fluentd -c ./config/fluent.conf" >> Procfile
Run
-
foreman startのコマンドで各種を起動します。
$ bundle
$ foreman start
Elasticsearch
Elasticsearch に登録されたら API で確認できるので、いくつか紹介します。
- GET
http://localhost:9200/_aliases?prettyはインデックスの一覧を参照できます。
{
  "lograge-2015.12.24" : {
    "aliases" : { }
  }
}
- GET
http://localhost:9200/lograge*/_mapping?prettyは項目の一覧を参照できます。
{
  "lograge-2015.12.24" : {
    "mappings" : {
      "fluentd" : {
        "properties" : {
          "@timestamp" : {
            "type" : "date",
            "format" : "strict_date_optional_time||epoch_millis"
          },
          "@version" : {
            "type" : "string"
          },
          "action" : {
            "type" : "string"
          },
          "controller" : {
            "type" : "string"
          },
          "db" : {
            "type" : "double"
          },
          "duration" : {
            "type" : "double"
          },
          "format" : {
            "type" : "string"
          },
          "host" : {
            "type" : "string"
          },
          "message" : {
            "type" : "string"
          },
          "method" : {
            "type" : "string"
          },
          "path" : {
            "type" : "string"
          },
          "status" : {
            "type" : "long"
          },
          "timestamp" : {
            "type" : "date",
            "format" : "strict_date_optional_time||epoch_millis"
          },
          "username" : {
            "type" : "string"
          },
          "view" : {
            "type" : "double"
          }
        }
      }
    }
  }
}
- GET
http://localhost:9200/lograge-*/_search?status=200&prettyは検索の結果を参照できます。
{
  "took" : 10,
  "timed_out" : false,
  "_shards" : {
    "total" : 5,
    "successful" : 5,
    "failed" : 0
  },
  "hits" : {
    "total" : 1,
    "max_score" : 1.0,
    "hits" : [ {
      "_index" : "lograge-2015.12.24",
      "_type" : "fluentd",
      "_id" : "AVHU-kjPTuY2Nzr3aWVO",
      "_score" : 1.0,
      "_source":{"method":"GET","path":"/","format":"html","controller":"user/session","action":"show","status":200,"duration":316.39,"view":284.64,"db":1.12,"host":"localhost","username":"foo","timestamp":"2015-12-25T02:12:30.224+09:00","@timestamp":"2015-12-24T17:12:30.541Z","@version":"1","message":"[200] GET / (user/session#show)"}
    } ]
  }
}
- DELETE
http://localhost:9200/lograge-*はデータを削除できます。- 危険な API ので扱いには十分に注意してください。
Tips
Elasticsearch Client
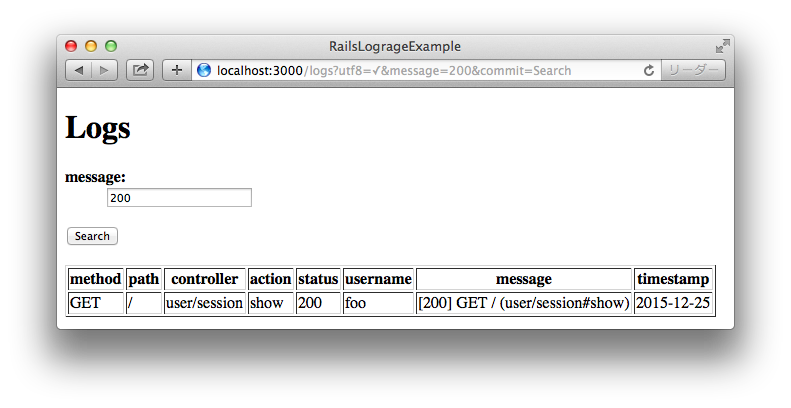
Elasticsearch のクライアントには Kibana がありますが Rails にも簡単にクライアントを実装できます。
Setup
- 今回は ActiveRecord のインタフェースに合わせたライブラリを利用します。
$ echo "gem 'elasticsearch-persistence'" >> Gemfile
$ bundle
-
rails generateのコマンドで View と Controller を作成します。
$ rails generate controller logs index
Making
-
routes.rbのlogsのパスを編集します。
get :logs, to: 'logs#index'
-
logs_controller.rbにmessageで検索できるように処理を記述します。
class LogsController < ApplicationController
  def index
    @message = params[:message] || ""
    @logs = Elasticsearch::Lograge.search(query: {
      match: {message: @message}
    })
  end
end
-
index.html.erbに検索フォームと表示エリアを記述します。
<h1>Logs</h1>

<%= form_tag logs_path, method: :get do %>
<dl>
  <dt><strong>message:</strong></dt>
  <dd><%= text_field_tag :message, @message %></dd>
</dl>
<%= submit_tag 'Search' %>
<% end %>

<br/>

<table border="1">
  <thead>
    <tr>
      <th>method</th>
      <th>path</th>
      <th>controller</th>
      <th>action</th>
      <th>status</th>
      <th>username</th>
      <th>message</th>
      <th>timestamp</th>
    </tr>
  </thead>
  <tbody>
    <% @logs.each do |log| %>
      <tr>
        <td><%= log.method %></td>
        <td><%= log.path %></td>
        <td><%= log.controller %></td>
        <td><%= log.action %></td>
        <td><%= log.status %></td>
        <td><%= log.username %></td>
        <td><%= log.message %></td>
        <td><%= log.timestamp %></td>
      </tr>
    <% end %>
  </tbody>
</table>
-
lograge.rbに参照する項目を記述します。-
index_nameにインデックスを指定します。 -
document_typeにドキュメントを指定します。 -
attributeにマッピングの項目を指定します。
-
require 'elasticsearch/persistence/model'

module Elasticsearch
  class Lograge
    include Elasticsearch::Persistence::Model

    index_name 'lograge*'
    document_type 'fluentd'

    attribute :method,      String
    attribute :path,        String
    attribute :format,      String
    attribute :controller,  String
    attribute :action,      String
    attribute :status,      Integer
    attribute :duration,    Float
    attribute :view,        Float
    attribute :db,          Float
    attribute :username,    String
    attribute :message,     String
    attribute :timestamp,   Date
  end
end
-
lograge.rbにはログに出力しないパスを記述できます。
config.lograge.ignore_actions = %W(
  user/session#new
  logs#index
)
Run
検索は全文検索なので調査が捗ります。
いつ(When)、どこで(Where)、だれが(Who)、なにを(What)を追跡できる準備が安全な開発、安心な運用に繋がります。
Enjoy Logging


