##cc.TableViewを使ってTwitterクライアントを作ってみる
Cocos2d-JS(Cocos2d-html5)をダウンロードして
3分でTwitterクライアントを作成する方法を記載してみました。
HTML5Canvasを直接書くと面倒なスクロール操作や、リスト表示もCocos2d-JSの
cc.TableViewを使う事で簡単に作る事ができます。
TableViewの動作サンプル
http://oggata.github.io/Cocos2d-JS-Study/TableView/
今回はTwitterと連携をしてAPIを連携させることで
ゲーム制作に応用できるコンテンツを作成しています。
##3分間の流れ
00:00 - 00:30(30秒) Cocos2d-JSをサイトからダウンロード
00:30 - 01:00(30秒) 初期設定を行いHelloHTML5Worldをブラウザで表示
01:00 - 02:00(60秒) TwitterでAPIを作成。ID/KEYの取得
02:00 - 03:00(60秒) HelloHTML5Worldの修正。
##Cocos2d-JSの準備
###1.Cocos2d-JSのv2.2.3をダウンロードします。
http://www.cocos2d-x.org/download
###2.ローカルの適当な場所に保存します。
今回はUsers/hoge/cocos2d-html5-v2.2.3のように保存しました。
###3.ディレクトリに移動
cd Users/hoge/cocos2d-html5-v2.2.3/
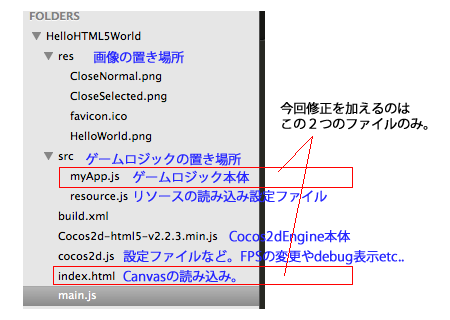
###4.ファイルをコピーします。
cp lib/Cocos2d-html5-v2.2.3.min.js HelloHTML5World/Cocos2d-html5-v2.2.3.min.js
ディレクトリ構成自体はこんな感じになります。
###5.cocos2d.jsのSingleEngineFileを修正します
vim Users/hoge/cocos2d-html5-v2.2.3/HelloHTML5World/cocos2d.js
    >//engineDir:'../cocos2d/',
    >SingleEngineFile:'Cocos2d-html5-v2.2.3.min.js',
    >//SingleEngineFile:'',
###6.HTTPサーバーを立ち上げます
macの場合はSimleHTTPServerで簡単にHTTPServerが起動します。
ApacheなどHTTPServerを起動して、/var/www/htmlに設置する方法でもOK。
cd Users/hoge/cocos2d-html5-v2.2.3/HelloHTML5World/
python -m SimpleHTTPServer
###7.アクセスしてHellowWorldが表示されることを確認します。

##TwitterでAPPを作成
###1.Appの作成
https://apps.twitter.com/
にアクセスしてCreate New Appでアプリを作成します。
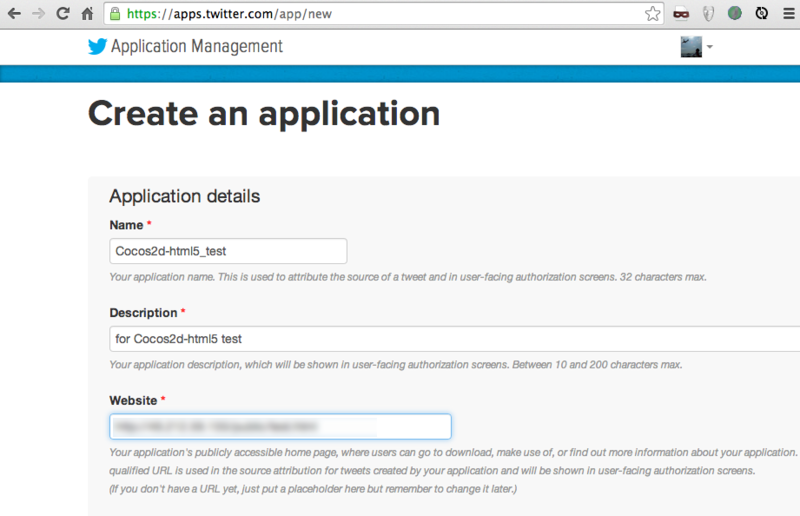
###2.AppKey,AppSecret,AccessToken,AccessTokenSecretをメモします

##ソースコードの準備
###1.index.htmlの修正し、sha1.jsとoauth.jsを読み込みます
vim Users/hoge/cocos2d-html5-v2.2.3/HelloHTML5World/index.html
に下記2行を追記します。
<script type="text/javascript" src="http://oauth.googlecode.com/svn/code/javascript/sha1.js"></script>
<script type="text/javascript" src="http://oauth.googlecode.com/svn/code/javascript/oauth.js"></script>
###2.myApp.jsを変更
vim Users/hoge/cocos2d-html5-v2.2.3/HelloHTML5World/src/myApp.js
で下記のコードに全部置き換えます。
今回はCocos2d-html5のcc.TableViewを使ってリストを作成して使用します。
今回、リストに表示するデータはTwitterのuser_timelineというAPIから取得されたものを利用します。
(例) コジコジbotのタイムラインを最新から20件引っ張ってくる場合のサンプル
https://api.twitter.com/1.1/statuses/user_timeline.json?>screen_name=kojikoji_Bot&count=20
(本家:APIの使い方)
https://dev.twitter.com/docs/api/1/get/statuses/user_timeline
下記にソースコードを記載していますので
Users/hoge/cocos2d-html5-v2.2.3/HelloHTML5World/src/myApp.js
をすべて上書きしてください。
var responses       = [];
var getTwitterAPI = function(apiUrl, callBackFunc, onerror){
    var parameters = {
        oauth_signature_method : "HMAC-SHA1",
        oauth_consumer_key     : "--------API keyに変更します.----------",
        oauth_token            : "--------Access tokenに変更します.----------",
        callback               : callBackFunc
    };
    var message = {
        method: "GET",
        action: apiUrl,
        parameters: parameters
    };
    var secretKeys = {
        "consumerSecret" : "--------API secretに変更します.----------",
        "tokenSecret"    : "--------Access token secretに変更します.----------"
    };
    OAuth.setTimestampAndNonce(message);
    OAuth.SignatureMethod.sign(message, secretKeys);
    var signed_url = OAuth.addToURL(apiUrl, parameters);
    var ele = document.createElement("script");
    var head = document.getElementsByTagName('head').item(0);
    ele.type = "text/javascript";
    ele.src = signed_url;
    head.appendChild(ele);
}
var callback_limit = function(json){
    var limitHash = json;
    for(var i=0;i<limitHash.length;i++){
        responses.push(limitHash[i]["text"]);
    }
}
var Helloworld = cc.Layer.extend({

    createTable:function(){
        var winSize = cc.Director.getInstance().getWinSize();
        var tableView = cc.TableView.create(this, cc.size(320, 480));
        tableView.setDirection(cc.SCROLLVIEW_DIRECTION_VERTICAL);
        tableView.setPosition(0, 0);
        tableView.setDelegate(this);
        tableView.setVerticalFillOrder(cc.TABLEVIEW_FILL_TOPDOWN);
        this.addChild(tableView);
        tableView.reloadData();
    },
    init:function () {
        if (!this._super()) {
            return false;
        }
        this.tweetReadFlg = 0;
        getTwitterAPI(
            'https://api.twitter.com/1.1/statuses/user_timeline.json?screen_name=kojikoji_Bot&count=20',
            'callback_limit'
        );
        this.scheduleUpdate();
        this.setTouchEnabled(true);
        return true;
    },
    update:function(dt){
        this._super();
        if(responses.length > 0 && this.tweetReadFlg == 0){
            this.tweetReadFlg = 1;
            this.createTable();
        }
    },
    tableCellSizeForIndex:function (table, idx) {
        return cc.size(300,100);
    },
    tableCellAtIndex:function (table, idx) {
        var strValue = idx.toFixed(0);
        var cell = table.dequeueCell();
        var label;
        if (!cell) {
            cell = new CustomTableViewCell();

            label = cc.LabelTTF.create(strValue, "Helvetica", 15);
            label.setPosition(50,0);
            label.setAnchorPoint(0,0);
            label.setTag("comment");
            cell.addChild(label);
        } else {
            label = cell.getChildByTag("comment");
            var txt = responses[strValue];
            label.setString(txt);
        }
        return cell;
    },
    numberOfCellsInTableView:function (table) {
        return responses.length;
    }
});
var CustomTableViewCell = cc.TableViewCell.extend({
    draw:function (ctx) {
        this._super(ctx);
    }
});
var HelloWorldScene = cc.Scene.extend({
    onEnter:function () {
        this._super();
        var layer = new Helloworld();
        layer.init();
        this.addChild(layer);
    }
});
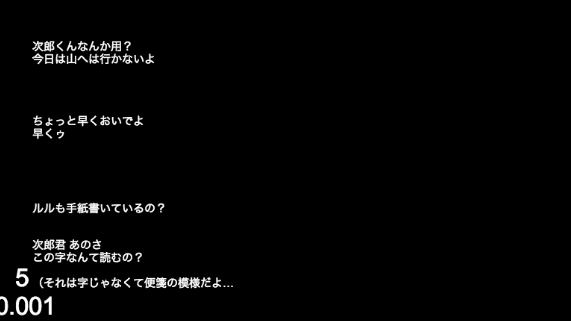
###3.http://localhost:8000/にアクセスします。
スクリーンショットでは分かりにくいですが上下にちゃんとスクロールするTwitterタイムラインを見るクライアントの完成です。
画像をいれたり、もっと奇麗にUIを作ることで体裁を整えると良いかも。
TwitterのID/KeyまでGithubに載せることができないので、
参考までにTableViewの動作サンプルを記載しておきます。
TableViewの動作サンプル
http://oggata.github.io/Cocos2d-JS-Study/TableView/