py_face_detection.markdownを元に
「OpenCV-Python Tutorials」 和訳の中の
[Face Detection using Haar Cascades]
(http://docs.opencv.org/3.0-beta/doc/py_tutorials/py_objdetect/py_face_detection/py_face_detection.html#face-detection)
の訳を作成しました。
原文の英語の後に、和訳を記載しました。アルゴリズムに興味をもっていただくのに役立てば幸いです。
以下のページが立ち上がっているので、私のつたない訳は必要としなくなっています。
鳥取大学内のOpenCV-Python チュートリアル文書のページ[Haar Cascadesを使った顔検出]
(http://labs.eecs.tottori-u.ac.jp/sd/Member/oyamada/OpenCV/html/py_tutorials/py_objdetect/py_face_detection/py_face_detection.html#face-detection)
Face Detection using Haar Cascades {#tutorial_py_face_detection}
Haar Cascadesを用いた顔検出
Goal
In this session,
- We will see the basics of face detection using Haar Feature-based Cascade Classifiers
- We will extend the same for eye detection etc.
この節では,
- Haar 特徴量にもとづくCascade 識別器を用いた顔検出の基礎を学びます。
- それを拡張して目検出などに用います。
Basics
Object Detection using Haar feature-based cascade classifiers is an effective object detection
method proposed by Paul Viola and Michael Jones in their paper, "Rapid Object Detection using a
Boosted Cascade of Simple Features" in 2001. It is a machine learning based approach where a cascade
function is trained from a lot of positive and negative images. It is then used to detect objects in
other images.
Haar 特徴量にもとづくCascade 識別器を用いたオブジェクト検出は、効率的なオブジェクト検出方法で、 Paul Viola と Michael Jonesによって"Rapid Object Detection using a
Boosted Cascade of Simple Features" (2001)の論文の中で提案されています。
その手法は、機械学習に基づくアプローチであり、その中で使われる各々のカスケード識別器はたくさんのポジティブ画像とネガティブ画像から訓練されます。訓練の後に、他の画像の中からオブジェクトを検出するのに用いられます。
Here we will work with face detection. Initially, the algorithm needs a lot of positive images
(images of faces) and negative images (images without faces) to train the classifier. Then we need
to extract features from it. For this, haar features shown in below image are used. They are just
like our convolutional kernel. Each feature is a single value obtained by subtracting sum of pixels
under white rectangle from sum of pixels under black rectangle.
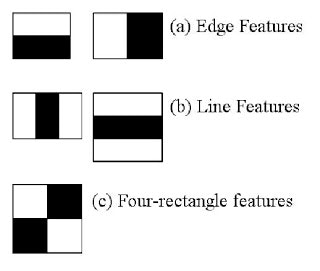
さあ、顔検出について始めてみましょう。まず、アルゴリズムはたくさんのポジティブ画像群(顔画像群)とネガティブ画像群(顔のない画像群)を識別器を訓練するのに用います。次に、画像から特徴量を抽出する必要があります。このために、下の図に示すHaar特徴量が用いられます。Haar特徴量は、畳み込みカーネルのようなものです。
それぞれの特徴量は単一の数値であり、黒の矩形の位置の画素の輝度の合計から白の矩形の位置の画素の輝度の合計を差し引いたものです。
Now all possible sizes and locations of each kernel is used to calculate plenty of features. (Just
imagine how much computation it needs? Even a 24x24 window results over 160000 features). For each
feature calculation, we need to find sum of pixels under white and black rectangles. To solve this,
they introduced the integral images. It simplifies calculation of sum of pixels, how large may be
the number of pixels, to an operation involving just four pixels. Nice, isn't it? It makes things
super-fast.
このとき、それぞれのカーネルのとりうる大きさと位置の全てが、たくさんの特徴量を計算するために用いられます。
(どれくらいの数の計算が必要なのか想像してみましょう。24x24画素の窓でさえ、16000以上の特徴量になります。) この問題を解決するために彼らは積分画像を導入しました。積分画像を使うことで、画素値の合計の計算を簡単にしています。画素の数がどんなに多くても、(積分画像の)4つの画素の値を用いる演算に置き換えています。素敵でしょう。積分画像を用いることで、とっても速くしています。
But among all these features we calculated, most of them are irrelevant. For example, consider the
image below. Top row shows two good features. The first feature selected seems to focus on the
property that the region of the eyes is often darker than the region of the nose and cheeks. The
second feature selected relies on the property that the eyes are darker than the bridge of the nose.
But the same windows applying on cheeks or any other place is irrelevant. So how do we select the
best features out of 160000+ features? It is achieved by Adaboost.
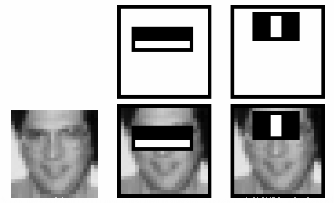
しかし、計算したこれらの特徴量の大半は、(顔かどうかの識別には)無関係です。例として下の図をご覧ください。トップの行に2つのよい特徴量を示しています。最初の選ばれた特徴量は、目の領域は、鼻と頬の領域よりも暗くなりがちであるという特性に着目しているように見えます。2番目に選ばれた特徴量は両目の領域は鼻筋よりも暗いという特性に依存しています。でも、同じ窓であっても、頬や別の場所に用いられたものは、(顔かどうかの識別には)無関係です。それでは、どうやって16000以上の特徴量から最適な複数の特徴量を選択したらいいのでしょうか? それはAdaBoostによって達成されました。
For this, we apply each and every feature on all the training images. For each feature, it finds the
best threshold which will classify the faces to positive and negative. But obviously, there will be
errors or misclassifications. We select the features with minimum error rate, which means they are
the features that best classifies the face and non-face images. (The process is not as simple as
this. Each image is given an equal weight in the beginning. After each classification, weights of
misclassified images are increased. Then again same process is done. New error rates are calculated.
Also new weights. The process is continued until required accuracy or error rate is achieved or
required number of features are found).
これにより、全ての訓練画像に対して各々の特徴量を適用します。それぞれの特徴量で、顔候補をポジティブとネガティブに分類する最善の閾値を見つけます。しかし明らかなように、エラー、誤分類が生じます。最小のエラー率となる特徴を選択します。つまり、顔と非顔画像を最もよく分類する特徴量であることを意味します。(実際のプロセスはここに書いたほど簡単ではありません。最初は全ての画像が同じ重みで与えられます。それぞれの分類の後で、誤分類画像の重みが増やされます。このプロセスは、要求精度かエラー率が達成されるか、要求値の数の特徴量が見つけられるまで繰り返されます。)
Final classifier is a weighted sum of these weak classifiers. It is called weak because it alone
can't classify the image, but together with others forms a strong classifier. The paper says even
200 features provide detection with 95% accuracy. Their final setup had around 6000 features.
(Imagine a reduction from 160000+ features to 6000 features. That is a big gain).
最後の識別器がこれらの弱識別器の重み付けとして得られます。(弱識別器は)それ単独では画像を分類できないので弱識別器と呼ばれていますが、他の複数の弱識別器と組み合わせて強識別器を形成します。その論文によれば、200個の特徴量でさえ、95%精度の検出を可能にします。彼らの最後の構成では、約6000個の特徴量を用いています。(160000以上の特徴から6000の特徴に削減されたということを考えに入れてみてください。ずいぶん減ったでしょう。)
So now you take an image. Take each 24x24 window. Apply 6000 features to it. Check if it is face or
not. Wow.. Wow.. Isn't it a little inefficient and time consuming? Yes, it is. Authors have a good
solution for that.
それで今1枚の画像を用意します。各々の24x24画素の窓を適用します。窓に6000個の特徴を適用します。それが顔か非顔かチェックします。ああ、ちょっとばかし非効率で時間を無駄にしていませんか?そうです。著者たちはそれによい解決法を持っています。
In an image, most of the image region is non-face region. So it is a better idea to have a simple
method to check if a window is not a face region. If it is not, discard it in a single shot. Don't
process it again. Instead focus on region where there can be a face. This way, we can find more time
to check a possible face region.
1枚の画像では、画像の大部分の領域は非顔の領域です。そこで、窓領域が顔領域でないことを確かめる簡単な方法を持つというのはよい考えです。もし窓領域が顔領域でなければ、すぐさまに捨ててしまうことです。それについて再度(強判別器で)処理しません。その代わり、顔かもしれない領域に着目します。このようにして、ありうる顔領域をチェックするのにもっと時間をさくことができます。
For this they introduced the concept of Cascade of Classifiers. Instead of applying all the 6000
features on a window, group the features into different stages of classifiers and apply one-by-one.
(Normally first few stages will contain very less number of features). If a window fails the first
stage, discard it. We don't consider remaining features on it. If it passes, apply the second stage
of features and continue the process. The window which passes all stages is a face region. How is
the plan !!!
これについて彼らは、カスケード型識別器という概念を導入しました。1つの窓領域に6000個の特徴の全てを適用する代わりに、一連の特徴を異なるステージに属する識別器群にグルーピングし、1つずつ適用する。(通常 最初の数ステージでは、とても少ない数の特徴を含んでいることでしょう。)
ある窓領域で最初のステージで失敗したら。その窓領域を捨てます。その領域に残りの特徴を考慮することをしません。もし最初のステージで通過したら、2番目の特徴量群を適用し、処理を継続します。全てのステージで通過した窓領域は顔領域です。
Authors' detector had 6000+ features with 38 stages with 1, 10, 25, 25 and 50 features in first five
stages. (Two features in the above image is actually obtained as the best two features from
Adaboost). According to authors, on an average, 10 features out of 6000+ are evaluated per
sub-window.
著者による検出器は、6000以上の特徴をもつ38ステージからなる識別器で、最初の5ステージでは、1, 10, 25, 25, 50個の特徴を持つものです。(上記の図にある2つの特徴は、Adaboostによって最善の2つの特徴として実際に得られたものです。) 著者によれば、平均では、1つのsub-windowあたり6000個以上中の10個の特徴が評価されています・
So this is a simple intuitive explanation of how Viola-Jones face detection works. Read paper for
more details or check out the references in Additional Resources section.
これが、Viola-Jonesの顔検出がどのように動作しているかについての簡単な直感的な説明です。詳細は論文を読むなり、Additional Resourcesの節に示してある参考情報にあたってください。
Haar-cascade Detection in OpenCV
OpenCVでのHaar-cascade 検出
OpenCV comes with a trainer as well as detector. If you want to train your own classifier for any
object like car, planes etc. you can use OpenCV to create one. Its full details are given here:
Cascade Classifier Training.
OpenCVには検出器と同様に訓練器があります。もし、自動車、飛行機などのオブジェクトのための自作の識別器を訓練(=学習)したいなら、そのためにOpenCVを使うことができます。その詳細は、ここにあります。
カスケード型検出器の学習.
Here we will deal with detection. OpenCV already contains many pre-trained classifiers for face,
eyes, smile etc. Those XML files are stored in opencv/data/haarcascades/ folder. Let's create face
and eye detector with OpenCV.
ここで、検出をしてみましょう。OpenCVは顔検出、目検出、笑顔検出などの学習済みの検出器を既に含んでいます。それらのXMLはopencv/data/haarcascades/のフォルダに保存してあります。OpenCVの顔と目の検出器を作ってみましょう。
First we need to load the required XML classifiers. Then load our input image (or video) in
grayscale mode.
まず、所定のXML識別器を読み取る必要があります。次に入力画像(あるいは動画)をグレースケールモードで読み取ります。
import numpy as np
import cv2

face_cascade = cv2.CascadeClassifier('haarcascade_frontalface_default.xml')
eye_cascade = cv2.CascadeClassifier('haarcascade_eye.xml')

img = cv2.imread('sachin.jpg')
gray = cv2.cvtColor(img, cv2.COLOR_BGR2GRAY)
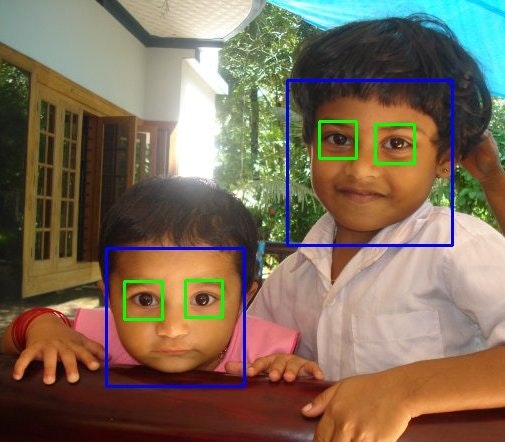
Now we find the faces in the image. If faces are found, it returns the positions of detected faces
as Rect(x,y,w,h). Once we get these locations, we can create a ROI for the face and apply eye
detection on this ROI (since eyes are always on the face !!! ).
さあ、画像の中の顔を見つけます。もし顔が見つかれば、検出されたそれぞれの顔の位置をRect(x,y,w,h)で返します。これらの位置が見つかりしだい、顔についてのROIを設定でき、このROIに目検出を適用できます。(目があるのはいつだって顔の上なんだから)
faces = face_cascade.detectMultiScale(gray, 1.3, 5)
for (x,y,w,h) in faces:
    cv2.rectangle(img,(x,y),(x+w,y+h),(255,0,0),2)
    roi_gray = gray[y:y+h, x:x+w]
    roi_color = img[y:y+h, x:x+w]
    eyes = eye_cascade.detectMultiScale(roi_gray)
    for (ex,ey,ew,eh) in eyes:
        cv2.rectangle(roi_color,(ex,ey),(ex+ew,ey+eh),(0,255,0),2)

cv2.imshow('img',img)
cv2.waitKey(0)
cv2.destroyAllWindows()
Result looks like below:
結果は次のようになります。
Additional Resources
-# Video Lecture on Face Detection and Tracking
2. An interesting interview regarding Face Detection by Adam
Harvey