このドキュメントは、StoryboardからUISplitViewcontrollerを使ったサンプルの作成方法について説明します。
前提知識
Adaptive UI Design
解像度や画面サイズの異なるデバイスに対応するため、iOS8以降はAdaptive User Interfaceという考え方が取り入れられました。
Size ClassesやTrait Collectionについての説明は、こちらの記事を参照してください。
Trait Enviornments
iOS8から導入されたTrait Collectionは、実行するデバイスやデバイスの向きに応じて変化します。
変更されたTrait Collectionは、どれか1つのUIViewControllerにだけ適用されるわけでなく、アプリケーション全体(UIScreenからUIViewやUIPresentationControllerまで)に適用されます。

UISplitViewController
上記のTrait Collectionに応じて表示される内容が変わる例として、UISplitViewControllerがあります。
これまではiPadでのみ使えていましたが、iOS8以降、iPhoneでも使えるように変わりました。
特に何も手を加えず、Universal AppとしてStoryboardで作成した場合、Trait Collectionに応じて表示される内容が以下のように変わります。
- Horizontal Size ClassがRegular(iPad, iPhone6 Plus Landscape): Master/Detailの両方が表示される
- Horizontal Size ClassがCompact(iPhone6 Plus Landscape以外のiPhone): Master/Detailのどちらかのみ表示される
Presentation Controller
Presentation Contrllerも同様に、Trait Collectionに応じて表示する内容が変わります。
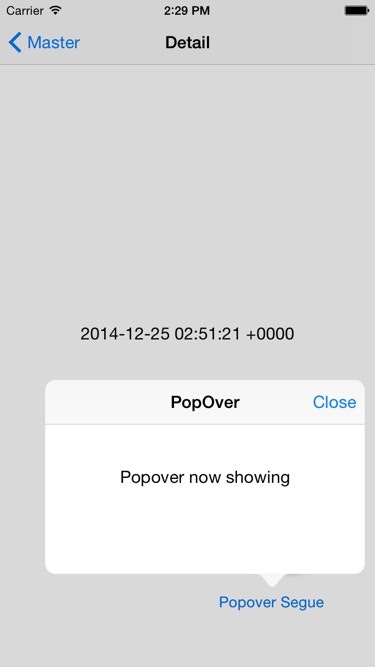
iOS8からiPhoneでも使えるようになった、Popoverをサンプルに説明します。
PopoverとTrait Collection
PopoverもTrait Collectionに応じて、表示され方が変わります。
- Horizontal Size ClassがRegular(iPad, iPhone6 Plus Landscape): Popoverで表示される
- Horizontal Size ClassがCompact(iPhone6 Plus Landscape以外のiPhone): FullScreenで表示される
UIKitの中で、Trait Collectionに応じて最適な表示方法を実現するため、上記のように切り替えていると思われます。
Adaptive Presentation Controller
Trait Collectionに応じた描画内容の変更を、開発者が自分で調整したいという場合は、UIAdaptivePresentationControllerDelegateを使ってハンドリングすることもできます。
例えば、"Popover Segueを使い、Horizontal Size ClassがCompactの場合でもPopoverで表示したい"というような場合、以下のように実装すると必ずPopoverで表示することができます。
- (void)prepareForSegue:(UIStoryboardSegue *)segue sender:(id)sender
{
    if ([segue.identifier compare:@"showPopOver"] == NSOrderedSame) {
        UINavigationController * nvc = segue.destinationViewController;
        UIPresentationController * pc = nvc.presentationController;
        pc.delegate = self;
        // In WWDC 2014 "View Controller Advancements in iOS8",
        // below codes can show popover on iPhone (Adaptive popover).
        //
        // UINavigationController * nvc = segue.destinationViewController;
        // UIPopoverPresentationController * pvc = nvc.popoverPresentationController;
        // pvc.delegate = self;
        //
        // But On Xcode 6.1, these codes shows FullScreen presentation...
        // (nvc.popoverPresentationController is nil)
        // For workarounds, I use presentationController's delegate instead of popoverController's.
    }
}

# pragma mark == UIPopoverPresentationControllerDelegate ==

- (UIModalPresentationStyle)adaptivePresentationStyleForPresentationController:(UIPresentationController *)controller
{
    return UIModalPresentationNone;
}
iPhoneでPopoverを表示する例:
上記の例は、Xcode6.1で動作確認できたものです。以降のバージョンでは使えなくなる可能性がありますので、実装時には確認したうえで試してみてください。
Appearance Proxy
iOS5から追加されたUIAppearanceにも、Trait Collectionに対応したメソッドが追加されています。
以下の例は、apperanceForTraitCollectionを使ってUIButtonの背景画像を変えるサンプルです。
// iOS7.x以前のサンプル
// iOS7.x以前なら、デバイスの向きが変更されたタイミングで切り替える処理が必要だった。
- (void)willRotateToInterfaceOrientation:(UIInterfaceOrientation)toInterfaceOrientation duration:(NSTimeInterval)duration
    UIButton btn;
    if (UIInterfaceOrientationIsPortrait(orientation)) {
        [btn setBackgroundImage:[UIImage imageNamed:@"image1"]
                     forBarMetrics:UIBarMetricsDefault];
    } else {
        [btn setBackgroundImage:[UIImage imageNamed:@"image2"]
                     forBarMetrics:UIBarMetricsDefault];
    }
}
// iOS8以降なら、Appearance Proxyを使って以下のように設定できる。
// AppDelegateあたりに書いておけばアプリケーション全体で使いまわせる。
- (BOOL)application:(UIApplication *)application didFinishLaunchingWithOptions:(NSDictionary *)launchOptions {

    [[UIButton appearance] setBackgroundImage:[UIImage imageNamed:@"image1"]
                                forBarMetrics:UIBarMetricsDefault];
    [[UIButton appearanceForTraitCollection:
      [UITraitCollection traitCollectionWithVerticalSizeClass:UIUserInterfaceSizeClassCompact]]
         setBackgroundImage:[UIImage imageNamed:@"image2"] forBarMetrics:UIBarMetricsDefault];
}
UISplitViewControllerを使ったサンプル
ここまでの内容を元に、UISplitViewControllerを使ったサンプルを作成してみます。
実現したいこととしては、
- どのデバイスでも、UISplitViewControllerを使って画面を表示させたい
- どのデバイスでもPopoverで何かしら表示させたい
ソースコードはこちらのものを確認してください。
プロジェクトの作成
はじめに、Universal Device向けのプロジェクトを作成します。
名前は何でも構いません。
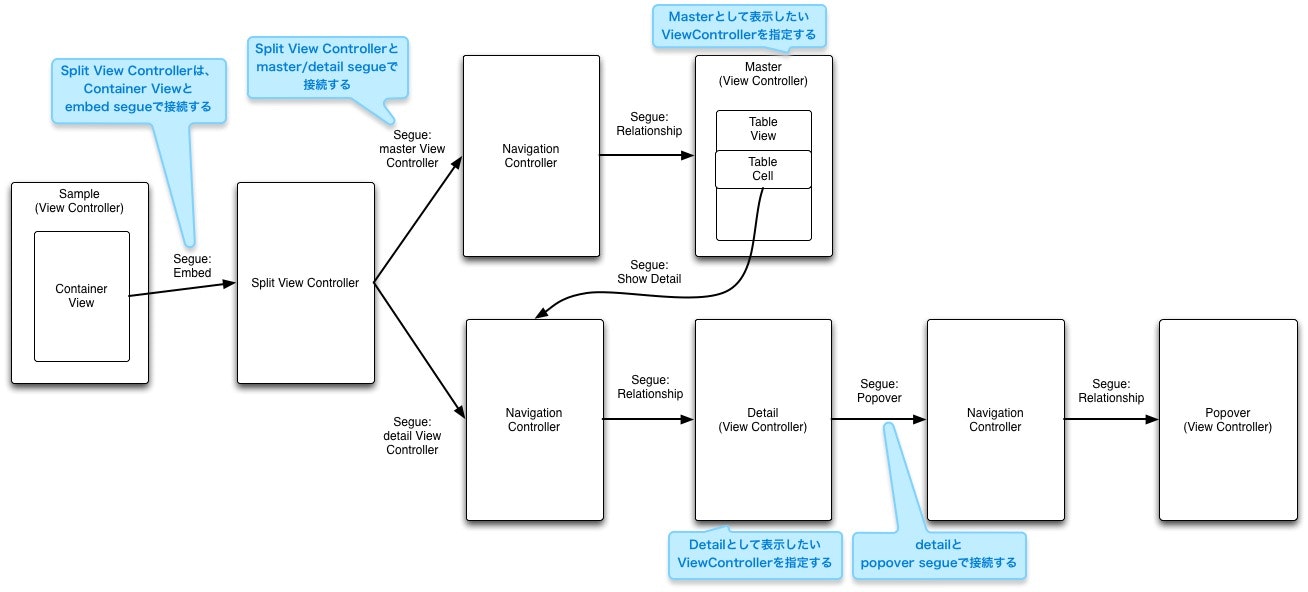
Storyboardの作成
Storyboardで、以下のようにView ControllerやUIViewを配置し、segueで接続します。
UISplitViewContollerをchildViewControllerとして追加・delegateの設定
上記サンプル中のViewControllerで、UISplitViewControllerDelegateを適用した上で以下の通り実装します。
@implementation ViewController

- (void)viewDidLoad
{
    [super viewDidLoad];
    // 省略
    UISplitViewController * svc = [self.childViewControllers firstObject];
    // Primary側のViewControllerの表示モードを指定する。
    // 今回は両方共表示するように指定。
    svc.preferredDisplayMode = UISplitViewControllerDisplayModeAllVisible;

    svc.preferredPrimaryColumnWidthFraction = 0.5;
    svc.maximumPrimaryColumnWidth = 500;
}

- (void)addChildViewController:(UIViewController *)childController
{
    // このサンプルでは、ChildViewControllerを設定するときにUISplitViewConrollerDelegateを指定しておく
    [super addChildViewController:childController];
    UISplitViewController * svc = [self.childViewControllers firstObject];

    if (svc) {
        svc.delegate = self;
    }
}

# pragma mark == UISplitViewControllerDelegate ==

- (BOOL)splitViewController:(UISplitViewController *)splitViewController collapseSecondaryViewController:(UIViewController *)secondaryViewController ontoPrimaryViewController:(UIViewController *)primaryViewController
{
    // Primary側(Master)の方を表示させておきたいので、
    // Secondary(Detail)はcollapseで表示するよう指定する。
    return YES;
}

@end
あとはMaster/Detailで表示するViewControllerの実装ができていれば、問題なく表示できているはずです。
Segueを使ってどのデバイスでもPopoverで表示させる
Segueを使ってどのデバイスでもPopoverで表示させたい場合は、上記[Adaptive Presentation Controller]で説明したように
-
prepareForSegue:でself.presentationControllerのdelegateを設定する -
adaptivePresentationStyleForPresentationController:でUIPresentationStyleNoneを戻り値として返すよう指定する
の通り実装すればPopoverで表示されます。
気になった点
SplitViewControllerからMaster/DetailのSegueを設定する時、どちら側を指定しようとしているのかわかりづらい
SplitViewControllerにMaster/DetailのSegueを設定する際、何も表示されないので非常にわかりづらいです。
Xcode6.2以降では改善されていることを期待しています。
他のSegueと比べて実装しなければならないことが多い
showやpresent modally等の他のSegueに比べ、コード側で指定しなければならない項目が多いように感じています。
Storyboardとコードから指定しなければならない項目が分散してしまっているので、なんとなく据わりの悪い印象を受けています。
Storyboardで指定しておくほうが、今後のiOSのバージョンアップを考えると良いのかもしれませんが………コード側で実装してしまうほうが早いよなあとも感じています。
参考にしたURL
WWDC 2014
What's New in Cocoa Touch
Building Adaptive Apps with UIKit
What's New in Interface Builder
Apple Developer Library
What's New In iOS: iOS8
iOS Human Interface Guidelines Adaptivity and Layout
Deploying an App With Size Classes on Earlier iOS Versions
AdaptivePhotos: An Adaptive Application
Others
iMore: Adaptive UI in iOS 8: Explained
Beginning Adaptive Layout Tutorial
Nerdely: Overcoming the iPad Tax With iOS 8 and Adaptive UI
Xamarin: Introduction to Unified Storyboards
stackoverflow: Design app that supports both iOS8 and iOS7
stackoverflow: Xcode6 Universal Storyboards and view sizing
stackoverflow: Xcode 6 – Unified storyboard & Size Classes
stackoverflow: How can Xcode 6 adaptive UIs be backwards-compatible with iOS 7 and iOS 6?
stackoverflow: Example for iPhone portrait landscape adaptive UI which is backwards-compatible with iOS 7])