概要
- インフラ運用でアラートメールたくさんあるので程よくパースしてチャットに貼りたい
- いろいろ使ってみたかった
- 今回はとりあえずメール送ったらhipchatに届けばいい
- 処理の流れ
- [前提] 監視システムからアラートメールが飛ぶ(今回はめんどいのでlocalhostからコマンドで)
- postfixでメール受信
- /etc/aliasesでpythonスクリプト1をキック
- pythonスクリプト1はメールを簡単にパースしてfluentdにお届け
- fluentdはメールの中身次第でパースしてpythonスクリプト2をキック(今回はパースはしないで素通り)
- pythonスクリプト2はfluentdからもらったデータをhipchatに投稿
- なんかいまいちめんどくさい実装なのは後述(fluentd経由する必要はまぁないですね)
では順に行ってみましょう
Azureでサーバを建てる
初月無料でなんか2万円分タダ券もらえるときいて以下から登録。
Microsoft Azure Free Trial: Try Azure | Azure Free Trial
電話番号、最初の0抜くんだ...とか地味にはまりながらだいたい登録。
参考:
[サブスクリプション] Windows Azure 新規契約時の個人認証について - Microsoft Azure サポート チーム サイト - Site Home - MSDN Blogs
centos6.5(OpenLogicってなんだろう?)を1コアCPU、1.75GBメモリで作った。
管理画面がリソースでたりしてシャレオツですね。
td-agentとかruby2.0.0とかgemでfluentdとか(fluent-catのため)インストールしたりしました。
参考:
rbenv を使って ruby をインストールする(CentOS編) - Qiita
- openssl-develとか追加でいれました
rpmパッケージからFluentdをインストールする | Fluentd
postfixからスクリプト実行
めんどくさいのvirtual domainとかそこら辺はさっぱりいじってないので
お好きな感じにどうぞ。
postfixでいじったのは3箇所
# 以下を追記
allow_mail_to_commands = alias,forward,include
# 以下を追記
hoge: :include:/home/hoge/.forward
"|/usr/bin/python /home/hoge/mail_parser/script1.py"
普通はsendmailなのでpostfixに切り替えとか必要でしょうがこいつはいらんでした。
includeしてるのはscript1.pyの実行ユーザを変えるためですね、
やたらPermission Errorで怒られたので...
設定変更したらそっと、
$ newaliases
$ /etc/init.d/postfix reload
して設定を反映。
参考:
ケーワン・エンタープライズのエンジニアメモ(`・ω・´)ゞビシッ!!: postfix 設定 その5 メール受信をトリガーにプログラムを起動する
一行mailコマンドでメールを飛ばす - 山歩きプログラマー
標準入力からfluentd投稿
スクリプト1は以下な感じで標準入力から生メールをパーサに食わせてる感じです。
# ! /usr/local/bin/python
# -*- coding:utf-8 -*-

from fluent import sender
from fluent import event
import sys
import email

### get stdin
input_lines = sys.stdin.read()

### get mail text
mail_text = email.message_from_string(input_lines)

### send message to fluentd
sender.setup('out.test', host='localhost', port=24224)
event.Event('follow', {
    'from': mail_text["from"],
    'to': mail_text["to"],
    'date': mail_text["date"],
    'subject': mail_text["subject"],
    'body': mail_text.get_payload()
    })
fluent(td-agent)の設定
in_forwardでtcpで受けて、out_execでスクリプト2を実行します。
### built-in TCP input
<source>
  type forward
  port 24224
</source>

### file output
<match local.**>
  type file
  path /var/log/td-agent/access
</match>

### debug stdout
<match debug.**>
  type stdout
</match>

### out_exec
<match out.**>
  type exec
  command /usr/bin/python /var/td-agent/bin/hipchat_poster/script2.py
  time_key got_at
  time_format %Y-%m-%d %H:%M:%S
  format json
  flush_interval 5s
  buffer_path /var/td-agent/tmp/buffer
  buffer_chunk_limit 256m
  buffer_queue_limit 10
  retry_limit 3
  retry_wait 1s
</match>
上記script1.pyでout.testをlocal.testとかdebug.testにすれば、
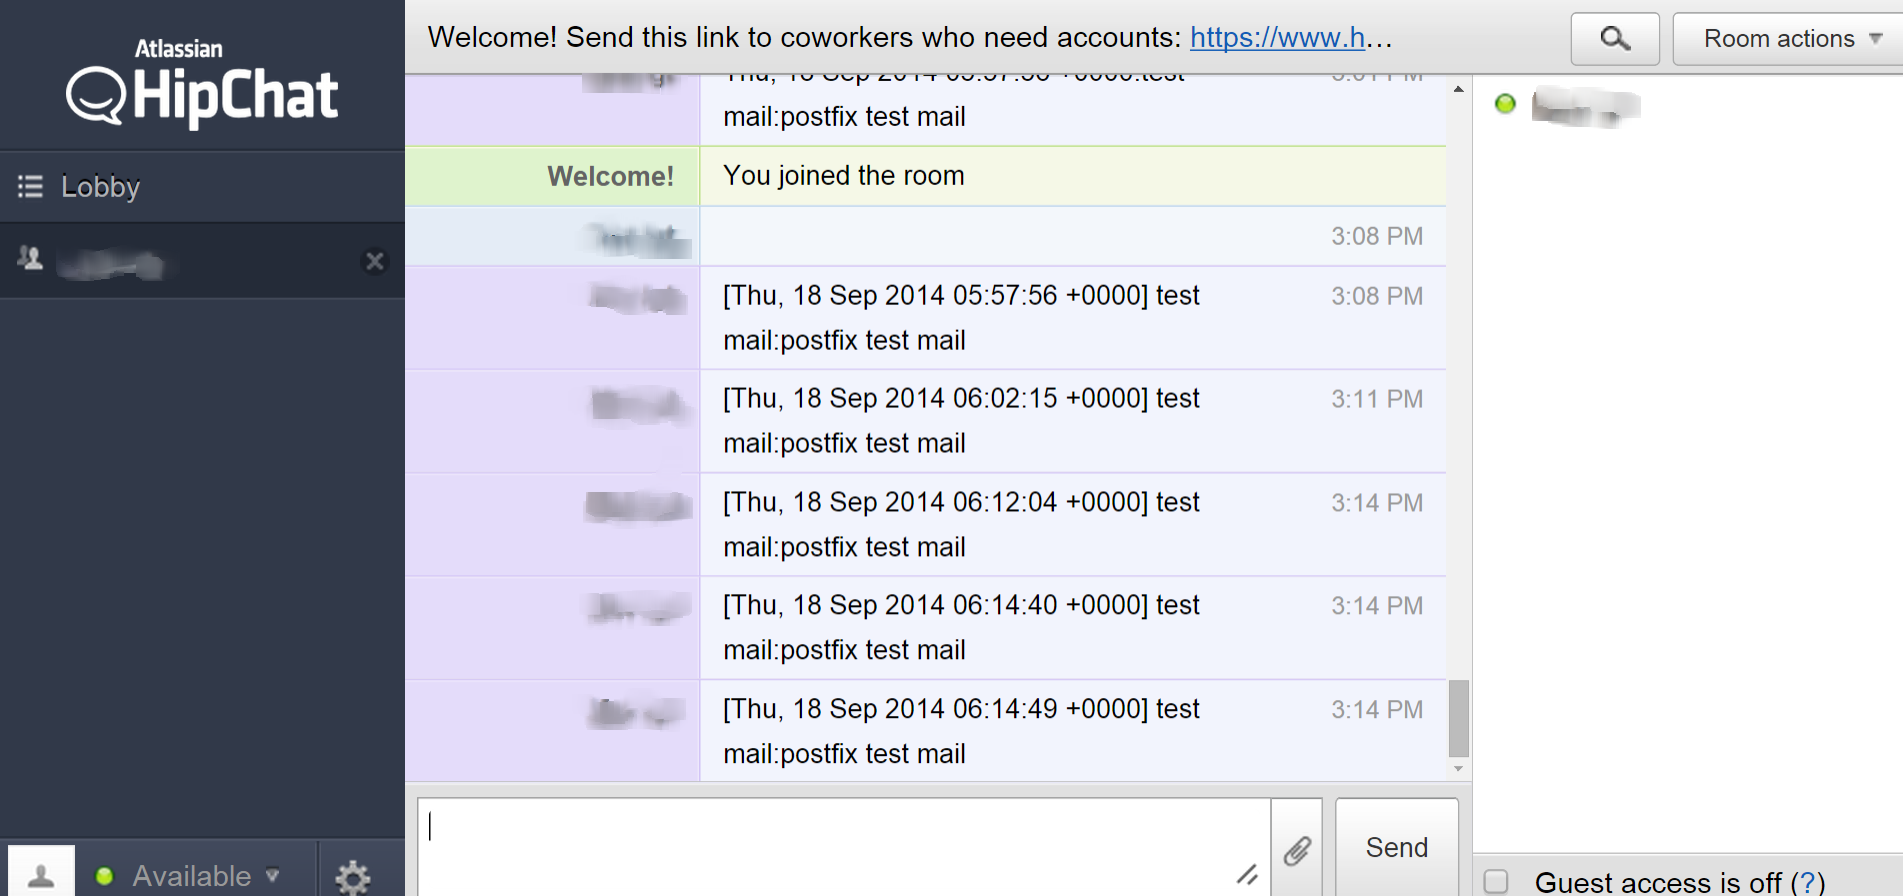
echo "postfix test mail" | mail -s "test mail" hoge@localhost
でテストメール送ってメールの中身がファイルに書きだされるの確認できるかと思います。
ちなみにout_execへデータを渡すには実行コマンドの引数にデータが入ったバッファファイルのパスが渡されるのでそこは注意点ですね。 ありがたいことに周りの方に教えていただいて解決しましたが仕様の勘違いは怖いですね... 標準入力でくるのかと思ってました...
あとfluentdのバッファはちゃんと制御しないとまぁつまるのでそこら辺も注意ですかね。そこら辺まだあまりわかってなくていけない。
参考:
exec Output Plugin | Fluentd
多段fluentd + mongodb のハマリ所 - stanaka's blog
引数のファイルパスに入ってるjsonからhipchat投稿
そしてスクリプト2は以下な感じで引数のファイルパスのjsonを読み取って、hipchatにメッセージを投稿します。
事前に、hipchatアカウント作ってトークン発行したり、pipでhypcaht入れたり、ディレクトリほったりは必要ですね。
from hypchat import HypChat
import sys
import json

def main():
        ### api call rundown
        API_KEY = "xxxxxxxxxxxxxxxxxxxxxxxxxxxxxxxxxxxxxxxx"
        ROOM_NUMBER = 000000
        DEFAULT_COLOR = "purple"

        ### get fluentd log
        f = open(sys.argv[1], 'r')
        data = json.load(f)
        input_lines = "[" + data["date"] + "] " + data["subject"] + ":" + data["body"]

        ### post message to hipchat
        hc = HypChat(API_KEY)
        room = hc.get_room(ROOM_NUMBER)
        message = input_lines
        room.notification(message, color=DEFAULT_COLOR)
        return 0

if __name__ == "__main__":
        main()
参考:
Fluentdプラグイン in_exec, out_execの動作を確認する | OpenGroove
あとはまた
echo "postfix test mail" | mail -s "test mail" hoge@localhost
とかで投稿すると以下な感じでhipchatに投稿できました。めでたしめでたし。
おまけ:実装の理由あれこれ
- azureはawsしか使ったことなかったから興味本位 + なんか仕事で使う羽目になりそうだったから + pyconでちょっと話聞いてきたから
- pythonは普段書きなので
- hipchatは会社で使ってるから
- postfixはsendmailだと設定めんどいかも?とか思ったから
- fluentdはごりごりパースしたりプラグイン既存の使ったらきっと幸せになれるよね?と祈りを込めて(やってないけど
ちなみに監視はとりあえずmonitとか入れてアラートメール飛ぶようにはしたのですが、まぁお勉強用なので露骨なアラートメールいろいろでっちあげるのと、それ用のfluentdのパーサを書くとこの作り込みはとっとと満足してしまったので次の機会に。
以上。