メインウィンドウが閉じても、サブウィンドウが常駐アプリとして画面に残り続けるアプリを作成したいと思います。
Lollipop (API Level 22) までは android.permission.SYSTEM_ALERT_WINDOW を Manifest に設定する方式でしたが、Marshmallow (API Level 23) からは Settings.canDrawOverlays(Context) で権限を取得する方式に変更されました。
ここでは、Lollipop までと Marshmallow の両バージョンに対応した常駐アプリの作成方法を記載します。
AndroidManifest.xml
AndroidManifest.xml に記載するのは Lollipop までのアプリ向け設定です。
android.permission.SYSTEM_ALERT_WINDOW の uses-permission 設定にて TYPE_SYSTEM_ALERT レイヤーに常駐させる権限を設定します。
<service android:name=".SubWindowService"/> の設定は、アプリを常駐させる際に別プロセスに切り離さないといけないので SubWindowService Class を用意します、という設定です。
<?xml version="1.0" encoding="utf-8"?>
<manifest xmlns:android="http://schemas.android.com/apk/res/android"
    package="com.hoge">

    <uses-permission android:name="android.permission.SYSTEM_ALERT_WINDOW" /> // この行を追加

    <application
        android:allowBackup="true"
        android:icon="@mipmap/ic_launcher"
        android:label="@string/app_name"
        android:supportsRtl="true"
        android:theme="@style/AppTheme">
        <activity android:name=".MainActivity">
            <intent-filter>
                <action android:name="android.intent.action.MAIN" />

                <category android:name="android.intent.category.LAUNCHER" />
            </intent-filter>
        </activity>
        <service android:name=".SubWindowService"/> // この行を追加
    </application>
</manifest>
SubWindowFlagment.java
常駐アプリとしてサブウィンドウを表示する画面用に SubWindowFlagment を用意します。
メインウィンドウを非表示にするボタンとサブウィンドウを非表示にするボタンの2つの処理を行うだけです。
それぞれの処理自体は MainActivity にお任せで、ここでは何もやりません。
public class SubWindowFlagment extends Fragment {
    public View view;
    private MainActivity _activity;

    /*
     * 画面呼び出し
     */
    public View loadView(MainActivity mainActivity) {
        _activity = mainActivity;

        LayoutInflater inflater = LayoutInflater.from(_activity);
        view =  inflater.inflate(R.layout.sub_window_fragment, null);

        // メインウィンドウを閉じるボタン
        Button windowButton = (Button)view.findViewById(R.id.closeMainButton);
        windowButton.setOnClickListener(new View.OnClickListener() {
            @Override
            public void onClick(View view) {
                closeMainWindow();
            }
        });

        // 常駐アプリを閉じるボタン
        Button closeButton = (Button)view.findViewById(R.id.closeSubButton);
        closeButton.setOnClickListener(new View.OnClickListener() {
            @Override
            public void onClick(View view) {
                closeSubWindow();
            }
        });

        return view;
    }

    /*
     * メインウィンドウを閉じる
     */
    private void closeMainWindow() {
        _activity.moveTaskToBack(true);
    }

    /*
     * サブウィンドウを閉じる
     */
    private void closeSubWindow() {
        _activity.closeSubWindow();
    }
}
sub_window_fragment.xml
サブウィンドウの画面として Flagment を用意します。
ボタンが2つ存在しているだけの単純な画面です。
<?xml version="1.0" encoding="utf-8"?>
<RelativeLayout xmlns:android="http://schemas.android.com/apk/res/android"
    android:orientation="horizontal"
    android:layout_width="match_parent"
    android:layout_height="match_parent"
    android:background="@color/colorWindow">

    <Button
        android:id="@+id/closeMainButton"
        android:layout_width="wrap_content"
        android:layout_height="wrap_content"
        android:text="Close\nMain" />

    <Button
        android:id="@+id/closeSubButton"
        android:layout_width="wrap_content"
        android:layout_height="wrap_content"
        android:layout_toRightOf="@+id/closeMainButton"
        android:layout_marginLeft="20dp"
        android:text="close\nsub"/>
</RelativeLayout>
SubWindowService.java
SubWindowService.java にコーディングするのは Lollipop までのアプリ向け設定です。
常駐アプリとしてのサブウィンドウ生成を行った後、メインウィンドウを閉じる処理を行うとサブウィンドウも閉じてしまうため、Service としてプロセスを切り離す必要があるためです。
ちなみに Marshmallow ではこのような切り離しを行わなくてもメインウィンドウのみ閉じることが可能です。
楽になっていますね〜。
public class SubWindowService extends Service {
    private WindowManager _windowManager;
    private SubWindowFlagment _windowFragment;

    /*
     * MainActivity とやりとりをするための Binder
     */
    public class SubWindowServiceBinder extends Binder {
        SubWindowService getService() {
            return SubWindowService.this;
        }
    }
    private final  IBinder _binder = new SubWindowServiceBinder();

    @Override
    public IBinder onBind(Intent intent) {
        return _binder;
    }

    /*
     * サブウィンドウの生成
     */
    public void openWindow(MainActivity activity) {
        WindowManager.LayoutParams params = new WindowManager.LayoutParams(
                WindowManager.LayoutParams.WRAP_CONTENT,
                WindowManager.LayoutParams.WRAP_CONTENT,
                WindowManager.LayoutParams.TYPE_SYSTEM_ALERT, // 画面にタッチできるように SYSTEM_ALERT レイヤーに表示
                WindowManager.LayoutParams.FLAG_NOT_FOCUSABLE | // 下の画面を操作できるようにする
                        WindowManager.LayoutParams.FLAG_FULLSCREEN |
                        WindowManager.LayoutParams.FLAG_WATCH_OUTSIDE_TOUCH,
                PixelFormat.TRANSLUCENT
        );
        params.gravity = Gravity.TOP | Gravity.LEFT; // 左上に表示

        _windowManager = (WindowManager) this.getSystemService(Context.WINDOW_SERVICE);
        _windowFragment = new SubWindowFlagment();
        _windowManager.addView(_windowFragment.loadView(activity), params);
    }


    /*
     * サブウィンドウを閉じる
     */
    public void closeSubWindow() {
        if (_windowFragment != null && _windowFragment.view != null) {
            _windowManager.removeView(_windowFragment.view);
            _windowFragment.view = null;
        }
    }
}
main_activity.xml
ここでは常駐ボタンを用意しただけです。
<RelativeLayout xmlns:android="http://schemas.android.com/apk/res/android"
    android:layout_width="match_parent"
    android:layout_height="match_parent">

    <Button
        android:layout_width="wrap_content"
        android:layout_height="wrap_content"
        android:text="常駐"
        android:id="@+id/openWindowButton"
        android:layout_marginTop="10dp"
        android:layout_alignParentTop="true"
        android:layout_alignParentLeft="true"
        android:layout_marginLeft="10dp" />
</RelativeLayout>
MainActivity.java
今まで用意したプログラムなどを繋げてアプリにします。
MainActivity の役割としては、サブウィンドウを生成することと、サブウィンドウを閉じることを実装しています。
public class MainActivity extends AppCompatActivity {

    private WindowManager _windowManager;
    private SubWindowFlagment _subWindowFragment;
    private SubWindowService _subWindowService;
    private static int ACTION_MANAGE_OVERLAY_PERMISSION_REQUEST_CODE = 1234; // 適当な数字でOK?

    /*
     * メインの画面作成
     */
    @Override
    protected void onCreate(Bundle savedInstanceState) {
        super.onCreate(savedInstanceState);
        setContentView(R.layout.main_activity);

        Button windowButton = (Button)this.findViewById(R.id.openWindowButton);
        windowButton.setOnClickListener(new View.OnClickListener() {
            @Override
            public void onClick(View view) {
                openSubWindow();
            }
        });
    }

    /*
     * サブウィンドウを作成
     */
    public void openSubWindow() {
        if (Build.VERSION.SDK_INT >= 23) {
            // Marshmallow 以上用の処理
            if (Settings.canDrawOverlays(this)) {
                if (_subWindowFragment != null && _subWindowFragment.view != null) {
                    closeSubWindow();
                }

                WindowManager.LayoutParams params = new WindowManager.LayoutParams(
                        WindowManager.LayoutParams.WRAP_CONTENT,
                        WindowManager.LayoutParams.WRAP_CONTENT,
                        WindowManager.LayoutParams.TYPE_SYSTEM_ALERT,
                        WindowManager.LayoutParams.FLAG_NOT_FOCUSABLE |
                                WindowManager.LayoutParams.FLAG_FULLSCREEN |
                                WindowManager.LayoutParams.FLAG_WATCH_OUTSIDE_TOUCH,
                        PixelFormat.TRANSLUCENT
                );
                params.gravity = Gravity.TOP | Gravity.LEFT;

                _windowManager = (WindowManager) this.getSystemService(Context.WINDOW_SERVICE);
                _subWindowFragment = new SubWindowFlagment();
                _windowManager.addView(_subWindowFragment.loadView(this), params);


            } else {
                // サブウィンドウ生成の権限がなかった場合は、下記で権限を取得する
                Intent intent = new Intent(Settings.ACTION_MANAGE_OVERLAY_PERMISSION, Uri.parse("package:com.hoge"));
                this.startActivityForResult(intent, ACTION_MANAGE_OVERLAY_PERMISSION_REQUEST_CODE);
            }
        } else {
            // Lollipop 以前用の処理
            startService(new Intent(MainActivity.this, SubWindowService.class));
            // Binder によるサブウィンドウとの接続
            bindService(new Intent(MainActivity.this, SubWindowService.class), _connection, Context.BIND_ABOVE_CLIENT);
        }
    }


    // Build.VERSION.SDK_INT < 22 の対応
    private ServiceConnection _connection = new ServiceConnection() {
        @Override
        public void onServiceConnected(ComponentName componentName, IBinder iBinder) {
            _subWindowService = ((SubWindowService.SubWindowServiceBinder)iBinder).getService();
            openWindow();
        }

        @Override
        public void onServiceDisconnected(ComponentName componentName) {}
    };
    public void openWindow() {
        _subWindowService.openWindow(this);
    }

    // Build.VERSION.SDK_INT >= 23 の対応
    public void closeSubWindow() {
        if (Build.VERSION.SDK_INT >= 23) {
            if (_subWindowFragment != null && _subWindowFragment.view != null) {
                _windowManager.removeView(_subWindowFragment.view);
                _subWindowFragment.view = null;
            }
        } else {
            _subWindowService.closeSubWindow();
            stopService(new Intent(MainActivity.this, SubWindowService.class));
        }
    }

    /*
     * Lollipop までは、メインウィンドウをバックグランドに入れる際に onDestroy が実行されてしまう
     */
    @Override
    protected void onDestroy() {
        super.onDestroy();
        if (Build.VERSION.SDK_INT >= 23) {
            closeSubWindow();
        }
    }
}
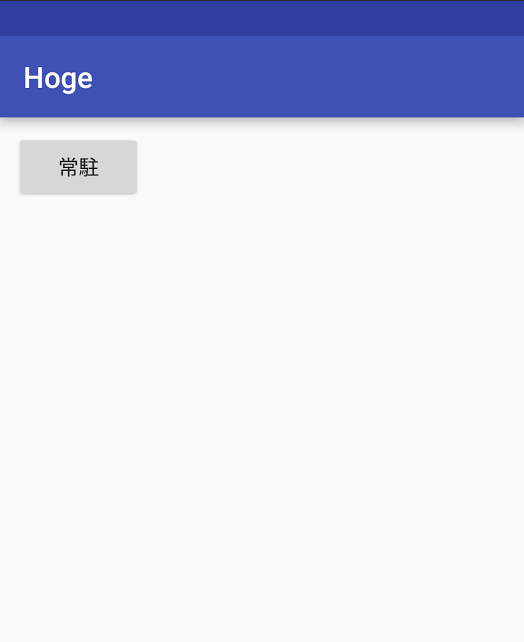
このアプリを実行すると、下記のような画面が表示されると思います。
常駐ボタンを押すと、Marshmallow 以降のバージョンの場合は下記のように権限を付与しても良いかの確認メッセージが表示されます。
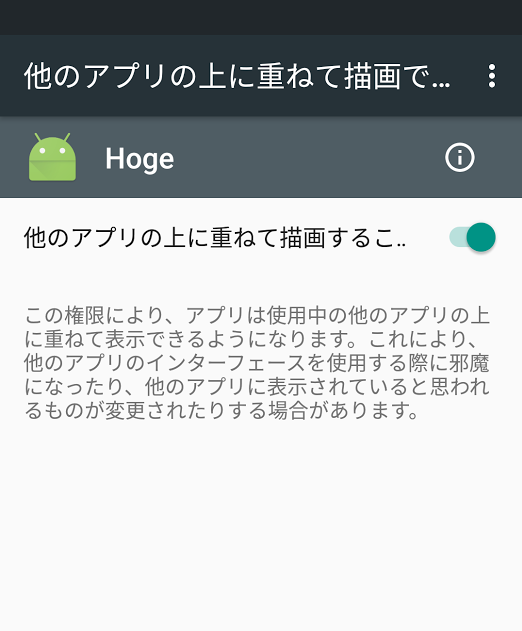
権限を付与するようにしたら戻るボタンで一度戻ります。
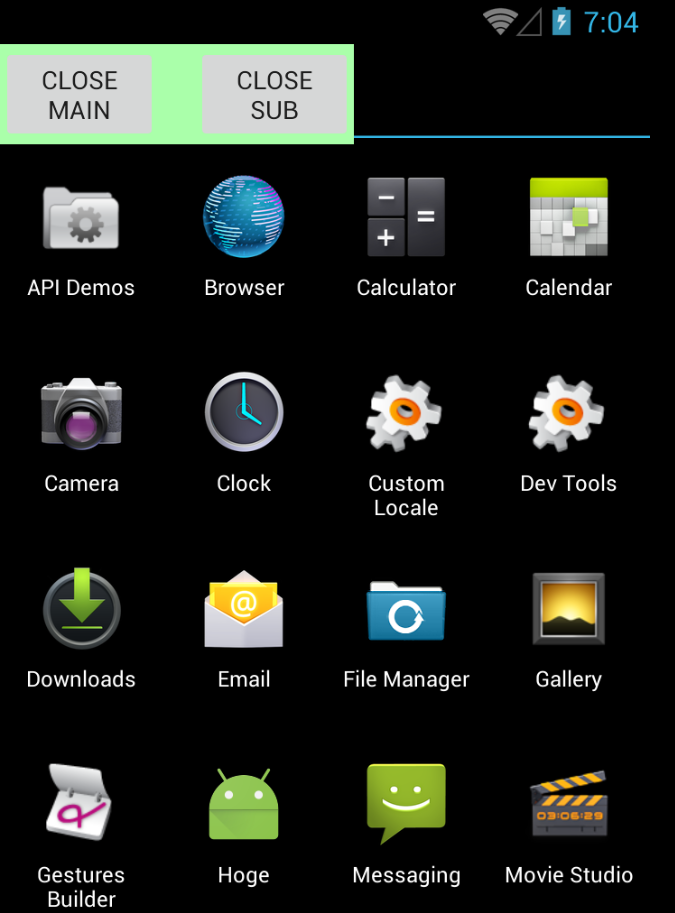
そして、改めて常駐ボタンを押すとこのような感じにウィンドウが出てきます。

CLOSE SUB をタップするとサブウィンドウが閉じ、CLOSE MAIN をタップすると下記のようにメインウィンドウのみバックグラウンドに隠れます。
サブウィンドウはこのまま画面に残り続け、他のアプリの操作も可能となります。
あとは必要に応じて画面やロジックを実装していけば、常駐アプリを完成させることができると思います。
[追記]
実際に動くプログラムをアップしたほうが良いかと思いまして、GitHubに動くものを用意しました。
もし興味のある方は実際の動きやプログラムを見ていただければと思います。