今日のゴール
- 艦これの資材的な要素を画面上に配置する
- エサをやる時に資材を消費する
今日のキーワード
- KVO
- UIView.animate
やったこと
資材用クラスResourceを設計する
- 艦これの資材的な要素を定義するためのResourceクラスについて考えてみるよ
- 数分間に一回、一定量が生産されて、保有量が増加していく
- エサをやったり、戦闘したり、ガチャしたり何かしらしたら消費されていく etc・・・
- ちょうど素材の中に、それっぽいアイコンがあるのでこれをベースに考えていくよ
こんな感じのやつ

- Resourceクラスを実現するために、こんな感じでプロパティとメソッドを考えてみるよ
- プロパティとして
-
nameがある
- 上のアイコンなら「炎のオーブ」とかかな?
- image(アイコン画像)がある
- quantity(現在保有量)がある
- increaseAmount(時間あたりの増加量)がある
- increaseInterval(増加の間隔)がある
-
nameがある
- メソッドとして
- increaseQuantityを実装する (一定間隔でquantityが増加する)
- setupTimerを実装する ("一定間隔"を実現するためタイマーを設定する)
- getQuantityを実装する (現在保有量を返す)
- consumeを実装する (現在保有量から一定量を消費して現在保有量を減らす)
- プロパティとして
上記を基にクラスを実装していくよ
Resource.swift
//
//  Resource.swift
//  Digikore
//
//  Created by nasteng on 2017/07/09.
//
//

import Foundation
import UIKit

final class Resource: NSObject {
    let name: String                             // 資源名(ex: 光のオーブ)
    let image: UIImage                           // 資源アイコン画像
    private var quantity: Int                    // 資源保有量
    private var incrementInterval: TimeInterval  // 増加間隔(秒)  デフォルトでは5秒
    private var increaseAmount: Int              // 増加量 デフォルトでは100,000
    private var increaseTimer: Timer

    init(name: String, image: UIImage, incrementInterval: TimeInterval = 5.0, increaseAmount: Int = 50) {
        self.name = name
        self.image = image
        self.quantity = 100000
        self.incrementInterval = incrementInterval
        self.increaseAmount = increaseAmount
        self.increaseTimer = Timer()
        super.init()
    }

    func setUpTimer() {
        self.increaseTimer = Timer.scheduledTimer(timeInterval: incrementInterval, target: self, selector: #selector(increaseQuantity), userInfo: nil, repeats: true)
    }

    func increaseQuantity() {
        self.quantity += increaseAmount
    }

    func getQuantity() -> Int {
        return self.quantity
    }

    func consume(_ amount: Int) {
        if quantity >= amount {
            self.quantity -= amount
        }
    }
}
- ここまで考えてincreaseQuantity()が発動した時に、即時にViewControllerに値を渡したいなあと考えたよ
- 資源が増加した時点で画面の表示を更新したいから
- 今までやったようなwillSetとかのプロパティ監視でもいいんだけど、他のKVO(Key-Value Observe)パターンのNotificationを使うことにしたよ
- 特に意味はなくて技術習得の意味合いが強いよ
Resource.swift
~~~省略~~~
    func increaseQuantity() {
        self.quantity += increaseAmount
        let notification = Notification(name: Notification.Name(rawValue: self.name), object: nil, userInfo: ["quantity": quantity])
        NotificationCenter.default.post(notification)
    }
~~~省略~~~
ViewController.swift
~~~省略~~~
class ViewController: UIViewController {

    private var resource: Resource = Resource(name: "光のオーブ", image: UIImage(named: "r_shine.png")!)

    override func viewDidLoad() {
~~~省略~~~
        resource.setUpTimer()
        resourceImageView.image = resource.image
        resourceQuantityLabel.text = String(self.resource.getQuantity())

        NotificationCenter.default.addObserver(forName: NSNotification.Name(resource.name), object: nil, queue: .main) { notification in
            self.reloadResource(with: notification)
        }
    }

    func reloadResource(with notification: Notification) {
        guard let userInfo = notification.userInfo as? [String: Int],
            let quantity = userInfo["quantity"] else {
                return
        }

        resourceQuantityLabel.text = String(quantity)
    }

    func feed() {
        resource.consume(10)
    }
}
- 通知を送る側の処理(Resource.swift)
- Resource自身の名前を通知名に設定するよ
- userInfoとして"quantity"をキーに増加した値をセットするよ
- NotificationCenterのpostメソッドを使って通知をポストするよ
- 通知を受け取る側の処理(ViewController.swift)
- viewDidLoadに通知を受け取った時の処理を実装するよ
- セレクターにreloadResource()を指定して画面上の表示を更新するようにするよ
- Main.storyboardにResource用のimageViewとかlabelを配置してるけどごちゃごちゃしそうなので割愛するよ
- ついでにfeed()を呼び出した時にリソースを減らすようにconsume()を呼び出すよ
うん、ちゃんとエサやりのたびに10ずつ減りつつ、50増加してるな!(多分!)
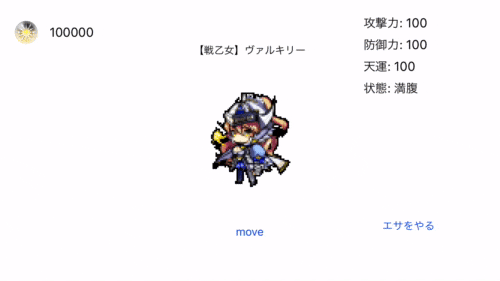
消費する時にふわぁっと消費量を表示して、フェードアウトさせたい
- このままだとなんか味気ないので消費したことが分かるように消費量をラベルで表示させてフェードアウトさせることにしたよ
- そのためにちょっとResourceクラスのconsume()を改造するよ
- クロージャーを追加して呼び出した側に消費が成功したかどうか(現在保有量 >= 消費量)のBool値を返してあげるようにしたよ
- こうすることで呼び出したViewController側でconsume()処理が成功したかどうか判断して処理を分岐させることができるよ
- まずはResourceの現在保有量のすぐ右あたりに消費量が表示されるようにしてみるよ
Resource.swift
    func consume(_ amount: Int, completion: ((_ didConsume: Bool) -> Void)) {
        if quantity >= amount {
            self.quantity -= amount
            completion(true)
            return
        }

        completion(false)
    }
ViewController.swift
@IBAction func feed(_ sender: Any) {
        let amount = 10
        resource.consume(amount) { didConsume in
            if didConsume {
                let targetFrame = self.resourceQuantityLabel.frame
                let rect = CGRect(x: targetFrame.origin.x + targetFrame.size.width + 10, y: targetFrame.origin.y, width: 300, height: 20)
                let label = UILabel(frame: rect)
                label.text = "\(amount)"

                self.view.addSubview(label)

                self.resourceQuantityLabel.text = String(self.resource.getQuantity())
                self.resourceQuantityLabel.sizeToFit()

                self.valkyrie.getFull()
                self.imageView.image = self.valkyrie.standardImage
                self.conditionLabel.text =  "状態: " + self.valkyrie.getCondition().description()

                // 満腹状態に戻るのでタイマーがどんな状態でも初期化する
                self.conditionTimer.invalidate()
                self.conditionTimer = Timer.scheduledTimer(timeInterval: 4.0 , target: self, selector: #selector(self.reloadCondition), userInfo: nil, repeats: true)
            }
        }
    }
とりあえず消費量は表示できたけど、ラベルがremoveされてなくてどんどん追加で表示されちゃうのでごめんなさいって感じですな

ラベルのフェードアウトアニメーションを設定する
- 検索ワード: 「swift UILabel フェードアウト」
- この記事が参考になったよ
- UIView.animate()のメソッドでアニメーションの間隔(1秒くらい)、アニメーションしたい内容(labelのx軸はそのままにy軸を0にする)、アニメーションが終わった後の処理(labelをsuperViewからremoveする)を書いていくよ
Resource.swift
    @IBAction func feed(_ sender: Any) {
        let amount = 10
        resource.consume(amount) { didConsume in
            if didConsume {
                let targetFrame = self.resourceQuantityLabel.frame

                // 資源量表示ラベルのすぐとなりに消費ラベルのrectを設定する
                let rect = CGRect(x: targetFrame.origin.x + targetFrame.size.width + 10, y: targetFrame.origin.y, width: 300, height: 20)
                let label = UILabel(frame: rect)
                label.text = "-\(amount)"

                self.view.addSubview(label)

                // 1秒間かけてy軸が0になるように、徐々に透明になるようにアニメーションさせる
                UIView.animate(withDuration: 1.0, animations: {
                    label.alpha = 0
                    label.frame = CGRect(origin: CGPoint(x: label.frame.origin.x, y: 0), size: label.frame.size)
                }, completion: { (didFinish) in
                    if didFinish {
                        // アニメーションが終了したらremoveする
                        label.removeFromSuperview()
                    }
                })

                self.resourceQuantityLabel.text = String(self.resource.getQuantity())
                self.resourceQuantityLabel.sizeToFit()

                self.valkyrie.getFull()
                self.imageView.image = self.valkyrie.standardImage
                self.conditionLabel.text =  "状態: " + self.valkyrie.getCondition().description()

                // 満腹状態に戻るのでタイマーがどんな状態でも初期化する
                self.conditionTimer.invalidate()
                self.conditionTimer = Timer.scheduledTimer(timeInterval: 4.0 , target: self, selector: #selector(self.reloadCondition), userInfo: nil, repeats: true)
            }
        }
    }
おお!案外アニメーション簡単やな!

結果
- 資材を追加したはいいもののそれを何に使うかまだ決めてないのが問題
- 案外アニメーションさせるのが簡単だったので汎用的に使えるようにメソッド化したい
- 本格的にコードがごちゃごちゃしてきたからリファクタしなければ・・・
- リファクタ会あってもいいかな

- リファクタ会あってもいいかな
- 今日の作業ブランチはこちら
次回
最後に
ご指摘・リファクタ大歓迎です![]()