JUnit を使ったパラメータライズドなテストについて、新たな選択肢として「JUnitParams」というライブラリを使用してみます。
JUnitParams
https://github.com/Pragmatists/JUnitParams
基本的な使い方
JUnitParams の Example にも書かれているが、この手の基本的な使い方は、既出のパラメータライズドなテストでも似たような書き方で、かつそれほど使う機会も少ないと思うので軽く飛ばしつつ。
まずランナーに JUnitParamsRunner を指定。
使用するアノテーションは @junitparams.Parameters。
これを @Test とセットで使用する。
ちなみに JUnitParams では、複数のパラメータで検証を行う中で、失敗するケースがあったとしても、全てのパラメータでテストを行う。
⇒ つまり、途中で失敗しても、ケース全てのテストを実施する
@RunWith(JUnitParamsRunner.class)
public class JUnitParamsSample {

    // 値の区切りには「|」(パイプ)の他に「,」も使える
    @Test
    @Parameters({ "A|1", "BBB|3", "CCCCC|5" })
    public void paramsInAnnotationPipeSeparated(String actual, Integer expected) {
        assertThat(actual).hasSize(expected);
    }
}
パラメータ用のメソッド指定
テストメソッドと、そのメソッドに渡すパラメータを定義するメソッドを、いくつかのルールで関連付けることが可能。
デフォルトの命名ルール
デフォルトの命名ルールは簡単。対象となるテストメソッド名の頭に「parametersFor」を付けるだけ。
// パラメータとして parametersForParamsInDefaultMethod の戻り値を使って呼ばれる
@Test
@Parameters
public void paramsInDefaultMethod(String actual, Integer expected) {
    assertThat(actual).hasSize(expected);
}

private Object parametersForParamsInDefaultMethod() {
    return new Object[] {
            new Object[] { "A", 1 },
            new Object[] { "BBB", 3 },
            new Object[] { "CCCCC", 5 }
    };
}
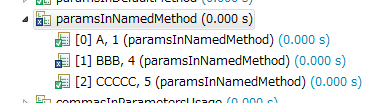
個別指定
また、@Parameters の method 属性を使って個別にパラメータ用のメソッドを指定することも可能。
@Test
@Parameters(method = "param1, param2, param3")
public void paramsInNamedMethod(String actual, Integer expected) {
    assertThat(actual).hasSize(expected);
}

private Object param1() {
    return new Object[] { "A", 1 };
}
private Object param2() {
    return new Object[] { "BBB", 3 };
}
private Object param3() {
    return new Object[] { "CCCCC", 5 };
}
実践的な使い方
テストコード内で Fixture を定義するケース
いわゆる Fixture を使ったパラメータ指定の場合も、基本的な書き方となんら変わりない。
@Test
@Parameters
public void paramsInCollectionFixture(Fixture f) {
    assertThat(f.actual).hasSize(f.expected);
}

// パラメータを返すメソッドの戻り値は Object の他に Collection, Iterator も可
private List<Fixture> parametersForParamsInCollectionFixture() {
    Fixture f1 = new Fixture("A", 1);
    Fixture f2 = new Fixture("BBB", 3);
    Fixture f3 = new Fixture("CCCCC", 5);
    return Arrays.asList(f1, f2, f3);
}

public static final class Fixture {
    public String actual;
    public Integer expected;

    public Fixture(String actual, Integer expected) {
        this.actual = actual;
        this.expected = expected;
    }
}
リソースファイル内で定義した Fixture 情報を Mapper 経由で変換するケース
Fixture の元ネタとなる情報を、リソースファイル (csv, etc) に定義するような場合、@junitparams.FileParameters を使ってファイルの内容を Fixture にマッピングするための Mapper を使って指定する。
// TestMethod
@Test
@FileParameters(value = "src/test/resources/params/fixture.csv", mapper = FixtureMappter.class)
// ↓コッチでもOK
// @FileParameters(value = "classpath:params/fixture.csv", mapper = FixtureMapper.class)
public void loadParamsFromAnyFile(Fixture f) {
    assertThat(f.actual).hasSize(f.expected);
}

// Mapper
public class FixtureMapper extends CsvWithHeaderMapper {
    @Override
    public Object[] map(Reader reader) {
        Object[] map = super.map(reader);
        List<Object[]> result = new LinkedList<Object[]>();
        for (Object lineObj : map) {
            String line = (String) lineObj;
            String[] values = line.split(",");
            result.add(new Object[] { values[0], Integer.parseInt(values[1]) });
        }
        return result.toArray();
    }
}
リソースファイルはこんな感じ。
文字列, 期待値
A,1
BBB,3
CCCCC,5
DDDD,4
リソースファイル内で定義した Fixture 情報を Converter 経由で変換するケース
上記の例の気持ち悪いところが、Mapper の戻り値が Object[] になるように実装しなければいけないところ。
※汎用的な作りにするためには致し方ないのかな...
それに対して Converter では、TypeSafe なコーディングが可能。
ただし、試した感じだと、リソースファイルに定義された元ネタの情報が「,」「|」で区切られていると、正しく変換できないので、TSV ファイルや独自のセパレーターを使用する必要がある。
// TestMethod
@Test
@FileParameters("classpath:params/no_header_fixture.tsv")
public void convertParams(@FixtureParam Fixture f) {
    assertThat(f.actual).hasSize(f.expected);
}

// 独自の ParamAnnotation
import junitparams.converters.Param;

@Retention(RetentionPolicy.RUNTIME)
@Target(ElementType.PARAMETER)
@Param(converter = FixtureConverter.class) // Converter を指定
public @interface FixtureParam {
    // 独自の属性を定義可能
}

// 独自の Converter
import junitparams.converters.Converter;

public static class FixtureConverter implements Converter<FixtureParam, Fixture> {

    @Override
    public void initialize(FixtureParam annotation) {
        // NOP
    }

    @Override
    public Fixture convert(Object param) throws ConversionFailedException {

        String line = param.toString();
        String[] values = line.split("\t");
        if (values.length != 2) {
            throw new ConversionFailedException("failed");
        }

        return new Fixture(values[0], Integer.parseInt(values[1]));
    }
}
リソースファイル (タブ区切り) はこんな感じ。
A   1
BBB 3
CCCCC   5
DDDD    4
その他
パラメータ化したテストケース毎に名前を指定
@junitparams.naming.TestCaseName アノテーションでケース名を指定可能。
@Test
@Parameters(method = "param1, param2, param3")
@TestCaseName("length({0}) = {1}")
public void paramsInNamedMethod(String p1, Integer p2) {
    assertThat(p1.length(), is(p2));
}
上記のテストケースにおいて、@TestCaseName アノテーションを指定しない場合と、指定した場合とで Eclipse の実行結果を比較。
JUnit の実行結果レベルでも見やすいのは親切ですね。パッと見てどのテストケースか分かるのはイイネ!!
@TestCaseName 指定なし
@TestCaseName 指定あり

最後に
JUnit に用意されている Theories や Parameterized にやきもきしている方は、お試しいかが?