2019年9月20日追記:余っていたESP32モジュール5個を搭載すべく、同じ見かけの開発ボードをAliExpressにて$1.90でゲット。ただし、MacBook Air 13の右側USBポートで認識できない不具合発生。左側だとオッケー。消費電力の関係?? 認識できるときもあるのが不思議。ちなみにCP2102ドライバーはバージョン5.2.1に。 今や、esp32付きの開発ボードで4ドルを切ってますね。
ESP32モジュールと開発ボードをゲット
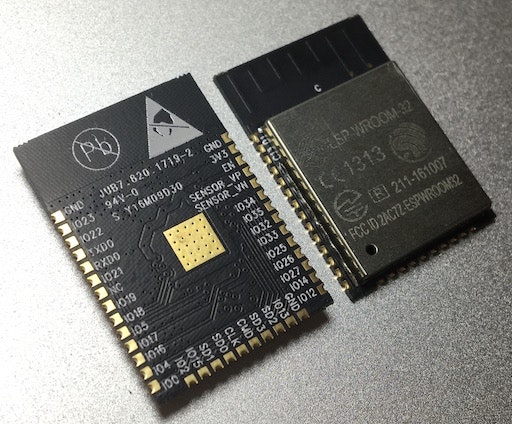
2017-2-1、秋月電子からESP32モジュールが発売されました。
ESP-WROOM-32
http://akizukidenshi.com/catalog/g/gM-11647/
一個700円、送料500円だったので、10個ゲット。翌日到着。
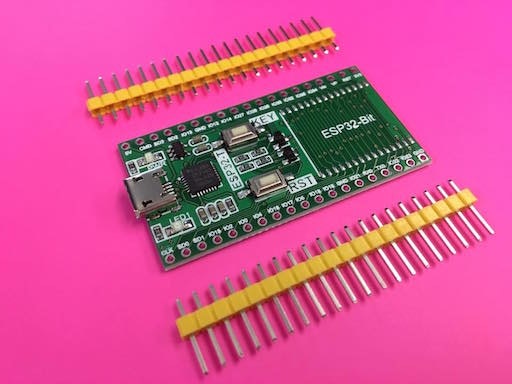
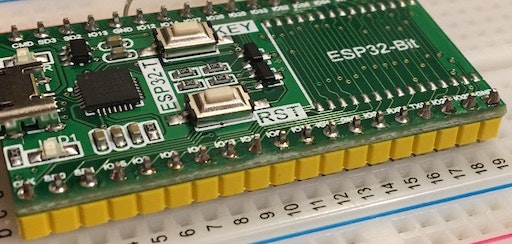
開発ボードをeBayで探してゲット。
「DIYmall ESP8266 ESP32 ESP32-Bit Module ESP3212 / Development Board CP2102 Chip」
https://www.ebay.com/itm/282291114351(リンク切れ)
CP2102というUSB-UARTブリッジが載ってます。
730円ぐらい。送料無料でしたが、納期が長そうだったのと割引があったので5個買いました。中国から、なんと、3日で到着(!)。
モジュールを実装
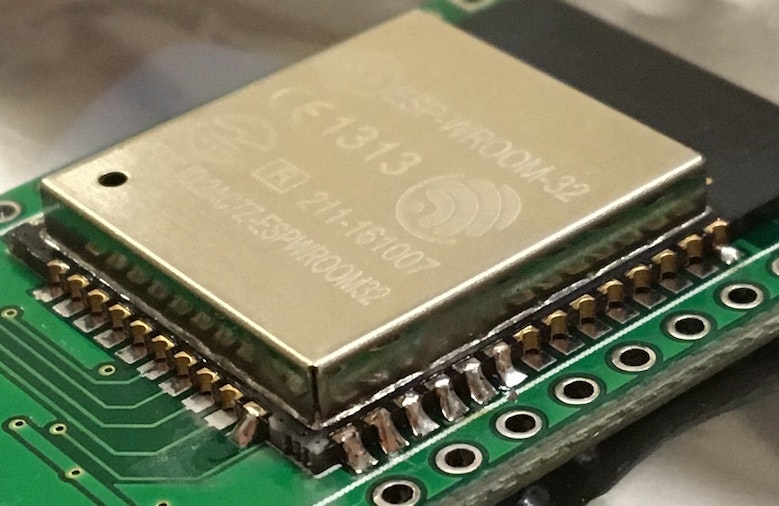
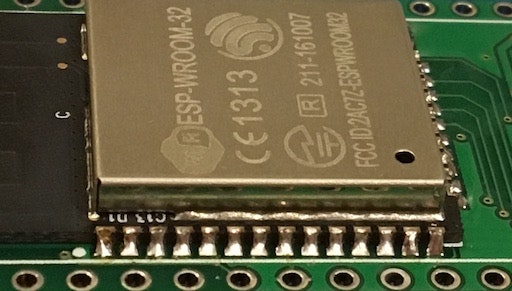
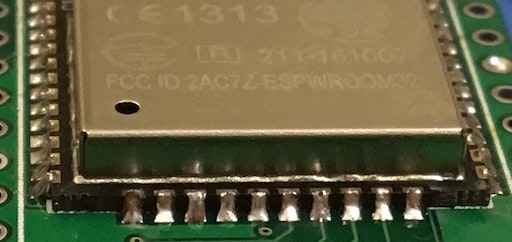
ESP-WROOM-32を開発ボードに半田付け、ハーフピッチ(1.25mm)14+14+10 =38ピンです。さらに19ピンのヘッダーを二つ、半田付け。ブレッドボードに刺すと、1ピンだけ穴が使える横幅。モジュールは残念ながら裏面です。
ハーフピッチの半田付けは、かなり久々でしたが問題なし。老眼との戦いは。。。!

Arduino IDEの準備
Arduinoも久々だったので、最新版1.8.1をダウンロード。
https://www.arduino.cc/en/Main/Donate
開発元espressifがArduinoボード設定をgithubに置いているので設定。
https://github.com/espressif/arduino-esp32
解説がかなり丁寧。だけど読まなくても、以下のコマンドラインをコピペ一発で設定終了。
mkdir -p ~/Documents/Arduino/hardware/espressif && \
cd ~/Documents/Arduino/hardware/espressif && \
git clone https://github.com/espressif/arduino-esp32.git esp32 && \
cd esp32/tools/ && \
python get.py
追記:2年ぶりにやってみたら、本家の方にちょっと変化が。下記のようにやらないと、BLEとAzureIoTでヘッダーファイルが見つからないというエラーが出ます。
git submodule update --init --recursive が追加されていました。
mkdir -p ~/Documents/Arduino/hardware/espressif && \
cd ~/Documents/Arduino/hardware/espressif && \
git clone https://github.com/espressif/arduino-esp32.git esp32 && \
cd esp32 && \
git submodule update --init --recursive && \
cd tools && \
python get.py
Arduino IDEのツール設定
Arduinoを起動して、ツール(Tools)メニューから、
ボード(Board): ESP 32 Dev Module を選びます。
シリアルポート(Port): ?? あれ? USBがないぞ。。
ははー、さては、CP2102(USB-UARTブリッジ)のドライバーが必要ですね。
開発元SILICON LABSサイトから、ダウンロード&インストール。日本語ページだ!
~~http://jp.silabs.com/products/mcu/Pages/USBtoUARTBridgeVCPDrivers.aspx#mac~~(リンク切れ)
2020-03-02 リンク切れに付き、修正。
https://jp.silabs.com/products/development-tools/software/usb-to-uart-bridge-vcp-drivers
シリアルポート(Port): /dev/cu.SLAB_USBtoUART が現れました。
MacのSystem Reportでも認識されています。
CP2102 USB to UART Bridge Controller:

  Product ID:	0xea60
  Vendor ID:	0x10c4  (Silicon Laboratories, Inc.)
  Version:	1.00
  Serial Number:	0001
  Speed:	Up to 12 Mb/sec
  Manufacturer:	Silicon Labs
  Location ID:	0x14200000 / 2
  Current Available (mA):	1000
  Current Required (mA):	100
  Extra Operating Current (mA):	0
いよいよLチカ!
さて、気を取り直して、いつものLチカスケッチを。開発ボードに載っているLED1がGPIO2につながっているのでチカらせます。
void setup() {
  pinMode(2, OUTPUT);
}

void loop() {
  digitalWrite(2, HIGH);
  delay(125);
  digitalWrite(2, LOW);
  delay(375);
}
Uploadしてみよう!
あれ、エラーが出る。。
[RST]ボタンを押すと、リセット動作してターミナルに返事が返ってくるので、配線、USB-UART接続は問題なし。書き込みモードになっていないようです。
[RST]ボタンと[KEY]ボタンを押して、[RST]ボタンから離すと、書き込みモードに。
Uploadしてみよう! メニュー左から2番目の[→]ボタン「マイコンボードに書き込む」をクリック。
esptool.py v2.0-dev
Connecting...
Uploading stub...
Running stub...
Stub running...
Changing baud rate to 921600
Changed.
Attaching SPI flash...
Configuring flash size...
Compressed 8752 bytes to 5468...

Writing at 0x00001000... (100 %)
Wrote 8752 bytes (5468 compressed) at 0x00001000 in 0.1 seconds (effective 857.9 kbit/s)...
Hash of data verified.
Compressed 3072 bytes to 82...

Writing at 0x00008000... (100 %)
Wrote 3072 bytes (82 compressed) at 0x00008000 in 0.0 seconds (effective 10520.4 kbit/s)...
Hash of data verified.
Compressed 288960 bytes to 122843...

Writing at 0x00010000... (12 %)
Writing at 0x00014000... (25 %)
Writing at 0x00018000... (37 %)
Writing at 0x0001c000... (50 %)
Writing at 0x00020000... (62 %)
Writing at 0x00024000... (75 %)
Writing at 0x00028000... (87 %)
Writing at 0x0002c000... (100 %)
Wrote 288960 bytes (122843 compressed) at 0x00010000 in 2.9 seconds (effective 809.4 kbit/s)...
Hash of data verified.

Leaving...
Hard resetting...
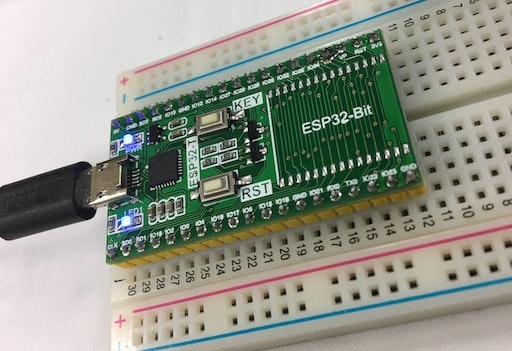
yay! チカチカしました! 写真手前のLED1です。
以降は、コード書き換え、「マイコンボードに書き込む」(Upload)で書き込めるようになりました。ただし、「ボード情報の取得」(Get Board Info)は対応していないようです。
ツールチェインを設定して、ESP-IDFでのLチカもうまくいったので、また書きます。
追記:書きました。MacでESP32のLチカ(ESP-IDF版)
追記(2019-02-15):久々にやってみたら、2年前と同じように動いたのだが、Arduino IDEにて、「AzureIoTとBLEのヘッダーがないので、無効なライブラリです。」というエラーメッセージが出てうざい。
ここ「ESP-WROOM-32 + Arduino IDE で、ヘッダが見つかりませんと言われちゃうときは。」の通りにやったら、治りました。感謝。
おー、本家の方も書き換わってた。引用部分も直しておきました。