Vue.jsでSSR(サーバサイドレンダリング)する
はじめに
この記事はなにかの Advent Calendar 2016の23日目の記事です.
Vue.jsは2系がリリースされてそこそこたちました.
日本語ドキュメントもそろっています. フロントの取りかかりとして簡単でスケールもしやすく良いのではないでしょうか.
そこで今回はVue.js2系の大きな特徴であるサーバサイドレンダリングを行ったアプリケーションの制作をしてみたいと思います.
最終的に
- APIコールをして動的ページのSSRを行う
- 初期表示以後はSPAとして動く
こんなアプリケーションを目指します.
完成版は以下です
使う物
vuejs vue-router vuex
このあたりを使います.
詳しくはソースコードのpackage.jsonを...
Step1 静的ページのSSR
さぁ作成していきます.
まず第一に静的ページ(APIコールでデータを書いたりしない)ページをSSRで表示しようと思います.
vuejsとvue-router,何も設定しないvuexでページを作っていきます.
ページ作成
適当なルーティング込みのページを作ります.
今回はAppコンポーネントをルートとしrouter-viewを子に与え
- /counter で Counterコンポーネント(よくあるカウンタ)
- /weather で Weatherコンポーネント (最終的にAPIコールで天気を表示)
この2つのコンポーネントがパスに応じて配置されるようにします.
それではまずvueファイルとエントリスクリプト、テンプレート、webpackの基本設定等を作成していきます.
尚,設定等は極力簡略化をしています. 実際に使うにはこれでは力不足なので参考ページのvue-hacker-news の設定をコピって自分に合うように変えた方がいいと思います. 今回示す設定は参考サイトの設定を元に削った物です
ページ
<template>
  <div id="app">
    <nav>
      <ul>
        <li><router-link to="/counter">Counter</router-link></li>
        <li><router-link to="/weather">Weather</router-link></li>
      </ul>
    </nav>
    <router-view></router-view>
  </div>
</template>
<script>
export default {
  name: 'app'
}
</script>
トップレベルコンポーネントです.
内部にrouter-viewを用意しパスに応じてコンポーネントを配置します.
<template>
    <div id="counter">
      <h1> Counter Comp </h1>
      <p> {{ cnt }}.sec </p>
    </div>
</template>
<script>
export default {
  name: 'counter',
  data () {
    return {
      cnt: 0
    }
  },
  beforeMount () {
    // クライアント側で走らせる処理は適当なライフサイクルメソッドで設定.
    // 注意: この関数とまりません(´・ω・`)
    setInterval(() => {
      this.cnt++
    }, 1000)
  }
}
</script>
カウンターです. 1秒後に表示される数値が増えます.
<template>
  <div id="weather">
    <h1> WeatherComp </h1>
  </div>
</template>
そのうちAPIコールしてデータを表示するコンポーネントですが,現状はただの静的データを表示するだけにします.
router設定
import Vue from 'vue'
import Router from 'vue-router'

Vue.use(Router)

import Counter from '../views/Counter.vue'
import Weather from '../views/Weather.vue'
export default new Router({
  mode: 'history',
  routes: [
    {
      path: '/counter',
      component: Counter
    },
    {
      path: '/weather',
      component: Weather
    },
    {
      path: '/',
      redirect: '/counter'
    }
  ]
})
パス割り当てをします.
vuex初期設定
import Vue from 'vue'
import Vuex from 'vuex'

Vue.use(Vuex)

const store = new Vuex.Store({
  state: {
  },
  actions: {
  },
  mutations: {
  },
  getters: {
  }
})

export default store
現段階では空っぽです.
アプリケーションエントリ
import Vue from 'vue'
import App from './App.vue'
import store from './store'
import router from './router'
import { sync } from 'vuex-router-sync'

// routerとstoreを同期させる処理です
// ページ遷移するとmutationが走ったりしてくれてstoreの中にrouterのパラメータ等が入る便利な奴です.
sync(store, router)

const app = new Vue({
  router,
  store,
  ...App
})

export { app, router, store }
Vueのインスタンスを生成する処理です.
普通ならここでマウントまで行いますが,今回はSSRを行うのでマウントはここでは行いません. 後述のclient-entry.jsでマウントをします.
SSR用の設定と実行コード
SSRできるようにwebpackの設定、及びサーバー側で実行するスクリプトを作ります.
SSRするにはクライアントに提供するいつものwebpackの出力に加えてサーバー側で実行するバイナリも作る必要があります.
具体的には
- webpackの設定をサーバーサイド側のモジュールをはき出す処理とクライアント側のモジュールをはき出す処理の2つの設定を作ります.
- webpackのエントリとして指定するものをclient側とserver側で分けます. client側はclient-entry.js server側はserve-entry.jsです
先にwebpackの設定を示します.
const path = require('path')
const webpack = require('webpack')

module.exports = {
  devtool: '#source-map',
  entry: {
    app: './src/client-entry.js',
    vendor: [
      'es6-promise',
      'vue',
      'vue-router',
      'vuex',
      'vuex-router-sync'
    ]
  },
  output: {
    path: path.resolve(__dirname, '../dist'),
    publicPath: '/dist/',
    filename: '[name].[chunkhash].js'
  },
  resolve: {
    alias: {
      'public': path.resolve(__dirname, '../public')
    }
  },
  module: {
    noParse: /es6-promise\.js$/, // avoid webpack shimming process
    rules: [
      {
        test: /\.vue$/,
        loader: 'vue-loader'
      },
      {
        test: /\.js$/,
        loader: 'babel-loader',
        exclude: /node_modules/
      }
    ]
  }
}
基本設定です. これを受け継ぎつつサーバ側とクライアント側の2つを吐く設定をそれぞれ作ります.
const webpack = require('webpack')
const base = require('./webpack.base.config')
const HTMLPlugin = require('html-webpack-plugin')

const config = Object.assign({}, base, {
  plugins: (base.plugins || []).concat([
    // strip comments in Vue code
    new webpack.DefinePlugin({
      'process.env.VUE_ENV': '"client"'
    }),
    // extract vendor chunks for better caching
    new webpack.optimize.CommonsChunkPlugin({
      name: 'vendor'
    }),
    // generate output HTML
    new HTMLPlugin({
      template: 'src/index.template.html'
    })
  ])
})

module.exports = config
クライアント側です.
const webpack = require('webpack')
const base = require('./webpack.base.config')

module.exports = Object.assign({}, base, {
  target: 'node',
  devtool: false,
  entry: './src/server-entry.js',
  output: Object.assign({}, base.output, {
    filename: 'server-bundle.js',
    libraryTarget: 'commonjs2'
  }),
  externals: Object.keys(require('../package.json').dependencies),
  plugins: [
    new webpack.DefinePlugin({
      'process.env.VUE_ENV': '"server"'
    })
  ]
})
サーバ側です baseで設定されたentryを上書きしてserver-entry.jsにします.
クライアント側で使われる重要なファイルは以下です
import 'es6-promise/auto'
import { app, store } from './app'

// window.__INITIAL_STATE__にサーバー側でのstateが入ってる
// サーバから渡されたStateにstoreの状態を設定する
store.replaceState(window.__INITIAL_STATE__)

// actually mount to DOM
app.$mount('#app')
このスクリプトはclient側で実行されるスクリプトで
- サーバーからwindowのプロパティにつけられたINITIAL_STATEをstoreのstateに設定
- vueインスタンスのマウント
これらを行います.
サーバー側のレンダリング時にもstateが更新されたりします,そのstateをページをサーブする際に添付しておきそれを元にクライアントのstateに受け渡します. こうすることでサーバー側のstateを受けついてクライアント側でページをレンダリングできます.
このstateの受け渡しがある以外は基本的なvueの初期設定と同じだと思います.
クライアント側は以上です.
サーバー側はどうなっているかというと...
serer-entry.jsとexpressの設定とSSRを行いレンダリング結果を書き出す処理(server.js)があります.
2つめのserver.jsは実際にexpressを立ち上げレンダリングをし結果を返す処理が書かれています.
expressの設定はVue.jsの公式のSSRのページを参考に書いていくといいと思います.
import { app, router, store} from './app'

export default context => {
  // set router's location
  router.push(context.url)
  const matchedComponents = router.getMatchedComponents()

  // no matched routes
  if (!matchedComponents.length) {
    return Promise.reject({ code: '404' })
  }
  context.initialState = store.state
  return app
}
process.env.VUE_ENV = 'server'

const fs = require('fs')
const path = require('path')
const express = require('express')
const compression = require('compression')
const serialize = require('serialize-javascript')
const resolve = file => path.resolve(__dirname, file)

const app = express()

const indexHTML = parseIndex(fs.readFileSync(resolve('./dist/index.html'), 'utf-8'))
const renderer = createRenderer(fs.readFileSync(resolve('./dist/server-bundle.js'), 'utf-8'))


function createRenderer (bundle) {
  // https://github.com/vuejs/vue/blob/next/packages/vue-server-renderer/README.md#why-use-bundlerenderer
  return require('vue-server-renderer').createBundleRenderer(bundle, {
    cache: require('lru-cache')({
      max: 1000,
      maxAge: 1000 * 60 * 15
    })
  })
}

function parseIndex (template) {
  const contentMarker = '<!-- APP -->'
  const i = template.indexOf(contentMarker)
  return {
    head: template.slice(0, i),
    tail: template.slice(i + contentMarker.length)
  }
}

const serve = (path, cache) => express.static(resolve(path), {
  maxAge: cache && 60 * 60 * 24 * 30
})

app.use(compression({ threshold: 0 }))
app.use('/dist', serve('./dist'))

app.get('*', (req, res) => {
  if (!renderer) {
    return res.end('waiting for compilation... refresh in a moment.')
  }

  res.setHeader("Content-Type", "text/html");

  const context = { url: req.url }
  const renderStream = renderer.renderToStream(context)

  renderStream.once('data', () => {
    res.write(indexHTML.head)
  })

  renderStream.on('data', chunk => {
    res.write(chunk)
  })

  renderStream.on('end', () => {
    // サーバー側のstoreをclient側に流す.
    // windowに__INITIAL_STATE__みたいなプロパティをはやしておいてそこに入れておく
    // client-entryでこのオブジェクトでstateを置き換える.
    if (context.initialState) {
      res.write(
        `<script>window.__INITIAL_STATE__=${
          serialize(context.initialState, { isJSON: true })
        }</script>`
      )
    }
    res.end(indexHTML.tail)
  })

  // error処理
  renderStream.on('error', err => {
    if (err && err.code === '404') {
      res.status(404).end('404 | Page Not Found')
      return
    }
    // Render Error Page or Redirect
    res.status(500).end('Internal Error 500')
    console.error(`error during render : ${req.url}`)
    console.error(err)
  })
})

const port = 8080
app.listen(port, () => {
  console.log(`server started at localhost:${port}`)
})
実行
ここまでやると静的ページをSSRして表示することが可能になります.
尚,ここまでのコードはStep1 code (Github) にあります.
実際に実行した画面です。
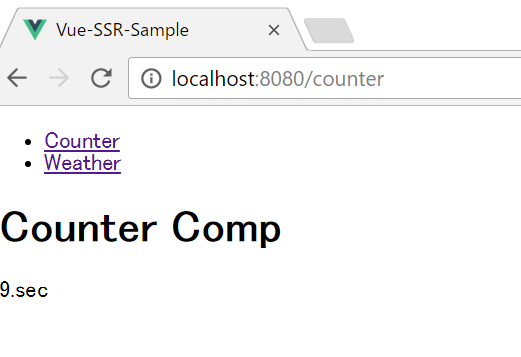
http://localhost:8080/counter
カウンターです. 1秒ごとに数値が増えます.

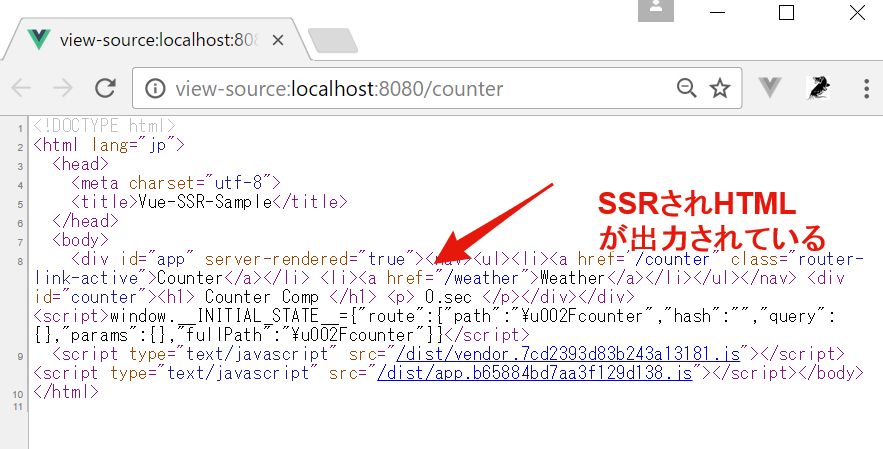
カウンターのソースを見た場合です. ちゃんとサーバ側でレンダリングされてDIVの中身が空っぽじゃなく帰ってきます.
簡単なページですがvuejsを用いてSSRができました! これでSEO対策も簡単?ですね
Step1はこれでおしまいです.
Step2 動的ページのレンダリング
APIコールを行い動的なページをレンダリングして返すようにします.
今何もないweatherコンポーネントをAPIコールを行い帰ってきたデータを元にレンダリングしクライアントに返してみようと思います.
APIは適当に見つけたお天気APIにお世話になろうと思います.
それではStep1のコードに追加していきます.
何をするかというと,まず第一にサーバーでレンダリング時にcomponentに紐付けられたメソッドを呼ぶように設定します.
preFetchメソッドというstoreを引数にもつメソッドをcomponentに実装し,この中でAPIコールを実行するactionを起こし,mutationを呼びます.
mutationによりstateは変更されます. prefetchメソッドの実行が終わった時点で(promiseが全部帰ってきたら)実際のレンダリングに入ります.
具体的にはまず
server-entry.jsを以下のようにします.
import { app, router, store} from './app'

export default context => {
  // set router's location
  router.push(context.url)
  const matchedComponents = router.getMatchedComponents()

  // no matched routes
  if (!matchedComponents.length) {
    return Promise.reject({ code: '404' })
  }
  // preFetchメソッドをサーバー側で呼んでactionの実行やmutationをさせる
  // stateにSSR時に必要な情報を入れる.
  return Promise.all(matchedComponents.map(component => {
    if (component.preFetch) {
      return component.preFetch(store)
    }
  })).then(() => {
    context.initialState = store.state
    return app
  })

  return app
}
このようにしレンダリングすべきコンポーネントのpreFetchメソッドを呼び出させます.
またwether.vueにpreFetchメソッドを実装します.
wether.vueではshowWeatherというactionを発行することにします.
気が早いですがwether.vueにstateのデータを表示するコードも書いてしましましょう
<template>
  <div id="weather">
    <h1> WeatherComp </h1>
    <p> {{weather.title}} </p>
    <p> {{weather.state}} </p>
  </div>
</template>
<script>
export default {
  name: 'weather',

  preFetch(store) {
    store.dispatch('SHOW_WEATHER')
  },
  beforeMount() {
    this.$store.dispatch('SHOW_WEATHER')
  },

  computed: {
    weather () {
      return this.$store.state.weather
    }
  }
}
</script>
preFetchでSSR時の処理は出来ますが,一度表示された後ページ遷移でこのコンポーネントが出されたとき等は対応できません,そこでbeforeMountにも同じ処理を呼ばせます. SHOW_WEATHERアクションではstateに既に天気の情報があるか確認し、存在しない場合のみFETCH_WEATHERアクションに処理を委譲しそのなかでAPIコールをしてもらいます.
これでwether.vueは完成です.
vuexの方を実装していきます
まずstateに天気情報(weather)を持たせます. 今回は天気だけ表示することにします.
- titleが○○の天気のような文字列
- stateが天気(晴れとか)です.
またAction showWeatherと実際にapiコールをするAction fetchWeatherを実装し,mutationも書きます.
import Vue from 'vue'
import Vuex from 'vuex'
import {fetchWeather} from './api'

Vue.use(Vuex)

const store = new Vuex.Store({
  state: {
    weather: {
      title: '',
      state: ''
    }
  },

  actions: {
    SHOW_WEATHER: ({state, dispatch}) => {
      // Promiseを返すのを忘れない!!
      if (state.weather.title.length !== 0) {
        return Promise.resolve()
      }
      return dispatch('FETCH_WEATHER')
    },
    FETCH_WEATHER: ({commit}) => {
      return fetchWeather()
        .then((weather) => {
          commit('SET_WEATHER', weather)
        })
    }
  },

  mutations: {
    SET_WEATHER: (state, weather) => {
      state.weather = weather
    }
  },

  getters: {
  }
})

export default store
storeから呼んでいるapiの処理fetchInformation自体は別ファイルに抽出します.
apiの処理において重要な点があります, それは
- クライアント側でAPIを叩く場合
- サーバ側でAPIを叩く場合
この2つがあるということです, サーバ側で毎回レンダリングの際にAPIを叩いていてはパフォーマンス最悪ですので応答はキャッシュし、キャッシュがある場合は問い合わせを行わないようにします.
クライアント側ではこのようなことは行いません.
この処理分けを効果的に実現するためcreate-api-client.jsとcreate-api-server.jsの2つのファイルを用意し,webpackの機能を用いてcreate-api.jsという名前で,client側ではcreate-api-client.jsがserver側ではcreate-api-server.jsが呼べるようにします.
webpackに以下の設定を追加します
  resolve: {
    alias: Object.assign({}, base.resolve.alias, {
      // apiで利用するモジュールをserver側とclient側で切り分ける
      'create-api': './create-api-client.js'
    })
  },
  resolve: {
    alias: Object.assign({}, base.resolve.alias, {
      // apiで利用するモジュールをserver側とclient側で切り分ける
      'create-api': './create-api-server.js'
    })
  },
create-api-client.js及びceate-api-server.jsを作ります
import axios from 'axios'

const api = {}
const axiosDefault = axios.create()

export {
  api,
  axiosDefault
}
import LRU from 'lru-cache'
import axios from 'axios'

let api

if (process.__API__) {
  api = process.__API__
} else {
  api = {}

  // SSRのプリフェッチデータキャッシュ
  api.cachedItems = LRU({
    max: 10000,
    maxAge: 1000 * 60 * 15 // 15 min cache
  })
  process.__API__ = api
}

const axiosDefault = axios.create()

export {
  api,
  axiosDefault
}
中では(サーバー側のみ)キャッシュの用意とAjaxリクエストを送るパッケージの初期設定をします. Ajaxですが今回はaxiosを用いてリクエストを飛ばします.Ajaxのリクエストを送るのは好きな物を使えばいいと思いますが,promiseを返すように作っていく必要があるのでpromiseがデフォルトで帰ってくる物が楽だと思います.
api.jsを作りAPIコールをする関数を実装します
import {api, axiosDefault as axios} from 'create-api'

export function fetchWeather() {
  const CACHE_KEY = 'WEATHER'

  // TOKYO
  const CITY_CODE = 130010
  const API_URL = `http://weather.livedoor.com/forecast/webservice/json/v1?city=${CITY_CODE}`

  // Cacheチェック
  const cache = api.cachedItems
  if (cache && cache.has(CACHE_KEY)) {
    return Promise.resolve(cache.get(CACHE_KEY))
  }

  return axios.get(API_URL)
    .then(response => {
      return response.data
    }).then(json => {
      // 今日の天気だけ出す.
      return {
        title: json.title,
        state: json.forecasts[0].telop
      }
    }).then(weather => {
      // キャッシュに入れる.
      cache && cache.set(CACHE_KEY, weather)
      return weather
    })

}
これでAPIコールを行う動的ページがレンダリングできるようになります.
実行
完成しました. 実行するとweatherコンポーネントが以下のように表示されます
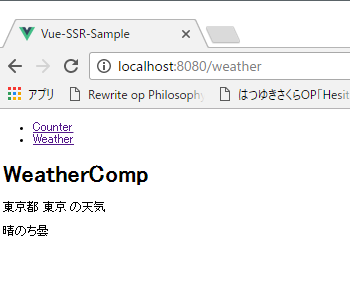
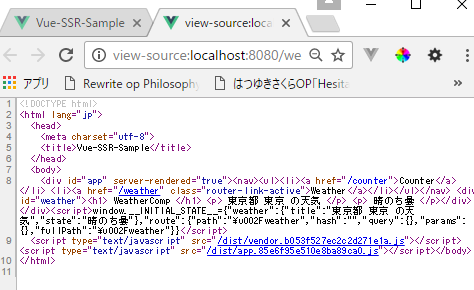
APIコールの結果がHTMLで飛んできます.
(尚APIちゃんと見ていなかったせいでCORSのAllowヘッダが着いていないことに完成してから気づきブラウザ側からAPIコールした結果が受け取れないことがわかりました。 次はちゃんと取れるAPIを選択します...)
重要点
- preFetchメソッドでは呼び出し元でpromiseを待っているため,チェーンを切らさないように繋ぐ必要があります. 忘れてチェーンを切ってしまうとレンダリング出力後にAPIの応答が帰ってくるなんて悲しいことになります. 気をつけましょう. 私は何度も嵌まりました.
おわりに
今回はVuejsを利用し動的なページのSSRを行う方法について示しました.
APIファーストで開発を進め,WebページをSSRを実現したSPAとして提供することはインタラクティブ性の向上とSPAの弱いSEO対策簡単化や初期表示時間の短縮,まったくページが見えないという状態の回避など大きなメリットがあると思います.
一般にはReact等を用いてこのような物は作成するのでしょうが,Vuejsという学習コストが低いフレームワークでこのようなことが行えるのはメリットだと思います.
参考ページ
Vue.js ガイドライン SSR
公式が日本語でわかりやすく書いてあります.
簡単な物だったらここの通り
vue.js 2.0 サーバーサイドレンダリング
2016Node学園祭のセッションのスライドです.
Vueのレンダリングシステムとかのお話.
SSRの仕組みとかも書いてあります.
vue-hacker-news-2.0
SSRを行う非常に実践的なサンプルです.
今回の記事はこれの超短縮版みたいなものです.
データの取得にはFirebaseを利用しています.