はじめに
みなさんConstraintLayoutは使っているでしょうか?
ConstraintLayoutはGoogleI/O 2016で新しく登場したLayoutです。その名の通り制約によってレイアウトを決めること複雑なレイアウトを、ネストを深くせずに作ることが出来るようになりました。
RelativeLayoutと似ていますが、iOSのAutoLayoutのようにAndroid Studio上のLayoutEditorでドラックアンドドロップによって簡単にレイアウトが作れます。
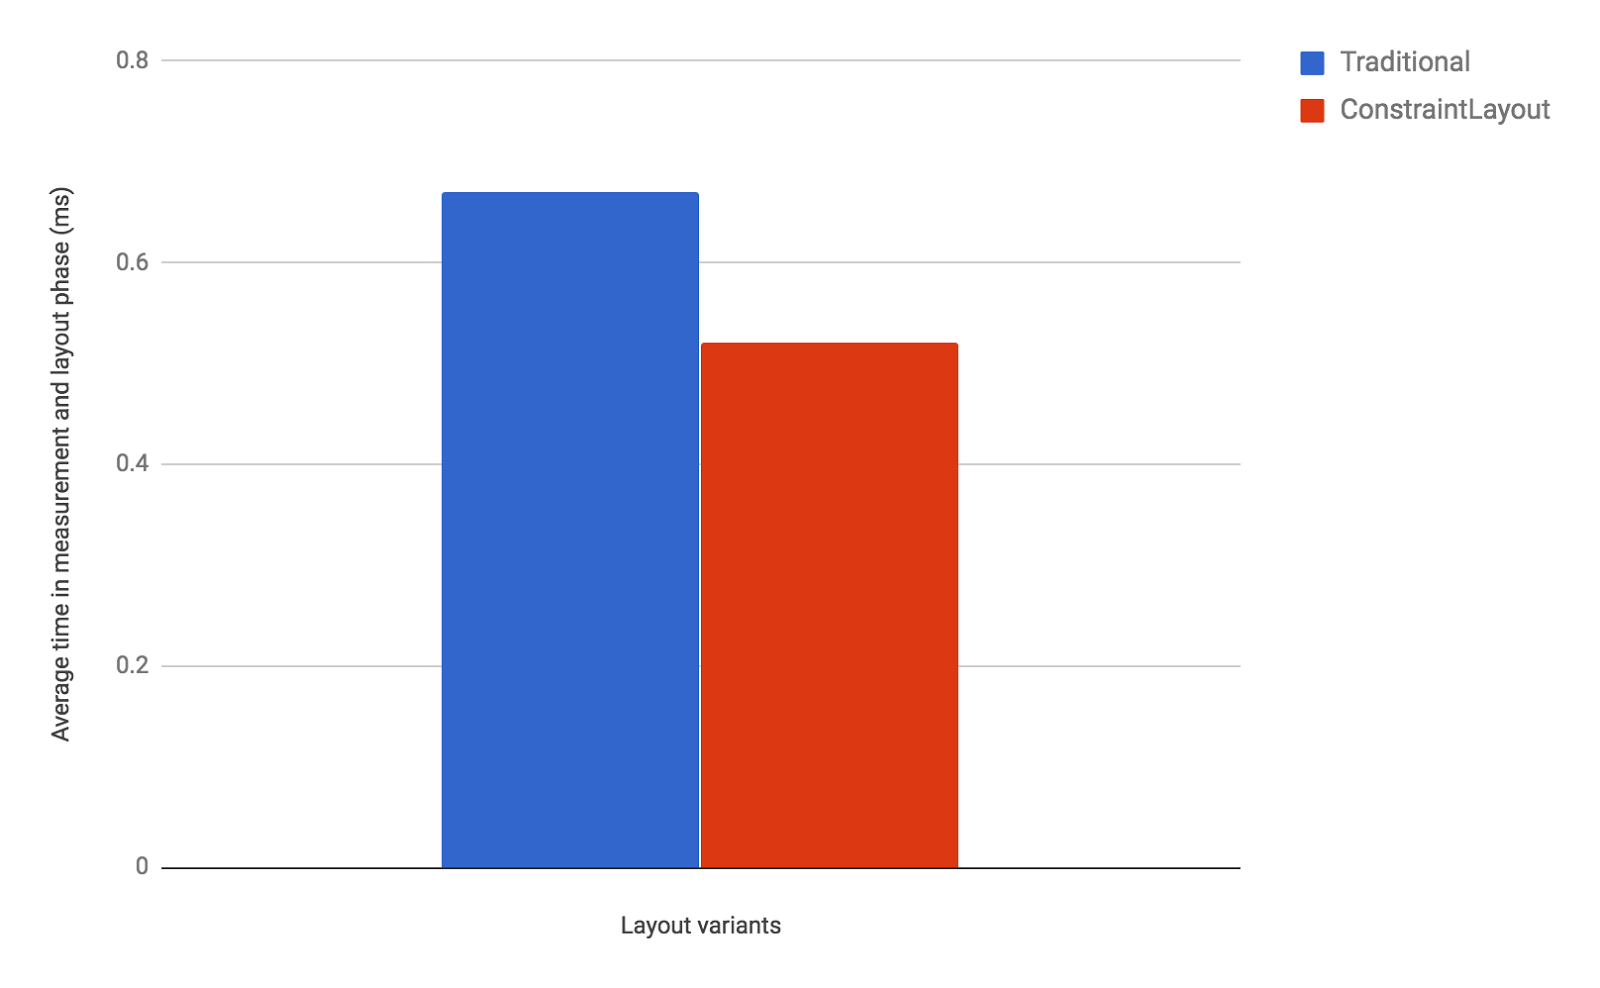
また、Android Developers Blogでは、RelativeLayoutに比べてパフォーマンスが約 40% 優れているといっています。
Our performance comparison shows that ConstraintLayout performs about 40% better in the measure/layout phase than RelativeLayout:
しかし、複雑なレイアウトを作る場合には、これまで通りLayout EditorからでなくXMLからConstraintLayoutを使いたいです。
そこで今回はConstraintLayoutをXML上で書くためのタグと意味をRelativeLayoutと比較しながら説明していきます。
RelativeLayoutの詳しい説明は今さら聞けないRelativeLayoutの話がおすすめです。
大きさ(width/height)
- WRAP_CONTENT
- MATCH_CONSTRAINT( 0dpを指定 )
ConstraintLayoutでは MATCH_PARENTがサポートされていません。
その代わりにMATCH_CONSTRAINTを用いることで、制約の範囲内でViewを最大サイズにします。
MATCH_PARENT的なことをするためには、対応する左/右または上/下の制約を「親」に設定することで可能となります。
位置
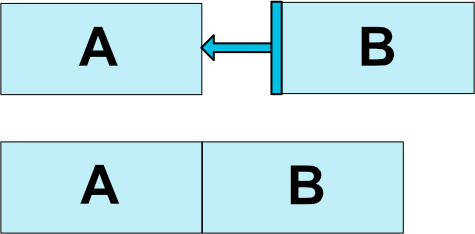
ConstraintLayoutでは属性を何も指定しない場合、左端に重なるようにして表示されてしまいます。
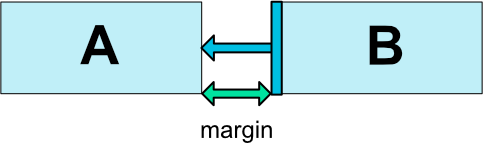
位置を指定するために、ConstraintLayoutでは自身のViewの一辺をどこに合わせるかという制約を考える必要があります。
例えば上の図では、ViewAの右端をViewBの左端に合わせています。これをxmlで書くと、layout_constraintEnd_toStartOf="B" となります。つまり、layout_自身のViewの一辺_対象のViewの一辺というように書くことで位置を指定することができるようになります。
layout_to~
特定のViewの右側・左側に配置したいときに指定するのがこのlayout_constraintStart_toEndOfです。
layout_constraintStart_toEndOf="parent" または layout_constraintStart_toEndOf="@id/hoge"のように使います。
| 属性 | 効果 | RelativeLayout |
|---|---|---|
| layout_constraintEnd_toStartOf | 指定したViewの左側に配置 | layout_toStartOf |
| layout_constraintStart_toEndOf | 指定したViewの右側に配置 | layout_toEndOf |
| layout_constraintRight_toLeftOf | 指定したViewの左側に配置 | layout_toLeftOf |
| layout_constraintLeft_toRightOf | 指定したViewの右側に配置 | layout_toRightOf |
| layout_constraintBottom_toTopOf | 指定したViewの上側に配置 | layout_above |
| layout_constraintTop_toBottomOf | 指定したViewの下側に配置 | layout_below |
layout_align
特定のViewに対して上端の位置や右端の位置を揃えるように配置したいときに使うのがこのlayout_constraintStart_toStartOfです。
同じように、layout_constraintStart_toStartOf="parent"(layout_constraintLeft_toLeftOf="@id/hoge") layout_constraintEnd_toEndOf="@id/hoge"(layout_constraintRight_toRightOf="@id/hoge")のように使います。
| 属性 | 効果 | RelativeLayout |
|---|---|---|
| layout_constraintStart_toStartOf | 自身の左端と指定したViewの左端を揃える | layout_alignStart |
| layout_constraintEnd_toEndOf | 自身の右端と指定したViewの右端を揃える | layout_alignEnd |
| layout_constraintLeft_toLeftOf | 自身の左端と指定したViewの左端を揃える | layout_alignLeft |
| layout_constraintRight_toRightOf | 自身の右端と指定したViewの右端を揃える | layout_alignRight |
| layout_constraintTop_toTopOf | 自身の上端と指定したViewの上端を揃える | layout_alignTop |
| layout_constraintBottom_toBottomOf | 自身の下端と指定したViewの下端を揃える | layout_alignBottom |
センタリング
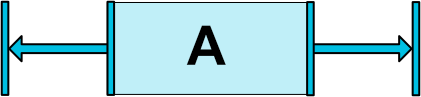
この左寄せと右寄せを同時に指定することで、センタリングをすることが出来ます。
水平方向・垂直方向どちらに対しても指定できます。
<TextView android:id="@+id/text_view"
    app:layout_constraintLeft_toLeftOf="parent"
    app:layout_constraintRight_toRightOf="parent" />
バイアス
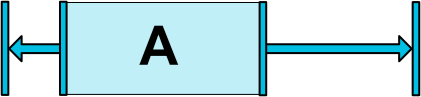
センタリングをすると、名前の通りViewは中央に配置されます。
そこで、0-1の範囲でバイアスを指定することで位置を調整させることが出来ます。
| 属性 | 効果 |
|---|---|
| layout_constraintHorizontal_bias | 水平方向のバイアスを指定 |
| layout_constraintVertical_bias | 垂直方向のバイアスを指定 |
左側に30%のバイアスを掛けた例
<TextView android:id="@+id/text_view"
    app:layout_constraintHorizontal_bias="0.3"
    app:layout_constraintStart_toStartOf="parent"
    app:layout_constraintEnd_toEndOf="parent" />
Baseline
その名の通り、特定のViewのベースラインの位置と指定したViewのベースラインを揃えて配置することができます。
Textのベースラインをしっかりと揃えたいときに使います。
| 属性 | 効果 | RelativeLayout |
|---|---|---|
| layout_constraintBaseline_toBaselineOf | 自身のベースラインと指定したViewのベースラインを揃える | layout_alignBaseline |
Margin
ConstraintLayoutでは 一般的なマージン と・制約の対象となるViewがGONEだったときのマージン の2種類のマージンを使うことが出来ます。
一般的なマージン
| 属性 | パラメーター |
|---|---|
| android:layout_marginLeft | dp |
| android:layout_marginRight | dp |
| android:layout_marginStart | dp |
| android:layout_marginEnd | dp |
| android:layout_marginTop | dp |
| android:layout_marginBottom | dp |
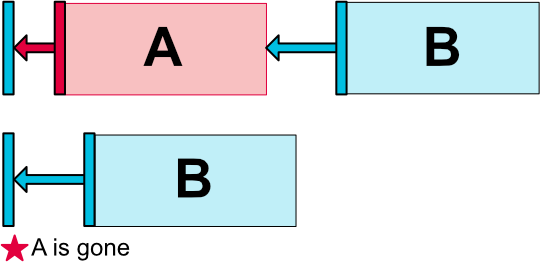
制約の対象となるViewがGONEだったときのマージン
| 属性 | パラメーター |
|---|---|
| layout_goneMarginLeft | dp |
| layout_goneMarginRight | dp |
| layout_goneMarginStart | dp |
| layout_goneMarginEnd | dp |
| layout_goneMarginTop | dp |
| layout_goneMarginBottom | dp |
比
ViewのWidth/HeightがMATCH_CONSTRAINTのときに比率を用いて大きさを指定することが出来ます。
| 属性 | パラメーター |
|---|---|
| layout_constraintDimensionRatio | X:Y |
<Button
    android:layout_width="wrap_content"
    android:layout_height="0dp"
    app:layout_constraintDimensionRatio="1:1" />
WidthとHeight両方がMATCH_CONSTRAINTのときにはapp:layout_constraintDimensionRatio="w,1:1"のようにカンマ区切りでwまたはhを指定することでどちらを基準にするかを選択できます。
比で指定する方法としては@mochicoさんのこちらの記事がわかりやすいです。
チェーン
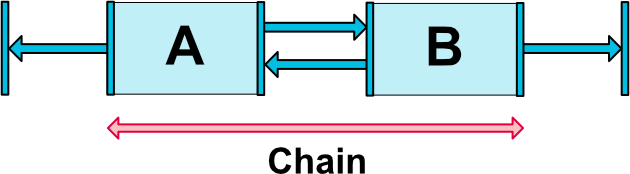
複数のViewが双方向に作用するように制約をかけている状態をチェーンと言います。
チェーンは起点となる位置のView(ヘッド)にlayout_constraintHorizontal_chainStyle もしくは、layout_constraintVertical_chainStyleを利用することで設定できます。また、layout_constraintHorizontal_chainStyleは水平方向、layout_constraintVertical_chainStyleは垂直方向の設定です。
| 属性 | パラメーター |
|---|---|
| layout_constraintHorizontal_chainStyle | スタイル |
| layout_constraintVertical_chainStyle | スタイル |
<TextView
    android:layout_width="wrap_content"
    android:layout_height="wrap_content"
    app:layout_constraintHorizontal_chainStyle="packed" />
チェーンスタイル
チェーンのスタイルは3種類あります。
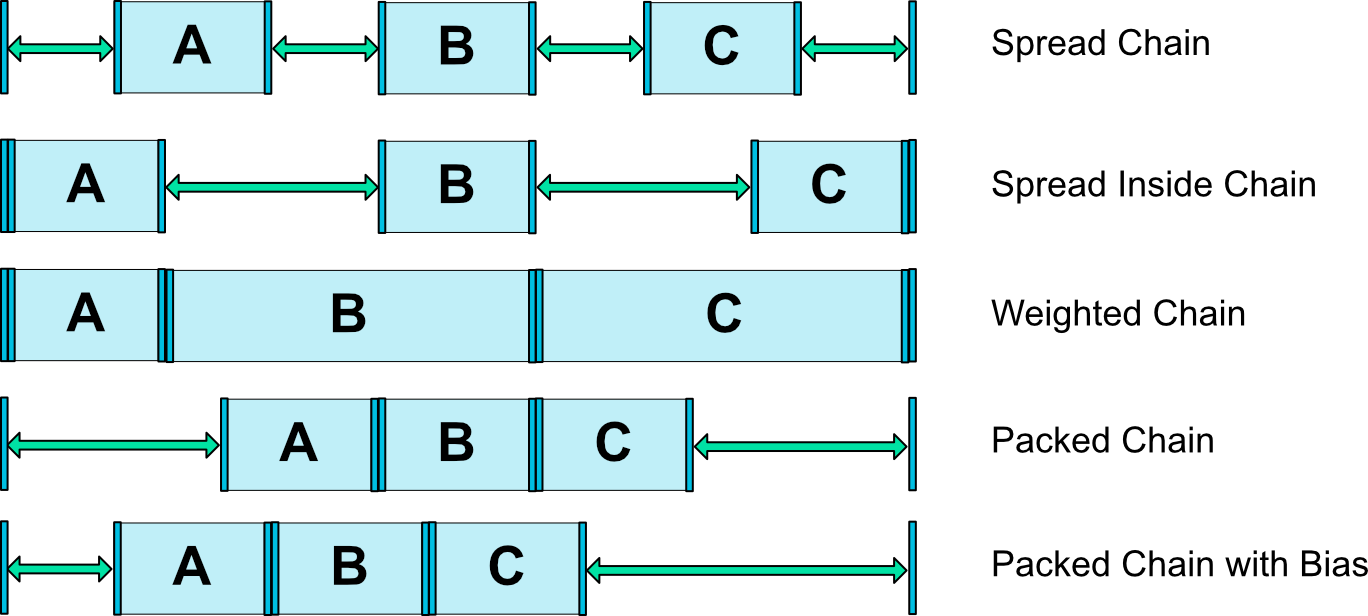
| 種類 | 意味 |
|---|---|
| spread | 均等になるようにマージンを取って並べる |
| spread_inside | エンドポイントのマージンは取らずに、中のViewは均等になるようにマージンを取って並べる |
| packed | 一つの要素としてくっつけた状態で均等にマージンを設定する |
Weighted Chain
スタイルがspreadもしくはspread_insideのときにlayout_constraintHorizontal_weightまたはlayout_constraintVertical_weightを指定することで、ウエイトを用いてViewの幅を指定することが出来ます。
Packed Chain with Bias
スタイルがpackedのときにlayout_constraintHorizontal_biasまたはlayout_constraintVertical_biasを指定することでバイアスを掛けることが出来ます。
さいごに
さて、以上をもとに、このようなよく使うレイアウトを作ってみましょう。
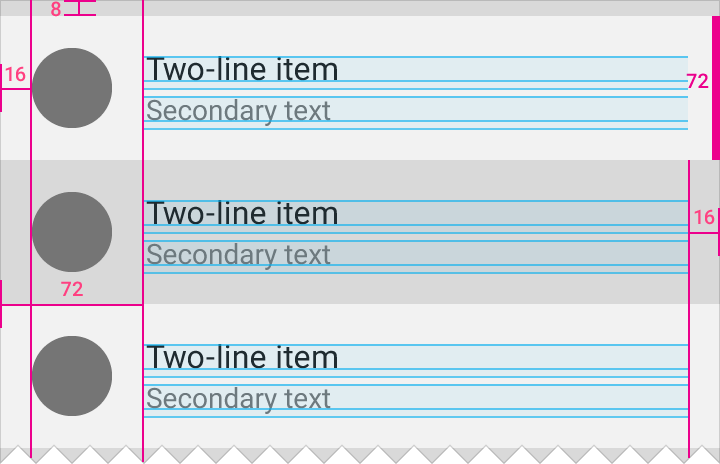
もちろんRelativeLayoutでも書くことが出来ます。
<?xml version="1.0" encoding="utf-8"?>
<RelativeLayout xmlns:android="http://schemas.android.com/apk/res/android"
    xmlns:tools="http://schemas.android.com/tools"
    android:layout_width="match_parent"
    android:layout_height="72dp"
    android:paddingEnd="16dp"
    android:paddingRight="16dp">

    <ImageView
        android:id="@+id/icon"
        android:layout_width="72dp"
        android:layout_height="72dp"
        android:layout_alignParentLeft="true"
        android:layout_alignParentStart="true"
        android:layout_alignParentTop="true"
        android:layout_centerVertical="true" />

    <LinearLayout
        android:layout_width="match_parent"
        android:layout_height="wrap_content"
        android:layout_centerVertical="true"
        android:layout_toEndOf="@id/icon"
        android:layout_toRightOf="@id/icon"
        android:orientation="vertical">

        <TextView
            android:id="@+id/title"
            android:layout_width="match_parent"
            android:layout_height="wrap_content"
            android:gravity="bottom"
            tools:text="Title" />

        <TextView
            android:id="@+id/text"
            android:layout_width="match_parent"
            android:layout_height="wrap_content"
            android:gravity="top"
            tools:text="text" />

    </LinearLayout>

</RelativeLayout>
これをConstraintLayoutで書くと...
<?xml version="1.0" encoding="utf-8"?>
<android.support.constraint.ConstraintLayout xmlns:android="http://schemas.android.com/apk/res/android"
    xmlns:app="http://schemas.android.com/apk/res-auto"
    xmlns:tools="http://schemas.android.com/tools"
    android:layout_width="match_parent"
    android:layout_height="72dp"
    android:paddingEnd="16dp"
    android:paddingRight="16dp">

    <ImageView
        android:id="@+id/icon"
        android:layout_width="72dp"
        android:layout_height="72dp"
        app:layout_constraintLeft_toLeftOf="parent" />

    <TextView
        android:id="@+id/title"
        android:layout_width="0dp"
        android:layout_height="wrap_content"
        app:layout_constraintBottom_toTopOf="@+id/text"
        app:layout_constraintEnd_toEndOf="parent"
        app:layout_constraintStart_toEndOf="@id/icon"
        app:layout_constraintTop_toTopOf="parent"
        app:layout_constraintVertical_chainStyle="packed"
        tools:text="Title" />

    <TextView
        android:id="@+id/text"
        android:layout_width="0dp"
        android:layout_height="wrap_content"
        app:layout_constraintBottom_toBottomOf="parent"
        app:layout_constraintEnd_toEndOf="parent"
        app:layout_constraintStart_toEndOf="@id/icon"
        app:layout_constraintTop_toBottomOf="@id/title"
        tools:text="text" />

</android.support.constraint.ConstraintLayout>
ネストが減ってパフォーマンスの向上とともにコードが見やすくなりました。
ぜひXMLでConstraintLayoutを使っていきましょう。
参考
https://developer.android.com/reference/android/support/constraint/ConstraintLayout.html
https://developer.android.com/training/constraint-layout/index.html
https://android-developers.googleblog.com/2017/08/understanding-performance-benefits-of.html?m=1
http://qiita.com/yysk/items/c686153b39d32571d1bd
http://yuki312.blogspot.jp/2017/03/constraintlayout.html
http://blog.techium.jp/entry/2017/02/27/194714